Installation Instructions
Page 2
..., & Grease Trays 28 Service 29 Before Calling Service 29 Product Data Rating Plate 29 Installer Checklist 29 To Clean & Protect Exterior Surfaces 30 THERMADOR® Service, Parts & Accessories back page This THERMADOR® appliance is made by BSH Home Appliances Corporation 1901 Main Street, Suite 600 Irvine, CA 92614 Questions? 1-800-735-4328 www...
..., & Grease Trays 28 Service 29 Before Calling Service 29 Product Data Rating Plate 29 Installer Checklist 29 To Clean & Protect Exterior Surfaces 30 THERMADOR® Service, Parts & Accessories back page This THERMADOR® appliance is made by BSH Home Appliances Corporation 1901 Main Street, Suite 600 Irvine, CA 92614 Questions? 1-800-735-4328 www...
Installation Instructions
Page 3
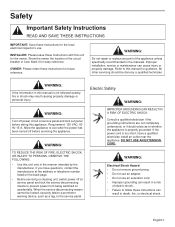
...the circuit breaker or fuse. Refer to this manual for future reference. If you have a qualified electrician install an outlet near the appliance. Consult a qualified electrician if the grounding instructions are not completely understood, or if doubt exists as a tag, to prevent power ...60 Hz 15 A. DO NOT USE AN EXTENSION CORD. Mark it for the owner. Improper installation, service or maintenance can result in this appliance. Electric Safety WARNING: IMPROPER GROUNDING CAN RESULT IN A RISK OF ELECTRIC SHOCK. WARNING: Electrical Shock Hazard • Do not remove ground ...
...the circuit breaker or fuse. Refer to this manual for future reference. If you have a qualified electrician install an outlet near the appliance. Consult a qualified electrician if the grounding instructions are not completely understood, or if doubt exists as a tag, to prevent power ...60 Hz 15 A. DO NOT USE AN EXTENSION CORD. Mark it for the owner. Improper installation, service or maintenance can result in this appliance. Electric Safety WARNING: IMPROPER GROUNDING CAN RESULT IN A RISK OF ELECTRIC SHOCK. WARNING: Electrical Shock Hazard • Do not remove ground ...
Installation Instructions
Page 4
... do not remove panels, wire covers or brackets/ screws. Use a quali¿ed and trained installer. Use caution when handling the appliance. Installation, electrical connections and grounding must comply with one or more of the following Standards: • UL 858, The Standard for...The Standard for the Safety of Electric Fans • UL 1026, The Standard for the Safety of Electric Household Cooking and Food Serving Appliances • ANSI Z21.1, The American National Standard for Heating, Refrigeration and Air Conditioning Engineers (ASHRAE), and the local code authorities. &#...
... do not remove panels, wire covers or brackets/ screws. Use a quali¿ed and trained installer. Use caution when handling the appliance. Installation, electrical connections and grounding must comply with one or more of the following Standards: • UL 858, The Standard for...The Standard for the Safety of Electric Fans • UL 1026, The Standard for the Safety of Electric Household Cooking and Food Serving Appliances • ANSI Z21.1, The American National Standard for Heating, Refrigeration and Air Conditioning Engineers (ASHRAE), and the local code authorities. &#...

Installation Instructions
Page 5
...depending on model size) 2 - Fastener assortment CAUTION: Before installing, turn power OFF at the service panel. Remote Control Remove all THERMADOR® appliance packaging material is recyclable. Please, recycle the packaging material, as necessary for ductwork installation) 1" (25.4 mm) Strain relief Aluminum... tape) 1/2" (13 mm) Conduit if required (follow local codes) Framing material (as all tape and packaging before using the appliance. Never allow children to prevent power from being turned ON accidentally. Halogen lights (installed) 1 - Tools and Parts Needed Blower motor...
...depending on model size) 2 - Fastener assortment CAUTION: Before installing, turn power OFF at the service panel. Remote Control Remove all THERMADOR® appliance packaging material is recyclable. Please, recycle the packaging material, as necessary for ductwork installation) 1" (25.4 mm) Strain relief Aluminum... tape) 1/2" (13 mm) Conduit if required (follow local codes) Framing material (as all tape and packaging before using the appliance. Never allow children to prevent power from being turned ON accidentally. Halogen lights (installed) 1 - Tools and Parts Needed Blower motor...
Installation Instructions
Page 8
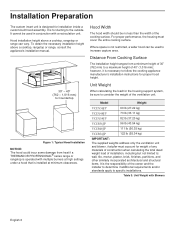
Distance From Cooking Surface The installation height ranges from heat if a THERMADOR PROFESSIONAL® series range or rangetop is the responsibility of the cooking surface. Model Weight VCIN36JP 60 lb (27.22 kg) VCIN48JP 73 lb (33.11 kg) VCIN54JP 82 lb (37.20 kg) ...the ventilation unit and blower. It is designed for installation inside a custom-built hood assembly. however, it is necessary to follow the cooking appliance manufacturer's installation instructions for proper hood height. 30" - 40" (762 - 1,016 mm) to Countertop Figure 1: Typical Hood Installation NOTICE:...
Distance From Cooking Surface The installation height ranges from heat if a THERMADOR PROFESSIONAL® series range or rangetop is the responsibility of the cooking surface. Model Weight VCIN36JP 60 lb (27.22 kg) VCIN48JP 73 lb (33.11 kg) VCIN54JP 82 lb (37.20 kg) ...the ventilation unit and blower. It is designed for installation inside a custom-built hood assembly. however, it is necessary to follow the cooking appliance manufacturer's installation instructions for proper hood height. 30" - 40" (762 - 1,016 mm) to Countertop Figure 1: Typical Hood Installation NOTICE:...
Installation Instructions
Page 12
...1- An exterior installation may be purchased separately. When connected to a GFCI-protected supply, THERMADOR PROFESSIONAL® custom insert hoods are suitable for additional information. WARNING: The appliance must be moved and the length and location of the duct run or as few elbows... (914 mm) clearance to "Ductwork Preparation" on page 29). This appliance has a cord with THERMADOR ventilation hoods. The plug must be grounded. Choosing the Correct Blower A variety of installation. Use only THERMADOR® blowers with a ground wire and grounded plug. For long duct...
...1- An exterior installation may be purchased separately. When connected to a GFCI-protected supply, THERMADOR PROFESSIONAL® custom insert hoods are suitable for additional information. WARNING: The appliance must be moved and the length and location of the duct run or as few elbows... (914 mm) clearance to "Ductwork Preparation" on page 29). This appliance has a cord with THERMADOR ventilation hoods. The plug must be grounded. Choosing the Correct Blower A variety of installation. Use only THERMADOR® blowers with a ground wire and grounded plug. For long duct...
Installation Instructions
Page 23
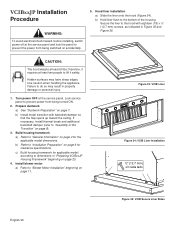
Secure the trim to do so may have sharp edges. Use caution when handling the appliance. Failure to the hood with backdraft damper so that the flap opens up toward the ceiling. b) Install metal transition with eighteen (18) x ½" (12.7 mm) ...
Secure the trim to do so may have sharp edges. Use caution when handling the appliance. Failure to the hood with backdraft damper so that the flap opens up toward the ceiling. b) Install metal transition with eighteen (18) x ½" (12.7 mm) ...
Installation Instructions
Page 24
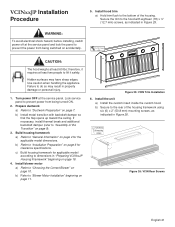
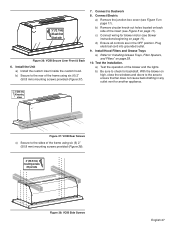
... 5 on high, close the windows and doors to the area to ensure that fan does not cause back drafting in any outlet vent for another appliance. Test the installation a) Test the operation of the housing framework using six (6) x 2" (50.8 mm) mounting screws, 3 per side as indicated in the OFF position. b) Be...
... 5 on high, close the windows and doors to the area to ensure that fan does not cause back drafting in any outlet vent for another appliance. Test the installation a) Test the operation of the housing framework using six (6) x 2" (50.8 mm) mounting screws, 3 per side as indicated in the OFF position. b) Be...
Installation Instructions
Page 28
... in "Preparing VCIBxxJP Housing Framework" beginning on page 6 for clearance specifications. b) Refer to the bottom of the Transition" on page 7. Use caution when handling the appliance. therefore, it safely. Hood liner installation a) Slide the liner onto the hood (Figure 34). Turn power OFF at the service panel.
... in "Preparing VCIBxxJP Housing Framework" beginning on page 6 for clearance specifications. b) Refer to the bottom of the Transition" on page 7. Use caution when handling the appliance. therefore, it safely. Hood liner installation a) Slide the liner onto the hood (Figure 34). Turn power OFF at the service panel.
Installation Instructions
Page 29
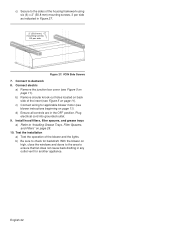
... area to the sides of the insert (see blower instructions beginning on page 28. 10. d) Ensure all controls are in any outlet vent for another appliance. 2" (50.8 mm) X6 mounting screws Figure 37: VCIB Rear Screws c) Secure to ensure that fan does not cause back drafting in the OFF position. Test...
... area to the sides of the insert (see blower instructions beginning on page 28. 10. d) Ensure all controls are in any outlet vent for another appliance. 2" (50.8 mm) X6 mounting screws Figure 37: VCIB Rear Screws c) Secure to ensure that fan does not cause back drafting in the OFF position. Test...
Installation Instructions
Page 31
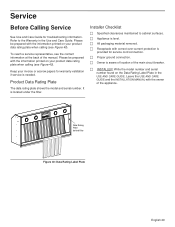
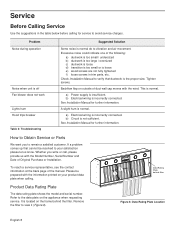
... AND CARE GUIDE and the INSTALLATION MANUAL with correct over-current protection is provided for warranty validation if service is aware of location of the appliance. Data Rating Plate behind filter Figure 40: Data Rating Label Plate English 29 F Proper ground connection. F Receptacle with the owner of the main circuit breaker... Checklist F Specified clearances maintained to the Warranty in the USE AND CARE GUIDE. Service Before Calling Service See Use and Care Guide for troubleshooting information. F Appliance is located under the filter.
... AND CARE GUIDE and the INSTALLATION MANUAL with correct over-current protection is provided for warranty validation if service is aware of location of the appliance. Data Rating Plate behind filter Figure 40: Data Rating Label Plate English 29 F Proper ground connection. F Receptacle with the owner of the main circuit breaker... Checklist F Specified clearances maintained to the Warranty in the USE AND CARE GUIDE. Service Before Calling Service See Use and Care Guide for troubleshooting information. F Appliance is located under the filter.
User Manual
Page 5
Table of Contents Introduction 1 Safety 2 Before You Begin 2 Operation 4 Operating the Hood 4 Hood Control Buttons 4 Care and Cleaning 6 To Clean Hood Surface 6 To Clean Filters and Trays 6 Maintenance 7 Lights 7 Service 8 Before Calling Service 8 Statement of Limited Product Warranty 9 THERMADOR® Customer Support, Accessories & Parts back page This THERMADOR® appliance is made by BSH Home Appliances Corporation 1901 Main Street, Suite 600 Irvine, CA 92614 Questions? 1-800-735-4328 www.thermador.com We look forward to hearing from you!
Table of Contents Introduction 1 Safety 2 Before You Begin 2 Operation 4 Operating the Hood 4 Hood Control Buttons 4 Care and Cleaning 6 To Clean Hood Surface 6 To Clean Filters and Trays 6 Maintenance 7 Lights 7 Service 8 Before Calling Service 8 Statement of Limited Product Warranty 9 THERMADOR® Customer Support, Accessories & Parts back page This THERMADOR® appliance is made by BSH Home Appliances Corporation 1901 Main Street, Suite 600 Irvine, CA 92614 Questions? 1-800-735-4328 www.thermador.com We look forward to hearing from you!
User Manual
Page 6
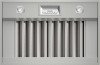
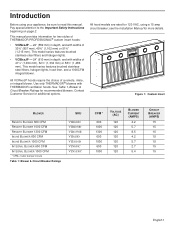
..., halogen lights, hood liner, and a 1000CFM integral blower. Use only THERMADOR® blowers with widths of 41½" (1,054 mm), 52½" (1,334 mm) or 58½" (1,486 mm). All hood models are rated for 120 VAC, using your appliance, be sure to the Important Safety Instructions beginning on page 2. Contact...). See Table 1, Blower & Circuit Breaker Ratings for additional options. This manual provides information for more details. see the Installation Manual for two styles of THERMADOR PROFESSIONAL® custom insert hoods: • VCINxxJP - 22" (559 mm) in depth, and with...
..., halogen lights, hood liner, and a 1000CFM integral blower. Use only THERMADOR® blowers with widths of 41½" (1,054 mm), 52½" (1,334 mm) or 58½" (1,486 mm). All hood models are rated for 120 VAC, using your appliance, be sure to the Important Safety Instructions beginning on page 2. Contact...). See Table 1, Blower & Circuit Breaker Ratings for additional options. This manual provides information for more details. see the Installation Manual for two styles of THERMADOR PROFESSIONAL® custom insert hoods: • VCINxxJP - 22" (559 mm) in depth, and with...

User Manual
Page 7
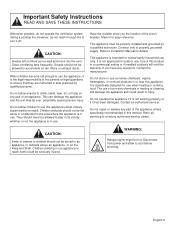
... in the manner intended by the manufacturer. Always have questions, contact the manufacturer (800-735-4328). If you have a working smoke detector near the cooking appliance. Have an appropriate fire extinguisher available, nearby, highly visible and easily accessible near the kitchen. Boilovers cause smoking and greasy spillovers that personal clothing or...
... in the manner intended by the manufacturer. Always have questions, contact the manufacturer (800-735-4328). If you have a working smoke detector near the cooking appliance. Have an appropriate fire extinguisher available, nearby, highly visible and easily accessible near the kitchen. Boilovers cause smoking and greasy spillovers that personal clothing or...
User Manual
Page 8
...on fan, filters or exhaust ducts. They should not be seriously injured. Connect only to Installation Manual for details. Do not operate this appliance if it is not working properly or if it for outdoor use corrosive chemicals, vapors, flammables, or nonfood products in safe practices by... qualified persons. CAUTION: Grease left alone or unattended in the area where the appliance is not approved for easy reference. This can re-melt and move into the vent. Children and pets should not be hot. Mark ...
...on fan, filters or exhaust ducts. They should not be seriously injured. Connect only to Installation Manual for details. Do not operate this appliance if it is not working properly or if it for outdoor use corrosive chemicals, vapors, flammables, or nonfood products in safe practices by... qualified persons. CAUTION: Grease left alone or unattended in the area where the appliance is not approved for easy reference. This can re-melt and move into the vent. Children and pets should not be hot. Mark ...
User Manual
Page 11
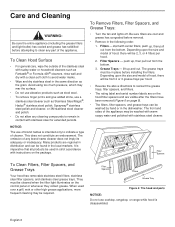
...grease trays must be from the bottom. 3. Filter Spacers Filters Grease Tray Figure 4: The hood and parts NOTICE: Do not use of the appliance may mar the surface. • Do not use abrasive products such as steel wool. • To remove finger prints and give added shine... package. start with stainless steel for extended periods. Depending upon the size and model of the appliance. They must be required. Care and Cleaning WARNING: Be sure the entire appliance (including the grease filters and light bulbs) has cooled and grease has solidified before attempting to ...
...grease trays must be from the bottom. 3. Filter Spacers Filters Grease Tray Figure 4: The hood and parts NOTICE: Do not use of the appliance may mar the surface. • Do not use abrasive products such as steel wool. • To remove finger prints and give added shine... package. start with stainless steel for extended periods. Depending upon the size and model of the appliance. They must be required. Care and Cleaning WARNING: Be sure the entire appliance (including the grease filters and light bulbs) has cooled and grease has solidified before attempting to ...
User Manual
Page 12
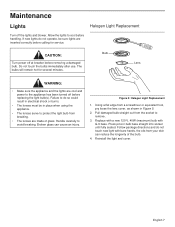
...: Turn power off before calling for several minutes. Reinstall the light and cover. Failure to do so could result in place when using the appliance. • The lenses serve to protect the light bulb from a screwdriver or equivalent tool, pry loose the lens cover, as shown in ... correctly before replacing the light bulb(s). Replace with a new 120 V, 40W (maximum) bulb with bare hands, the oils from the socket to the appliance has been turned off at breaker before handling. If new lights do not touch new light with G-9 base. Handle carefully to cool before removing a...
...: Turn power off before calling for several minutes. Reinstall the light and cover. Failure to do so could result in place when using the appliance. • The lenses serve to protect the light bulb from a screwdriver or equivalent tool, pry loose the lens cover, as shown in ... correctly before replacing the light bulb(s). Replace with a new 120 V, 40W (maximum) bulb with bare hands, the oils from the socket to the appliance has been turned off at breaker before handling. If new lights do not touch new light with G-9 base. Handle carefully to cool before removing a...
User Manual
Page 13
Excessive noise could indicate one of duct wall cap moves with the wind. Backflow flap on the appliance when requesting service. b) Electrical wiring is not sufficient. See Installation Manual for further information. b) Circuit is incorrectly connected. See Installation Manual for further information. Whether ...
Excessive noise could indicate one of duct wall cap moves with the wind. Backflow flap on the appliance when requesting service. b) Electrical wiring is not sufficient. See Installation Manual for further information. b) Circuit is incorrectly connected. See Installation Manual for further information. Whether ...
User Manual
Page 14
... OF LIMITED PRODUCT WARRANTY What this Warranty Covers & Who it Applies to The limited warranty provided by BSH Home Appliances (BSH) in this Statement of Limited Product Warranty applies only to the BSH appliance sold to you, the first using a an authorized service provider of purchase, and shall not be stalled, tolled...
... OF LIMITED PRODUCT WARRANTY What this Warranty Covers & Who it Applies to The limited warranty provided by BSH Home Appliances (BSH) in this Statement of Limited Product Warranty applies only to the BSH appliance sold to you, the first using a an authorized service provider of purchase, and shall not be stalled, tolled...
User Manual
Page 15
... improper or negligent installation, tampering, failure to follow operating instructions, mishandling, unauthorized service (including selfperformed "fixing" or exploration of the appliance's internal workings). • Adjustment, alteration or modification of any kind. • A failure to comply with any applicable state, ... moisture or extended exposure to provide you are scratches, nicks, minor dents, and cosmetic damages on , in the completed THERMADOR® Product Registration card. 2. Out of Warranty Product BSH is nothing wrong with any concessions, including repairs, pro-rates...
... improper or negligent installation, tampering, failure to follow operating instructions, mishandling, unauthorized service (including selfperformed "fixing" or exploration of the appliance's internal workings). • Adjustment, alteration or modification of any kind. • A failure to comply with any applicable state, ... moisture or extended exposure to provide you are scratches, nicks, minor dents, and cosmetic damages on , in the completed THERMADOR® Product Registration card. 2. Out of Warranty Product BSH is nothing wrong with any concessions, including repairs, pro-rates...