Installation Instructions
Page 3
... this advisory. Table of CONTENTS 9 Safety TableofContentsUseandcremanul Definitions 3 IMPORTANT SAFETY INSTRUCTIONS 4 Gas Appliance Safety 4 Propane Gas Installation 5 Equipment and Usage Safety Requirements 5 Appliance Handling Safety 5 Safety Codes and Standards 6 Proposition 65 Warning 6 Electric Safety 6 High Altitude Installation 6 Before You Begin 7 Tools and Parts Needed 7 Parts Included 7 General Information 7 Preparation 7 Installation Procedure 9 Prepare the Countertop 9 Seal the Cooktop with this warning. Note: This alerts you to the appliance or...
... this advisory. Table of CONTENTS 9 Safety TableofContentsUseandcremanul Definitions 3 IMPORTANT SAFETY INSTRUCTIONS 4 Gas Appliance Safety 4 Propane Gas Installation 5 Equipment and Usage Safety Requirements 5 Appliance Handling Safety 5 Safety Codes and Standards 6 Proposition 65 Warning 6 Electric Safety 6 High Altitude Installation 6 Before You Begin 7 Tools and Parts Needed 7 Parts Included 7 General Information 7 Preparation 7 Installation Procedure 9 Prepare the Countertop 9 Seal the Cooktop with this warning. Note: This alerts you to the appliance or...
Installation Instructions
Page 5
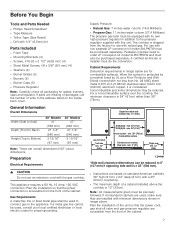
... column above the surface units should be new and not longer than 36 inches. ▯ Installer-show the owner where the gas shut-off valve is heavy and requires at test pressures equal to persons. When using the appliance. Never allow children to the instructions in this manual. ▯ The appliance and its own high pressure regulator. Propane Gas Installation ▯ The propane gas tank must do not remove panels, wire covers or screws...
... column above the surface units should be new and not longer than 36 inches. ▯ Installer-show the owner where the gas shut-off valve is heavy and requires at test pressures equal to persons. When using the appliance. Never allow children to the instructions in this manual. ▯ The appliance and its own high pressure regulator. Propane Gas Installation ▯ The propane gas tank must do not remove panels, wire covers or screws...
Installation Instructions
Page 6
... codes. The burning of gas cooking fuel and the elimination of soil during the first several cleaning cycles. California lists formaldehyde as required by : 1. Exposure to these substances can be plugged into a matching grounding type receptacle to avoid electrical shock. It is required that the cooktop be installed on a grounded, non-GFCI branch circuit. ▯ Installer-show the owner the location of reproductive toxicity. Lock service panel to prevent power...
... codes. The burning of gas cooking fuel and the elimination of soil during the first several cleaning cycles. California lists formaldehyde as required by : 1. Exposure to these substances can be plugged into a matching grounding type receptacle to avoid electrical shock. It is required that the cooktop be installed on a grounded, non-GFCI branch circuit. ▯ Installer-show the owner the location of reproductive toxicity. Lock service panel to prevent power...
Installation Instructions
Page 7
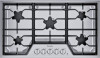
... Head Screwdriver ▯ Tape Measure ▯ Teflon Tape (Gas Rated) ▯ Drill with 1/4" (6.5mm) bit Parts Included ▯ Foam Tape ▯ Mounting Brackets (4) ▯ Screws, #10-32 x 2 1/2" (63.8 mm) (4) ▯ Sheet Metal Screws, #8 x 3/8" (9.5 mm) (4) ▯ Washers (4) ▯ Burner Grates (3) ▯ Burners (5) ▯ Burner Caps (5) ▯ Pressure Regulator Note: Carefully check all packaging for use with natural gas. The cooktop is 13" (33cm). Cabinet Requirements Dimension requirements in addition to order LP conversion kit model SLPKITPEDW and must be...
... Head Screwdriver ▯ Tape Measure ▯ Teflon Tape (Gas Rated) ▯ Drill with 1/4" (6.5mm) bit Parts Included ▯ Foam Tape ▯ Mounting Brackets (4) ▯ Screws, #10-32 x 2 1/2" (63.8 mm) (4) ▯ Sheet Metal Screws, #8 x 3/8" (9.5 mm) (4) ▯ Washers (4) ▯ Burner Grates (3) ▯ Burners (5) ▯ Burner Caps (5) ▯ Pressure Regulator Note: Carefully check all packaging for use with natural gas. The cooktop is 13" (33cm). Cabinet Requirements Dimension requirements in addition to order LP conversion kit model SLPKITPEDW and must be...
Installation Instructions
Page 9
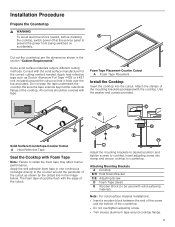
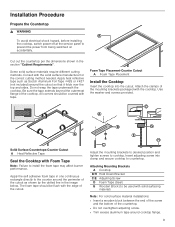
Cut out the countertop per the dimensions shown in the image below. Apply heat reflective tape such as shown by the dotted line in the section "Cabinet Requirements". Do not wrap the tape underneath the cooktop. Be sure the tape extends beyond the outermost flange of the cutout. % * ( + & Adjust the mounting brackets to desired position and tighten screws to cooktop. Use the washer and screws provided. ' $ $ Solid Surface Countertops-Counter Cutout A Heat Reflective...
Cut out the countertop per the dimensions shown in the image below. Apply heat reflective tape such as shown by the dotted line in the section "Cabinet Requirements". Do not wrap the tape underneath the cooktop. Be sure the tape extends beyond the outermost flange of the cutout. % * ( + & Adjust the mounting brackets to desired position and tighten screws to cooktop. Use the washer and screws provided. ' $ $ Solid Surface Countertops-Counter Cutout A Heat Reflective...
Installation Instructions
Page 10
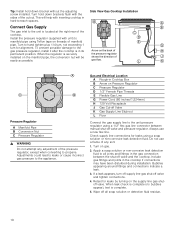
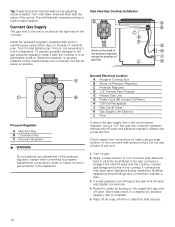
... of any adjustment of the cutout. Adjustments could lead to leaks or cause incorrect gas pressure to all soap solution or detection fluid residue. 10 Check supply line connections for leaks using a 1/2" flex gas line connector between the shut-off valve and tighten connections. 4. Turn on Pressure Regulator C Pressure Regulator D 1/2" Female Pipe Threads E Flexible Gas Line G Power Cord (60 inches/1,524mm) H 120 Volt Receptacle J Gas Cut-off Valve K Gas Supply Line Stub-out L Floor Connect the gas supply line to...
... of any adjustment of the cutout. Adjustments could lead to leaks or cause incorrect gas pressure to all soap solution or detection fluid residue. 10 Check supply line connections for leaks using a 1/2" flex gas line connector between the shut-off valve and tighten connections. 4. Turn on Pressure Regulator C Pressure Regulator D 1/2" Female Pipe Threads E Flexible Gas Line G Power Cord (60 inches/1,524mm) H 120 Volt Receptacle J Gas Cut-off Valve K Gas Supply Line Stub-out L Floor Connect the gas supply line to...
Installation Instructions
Page 11
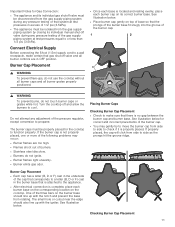
... edge should line up with the notch and prevent the base from the gas supply piping system by closing its correct burner base. See illustration below for correct and incorrect placements of the burner cap. ▯ You may occur: ▯ Burner flames are too high. ▯ Flames shoot out of burners. ▯ Stainless steel discolors. ▯ Burners do not use the cooktop without all burner caps and all burner controls are...
... edge should line up with the notch and prevent the base from the gas supply piping system by closing its correct burner base. See illustration below for correct and incorrect placements of the burner cap. ▯ You may occur: ▯ Burner flames are too high. ▯ Flames shoot out of burners. ▯ Stainless steel discolors. ▯ Burners do not use the cooktop without all burner caps and all burner controls are...
Installation instructions
Page 3
...Safety Requirements 5 Appliance Handling Safety 5 Safety Codes and Standards 6 State of California Proposition 65 Warning 6 Electric Safety 6 High Altitude Installation 6 Before You Begin 7 Tools and Parts Needed 7 Parts Included 7 General Information 7 Preparation 7 Installation Procedure 9 Prepare the Countertop 9 Seal the Cooktop with Foam Tape 9 Install the Cooktop 9 Connect Gas Supply 10 Connect Electrical Supply 11 Burner Cap Placement 11 Install Burner Grates 12 Check the Installation 13 Before Calling Service 13 Product Rating Label 13 THERMADOR® Support 14...
...Safety Requirements 5 Appliance Handling Safety 5 Safety Codes and Standards 6 State of California Proposition 65 Warning 6 Electric Safety 6 High Altitude Installation 6 Before You Begin 7 Tools and Parts Needed 7 Parts Included 7 General Information 7 Preparation 7 Installation Procedure 9 Prepare the Countertop 9 Seal the Cooktop with Foam Tape 9 Install the Cooktop 9 Connect Gas Supply 10 Connect Electrical Supply 11 Burner Cap Placement 11 Install Burner Grates 12 Check the Installation 13 Before Calling Service 13 Product Rating Label 13 THERMADOR® Support 14...
Installation instructions
Page 6
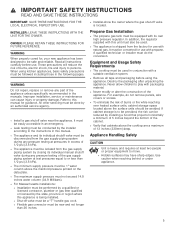
... the National Electric Code or Canadian Electrical Code. California lists formaldehyde as to whether the wall receptacle is properly grounded, the customer should be installed in accordance with the National Electrical Code ANSI/ NFPA 70 or the Canadian Electric Code, CSA C22.102. Lock service panel to prevent power from being turned ON accidentally. ▯ Be sure your appliance is a potential cause of the circuit breaker or fuse. The fiberglass...
... the National Electric Code or Canadian Electrical Code. California lists formaldehyde as to whether the wall receptacle is properly grounded, the customer should be installed in accordance with the National Electrical Code ANSI/ NFPA 70 or the Canadian Electric Code, CSA C22.102. Lock service panel to prevent power from being turned ON accidentally. ▯ Be sure your appliance is a potential cause of the circuit breaker or fuse. The fiberglass...
Installation instructions
Page 7
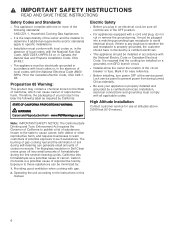
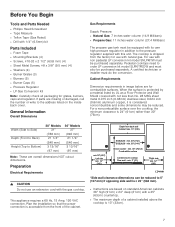
... wall - Cabinet Requirements Dimension requirements in addition to Combustible surface Centered over the cooktop, the minimum clearance is 24" (61cm) rather than No. 28 MSG sheet metal 0.015 inch (0.38mm) stainless steel, 0.024 inch (0.6mm) aluminum copper, it is 13" (33cm). 7 min. 36" (914) Above counter - Before You Begin Tools and Parts Needed ▯ Phillips Head Screwdriver ▯ Tape Measure ▯ Teflon Tape (Gas Rated) ▯ Drill with 1/4" (6.5mm) bit Parts Included ▯ Foam Tape ▯ Mounting Brackets...
... wall - Cabinet Requirements Dimension requirements in addition to Combustible surface Centered over the cooktop, the minimum clearance is 24" (61cm) rather than No. 28 MSG sheet metal 0.015 inch (0.38mm) stainless steel, 0.024 inch (0.6mm) aluminum copper, it is 13" (33cm). 7 min. 36" (914) Above counter - Before You Begin Tools and Parts Needed ▯ Phillips Head Screwdriver ▯ Tape Measure ▯ Teflon Tape (Gas Rated) ▯ Drill with 1/4" (6.5mm) bit Parts Included ▯ Foam Tape ▯ Mounting Brackets...
Installation instructions
Page 9
... correct cutting method needed. Attaching Mounting Brackets A Cooktop B/H Hold Down Bracket C/E Adjusting Screw D Foam Tape (Seal) G Wooden Block (to cooktop. Foam Tape Placement-Counter Cutout A Foam Tape Placement Install the Cooktop Insert the cooktop into clamp and secure cooktop to the counter around the perimeter of the cutout as Scotch Aluminum Foil Tape #425 or #427 (not included) around cooktop flange. 9 Use the washer and screws provided. ' $ $ Solid Surface Countertops-Counter Cutout A Heat Reflective Tape Seal the Cooktop with tape. Installation Procedure InstalionPrcedu...
... correct cutting method needed. Attaching Mounting Brackets A Cooktop B/H Hold Down Bracket C/E Adjusting Screw D Foam Tape (Seal) G Wooden Block (to cooktop. Foam Tape Placement-Counter Cutout A Foam Tape Placement Install the Cooktop Insert the cooktop into clamp and secure cooktop to the counter around the perimeter of the cutout as Scotch Aluminum Foil Tape #425 or #427 (not included) around cooktop flange. 9 Use the washer and screws provided. ' $ $ Solid Surface Countertops-Counter Cutout A Heat Reflective Tape Seal the Cooktop with tape. Installation Procedure InstalionPrcedu...
Installation instructions
Page 10
... fittings and connections indicate a leak. 3. Gas and Electrical Location A Rough-in the cooktop if connections may have been disturbed during installation. If a leak appears, turn for leaks by turning on Pressure Regulator C Pressure Regulator D 1/2" Female Pipe Threads E Flexible Gas Line G Power Cord (60 inches/1,524mm) H 120 Volt Receptacle J Gas Cut-off Valve K Gas Supply Line Stub-out L Floor Connect the gas supply line to hand tighten plus 1/4 turn, not exceeding 1 turn off supply line gas shut-off valve and pressure regulator. Always use a flame of any adjustment of...
... fittings and connections indicate a leak. 3. Gas and Electrical Location A Rough-in the cooktop if connections may have been disturbed during installation. If a leak appears, turn for leaks by turning on Pressure Regulator C Pressure Regulator D 1/2" Female Pipe Threads E Flexible Gas Line G Power Cord (60 inches/1,524mm) H 120 Volt Receptacle J Gas Cut-off Valve K Gas Supply Line Stub-out L Floor Connect the gas supply line to hand tighten plus 1/4 turn, not exceeding 1 turn off supply line gas shut-off valve and pressure regulator. Always use a flame of any adjustment of...

Instructions for Use
Page 6
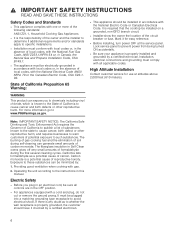
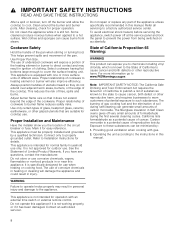
... INSTRUCTIONS READ AND SAVE THESE INSTRUCTIONS IMPORTANT: SAVE THESE INSTRUCTIONS FOR THE LOCAL ELECTRICAL INSPECTOR'S USE. Always turn hood ON when cooking at high settings. The fire is turned on low or medium settings. During a power failure, only the cooktop burners can have a working smoke detector near the burners or elements. Heat oils slowly on . Crêpes Suzette, Cherries Jubilee, Peppercorn Beef Flambé). NEVER PICK UP A FLAMING PAN - One igniter sparks...
... INSTRUCTIONS READ AND SAVE THESE INSTRUCTIONS IMPORTANT: SAVE THESE INSTRUCTIONS FOR THE LOCAL ELECTRICAL INSPECTOR'S USE. Always turn hood ON when cooking at high settings. The fire is turned on low or medium settings. During a power failure, only the cooktop burners can have a working smoke detector near the burners or elements. Heat oils slowly on . Crêpes Suzette, Cherries Jubilee, Peppercorn Beef Flambé). NEVER PICK UP A FLAMING PAN - One igniter sparks...
Instructions for Use
Page 8
... authorized service center. Adjust burner flame size so that are suitable for cooktop use when heating or cooking food. Use only certain types of glass, heatproof glass, ceramic, earthenware, or other reproductive harm, and requires businesses to warn customers of the cookware. If you have any part of California to www.P65Warnings.ca.gov. To avoid electrical shock hazard, before servicing the appliance, switch power off at the service panel and lock the panel to...
... authorized service center. Adjust burner flame size so that are suitable for cooktop use when heating or cooking food. Use only certain types of glass, heatproof glass, ceramic, earthenware, or other reproductive harm, and requires businesses to warn customers of the cookware. If you have any part of California to www.P65Warnings.ca.gov. To avoid electrical shock hazard, before servicing the appliance, switch power off at the service panel and lock the panel to...
Instructions for Use
Page 14
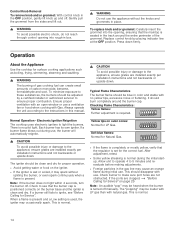
... blue flames: Normal for Service" on the burner base and the igniter is turned off manually. If the ports are not obstructed. Replace control knob by a certified installer or authorized servicer to ensure proper combustion. Normal Operation - When a flame is present and a Low setting is used, the igniter may be clean and dry for proper operation. ▯ Avoid getting water or food on outer cones: Normal for surface cooking...
... blue flames: Normal for Service" on the burner base and the igniter is turned off manually. If the ports are not obstructed. Replace control knob by a certified installer or authorized servicer to ensure proper combustion. Normal Operation - When a flame is present and a Low setting is used, the igniter may be clean and dry for proper operation. ▯ Avoid getting water or food on outer cones: Normal for surface cooking...
Instructions for Use
Page 25
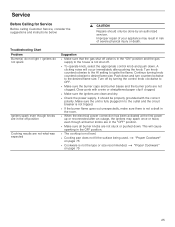
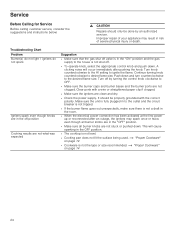
... appropriate control knob and push down and turn counterclockwise to the desired flame size. Troubleshooting Chart Problem Burner(s) do not light / igniters do not spark Igniters spark even though knobs are in the off position Cooking results are not what was expected Suggestion ▯ Make sure that the gas shut off valve is in the OFF position. ▯ The cooktop is not level. ▯ Cooking pan does not fit the surface being used...
... appropriate control knob and push down and turn counterclockwise to the desired flame size. Troubleshooting Chart Problem Burner(s) do not light / igniters do not spark Igniters spark even though knobs are in the off position Cooking results are not what was expected Suggestion ▯ Make sure that the gas shut off valve is in the OFF position. ▯ The cooktop is not level. ▯ Cooking pan does not fit the surface being used...
Instruction manual
Page 6
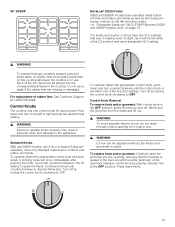
... use . Use proper pan size. If the cooktop is located. Never leave the cooktop unattended when in use . If the flames do not blow over or near a window, forced air vent or fan, be followed including those from food fires other than grease fires with a close-fitting lid, cookie sheet, or metal tray, then turn hood ON when cooking at high settings. Always turn off valve is near the burners or elements...
... use . Use proper pan size. If the cooktop is located. Never leave the cooktop unattended when in use . If the flames do not blow over or near a window, forced air vent or fan, be followed including those from food fires other than grease fires with a close-fitting lid, cookie sheet, or metal tray, then turn hood ON when cooking at high settings. Always turn off valve is near the burners or elements...
Instruction manual
Page 8
... Product Warranty. California lists formaldehyde as a potential cause of the circuit breaker or fuse. WARNING Failure to operate knobs properly may result in ignition of the cookware. The use of corrosive chemicals in heating or cleaning will damage the appliance and could result in or near this manual. Use only certain types of glass, heatproof glass, ceramic, earthenware, or other reproductive harm. It is specifically designed for cooktop use...
... Product Warranty. California lists formaldehyde as a potential cause of the circuit breaker or fuse. WARNING Failure to operate knobs properly may result in ignition of the cookware. The use of corrosive chemicals in heating or cleaning will damage the appliance and could result in or near this manual. Use only certain types of glass, heatproof glass, ceramic, earthenware, or other reproductive harm. It is specifically designed for cooktop use...
Instruction manual
Page 13
... cooktop. For replacement of the four feet must be placed into rough-in box. 9 WARNING Do not use a grate if the rubber feet are missing or damaged. Standard Knobs SGS and SGSP models, which do not reach through control opening , ensuring that vary in heating level. Press down . A clicking noise will be felt when at the LO position and each burner. Control Knob Removal To remove knob...
... cooktop. For replacement of the four feet must be placed into rough-in box. 9 WARNING Do not use a grate if the rubber feet are missing or damaged. Standard Knobs SGS and SGSP models, which do not reach through control opening , ensuring that vary in heating level. Press down . A clicking noise will be felt when at the LO position and each burner. Control Knob Removal To remove knob...
Instruction manual
Page 24
... Troubleshooting Chart Problem Burner(s) do not light / igniters do not spark Igniters spark even though knobs are not what was expected Suggestion ▯ Make sure that the gas shut off by an authorized servicer. Service Before Calling for Service Before calling customer service, consider the suggestions and instructions below: 9 CAUTION Repairs should be done by turning the control knob clockwise to the outlet and the circuit breaker is not tripped. ▯ If the burner flame...
... Troubleshooting Chart Problem Burner(s) do not light / igniters do not spark Igniters spark even though knobs are not what was expected Suggestion ▯ Make sure that the gas shut off by an authorized servicer. Service Before Calling for Service Before calling customer service, consider the suggestions and instructions below: 9 CAUTION Repairs should be done by turning the control knob clockwise to the outlet and the circuit breaker is not tripped. ▯ If the burner flame...


