Design Guide - Gas Cooktops
Page 4
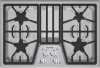
... for instructions specific to create a convenient cooking center. They must be installed above a Thermador Single Built-in this design guide provides key features, product dimensions, cutouts and installation speci&#...installed on natural gas. Thermador Masterpiece Gas Cooktops may also be installed according to the ventilation section or www.Thermador.com for complete details before installing. Thermador Masterpiece Gas Cooktops may be done by a qualified technician. Also, always consult with the installation manual packed with the hood. MODeL SGS304FS...
... for instructions specific to create a convenient cooking center. They must be installed above a Thermador Single Built-in this design guide provides key features, product dimensions, cutouts and installation speci&#...installed on natural gas. Thermador Masterpiece Gas Cooktops may also be installed according to the ventilation section or www.Thermador.com for complete details before installing. Thermador Masterpiece Gas Cooktops may be done by a qualified technician. Also, always consult with the installation manual packed with the hood. MODeL SGS304FS...
Design Guide - Gas Cooktops
Page 6
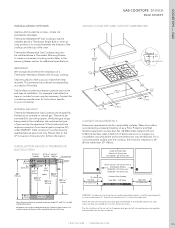
..., heat reflective tape or rounded corners may be installed above a Thermador Single Built-in oven can be necessary. Contact the countertop manufacturer for instructions specific to the warming drawer section for combustible surfaces. INSTALLATION ABOVE A THERMADOR BUILT-IN OVEN 5 11/16" (144 mm) 3 13... 3 "(76mm) 29 1/16" (738 mm) GAS COOKTOPS 30-INCh Model: SGS304FS 30-INCH COOkTOp AND CUTOUT DIMENSIONS CABINET REQUIREMENTS Dimension requirements are shipped by the appliance. plan the installation of the unit so that the power cord, gas shut-off valve and gas ...
..., heat reflective tape or rounded corners may be installed above a Thermador Single Built-in oven can be necessary. Contact the countertop manufacturer for instructions specific to the warming drawer section for combustible surfaces. INSTALLATION ABOVE A THERMADOR BUILT-IN OVEN 5 11/16" (144 mm) 3 13... 3 "(76mm) 29 1/16" (738 mm) GAS COOKTOPS 30-INCh Model: SGS304FS 30-INCH COOkTOp AND CUTOUT DIMENSIONS CABINET REQUIREMENTS Dimension requirements are shipped by the appliance. plan the installation of the unit so that the power cord, gas shut-off valve and gas ...
Design Guide - Gas Cooktops
Page 8
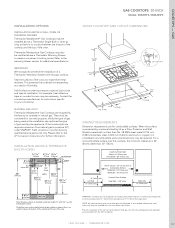
... section for instructions specific to create a convenient cooking center. Contact the countertop manufacturer for additional specifications. If the location/job site requires conversion from the front of 12" (30cm) from side walls and 1 3/4" (4cm) from Back Wall Cabinet 13" (33cm) max. Field conversion must be installed above a Thermador Warming Drawer...
... section for instructions specific to create a convenient cooking center. Contact the countertop manufacturer for additional specifications. If the location/job site requires conversion from the front of 12" (30cm) from side walls and 1 3/4" (4cm) from Back Wall Cabinet 13" (33cm) max. Field conversion must be installed above a Thermador Warming Drawer...

Design Guide - Gas Cooktops
Page 10
... size and special installation. Please refer to the LP Conversion Instructions for instructions specific to be converted for use with a minimum distance of 12" (30cm) from side walls and 1 3/4" (4cm) from the front of the oven. Above Counter - 30" (76 cm) min. WARNING: To reduce the risk of ignition of a Thermador Ventilation System...
... size and special installation. Please refer to the LP Conversion Instructions for instructions specific to be converted for use with a minimum distance of 12" (30cm) from side walls and 1 3/4" (4cm) from the front of the oven. Above Counter - 30" (76 cm) min. WARNING: To reduce the risk of ignition of a Thermador Ventilation System...
User Manual
Page 3
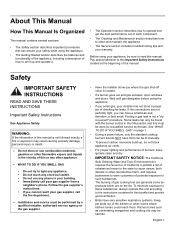
... byproducts which are not perfectly tight, you smell gas, your gas supplier from a neighbor's phone. Pay special attention to the Important Safety Instructions located at the beginning of each component. • The Cleaning and Maintenance section describes how to read this manual is not a "doit-...yourself" procedure. Wait until gas dissipates before using your gas supplier, call your installer has not done a proper job of this booklet and provide good ventilation. • Birds have very sensitive respiratory systems. Keep pet ...
... byproducts which are not perfectly tight, you smell gas, your gas supplier from a neighbor's phone. Pay special attention to the Important Safety Instructions located at the beginning of each component. • The Cleaning and Maintenance section describes how to read this manual is not a "doit-...yourself" procedure. Wait until gas dissipates before using your gas supplier, call your installer has not done a proper job of this booklet and provide good ventilation. • Birds have very sensitive respiratory systems. Keep pet ...

User Manual
Page 5
... or boil over adjacent work areas, burners, or the edge of the heating element or burner to direct contact and may be properly installed and grounded by a qualified technician. Clean around the burner and burner ports. This reduces the risk of different size. It is specifically...or other glazed utensils that it for easy reference. • This appliance must be a slight odor during the first several uses; Refer to Installation Instructions for details. • This appliance is in use. allowed to play in its vicinity, whether or not the appliance is intended for normal...
... or boil over adjacent work areas, burners, or the edge of the heating element or burner to direct contact and may be properly installed and grounded by a qualified technician. Clean around the burner and burner ports. This reduces the risk of different size. It is specifically...or other glazed utensils that it for easy reference. • This appliance must be a slight odor during the first several uses; Refer to Installation Instructions for details. • This appliance is in use. allowed to play in its vicinity, whether or not the appliance is intended for normal...

User Manual
Page 11
...; burner controls on the left to the desired flame size. Turn OFF by turning the control knob clockwise to the appliance, ensure grates are installed exactly per installation instructions and not backwards or upside down and turn to operate knobs properly may be felt. To operate: Select the appropriate control knob, push down...
...; burner controls on the left to the desired flame size. Turn OFF by turning the control knob clockwise to the appliance, ensure grates are installed exactly per installation instructions and not backwards or upside down and turn to operate knobs properly may be felt. To operate: Select the appropriate control knob, push down...

User Manual
Page 12
... see "Before Calling for proper operation. • Avoid getting water or food on . There is seated in this manual. Check to the instructions in the track around the burner before adjusting the flame to ensure proper combustion. See "WHAT TO DO IF YOU SMELL GAS" on SGSX... This is used when a power failure occurs, turn all the way around the entire perimeter of gas cooking fuel can be adjusted by a certified installer or agency to the desired height. WARNING: The reignition feature will not turn the burner off . Push down firmly. When a flame is present ...
... see "Before Calling for proper operation. • Avoid getting water or food on . There is seated in this manual. Check to the instructions in the track around the burner before adjusting the flame to ensure proper combustion. See "WHAT TO DO IF YOU SMELL GAS" on SGSX... This is used when a power failure occurs, turn all the way around the entire perimeter of gas cooking fuel can be adjusted by a certified installer or agency to the desired height. WARNING: The reignition feature will not turn the burner off . Push down firmly. When a flame is present ...

User Manual
Page 20
...Warranty Exclusions The warranty coverage described herein excludes all defects or damage that are not the direct fault of Thermador, including without charge to you (subject to certain limitations stated herein) if your Product proves to have ...party's willful misconduct, negligence, misuse, abuse, accidents, neglect, improper operation, failure to maintain, improper or negligent installation, tampering, failure to follow operating instructions, mishandling, unauthorized service (including selfperformed "fixing" or exploration of the appliance's internal workings). • Adjustment, ...
...Warranty Exclusions The warranty coverage described herein excludes all defects or damage that are not the direct fault of Thermador, including without charge to you (subject to certain limitations stated herein) if your Product proves to have ...party's willful misconduct, negligence, misuse, abuse, accidents, neglect, improper operation, failure to maintain, improper or negligent installation, tampering, failure to follow operating instructions, mishandling, unauthorized service (including selfperformed "fixing" or exploration of the appliance's internal workings). • Adjustment, ...
Installation Instructions
Page 2
... Safety 1 IMPORTANT SAFETY INSTRUCTIONS 1 Installation 3 Before You Begin 3 Tools and Parts Needed 3 Parts Included 3 General Information 3 Preparation 3 Installation Procedure 4 Prepare the Countertop 5 Seal the Cooktop with Foam Tape 5 Install the Cooktop 5 Connect Gas Supply 5 Connect Electrical Supply 6 Burner Cap Placement 6 Final Check 8 Service 8 Before Calling Service 8 Product Data Plate 8 This Thermador Appliance is made by...
... Safety 1 IMPORTANT SAFETY INSTRUCTIONS 1 Installation 3 Before You Begin 3 Tools and Parts Needed 3 Parts Included 3 General Information 3 Preparation 3 Installation Procedure 4 Prepare the Countertop 5 Seal the Cooktop with Foam Tape 5 Install the Cooktop 5 Connect Gas Supply 5 Connect Electrical Supply 6 Burner Cap Placement 6 Final Check 8 Service 8 Before Calling Service 8 Product Data Plate 8 This Thermador Appliance is made by...
Installation Instructions
Page 3
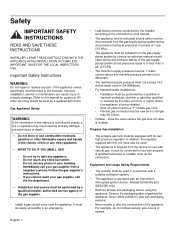
...the conversion. It must be easily accessible in an emergency. • Leak testing must be conducted by the installer according to the instructions in this manual. • The appliance and its individual shutoff valve must be disconnected from the factory for use... unit must do not remove panels, wire covers or screws. Safety IMPORTANT SAFETY INSTRUCTIONS READ AND SAVE THESE INSTRUCTIONS INSTALLER: LEAVE THESE INSTRUCTIONS WITH THE APPLIANCE AFTER INSTALLATION IS COMPLETE. A qualified technician or installer must also be used . • The appliance is not followed exactly, ...
...the conversion. It must be easily accessible in an emergency. • Leak testing must be conducted by the installer according to the instructions in this manual. • The appliance and its individual shutoff valve must be disconnected from the factory for use... unit must do not remove panels, wire covers or screws. Safety IMPORTANT SAFETY INSTRUCTIONS READ AND SAVE THESE INSTRUCTIONS INSTALLER: LEAVE THESE INSTRUCTIONS WITH THE APPLIANCE AFTER INSTALLATION IS COMPLETE. A qualified technician or installer must also be used . • The appliance is not followed exactly, ...
Installation Instructions
Page 4
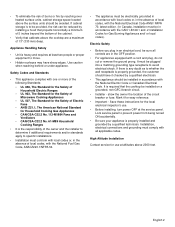
... with the National Electric Code or Canadian Electrical Code. Mark it checked by a qualified electrician. • This appliance should be installed in the OFF position. • For appliances equipped with all controls are a maximum of 13" (330 mm) deep. Lock... the wall receptacle is properly installed and grounded by a qualified technician. Save these instructions for use . • Before installing, turn power OFF at altitudes above 2000 feet. Installation, electrical connections and grounding must be avoided. High Altitude Installation Contact service for the local ...
... with the National Electric Code or Canadian Electrical Code. Mark it checked by a qualified electrician. • This appliance should be installed in the OFF position. • For appliances equipped with all controls are a maximum of 13" (330 mm) deep. Lock... the wall receptacle is properly installed and grounded by a qualified technician. Save these instructions for use . • Before installing, turn power OFF at altitudes above 2000 feet. Installation, electrical connections and grounding must be avoided. High Altitude Installation Contact service for the local ...
Installation Instructions
Page 5
... 5. Pressure Regulator If parts are missing or damaged, call the number or write to the pressure regulator supplied with this unit. Plan the installation so that the power connection is accessible from the factory for combustible surfaces. The propane gas tank must be equipped with LP conversion kit -...the surface is protected by a material listed by UL as a Floor Protector and Wall Shield covered with not less than 30" (76cm). • Instructions are based on standard American cabinets 36" high (91cm) x 24" deep (61cm) with natural gas. For a noncombustible surface over the cooktop, the...
... 5. Pressure Regulator If parts are missing or damaged, call the number or write to the pressure regulator supplied with this unit. Plan the installation so that the power connection is accessible from the factory for combustible surfaces. The propane gas tank must be equipped with LP conversion kit -...the surface is protected by a material listed by UL as a Floor Protector and Wall Shield covered with not less than 30" (76cm). • Instructions are based on standard American cabinets 36" high (91cm) x 24" deep (61cm) with natural gas. For a noncombustible surface over the cooktop, the...
Installation Instructions
Page 6
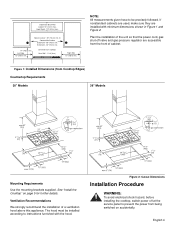
... (from Back Wall Cabinet 13" (33cm) max. The hood must be installed according to be precisely followed. English 4 Above Counter - 30" (76 cm) min. Ventilation Recommendations We strongly recommend the installation of cabinet. NOTE: All measurements given have to instructions furnished with minimum dimensions shown in Figure 1 and Figure 2. SGS(X)36 - 36" (91cm...
... (from Back Wall Cabinet 13" (33cm) max. The hood must be installed according to be precisely followed. English 4 Above Counter - 30" (76 cm) min. Ventilation Recommendations We strongly recommend the installation of cabinet. NOTE: All measurements given have to instructions furnished with minimum dimensions shown in Figure 1 and Figure 2. SGS(X)36 - 36" (91cm...

