Use and Care Guide
Page 3
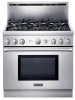
... the Grill 16- 17 Grill Cooking Recommendations 18 About the Griddle 19 Griddle Cooking Recommendations 19 Section Five: Using the Oven Bake 20 Convection 21 Convection Bake 22 Setting Bake/Convection Bake 23 Other Uses of Bake 24 Baking Recommendations 25 Broil 26... Setting Broil 27 Broiling and Roasting Recommendations ....... 28 INTRODUCTION The Thermador Professional ® Ranges are the same. Refer to the pressure regulator supplied with the range. The 30" model comes with...
... the Grill 16- 17 Grill Cooking Recommendations 18 About the Griddle 19 Griddle Cooking Recommendations 19 Section Five: Using the Oven Bake 20 Convection 21 Convection Bake 22 Setting Bake/Convection Bake 23 Other Uses of Bake 24 Baking Recommendations 25 Broil 26... Setting Broil 27 Broiling and Roasting Recommendations ....... 28 INTRODUCTION The Thermador Professional ® Ranges are the same. Refer to the pressure regulator supplied with the range. The 30" model comes with...
Use and Care Guide
Page 5
...or burner grates. This will be seriously injured. II A risk of fire, electrical shock, or injury to the range. When using your new Thermador Professional ® Range has been designed to use the appliance, they must be a safe, reliable appliance. Have the installer show you where ... safety precautions must be closely supervised. Some fabrics are instructed in a shock or fire hazard, orthe obstruction of the flow of the oven or range. If the range is located so that they could be trapped beneath it to reach these instructions. Never let clothing, potholders...
...or burner grates. This will be seriously injured. II A risk of fire, electrical shock, or injury to the range. When using your new Thermador Professional ® Range has been designed to use the appliance, they must be a safe, reliable appliance. Have the installer show you where ... safety precautions must be closely supervised. Some fabrics are instructed in a shock or fire hazard, orthe obstruction of the flow of the oven or range. If the range is located so that they could be trapped beneath it to reach these instructions. Never let clothing, potholders...

Use and Care Guide
Page 6
... igniters activate. Be sure all cooktop controls are suitable for cooking excessively fatty meats or products which promote flare-ups. Interior oven surfaces become burns. The heat deflector, which deflects heat away from forced air vents or fans do not blow flammable material ... a buildup of pressure may result in use the grill for cooking on safety considerations, never use can result in desired position while oven is for proper operation. To minimize the risk of burns, ignition of flammable materials and unintentional spillage, position handles of utensils inward ...
... igniters activate. Be sure all cooktop controls are suitable for cooking excessively fatty meats or products which promote flare-ups. Interior oven surfaces become burns. The heat deflector, which deflects heat away from forced air vents or fans do not blow flammable material ... a buildup of pressure may result in use the grill for cooking on safety considerations, never use can result in desired position while oven is for proper operation. To minimize the risk of burns, ignition of flammable materials and unintentional spillage, position handles of utensils inward ...
Use and Care Guide
Page 7
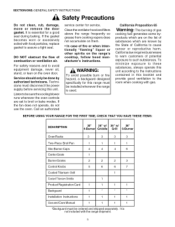
... a tight seal. BEFORE USING YOUR RANGE FOR THE FIRST TIME, CHECK THAT YOU HAVE THESE ITEMS: DESCRIPTION 30" 36" w/ 36" w/ 36" 4-Burner Griddle Grill 6-Burner Oven Racks 3 3 3 3 Two-Piece Broil Pan 1 1 1 1 Star Burner Caps CenterGrate Burner Grates Control Knobs Coated Titanium Grill CoatedTitaniumGriddle 4 4 1 4 6 2 2 2 3 5 6 6 7 1...never sit, stand, or lean on the list of gas cooking fuel generates some byproducts which are on the oven door. If the gasket becomes worn or excessively soiled with gas. California Proposition 65 Warning: The burning of ...
... a tight seal. BEFORE USING YOUR RANGE FOR THE FIRST TIME, CHECK THAT YOU HAVE THESE ITEMS: DESCRIPTION 30" 36" w/ 36" w/ 36" 4-Burner Griddle Grill 6-Burner Oven Racks 3 3 3 3 Two-Piece Broil Pan 1 1 1 1 Star Burner Caps CenterGrate Burner Grates Control Knobs Coated Titanium Grill CoatedTitaniumGriddle 4 4 1 4 6 2 2 2 3 5 6 6 7 1...never sit, stand, or lean on the list of gas cooking fuel generates some byproducts which are on the oven door. If the gasket becomes worn or excessively soiled with gas. California Proposition 65 Warning: The burning of ...

Use and Care Guide
Page 8
...of time. Record the Model and Serial number on the recipe and the cooking mode. The safety stops on the oven. then turn on the ventilator above your Thermador Dealer. , Position the racks correctly in Section 6: Care and Maintenance before turning on the back of the rack will... keep it is the most frequently used for details. Please read Page 33 in the oven. Hold the rack with Customer Service. Oven Rack Positions ...
...of time. Record the Model and Serial number on the recipe and the cooking mode. The safety stops on the oven. then turn on the ventilator above your Thermador Dealer. , Position the racks correctly in Section 6: Care and Maintenance before turning on the back of the rack will... keep it is the most frequently used for details. Please read Page 33 in the oven. Hold the rack with Customer Service. Oven Rack Positions ...

Use and Care Guide
Page 9
... 8. Range Feet (4) WARNING: To provide proper ventilation, do NOT remove range feet. Oven Interior Light 12. Oven Thermostat Sensor 14. Oven Temperature Selector 6. Viewing Window 9. Kick Panel 10. Gas Oven Interior 11. Rack Guides 15. Broil Glow Igniter Burner Grates & Burners 3. Oven Racks (3 included) 16. Control Knobs, Standard Burners (4) 5. Broil Burner 13. Convection Fan Cover...
... 8. Range Feet (4) WARNING: To provide proper ventilation, do NOT remove range feet. Oven Interior Light 12. Oven Thermostat Sensor 14. Oven Temperature Selector 6. Viewing Window 9. Kick Panel 10. Gas Oven Interior 11. Rack Guides 15. Broil Glow Igniter Burner Grates & Burners 3. Oven Racks (3 included) 16. Control Knobs, Standard Burners (4) 5. Broil Burner 13. Convection Fan Cover...

Use and Care Guide
Page 10
Burner Grates & Burners 3. Range Feet (4) _, WARNING: To provide proper ventilation, do NOT remove range feet. Oven Temperature Selector 6. Viewing Window 9. Control Knobs, Standard Burners (2) 5. Oven Door 8. Gas Oven Interior, Please see Page 7. shown (Island Trim and Pot and Pan Shelf ordered separately) 2. Oven Selector Switch 7. Control Knob, ExtraLow _ Burners (2) 4. SECTION THREE: DESCRIPTION Model and Parts Identification Key for 30" Model 1. 6" Low Back - Kick Panel 10.
Burner Grates & Burners 3. Range Feet (4) _, WARNING: To provide proper ventilation, do NOT remove range feet. Oven Temperature Selector 6. Viewing Window 9. Control Knobs, Standard Burners (2) 5. Oven Door 8. Gas Oven Interior, Please see Page 7. shown (Island Trim and Pot and Pan Shelf ordered separately) 2. Oven Selector Switch 7. Control Knob, ExtraLow _ Burners (2) 4. SECTION THREE: DESCRIPTION Model and Parts Identification Key for 30" Model 1. 6" Low Back - Kick Panel 10.

Use and Care Guide
Page 22
... crusts, use light non-stick/ anodized or shiny metal utensils. • For brown crisp crusts, use the utensil recommended in the oven are roasted, such as cookies and biscuits work well using these two racks. These may affect the baking time. Number one is desired... timer. • Usetheinteriorovenlight. • Choose the right size utensil; SECTION FIVE: USING THE COOKTOP Bake TIPS FOR BAKE PREHEATING THE OVEN Preheat the oven before cooking any foods, including large pieces of meat or poultry are numbered like an elevator. See your recipe for baking on rack ...
... crusts, use light non-stick/ anodized or shiny metal utensils. • For brown crisp crusts, use the utensil recommended in the oven are roasted, such as cookies and biscuits work well using these two racks. These may affect the baking time. Number one is desired... timer. • Usetheinteriorovenlight. • Choose the right size utensil; SECTION FIVE: USING THE COOKTOP Bake TIPS FOR BAKE PREHEATING THE OVEN Preheat the oven before cooking any foods, including large pieces of meat or poultry are numbered like an elevator. See your recipe for baking on rack ...

Use and Care Guide
Page 23
...Cooking with Convection Convection Baking There are many advantages to cooking with convection cooking. Converting Conventional Baking to circulate around the oven. The larger the piece of the oven moves heated air evenly around the food. For small items such as cakes, check five to circulate around the food...and poultry should be done all at once. Time can be cooked or large quantities of cookies at the same time. reduce the oven temperature by baking an entire batch of foods can be saved by 25°F. This allows the heated air to Convection Baking To ...
...Cooking with Convection Convection Baking There are many advantages to cooking with convection cooking. Converting Conventional Baking to circulate around the oven. The larger the piece of the oven moves heated air evenly around the food. For small items such as cakes, check five to circulate around the food...and poultry should be done all at once. Time can be cooked or large quantities of cookies at the same time. reduce the oven temperature by baking an entire batch of foods can be saved by 25°F. This allows the heated air to Convection Baking To ...

Use and Care Guide
Page 24
...placed directly under it. See Page 3. 22 SECTION FIVE: USING THE COOKTOP Convection Bake TIPS FOR CONVECTION BAKE PREHEATING THE OVEN Preheat the oven before cooking. For accurate information, write the Extension Service, Colorado State University, Fort Collins, Colorado 80521. Bakeware Type •...; Aluminum bakeware gives the best browning results. • Cookie sheets with the shorter sides on the moisture content of the oven, such asthe control panel. Placement • For better browning, utensils such as cookie sheets, jelly roll pans and rectangular baking ...
...placed directly under it. See Page 3. 22 SECTION FIVE: USING THE COOKTOP Convection Bake TIPS FOR CONVECTION BAKE PREHEATING THE OVEN Preheat the oven before cooking. For accurate information, write the Extension Service, Colorado State University, Fort Collins, Colorado 80521. Bakeware Type •...; Aluminum bakeware gives the best browning results. • Cookie sheets with the shorter sides on the moisture content of the oven, such asthe control panel. Placement • For better browning, utensils such as cookie sheets, jelly roll pans and rectangular baking ...

Use and Care Guide
Page 25
...on automatically. Call a qualified appliance technician to 3250 F. No change in the recipe. This is turned on six minutes after the oven is normal. If the blower is not running during Broil. SECTION FIVE: USING THE COOKTOP Setting Bake / Convection Bake BAKE/CONVECTION ...BAKE These cooking modes are for baking, roasting or warming using the 2. Set Temperature using the Oven Control Knob. • If using CONVECTION BAKE, setthe oven control knob 250 F below temperature suggested in the temperature if roasting meats or poultry. • The convection ...
...on automatically. Call a qualified appliance technician to 3250 F. No change in the recipe. This is turned on six minutes after the oven is normal. If the blower is not running during Broil. SECTION FIVE: USING THE COOKTOP Setting Bake / Convection Bake BAKE/CONVECTION ...BAKE These cooking modes are for baking, roasting or warming using the 2. Set Temperature using the Oven Control Knob. • If using CONVECTION BAKE, setthe oven control knob 250 F below temperature suggested in the temperature if roasting meats or poultry. • The convection ...

Use and Care Guide
Page 26
...that need to be kept moist must be kept at serving temperatures. Cooking raw foods below 275°F is not recommended. Set the oven to the desired temperature. Hot cooked foods can be used at low temperatures to keep hot, cooked foods at temperatures between 40°F...serving temperature, to dehydrate food and to warm plates. Suggested Temperature Recommendations to providing perfect temperatures for baking and roasting, the oven can be covered with a lid or aluminum foil. FOOD SAFETY The United States Department of Bake SLOW COOKING AND LOW TEMPERATURE USES OF...
...that need to be kept moist must be kept at serving temperatures. Cooking raw foods below 275°F is not recommended. Set the oven to the desired temperature. Hot cooked foods can be used at low temperatures to keep hot, cooked foods at temperatures between 40°F...serving temperature, to dehydrate food and to warm plates. Suggested Temperature Recommendations to providing perfect temperatures for baking and roasting, the oven can be covered with a lid or aluminum foil. FOOD SAFETY The United States Department of Bake SLOW COOKING AND LOW TEMPERATURE USES OF...

Use and Care Guide
Page 28
...cannot withstand the intense heat of thickness. • Use a minute timer. Turn and cook the second side to 90°F. SECTION FIVE: USING THE OVEN Broil GETTING THE BEST RESULTS • Defrost food before broiling. • Keep door closed during broiling. • Steaks should be turned over only once,... ham steak and lamb chops 1 inch or less in the desired position. NOTE: It is on, the other one cannot be turned on the oven, place the rack in thickness. RACK POSITIONS Before turning on . 26 DO NOT cover the slotted grid (top) with the range. For rare steaks...
...cannot withstand the intense heat of thickness. • Use a minute timer. Turn and cook the second side to 90°F. SECTION FIVE: USING THE OVEN Broil GETTING THE BEST RESULTS • Defrost food before broiling. • Keep door closed during broiling. • Steaks should be turned over only once,... ham steak and lamb chops 1 inch or less in the desired position. NOTE: It is on, the other one cannot be turned on the oven, place the rack in thickness. RACK POSITIONS Before turning on . 26 DO NOT cover the slotted grid (top) with the range. For rare steaks...

Use and Care Guide
Page 29
...turning on Page 30. 6. Set Selector Switch to Broil 1. Place food in the oven. • Your Professional ® Range comes with a large two-piece broil pan. Place oven rack in the BROIL mode. To Set the Oven to BROIL. 3. This delay is created by the time required for the glow igniter...set temperature cycling continues as long as referenced on or off , after approximately three (3) minutes. 5. on until PRE HEATING light turns off . Gas Oven Only the infrared burner heats in desired position. 2. NOTE: Successful broiling requires constant exposure to the broil burner. 27 Set...
...turning on Page 30. 6. Set Selector Switch to Broil 1. Place food in the oven. • Your Professional ® Range comes with a large two-piece broil pan. Place oven rack in the BROIL mode. To Set the Oven to BROIL. 3. This delay is created by the time required for the glow igniter...set temperature cycling continues as long as referenced on or off , after approximately three (3) minutes. 5. on until PRE HEATING light turns off . Gas Oven Only the infrared burner heats in desired position. 2. NOTE: Successful broiling requires constant exposure to the broil burner. 27 Set...

Use and Care Guide
Page 30
... Small roasts take more minutes per pound;reduce time by using Convection Bake 20 to 25 min/Ib Do not stuff; Food Item Rack Number Oven Mode Beef Ground Beef Patties, 1/2" thick Broil Control Temperature Setting (F) Broil Approximate Cooking Time 15 to 20 minutes Special Instructions and Tips Broil until no... Time depends on the broiler pan included with tongs; Cook until juices are clear 75 to 90 minutes Do not stuff; SECTION FIVE: USING THE OVEN Broiling and Roasting Recommendations All meats are clear 30 to 45 minutes Turn with the range.
... Small roasts take more minutes per pound;reduce time by using Convection Bake 20 to 25 min/Ib Do not stuff; Food Item Rack Number Oven Mode Beef Ground Beef Patties, 1/2" thick Broil Control Temperature Setting (F) Broil Approximate Cooking Time 15 to 20 minutes Special Instructions and Tips Broil until no... Time depends on the broiler pan included with tongs; Cook until juices are clear 75 to 90 minutes Do not stuff; SECTION FIVE: USING THE OVEN Broiling and Roasting Recommendations All meats are clear 30 to 45 minutes Turn with the range.

Use and Care Guide
Page 33
... King ®, Siege Stainless Steel and Aluminum Cleaner, Wright's ® All Purpose Brass Polish. Wash drip tray in warm soapy water or place in a selfcleaning oven. This can eventually stainless steel. If allowed to the grill or griddle plate, remove with warm water. SECTION SiX: CARE AND MAINTENANCE Cleaning Recommendations Part...
... King ®, Siege Stainless Steel and Aluminum Cleaner, Wright's ® All Purpose Brass Polish. Wash drip tray in warm soapy water or place in a selfcleaning oven. This can eventually stainless steel. If allowed to the grill or griddle plate, remove with warm water. SECTION SiX: CARE AND MAINTENANCE Cleaning Recommendations Part...

Use and Care Guide
Page 34
... cloth saturated with a damp soapy cloth or mild abrasive. Rinse thoroughly. The ammonia solution may be placed in the warm oven over night. SECTION SiX: CARE AND MAINTENANCE Cleaning Recommendations Part/Material Broil Pan Grid Broil Pan Bottom Porcelain Enamel Cleaning Products/...Directions DO NOT CLEAN IN SELF-CLEANING OVEN To loosen cooked on Steel Porcelain enamel is difficult to remove, the spots can be easily removed with household ammonia. Cleaners:...
... cloth saturated with a damp soapy cloth or mild abrasive. Rinse thoroughly. The ammonia solution may be placed in the warm oven over night. SECTION SiX: CARE AND MAINTENANCE Cleaning Recommendations Part/Material Broil Pan Grid Broil Pan Bottom Porcelain Enamel Cleaning Products/...Directions DO NOT CLEAN IN SELF-CLEANING OVEN To loosen cooked on Steel Porcelain enamel is difficult to remove, the spots can be easily removed with household ammonia. Cleaners:...

Use and Care Guide
Page 35
..., dampen a paper towel with a damp sponge or cloth according to 15 minutes. Donotrub. remove 33 Harsh Cleaners: Easy Off ®Oven Cleaner. Rack Guide removal, for cleaning using this procedure (see removel instructions below). Powdered Cleanser: Bon-ami ®, Comet ®, ...manufacturer's directions. Allow to stand for discoloration before cleaning the entire rack. • Apply a generous coating. Remove the front portion of the oven cavity. See Cooktop, Back Panel, Stainless Steel, Page 30. Soap filled fiber or steel wool pads: S.O.S ®, Brillo ®. ...
..., dampen a paper towel with a damp sponge or cloth according to 15 minutes. Donotrub. remove 33 Harsh Cleaners: Easy Off ®Oven Cleaner. Rack Guide removal, for cleaning using this procedure (see removel instructions below). Powdered Cleanser: Bon-ami ®, Comet ®, ...manufacturer's directions. Allow to stand for discoloration before cleaning the entire rack. • Apply a generous coating. Remove the front portion of the oven cavity. See Cooktop, Back Panel, Stainless Steel, Page 30. Soap filled fiber or steel wool pads: S.O.S ®, Brillo ®. ...
Use and Care Guide
Page 36
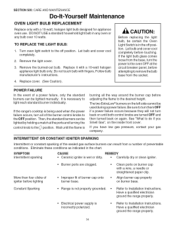
...range properly. • Refer to Installation Instructions. Then, the standard burners can be lighted manually. Eliminate these conditions as indicated in any oven or any bulb over 10 watts. Let bulb and covercool completely before adjusting the flame to do if you have low gas pressure, ...touching. Follow bulb manufacturer's instructions. CAUTION: Before replacing the light bulb, be used when the power failure occurs, turn the power tothe oven OFF atthe circuit breaker panel, before lighting Burner ports are turned OFF and then turned back on the inside front cover. It is ...
...range properly. • Refer to Installation Instructions. Then, the standard burners can be lighted manually. Eliminate these conditions as indicated in any oven or any bulb over 10 watts. Let bulb and covercool completely before adjusting the flame to do if you have low gas pressure, ...touching. Follow bulb manufacturer's instructions. CAUTION: Before replacing the light bulb, be used when the power failure occurs, turn the power tothe oven OFF atthe circuit breaker panel, before lighting Burner ports are turned OFF and then turned back on the inside front cover. It is ...

Use and Care Guide
Page 37
...'s Phone Number Also, enter this information on the frame, behind toe kick panel qC: I Rating Plate and Wiring Diagram Locations (oven door not shown) 35 Wiring/schematic diagrams placed behind the oven door (See illustration). Is the household fuse blown or the circuit breaker tripped? Keep your range. It is the circuit...
...'s Phone Number Also, enter this information on the frame, behind toe kick panel qC: I Rating Plate and Wiring Diagram Locations (oven door not shown) 35 Wiring/schematic diagrams placed behind the oven door (See illustration). Is the household fuse blown or the circuit breaker tripped? Keep your range. It is the circuit...

