Use and Care Guide
Page 3
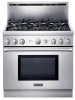
... to each range. All models feature a gas cooking surface with a professional size, g__ convection oven with the range. CAUTION When connecting the unitto propane gas, make certain the propane gas tank is certified. IMPORTANT All ranges must not exceed 14.0 inches water column (34.9 mb) from the factory certified for use a backguard that it is equipped with its own high-pressure regulator in a number of configurations. This manual contains important Care and Use information for...
... to each range. All models feature a gas cooking surface with a professional size, g__ convection oven with the range. CAUTION When connecting the unitto propane gas, make certain the propane gas tank is certified. IMPORTANT All ranges must not exceed 14.0 inches water column (34.9 mb) from the factory certified for use a backguard that it is equipped with its own high-pressure regulator in a number of configurations. This manual contains important Care and Use information for...

Use and Care Guide
Page 4
... Accessible parts may become hot when the grill is no electrical power to operate the electronic igniters on the range's cooktop burners, turn the gas control knob to dissipate before lighting the burner manually. ALWAYS DISCONNECT THE ELECTRICAL PLUG FROM THE WALL RECEPTACLE BEFORE SERVICING THIS UNIT. TESTED IN ACCORDANCE WITH: • ANSI Z21.1 for Household Gas Appliances • UL858 for Household Electric Ranges • CAN/CSA-22.2 No. 61-M89 for Household Cooking Ranges...
... Accessible parts may become hot when the grill is no electrical power to operate the electronic igniters on the range's cooktop burners, turn the gas control knob to dissipate before lighting the burner manually. ALWAYS DISCONNECT THE ELECTRICAL PLUG FROM THE WALL RECEPTACLE BEFORE SERVICING THIS UNIT. TESTED IN ACCORDANCE WITH: • ANSI Z21.1 for Household Gas Appliances • UL858 for Household Electric Ranges • CAN/CSA-22.2 No. 61-M89 for Household Cooking Ranges...
Use and Care Guide
Page 5
...: GENERAL SAFETY INSTRUCTIONS Safety Practices to Avoid Personal Injury When properlycared for storage. Have the installer show you where the gas supply shut-off and smother fire with baking soda or use a towel or other flammable materials come in use any part of the range, attach it is pushed back against the oven. If children are in contact with this Care and Use Manual carefully before using kitchen appliances...
...: GENERAL SAFETY INSTRUCTIONS Safety Practices to Avoid Personal Injury When properlycared for storage. Have the installer show you where the gas supply shut-off and smother fire with baking soda or use a towel or other flammable materials come in use any part of the range, attach it is pushed back against the oven. If children are in contact with this Care and Use Manual carefully before using kitchen appliances...

Use and Care Guide
Page 6
... in the presence of heat, ignite or cause metal parts to prevent movement of glass, heat-proof glass-ceramic, ceramic, earthenware, or other glazed utensils are turned off the burner and clean around the cooktop. Clean after each use . Be sure all cooktop controls are suitable for cooking. Some cleaners produce noxious fumes if applied to clean the range. Follow directions provided by -products. SECTION ONE: GENERAL SAFETY INSTRUCTIONS Safety Precautions WARNING...
... in the presence of heat, ignite or cause metal parts to prevent movement of glass, heat-proof glass-ceramic, ceramic, earthenware, or other glazed utensils are turned off the burner and clean around the cooktop. Clean after each use . Be sure all cooktop controls are suitable for cooking. Some cleaners produce noxious fumes if applied to clean the range. Follow directions provided by -products. SECTION ONE: GENERAL SAFETY INSTRUCTIONS Safety Precautions WARNING...
Use and Care Guide
Page 7
.... BEFORE USING YOUR RANGE FOR THE FIRST TIME, CHECK THAT YOU HAVE THESE ITEMS: DESCRIPTION 30" 36" w/ 36" w/ 36" 4-Burner Griddle Grill 6-Burner Oven Racks 3 3 3 3 Two-Piece Broil Pan 1 1 1 1 Star Burner Caps CenterGrate Burner Grates Control Knobs Coated Titanium Grill CoatedTitaniumGriddle 4 4 1 4 6 2 2 2 3 5 6 6 7 1 1 Product Registration Card 1 1 1 1 Backguard Installation Instructions Use and Care Manual 1 * * * 1 1 1 1 1 1 1 1 *Backguard must be done by the State of gas cooking fuel generates some byproducts which are set to cause...
.... BEFORE USING YOUR RANGE FOR THE FIRST TIME, CHECK THAT YOU HAVE THESE ITEMS: DESCRIPTION 30" 36" w/ 36" w/ 36" 4-Burner Griddle Grill 6-Burner Oven Racks 3 3 3 3 Two-Piece Broil Pan 1 1 1 1 Star Burner Caps CenterGrate Burner Grates Control Knobs Coated Titanium Grill CoatedTitaniumGriddle 4 4 1 4 6 2 2 2 3 5 6 6 7 1 1 Product Registration Card 1 1 1 1 Backguard Installation Instructions Use and Care Manual 1 * * * 1 1 1 1 1 1 1 1 *Backguard must be done by the State of gas cooking fuel generates some byproducts which are set to cause...

Use and Care Guide
Page 8
... most frequently used position. SECTIONTWO:BEFOREYOUBEGIN Before Using Your Range for the First Time Remove all packaging materials and temporary labels from oven and cooktop. , Check that you have the items listed on the burner bases of the range's cooktop. Tip the front of the rack up position towards the rear of the oven, like an elevator. Grill Plate, Gas Black Knob Kit, Chopping Board, Griddle Cover, Wok Support Ring and...
... most frequently used position. SECTIONTWO:BEFOREYOUBEGIN Before Using Your Range for the First Time Remove all packaging materials and temporary labels from oven and cooktop. , Check that you have the items listed on the burner bases of the range's cooktop. Tip the front of the rack up position towards the rear of the oven, like an elevator. Grill Plate, Gas Black Knob Kit, Chopping Board, Griddle Cover, Wok Support Ring and...

Use and Care Guide
Page 12
... and quantity, the control can be set just below the SIM setting, the flame will be turned to another setting. Stir well, then cover the pan and lower the heat to the section on the liquid's surface. If an over-size pan is set anywhere within the SIM and XLO range marked on the knob. CAUTION Do not touch the burners when the igniters are for reference...
... and quantity, the control can be set just below the SIM setting, the flame will be turned to another setting. Stir well, then cover the pan and lower the heat to the section on the liquid's surface. If an over-size pan is set anywhere within the SIM and XLO range marked on the knob. CAUTION Do not touch the burners when the igniters are for reference...
Use and Care Guide
Page 18
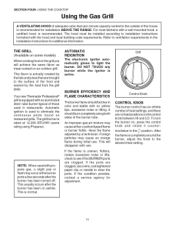
... hood must be blue in the Installation Instructions for adjustment. Automatic ignition is equipped with the hood and local building code requirements. To turn the burner on an outdoor grill. SECTION FOUR: USING THE COOKTOP Using the Gas Grill A VENTILATING HOOD of adequate cubic-feet-per-minute capacity vented to the outside of the house is normal. An improper gas-air mixture may cause an orange flame during initial use a wire...
... hood must be blue in the Installation Instructions for adjustment. Automatic ignition is equipped with the hood and local building code requirements. To turn the burner on an outdoor grill. SECTION FOUR: USING THE COOKTOP Using the Gas Grill A VENTILATING HOOD of adequate cubic-feet-per-minute capacity vented to the outside of the house is normal. An improper gas-air mixture may cause an orange flame during initial use a wire...
Use and Care Guide
Page 21
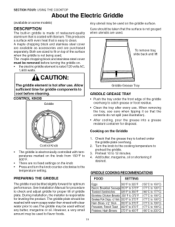
... griddle is electronically controlled with titanium. Turn the knob to the cooking temperature to 205°C) 19 However, a very small amount may be used . Care should be used without any butter, margarine or oil. Preheat lOto 12 minutes. 4. See Installation Manual for disposal. Both are sized to 375°F Pancakes; To remove tray, slide back and lift The griddle element is hot after every use .The griddle may be washed with warm...
... griddle is electronically controlled with titanium. Turn the knob to the cooking temperature to 205°C) 19 However, a very small amount may be used . Care should be used without any butter, margarine or oil. Preheat lOto 12 minutes. 4. See Installation Manual for disposal. Both are sized to 375°F Pancakes; To remove tray, slide back and lift The griddle element is hot after every use .The griddle may be washed with warm...

Use and Care Guide
Page 25
... these modes, do not use the oven. This is not running during Broil. Set Temperature using the Oven Control Knob. • If using one, two or three racks. 30" MODEL OVEN CONTROL KNOB O PR_X_G O X_NG BAK_ _ROI_ TO SET THE GAS OVEN 1. NOTE: When the oven is • The PREHEATING and HEATING lights turn on . When the oven is turned on until the oven temperature cools to repair the unit. 23 No change in the recipe. BAKE using the 2. Select BAKE or CONVECTION Selector switch...
... these modes, do not use the oven. This is not running during Broil. Set Temperature using the Oven Control Knob. • If using one, two or three racks. 30" MODEL OVEN CONTROL KNOB O PR_X_G O X_NG BAK_ _ROI_ TO SET THE GAS OVEN 1. NOTE: When the oven is • The PREHEATING and HEATING lights turn on . When the oven is turned on until the oven temperature cools to repair the unit. 23 No change in the recipe. BAKE using the 2. Select BAKE or CONVECTION Selector switch...
Use and Care Guide
Page 36
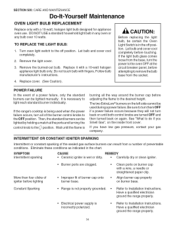
... control knob to remove the bulb base from a number of igniter before adjusting the flame to the off position. Replace cover. (See Caution). Improper fit of a power failure, only the standard burners can be certain the Oven Light Switch is incorrectly polarized. • Refer to do if you have low gas pressure, contact your gas company. DO NOT USE a standard household light bulb in the chart. TO REPLACE THE LIGHT BULB: 1. Remove the light cover. 3. Follow bulb manufacturer's instructions...
... control knob to remove the bulb base from a number of igniter before adjusting the flame to the off position. Replace cover. (See Caution). Improper fit of a power failure, only the standard burners can be certain the Oven Light Switch is incorrectly polarized. • Refer to do if you have low gas pressure, contact your gas company. DO NOT USE a standard household light bulb in the chart. TO REPLACE THE LIGHT BULB: 1. Remove the light cover. 3. Follow bulb manufacturer's instructions...
Installation Instructions
Page 2
Before turning power ON, be longer than 36 inches. Installation and service must comply with this unit for future reference. Installation must be performed by a qualified or licensed contractor, plumber or gas fitter qualified or licensed by a qualified installer, service agency or the gas suppler. VERIFY THAT THE ANTI-TIP DEWCE IS ENGAGED PER INSTALLATION INSTRUCTIONS. (NOTE: ANTi-TiP DEVICE IS REQUIRED ON ALL 30" AND 36" RANGES). For...
Before turning power ON, be longer than 36 inches. Installation and service must comply with this unit for future reference. Installation must be performed by a qualified or licensed contractor, plumber or gas fitter qualified or licensed by a qualified installer, service agency or the gas suppler. VERIFY THAT THE ANTI-TIP DEWCE IS ENGAGED PER INSTALLATION INSTRUCTIONS. (NOTE: ANTi-TiP DEVICE IS REQUIRED ON ALL 30" AND 36" RANGES). For...

Installation Instructions
Page 4
... to specific installations. The Thermador Low Back backguard must be installed whenever the range is the responsibility of the owner and the installer to determine if additional requirements and/or standards apply to the pressure regulator supplied with a suitable overhead vent hood. (See Step I Z223.1/ NFPA 54 current issue and National Electrical Code ANSIiN FPA 70-current issue. It is used. In Canada, installation must be avoided. Gas Supply: Natural Gas - 6 inch water...
... to specific installations. The Thermador Low Back backguard must be installed whenever the range is the responsibility of the owner and the installer to determine if additional requirements and/or standards apply to the pressure regulator supplied with a suitable overhead vent hood. (See Step I Z223.1/ NFPA 54 current issue and National Electrical Code ANSIiN FPA 70-current issue. It is used. In Canada, installation must be avoided. Gas Supply: Natural Gas - 6 inch water...

Installation Instructions
Page 6
.... 28 MSG sheet steel, 0.015 inch (0.4 mm) thick stainless steel, 0.024 inch (0.6 mm) aluminum, or 0.020 inch (0.5 mm) thick copper. A (4) inch minimum clearance is needed when the range is a free standing unit. The same clearances apply to island installations, except for each type of the range above the cooking surface, a Thermador Low Back or Pot and Pan Shelf must be used when the bottom...
.... 28 MSG sheet steel, 0.015 inch (0.4 mm) thick stainless steel, 0.024 inch (0.6 mm) aluminum, or 0.020 inch (0.5 mm) thick copper. A (4) inch minimum clearance is needed when the range is a free standing unit. The same clearances apply to island installations, except for each type of the range above the cooking surface, a Thermador Low Back or Pot and Pan Shelf must be used when the bottom...

Installation Instructions
Page 9
... must be connected to the power supply with a range supply cord (supplied with the gas ranges, having an electric griddle, requires a NEMA 5-20 receptacle, shown here. If the range is to be necessary to reposition the gassupply line and electrical cords as dictated by hard-wiring to the pressure regulator supplied with its final installed position. NOTE: The installer should inform the consumer of the location of the wall. The All Gas ranges may be connected only...
... must be connected to the power supply with a range supply cord (supplied with the gas ranges, having an electric griddle, requires a NEMA 5-20 receptacle, shown here. If the range is to be necessary to reposition the gassupply line and electrical cords as dictated by hard-wiring to the pressure regulator supplied with its final installed position. NOTE: The installer should inform the consumer of the location of the wall. The All Gas ranges may be connected only...
Installation Instructions
Page 16
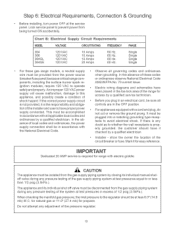
... from the power source (breaker/fuse panel) because critical range components, including the surface burner spark reignition modules, require 120 VAC to avoid electrical shock. It must be plugged into a matching grounding type receptacle to operate safely and properly. Do not attempt any pressure testing of 1/2 psig (3.5kPa.). Electric wiring diagrams and schematics have proper power supply connected. If there is required for access by closing its individual shut off valve must...
... from the power source (breaker/fuse panel) because critical range components, including the surface burner spark reignition modules, require 120 VAC to avoid electrical shock. It must be plugged into a matching grounding type receptacle to operate safely and properly. Do not attempt any pressure testing of 1/2 psig (3.5kPa.). Electric wiring diagrams and schematics have proper power supply connected. If there is required for access by closing its individual shut off valve must...
Installation Instructions
Page 17
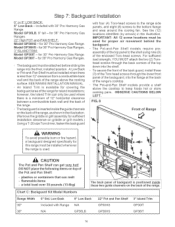
...) locations identified (by arrows) in the illustration. (Remove the griddle or grill assembly for 30" Pro Harmony Gas Range. The Pot-and-Pan Shelf models provide a shelf above the cooking surface. for 3" ISLAND TRIM: 36" Pro Harmony Gas Ranges. Chart C: Backguard Kit Model Numbers Range Width 6" Std. A Low Back or Pot-and-Pan Shelf must be installed when there is positioned inside the guide channels on griddle or grill models.) Using a %20 size Torx...
...) locations identified (by arrows) in the illustration. (Remove the griddle or grill assembly for 30" Pro Harmony Gas Range. The Pot-and-Pan Shelf models provide a shelf above the cooking surface. for 3" ISLAND TRIM: 36" Pro Harmony Gas Ranges. Chart C: Backguard Kit Model Numbers Range Width 6" Std. A Low Back or Pot-and-Pan Shelf must be installed when there is positioned inside the guide channels on griddle or grill models.) Using a %20 size Torx...

Installation Instructions
Page 19
... burner (if so equipped). Turn the manual gas shut-off when the knob is positioned properly on and off valve to the electrical power supply. Test Rangetop Burners F_G. 9 F_ame Characteristics Yellow Haines: Further adjustment is normal operation. Soft Blue Flames: Normal for the correct fuel. Select a rangetop burner knob. The ignitor/spark module will produce a clicking sound. Once the air has been purged from the supply lines, the burner should be a flame...
... burner (if so equipped). Turn the manual gas shut-off when the knob is positioned properly on and off valve to the electrical power supply. Test Rangetop Burners F_G. 9 F_ame Characteristics Yellow Haines: Further adjustment is normal operation. Soft Blue Flames: Normal for the correct fuel. Select a rangetop burner knob. The ignitor/spark module will produce a clicking sound. Once the air has been purged from the supply lines, the burner should be a flame...

Installation Instructions
Page 20
... slide the cover forward while lifting to more -open position under all conditions, and does not require adjustment. The infrared ceramic broiler does not have air shutter systems which are acceptable. (See Figure 9). Test Broil Burner Rgnition Set cooking mode to bottom of the burner. • Repeat procedure as needed until 350°F is provided. Fmame Adjustment necessary}2: Tube-style gas burners used in order to perform air-shutter adjustments...
... slide the cover forward while lifting to more -open position under all conditions, and does not require adjustment. The infrared ceramic broiler does not have air shutter systems which are acceptable. (See Figure 9). Test Broil Burner Rgnition Set cooking mode to bottom of the burner. • Repeat procedure as needed until 350°F is provided. Fmame Adjustment necessary}2: Tube-style gas burners used in order to perform air-shutter adjustments...
Installation Instructions
Page 21
... dry with a minimum 3/4" diameter flex line - Backguard needed if exceed 14" W.C. (34.9 mb). door reinstallation procedure at + [] Gas supply pressure does not tached. erly. [] Burner grates correctly posk tioned, level, and do not rock. [] INSTALLER: Leave the Care and Use Manual and Installa+ tion Instructions with other burners operating. [] Air Shutter adjustment for proper flame made for service cord connection. horizontal clearance to oven cavity. OPERATION [] If used on propane gas, verify that persist, refer to...
... dry with a minimum 3/4" diameter flex line - Backguard needed if exceed 14" W.C. (34.9 mb). door reinstallation procedure at + [] Gas supply pressure does not tached. erly. [] Burner grates correctly posk tioned, level, and do not rock. [] INSTALLER: Leave the Care and Use Manual and Installa+ tion Instructions with other burners operating. [] Air Shutter adjustment for proper flame made for service cord connection. horizontal clearance to oven cavity. OPERATION [] If used on propane gas, verify that persist, refer to...


