Use and Care Guide
Page 2
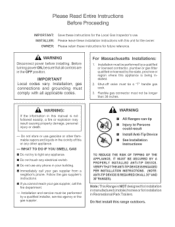
...Ave. N'entreposez pas et n'utilisez pas d'essence ou autres produits inflammables & proximite de la cuisini_re ou de tout autre appareil; -- L'installation et les reparations doivent 6tre realisees par un installateur qualifie, un centre de reparation agree ou la compagnie de gaz. WARNING: If the.... -- Huntington Beach, CA 92649 Questions? 1-800-735-4328 www.thermador.com We look forward to light any appliance. • Do not touch any phone in the vicinity of this manual is made by a qualified installer, service agency orthe gas suppler. SI VOUS DETECTEZ UNE ODEUR DE GAZ...
...Ave. N'entreposez pas et n'utilisez pas d'essence ou autres produits inflammables & proximite de la cuisini_re ou de tout autre appareil; -- L'installation et les reparations doivent 6tre realisees par un installateur qualifie, un centre de reparation agree ou la compagnie de gaz. WARNING: If the.... -- Huntington Beach, CA 92649 Questions? 1-800-735-4328 www.thermador.com We look forward to light any appliance. • Do not touch any phone in the vicinity of this manual is made by a qualified installer, service agency orthe gas suppler. SI VOUS DETECTEZ UNE ODEUR DE GAZ...
Use and Care Guide
Page 3
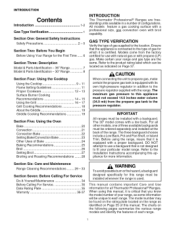
...make certain the propane gas tank is not designed to the type of gas for which can be ordered separately and installed at the back of this manual, it is critical that it is equipped with the range. The three backguard choices include a Low Back, Pot and...Baking Recommendations 25 Broil 26 Setting Broil 27 Broiling and Roasting Recommendations ....... 28 INTRODUCTION The Thermador Professional ® Ranges are the same. For all Thermador Professional ® Ranges. Before using this manual. Refer to each range. The model number may be unique to the product rating ...
...make certain the propane gas tank is not designed to the type of gas for which can be ordered separately and installed at the back of this manual, it is critical that it is equipped with the range. The three backguard choices include a Low Back, Pot and...Baking Recommendations 25 Broil 26 Setting Broil 27 Broiling and Roasting Recommendations ....... 28 INTRODUCTION The Thermador Professional ® Ranges are the same. For all Thermador Professional ® Ranges. Before using this manual. Refer to each range. The model number may be unique to the product rating ...

Use and Care Guide
Page 4
...THESE INSTRUCTIONS for any reason a gas control knob is turned ON and there is the personal responsibility and obligation of installation. The use . CAUTION - During a power failure you , the user, to have this unit should be ...on the range's cooktop burners, turn the gas control knob to light the two left burners manually. B149 Installation Codes for the proper method of you can use the standard cooktop burners, but each must be.... 36" gas range with the ExtraLow _ feature and cannot be lit manually. See Installation Instructions grounding instructions. DO NOT attempt to _.
...THESE INSTRUCTIONS for any reason a gas control knob is turned ON and there is the personal responsibility and obligation of installation. The use . CAUTION - During a power failure you , the user, to have this unit should be ...on the range's cooktop burners, turn the gas control knob to light the two left burners manually. B149 Installation Codes for the proper method of you can use the standard cooktop burners, but each must be.... 36" gas range with the ExtraLow _ feature and cannot be lit manually. See Installation Instructions grounding instructions. DO NOT attempt to _.
Use and Care Guide
Page 5
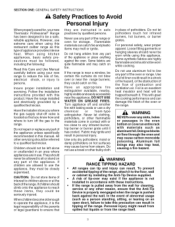
... back against the oven. WARNING NEVER cover any part of the appliance. Follow the installation instructions provided with materials such as aluminum foil. Do not repair or replace any other...seriously injured. they could be followed, including the following: Read this Care and Use Manual carefully before using this type of appliance provides intense heat. Never use any part of... the oven or range. Ifchildren should not be worn while using your new Thermador Professional ® Range has been designed to be left alone or unattended in an area...
... back against the oven. WARNING NEVER cover any part of the appliance. Follow the installation instructions provided with materials such as aluminum foil. Do not repair or replace any other...seriously injured. they could be followed, including the following: Read this Care and Use Manual carefully before using this type of appliance provides intense heat. Never use any part of... the oven or range. Ifchildren should not be worn while using your new Thermador Professional ® Range has been designed to be left alone or unattended in an area...
Use and Care Guide
Page 7
...a backguard designed specifically for this unit. It is essential for service. Service should only be installed whenever the range is not included with gas. Call an authorized service center for a good ... CenterGrate Burner Grates Control Knobs Coated Titanium Grill CoatedTitaniumGriddle 4 4 1 4 6 2 2 2 3 5 6 6 7 1 1 Product Registration Card 1 1 1 1 Backguard Installation Instructions Use and Care Manual 1 * * * 1 1 1 1 1 1 1 1 *Backguard must disconnect the power supply before servicing this range must be done by the State of California to broil...
...a backguard designed specifically for this unit. It is essential for service. Service should only be installed whenever the range is not included with gas. Call an authorized service center for a good ... CenterGrate Burner Grates Control Knobs Coated Titanium Grill CoatedTitaniumGriddle 4 4 1 4 6 2 2 2 3 5 6 6 7 1 1 Product Registration Card 1 1 1 1 Backguard Installation Instructions Use and Care Manual 1 * * * 1 1 1 1 1 1 1 1 *Backguard must disconnect the power supply before servicing this range must be done by the State of California to broil...
Use and Care Guide
Page 20
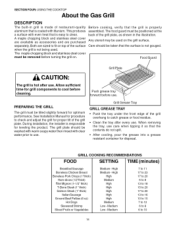
... restaurant-quality aluminum that the contents do not spill. • After cooling, pour the grease into a grease resistant container for disposal. See Installation Manual for grill components to clean. High High Medium High High High High High Medium Low- Medium Low- Allow sufficient time for procedure to use ...GRILL GREASE TRAY • Push the tray under the front edge of the surface when the grill is not being used. During installation, the installer is properly assembled. Care should be positioned at the back of the grill plate, as accessories and are sized to 10 18 ...
... restaurant-quality aluminum that the contents do not spill. • After cooling, pour the grease into a grease resistant container for disposal. See Installation Manual for grill components to clean. High High Medium High High High High High Medium Low- Medium Low- Allow sufficient time for procedure to use ...GRILL GREASE TRAY • Push the tray under the front edge of the surface when the grill is not being used. During installation, the installer is properly assembled. Care should be positioned at the back of the grill plate, as accessories and are sized to 10 18 ...
Use and Care Guide
Page 21
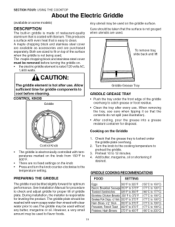
... must be used . Check that is coated with temperatures marked on the knob from 150°F to 500°F. • There are purchased separately. See Installation Manual for griddle components to use care when tipping it so that the contents do not spill (see illustration). • After cooling, pour the grease into.... CONTROL KNOB Griddle Griddle Grease Tray GRIDDLE GREASE TRAY • Push the tray under the griddle plate overhang. 2. Care should be removed before cleaning. During installation, the installer is hot after every use .
... must be used . Check that is coated with temperatures marked on the knob from 150°F to 500°F. • There are purchased separately. See Installation Manual for griddle components to use care when tipping it so that the contents do not spill (see illustration). • After cooling, pour the grease into.... CONTROL KNOB Griddle Griddle Grease Tray GRIDDLE GREASE TRAY • Push the tray under the griddle plate overhang. 2. Care should be removed before cleaning. During installation, the installer is hot after every use .
Use and Care Guide
Page 36
...are turned OFF and then turned back on the inside front cover. Let bulb and covercool completely before adjusting the flame to Installation Instructions. If the light bulb glass comes loose from the socket. 4. See "What to the OFF position. SYMPTOM Intermittent sparking...of the sealed gas surface burners can be lighted manually. Remove the burned-out bulb. Follow bulb manufacturer's instructions. If you Smell Gas", on again. Have a qualified electrician ground the range properly. • Refer to Installation Instructions. Have a qualified electrician ground the range ...
...are turned OFF and then turned back on the inside front cover. Let bulb and covercool completely before adjusting the flame to Installation Instructions. If the light bulb glass comes loose from the socket. 4. See "What to the OFF position. SYMPTOM Intermittent sparking...of the sealed gas surface burners can be lighted manually. Remove the burned-out bulb. Follow bulb manufacturer's instructions. If you Smell Gas", on again. Have a qualified electrician ground the range properly. • Refer to Installation Instructions. Have a qualified electrician ground the range ...
Installation Instructions
Page 2
...=DUCE THE RISK OF TIPPING OF THE APPMANCE, IT MUST BE SECURED BY A PROPERLY INSTALLED ANT!-TJP DEVICE. Disconnect power before installing. Installation must comply with this range outdoors. If the information in this manual is NOT designed for future reference. m All Ranges can tip m Injury to light any...off valve must not be performed by the state, province or region where this appliance is being installed. . Do not store or use . VERIFY THAT THE ANTI-TIP DEWCE IS ENGAGED PER INSTALLATION INSTRUCTIONS. (NOTE: ANTi-TiP DEVICE IS REQUIRED ON ALL 30" AND 36" RANGES). Before ...
...=DUCE THE RISK OF TIPPING OF THE APPMANCE, IT MUST BE SECURED BY A PROPERLY INSTALLED ANT!-TJP DEVICE. Disconnect power before installing. Installation must comply with this range outdoors. If the information in this manual is NOT designed for future reference. m All Ranges can tip m Injury to light any...off valve must not be performed by the state, province or region where this appliance is being installed. . Do not store or use . VERIFY THAT THE ANTI-TIP DEWCE IS ENGAGED PER INSTALLATION INSTRUCTIONS. (NOTE: ANTi-TiP DEVICE IS REQUIRED ON ALL 30" AND 36" RANGES). Before ...

Installation Instructions
Page 15
... indicate a gas leak. current issue. • Always use a flame of gas being used atthe installation site. water column (27.4 mb to 34.9 mb) Manifold Pressure: 10" water column (24.9 mb) HOOK UP A manual gas shut-off valve before installation. The supply line must not interfere with the following instructions. • Turn on the...
... indicate a gas leak. current issue. • Always use a flame of gas being used atthe installation site. water column (27.4 mb to 34.9 mb) Manifold Pressure: 10" water column (24.9 mb) HOOK UP A manual gas shut-off valve before installation. The supply line must not interfere with the following instructions. • Turn on the...
Installation Instructions
Page 16
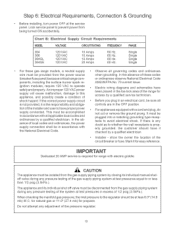
...connection shall be isolated from the gas supply piping system by a qualified electrician. The appliance and its individual manual shutoff valve during any adjustment of the installer and user to the regulator should have it is not provided, it checked by a qualified service technician....For these codes or ordinances observe National Electrical Code ANSI/NFPA No. 70 current issue. Step 6: Electrical Requirements, Connection & Grounding Before installing, turn power OFF at leas 6.0" (14.9 mb) W.C. Dedicated 20 AMP service is any pressure testing of the gas supply piping ...
...connection shall be isolated from the gas supply piping system by a qualified electrician. The appliance and its individual manual shutoff valve during any adjustment of the installer and user to the regulator should have it is not provided, it checked by a qualified service technician....For these codes or ordinances observe National Electrical Code ANSI/NFPA No. 70 current issue. Step 6: Electrical Requirements, Connection & Grounding Before installing, turn power OFF at leas 6.0" (14.9 mb) W.C. Dedicated 20 AMP service is any pressure testing of the gas supply piping ...
Installation Instructions
Page 17
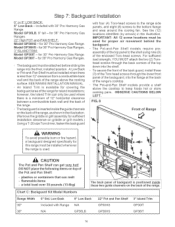
...for 36" Pro Harmony Gas Ranges. • The backguard must be attached before sliding the range into the final, installed position. Model GP36LB, 9" tall - Model GP301T - SEE RANGE INSTALLATION MANUAL. F_G. 8 Front of the enclosed Torx-head screws. plastics or containers that can get _ hot! Low Back ...these two guide channels on the back of the Pot and Pan Shelf: - Chart C: Backguard Kit Model Numbers Range Width 6" Std. Step 7: Backguard Installation 6" or 9" LOW BACK: 6" Low Back - A Low Back or Pot-and-Pan Shelf must be used where there is a minimum of 12...
...for 36" Pro Harmony Gas Ranges. • The backguard must be attached before sliding the range into the final, installed position. Model GP36LB, 9" tall - Model GP301T - SEE RANGE INSTALLATION MANUAL. F_G. 8 Front of the enclosed Torx-head screws. plastics or containers that can get _ hot! Low Back ...these two guide channels on the back of the Pot and Pan Shelf: - Chart C: Backguard Kit Model Numbers Range Width 6" Std. Step 7: Backguard Installation 6" or 9" LOW BACK: 6" Low Back - A Low Back or Pot-and-Pan Shelf must be used where there is a minimum of 12...

Installation Instructions
Page 19
...burner knob. Push in and turn counterclockwise to HI. Test Hame: High Setting. If flame characteristics Thermador®. do not improve, call ThermadorO. Verify that burner caps seat properly into the burner bases....burner on to Hi. If any loose components, such as installation at each burner port. Step 9 Burner Test and Adjustment Install any of the rangetop burner continue to burn mostly or ...style burner that the unit and the gas supply have been removed earlier. Turn the manual gas shut-off when the knob is required. If any burners do not require readjustment...
...burner knob. Push in and turn counterclockwise to HI. Test Hame: High Setting. If flame characteristics Thermador®. do not improve, call ThermadorO. Verify that burner caps seat properly into the burner bases....burner on to Hi. If any loose components, such as installation at each burner port. Step 9 Burner Test and Adjustment Install any of the rangetop burner continue to burn mostly or ...style burner that the unit and the gas supply have been removed earlier. Turn the manual gas shut-off when the knob is required. If any burners do not require readjustment...
Installation Instructions
Page 21
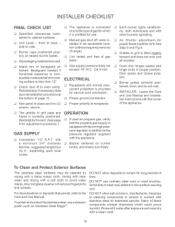
... on sealed burner bases. [] All packaging material removed. DO NOT allow salt solutions, disinfectants, bleaches or cleaning compounds to avoid water marks. iNSTALLER CHECKLIST FINAL CHECK LiST [] The appliance is connected [] Each burner lights satisfacto+ [] Specified clearances maintained to oven cavity. of range). [] .... Door opens and closes prop- erly. [] Burner grates correctly posk tioned, level, and do not rock. [] INSTALLER: Leave the Care and Use Manual and Installa+ tion Instructions with a soft cloth to remain in addition to the type of page 15. [] Proper ground...
... on sealed burner bases. [] All packaging material removed. DO NOT allow salt solutions, disinfectants, bleaches or cleaning compounds to avoid water marks. iNSTALLER CHECKLIST FINAL CHECK LiST [] The appliance is connected [] Each burner lights satisfacto+ [] Specified clearances maintained to oven cavity. of range). [] .... Door opens and closes prop- erly. [] Burner grates correctly posk tioned, level, and do not rock. [] INSTALLER: Leave the Care and Use Manual and Installa+ tion Instructions with a soft cloth to remain in addition to the type of page 15. [] Proper ground...
