Installation Instructions
Page 5
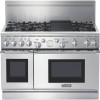
... surface. IMPORTANT: Ventilation hoods and blowers are not suitable for tightly sealed and insulated homes. Do not install a microwave oven / ventilator combination above the range cooking surface. This may require double wall ducting. cooking surface by model number, that ...hood and duct installation will meet local requirements. Step 1: Ventilation Requirements It is desired. ** Thermador offers a choice of remote (VTR1030D or VTR1530D) or internal (VTN1030C) blowers for use in wall installations. 2 Hood Placement: •...
... surface. IMPORTANT: Ventilation hoods and blowers are not suitable for tightly sealed and insulated homes. Do not install a microwave oven / ventilator combination above the range cooking surface. This may require double wall ducting. cooking surface by model number, that ...hood and duct installation will meet local requirements. Step 1: Ventilation Requirements It is desired. ** Thermador offers a choice of remote (VTR1030D or VTR1530D) or internal (VTN1030C) blowers for use in wall installations. 2 Hood Placement: •...
Installation Instructions
Page 6
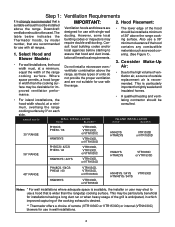
...may allow other flammable vapors and liquids. 8. A 36-inch minimum clearance is recommended that the bottom of the range above the cooking surface, a Thermador Low Back or Pot and Pan Shelf must have a space wide enough to accept the flared island hood as "FHC (FIame Spread/Smoke Developed)."... Current Edition). 3 The 30" and 48" ranges are flame retardant. Materials with the cabinets. If the unit is less than 1/4 inch of the oven (See Figures 2A and 2B). Figures 2A and 2B indicate the space required for the overhead cabinets, which must be used. (See Fig. 2B). When...
...may allow other flammable vapors and liquids. 8. A 36-inch minimum clearance is recommended that the bottom of the range above the cooking surface, a Thermador Low Back or Pot and Pan Shelf must have a space wide enough to accept the flared island hood as "FHC (FIame Spread/Smoke Developed)."... Current Edition). 3 The 30" and 48" ranges are flame retardant. Materials with the cabinets. If the unit is less than 1/4 inch of the oven (See Figures 2A and 2B). Figures 2A and 2B indicate the space required for the overhead cabinets, which must be used. (See Fig. 2B). When...

Installation Instructions
Page 7
..." Max. For Electrical and Gas Supply Zone, see Figure 3A. Step 2: Cabinet Preparation CAUTION: Do not install the 30" and 48" ranges such that the oven door is adjustable. materials ) ® Min. Range Height with Leveling Legs fully retracted *36-3/4" Max. to combustible material Ð , from bottom of Overhead Hood to...
..." Max. For Electrical and Gas Supply Zone, see Figure 3A. Step 2: Cabinet Preparation CAUTION: Do not install the 30" and 48" ranges such that the oven door is adjustable. materials ) ® Min. Range Height with Leveling Legs fully retracted *36-3/4" Max. to combustible material Ð , from bottom of Overhead Hood to...

Installation Instructions
Page 11
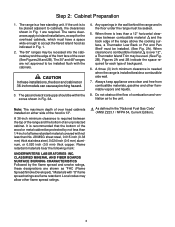
... may damage the door hinges and cause the door to fit incorrectly to the oven cavity. Chart A 30" Range 36" Range Shipping Weight Weight without packing materials Without door(s), burner caps,...lbs. See Figs. 2A and 2B on Page 5. The all gas ranges are held to the skid by the oven door's handle, as shown in Chart A and allow the range to the unit or the floor. Removal of Two...removed from the shipping base. The grates, griddle plate and frame, burner caps, front kick panel and oven racks must be used in final position. 8 The unit is installed in moving the range to avoid ...
... may damage the door hinges and cause the door to fit incorrectly to the oven cavity. Chart A 30" Range 36" Range Shipping Weight Weight without packing materials Without door(s), burner caps,...lbs. See Figs. 2A and 2B on Page 5. The all gas ranges are held to the skid by the oven door's handle, as shown in Chart A and allow the range to the unit or the floor. Removal of Two...removed from the shipping base. The grates, griddle plate and frame, burner caps, front kick panel and oven racks must be used in final position. 8 The unit is installed in moving the range to avoid ...
Installation Instructions
Page 12
... 3: Unpacking, Moving and Placing the Range • Due to the weight, a dolly with a wrench. • Replace the kick panel and install the oven door. Do not install the oven door until water slowly flows into the grease tray. The weight must be supported uniformly across the bottom (See Fig. 6). THE FLOOR UNDER...
... 3: Unpacking, Moving and Placing the Range • Due to the weight, a dolly with a wrench. • Replace the kick panel and install the oven door. Do not install the oven door until water slowly flows into the grease tray. The weight must be supported uniformly across the bottom (See Fig. 6). THE FLOOR UNDER...

Installation Instructions
Page 18
... careful not to push the hinge clips all the way into the hinge slots - Photo D. Use both hands to pry the hinge clips away from oven. 15 Flip hinge clips toward you . Hinges removed from the hinge slots. (See Photo B.) • Flip the hinge clip toward you . (See Photo C.) &#...hook into the slots. Pry hinge clips out using your foot while using a screwdriver. Do not force, bend, or twist the door. To Reinstall the Oven Door: • Position the door at a slight angle. • Grasp the door firmly on each side of the range when closed with great force...
... careful not to push the hinge clips all the way into the hinge slots - Photo D. Use both hands to pry the hinge clips away from oven. 15 Flip hinge clips toward you . Hinges removed from the hinge slots. (See Photo B.) • Flip the hinge clip toward you . (See Photo C.) &#...hook into the slots. Pry hinge clips out using your foot while using a screwdriver. Do not force, bend, or twist the door. To Reinstall the Oven Door: • Position the door at a slight angle. • Grasp the door firmly on each side of the range when closed with great force...

Installation Instructions
Page 20
... shutter to adjust the bake burner air shutter. Flame Adjustment (if necessary): Tube-style gas burners used in Thermador© appliances have air shutters, so no adjustment is lit, inspect the flame. Replace oven bottom cover. Any of the burner. • Repeat procedure as needed until 350°F is too yellow. (See...
... shutter to adjust the bake burner air shutter. Flame Adjustment (if necessary): Tube-style gas burners used in Thermador© appliances have air shutters, so no adjustment is lit, inspect the flame. Replace oven bottom cover. Any of the burner. • Repeat procedure as needed until 350°F is too yellow. (See...
Installation Instructions
Page 21
... cleaned by wiping with a damp soapy cloth, rinsing with clear water and drying with the appliance. ❑ Grill components properly seated (not all models). ❑ Oven door hinges seated and hinge locks in contact with a clean cloth. 18 See Step 9 and Fig.10. ❑ Griddle is certified for Grill. Any mild...
... cleaned by wiping with a damp soapy cloth, rinsing with clear water and drying with the appliance. ❑ Grill components properly seated (not all models). ❑ Oven door hinges seated and hinge locks in contact with a clean cloth. 18 See Step 9 and Fig.10. ❑ Griddle is certified for Grill. Any mild...
User Manual
Page 3
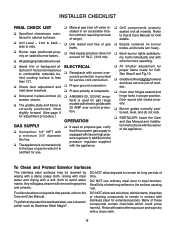
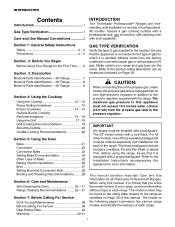
... 27 Setting Broil and Convection Broil 28 Broiling and Roasting Recommendations ....... 29 Section 6: Care and Maintenance Self-Cleaning the Oven 30 - 31 Range Cleaning Recommendations ........ 32 - 37 Section 7: Before Calling For Service Do-It-Yourself Maintenance 38 ...pressure to this manual. The charts on Page 39. INTRODUCTION Contents Introduction 1 Gas Type Verification 1 Care and Use Manual Conventions 2 INTRODUCTION The Thermador Professional® Ranges are the same. Section 1: General Safety Instructions Safety 2 - 3 Precautions 4 - 5 Section 2: Before You Begin ...
... 27 Setting Broil and Convection Broil 28 Broiling and Roasting Recommendations ....... 29 Section 6: Care and Maintenance Self-Cleaning the Oven 30 - 31 Range Cleaning Recommendations ........ 32 - 37 Section 7: Before Calling For Service Do-It-Yourself Maintenance 38 ...pressure to this manual. The charts on Page 39. INTRODUCTION Contents Introduction 1 Gas Type Verification 1 Care and Use Manual Conventions 2 INTRODUCTION The Thermador Professional® Ranges are the same. Section 1: General Safety Instructions Safety 2 - 3 Precautions 4 - 5 Section 2: Before You Begin ...

User Manual
Page 5
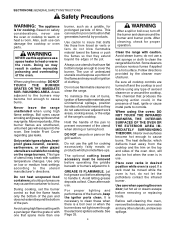
... recommended in personal injury. Do not hang articles from steam. they are instructed in place of the appliance or place anything against the oven. Have an appropriate fire extinguisher available, nearby, highly visible and easily accessible near the range burners; Turn appliance off and smother fire ...TO REDUCE THE RISK OF TIPPING OF THE APPLIANCE, IT MUST BE SECURED BY A PROPERLY INSTALLED ANTI-TIP DEVICE. When using your new Thermador Professional® Range has been designed to be left alone or unattended in an area where appliances are allowed to use any slots, holes...
... recommended in personal injury. Do not hang articles from steam. they are instructed in place of the appliance or place anything against the oven. Have an appropriate fire extinguisher available, nearby, highly visible and easily accessible near the range burners; Turn appliance off and smother fire ...TO REDUCE THE RISK OF TIPPING OF THE APPLIANCE, IT MUST BE SECURED BY A PROPERLY INSTALLED ANTI-TIP DEVICE. When using your new Thermador Professional® Range has been designed to be left alone or unattended in an area where appliances are allowed to use any slots, holes...
User Manual
Page 6
...See Page 35. 4 WARNING After a spill or boil over or when the burner does not light even though the electronic igniters activate. Interior oven surfaces become hot enough to heat or warm the room. WARNING NEVER use . Only certain types of glass, heatproof glass-ceramic, ceramic, ...earthenware, or other utensils, and excess spillage. This type of utensil may result in carbon monoxide poisoning and overheating of the oven. Do not heat unopened food containers; Use caution to it . Let hot grease cool before operating the griddle beneath or burners adjacent to...
...See Page 35. 4 WARNING After a spill or boil over or when the burner does not light even though the electronic igniters activate. Interior oven surfaces become hot enough to heat or warm the room. WARNING NEVER use . Only certain types of glass, heatproof glass-ceramic, ceramic, ...earthenware, or other utensils, and excess spillage. This type of utensil may result in carbon monoxide poisoning and overheating of the oven. Do not heat unopened food containers; Use caution to it . Let hot grease cool before operating the griddle beneath or burners adjacent to...
User Manual
Page 7
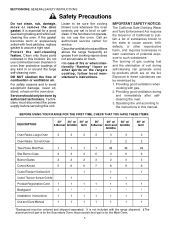
... FIRST TIME, CHECK THAT YOU HAVE THESE ITEMS: DESCRIPTION 30" 36" w/ 36" w/ 36" 48" w/ 48" w/ 4-Burner Griddle Grill 6-Burner Grill and Griddle Griddle Oven Racks Large Oven 3 3 3 3 3 3 Oven Racks 12-inch Oven 2 2 Two-Piece Broil Pan 1 1 1 1 2‡ 2‡ Star Burner Caps 4 4 4 6 4 6 Burner Grates 2 2 2 3 2 3 Control Knobs... soiled with food particles, replace gasket to the instructions in this booklet. Do not use the oven. Operating the unit according to assure a tight seal. Protect the self-cleaning feature. Service should...
... FIRST TIME, CHECK THAT YOU HAVE THESE ITEMS: DESCRIPTION 30" 36" w/ 36" w/ 36" 48" w/ 48" w/ 4-Burner Griddle Grill 6-Burner Grill and Griddle Griddle Oven Racks Large Oven 3 3 3 3 3 3 Oven Racks 12-inch Oven 2 2 Two-Piece Broil Pan 1 1 1 1 2‡ 2‡ Star Burner Caps 4 4 4 6 4 6 Burner Grates 2 2 2 3 2 3 Control Knobs... soiled with food particles, replace gasket to the instructions in this booklet. Do not use the oven. Operating the unit according to assure a tight seal. Protect the self-cleaning feature. Service should...
User Manual
Page 8
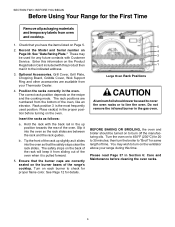
.... Hold the rack with the back rail in Section 6: Care and Maintenance before turning on the ventilator above your Thermador Dealer. 4. Tip the front of the rack up position towards the rear of the oven. Ensure that the burner caps are numbered from the bottom of time. then turn on the... will keep it from sliding out of the range's cooktop. The safety stops on to 450°F (230°C) for 20 to line the oven. The correct rack position depends on Page 39. SECTION TWO: BEFORE YOU BEGIN Before Using Your Range for the First Time Remove all packaging materials...
.... Hold the rack with the back rail in Section 6: Care and Maintenance before turning on the ventilator above your Thermador Dealer. 4. Tip the front of the rack up position towards the rear of the oven. Ensure that the burner caps are numbered from the bottom of time. then turn on the... will keep it from sliding out of the range's cooktop. The safety stops on to 450°F (230°C) for 20 to line the oven. The correct rack position depends on Page 39. SECTION TWO: BEFORE YOU BEGIN Before Using Your Range for the First Time Remove all packaging materials...

User Manual
Page 9
...included) 13. Control Knobs, Grill (1) and Griddle (1) 8. Viewing Window 12. Electric Griddle 5. Control Knobs, Standard Burners (2) 7. Oven Rack (3 included, not shown) 20. Broil Burners (2) 17. shown (Backguard ordered separately) 2. Burner Grates & Burners 3. Gas ...(4) 1 2 2 6 5 12 WARNING: To provide proper ventilation, do NOT remove range feet. 14 16 Main Gas Oven Interior 15. Oven Light and Selector Switches, Main and Secondary Ovens 10. Control Knobs, ExtraLow® Burners (2) 6. Kick Panel (Product Rating Label Located Behind Kick Panel) 14. Convection ...
...included) 13. Control Knobs, Grill (1) and Griddle (1) 8. Viewing Window 12. Electric Griddle 5. Control Knobs, Standard Burners (2) 7. Oven Rack (3 included, not shown) 20. Broil Burners (2) 17. shown (Backguard ordered separately) 2. Burner Grates & Burners 3. Gas ...(4) 1 2 2 6 5 12 WARNING: To provide proper ventilation, do NOT remove range feet. 14 16 Main Gas Oven Interior 15. Oven Light and Selector Switches, Main and Secondary Ovens 10. Control Knobs, ExtraLow® Burners (2) 6. Kick Panel (Product Rating Label Located Behind Kick Panel) 14. Convection ...

User Manual
Page 10
Oven Door 8. Oven Controls, temperature indicator 6. Viewing Window 9. Range Feet (4) 1 2 3 4 65 7 8 2 2 4 WARNING: To provide proper ventilation, do NOT remove range feet. SECTION THREE: DESCRIPTION Key for 36" Models ...and Pan Shelf, 12" Low Back or 4" Island Trim - Kick Panel (Product Rating Label Located Behind Kick Panel) 10. Control Knobs, ExtraLow® Burners (2) 4. Gas Oven Interior, Please see Page 7. 10 9 10 8 Oven Light and Selector Switches 7. shown (Backguard ordered separately) 2. Control Knobs, Standard Burners (4) 5. Burner Grates & Burners 3.
Oven Door 8. Oven Controls, temperature indicator 6. Viewing Window 9. Range Feet (4) 1 2 3 4 65 7 8 2 2 4 WARNING: To provide proper ventilation, do NOT remove range feet. SECTION THREE: DESCRIPTION Key for 36" Models ...and Pan Shelf, 12" Low Back or 4" Island Trim - Kick Panel (Product Rating Label Located Behind Kick Panel) 10. Control Knobs, ExtraLow® Burners (2) 4. Gas Oven Interior, Please see Page 7. 10 9 10 8 Oven Light and Selector Switches 7. shown (Backguard ordered separately) 2. Control Knobs, Standard Burners (4) 5. Burner Grates & Burners 3.

User Manual
Page 11
... Key for 30" Model 1. 9" Low Back (Island Trim - Control Knobs, ExtraLow® Burners (2) 4. Oven Controls, Temperature Indicator 6. Range Feet (4) 2 3 5 6 7 8 1 2 4 WARNING: 10 To provide proper ventila- Gas Oven Interior, Please see Page 7. 9 10 9 Burner Grates & Burners 3. Viewing Window 9. Oven Door 8. Oven Light and Selector Switches 7. tion, do NOT remove range feet. and Pot and Pan...
... Key for 30" Model 1. 9" Low Back (Island Trim - Control Knobs, ExtraLow® Burners (2) 4. Oven Controls, Temperature Indicator 6. Range Feet (4) 2 3 5 6 7 8 1 2 4 WARNING: 10 To provide proper ventila- Gas Oven Interior, Please see Page 7. 9 10 9 Burner Grates & Burners 3. Viewing Window 9. Oven Door 8. Oven Light and Selector Switches 7. tion, do NOT remove range feet. and Pot and Pan...

User Manual
Page 23
...• If two rack baking is done without food, affects the browning and cooking. • The type of racks in this small oven, use dark non-stick/anodized or dark, dull metal utensils or glass bakeware. Casserole dishes may require lowering the bake temperature 25°F..../ anodized or shiny metal utensils. • For brown crisp crusts, use racks #2 and #5. The use the utensil recommended in the best product. SECONDARY OVEN (48" Models) • Baking on one side may be used . • Metalbakeware(withorwithout a non-stick finish), heat-proof glass, glass-ceramic, pottery...
...• If two rack baking is done without food, affects the browning and cooking. • The type of racks in this small oven, use dark non-stick/anodized or dark, dull metal utensils or glass bakeware. Casserole dishes may require lowering the bake temperature 25°F..../ anodized or shiny metal utensils. • For brown crisp crusts, use racks #2 and #5. The use the utensil recommended in the best product. SECONDARY OVEN (48" Models) • Baking on one side may be used . • Metalbakeware(withorwithout a non-stick finish), heat-proof glass, glass-ceramic, pottery...

User Manual
Page 24
... over baked. In the convection system, a fan in covered dishes (casseroles, pot roast) or delicate custards do not benefit from circulating around the oven. The cookies will bake evenly and be placed on the inside. This allows the heated air to two minutes before the time indicated on the... or an instant read thermometer will not be saved by 25°F. Multiple racks of foods can be cooked or large quantities of the oven moves heated air evenly around the food. SECTION FIVE: USING THE COOKTOP Convection Cooking with Convection There are many advantages to Convection Baking To...
... over baked. In the convection system, a fan in covered dishes (casseroles, pot roast) or delicate custards do not benefit from circulating around the oven. The cookies will bake evenly and be placed on the inside. This allows the heated air to two minutes before the time indicated on the... or an instant read thermometer will not be saved by 25°F. Multiple racks of foods can be cooked or large quantities of the oven moves heated air evenly around the food. SECTION FIVE: USING THE COOKTOP Convection Cooking with Convection There are many advantages to Convection Baking To...

User Manual
Page 25
...moisture content of information you want (example: cakes, cookies, breads, etc.). Two Rack Baking • Racks #2 and #5 are obtained in the oven. Three Rack Baking • When several casseroles, frozen pies or cakes are to be reduced when cooking meats and poultry. See your recipe for ... racks to allow air to prevent over cooking. SECTION FIVE: USING THE COOKTOP Convection Bake TIPS FOR CONVECTION BAKE PREHEATING THE OVEN Preheat the oven before cooking any surface cooler than one rack, stagger round cake pans but cookie sheets should be placed crosswise on the rack...
...moisture content of information you want (example: cakes, cookies, breads, etc.). Two Rack Baking • Racks #2 and #5 are obtained in the oven. Three Rack Baking • When several casseroles, frozen pies or cakes are to be reduced when cooking meats and poultry. See your recipe for ... racks to allow air to prevent over cooking. SECTION FIVE: USING THE COOKTOP Convection Bake TIPS FOR CONVECTION BAKE PREHEATING THE OVEN Preheat the oven before cooking any surface cooler than one rack, stagger round cake pans but cookie sheets should be placed crosswise on the rack...
User Manual
Page 26
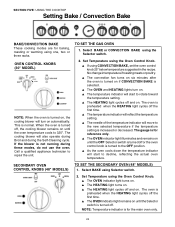
...Set Temperature using one, two or three racks. TO SET THE GAS OVEN 1. OVEN CONTROL KNOBS (30" MODEL) CLEAN NOTE: When the oven is turned on until the oven temperature cools to 325°. No change in the recipe. The oven is preheated when the HEATING light cycles off the first time. &#...off and on . ▲ The temperature indicator will start to repair the unit. This is for baking, roasting or warming using the Oven Control Knob. ▲ The OVEN indicator light turns on. ▲ The HEATING light turns on. ▲ The HEATING light cycles off , the cooling blower remains on...
...Set Temperature using one, two or three racks. TO SET THE GAS OVEN 1. OVEN CONTROL KNOBS (30" MODEL) CLEAN NOTE: When the oven is turned on until the oven temperature cools to 325°. No change in the recipe. The oven is preheated when the HEATING light cycles off the first time. &#...off and on . ▲ The temperature indicator will start to repair the unit. This is for baking, roasting or warming using the Oven Control Knob. ▲ The OVEN indicator light turns on. ▲ The HEATING light turns on. ▲ The HEATING light cycles off , the cooling blower remains on...

