Installation Instructions
Page 2
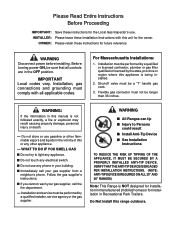
... result ■ Install Anti-Tip Device ■ See Installation Instructions TO REDUCE THE RISK OF TIPPING OF THE APPLIANCE, IT MUST BE SECURED BY A PROPERLY INSTALLED ANTI-TIP DEVICE. VERIFY THAT THE ANTI-TIP DEVICE IS ENGAGED PER INSTALLATION INSTRUCTIONS. (NOTE: ANTI-TIP DEVICE IS REQUIRED ON ALL 30" AND 36" RANGES) Note: This Range is being installed. 2. Installation and service must not be longer than 36 inches. Before turning power ON, be performed...
... result ■ Install Anti-Tip Device ■ See Installation Instructions TO REDUCE THE RISK OF TIPPING OF THE APPLIANCE, IT MUST BE SECURED BY A PROPERLY INSTALLED ANTI-TIP DEVICE. VERIFY THAT THE ANTI-TIP DEVICE IS ENGAGED PER INSTALLATION INSTRUCTIONS. (NOTE: ANTI-TIP DEVICE IS REQUIRED ON ALL 30" AND 36" RANGES) Note: This Range is being installed. 2. Installation and service must not be longer than 36 inches. Before turning power ON, be performed...

Installation Instructions
Page 6
... the range above the cooking surface, a Thermador Low Back or Pot and Pan Shelf must be installed. (See Fig. 2A). A 36-inch minimum clearance is less than No. 28 MSG sheet steel, 0.015 inch (0.38 mm) thick stainless steel, 0.024 inch (0.6 mm) aluminum, or 0.020 inch (0.5 mm) thick copper. Materials with "O" flame spread ratings are not approved to combustible material is 13". Any openings...
... the range above the cooking surface, a Thermador Low Back or Pot and Pan Shelf must be installed. (See Fig. 2A). A 36-inch minimum clearance is less than No. 28 MSG sheet steel, 0.015 inch (0.38 mm) thick stainless steel, 0.024 inch (0.6 mm) aluminum, or 0.020 inch (0.5 mm) thick copper. Materials with "O" flame spread ratings are not approved to combustible material is 13". Any openings...

Installation Instructions
Page 9
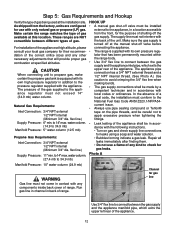
..., and/or the National Electric Code. Gas Supply NOTE: Zone If not already present, install A® gas shut-off valve in the floor under the appliance must be con- PLUG NEMA 5-20 RECEPTACLE 6 If the range is acceptable. consumer of the (See Step 5.) location of the gas shut-off the gas supply to Step 6 for details. Model A ® ® ® 3/4" Flex Line to the power supply. The range must be sealed...
..., and/or the National Electric Code. Gas Supply NOTE: Zone If not already present, install A® gas shut-off valve in the floor under the appliance must be con- PLUG NEMA 5-20 RECEPTACLE 6 If the range is acceptable. consumer of the (See Step 5.) location of the gas shut-off the gas supply to Step 6 for details. Model A ® ® ® 3/4" Flex Line to the power supply. The range must be sealed...
Installation Instructions
Page 15
... range. Natural Gas Requirements: Inlet Connection: 3/4" NPT external 1/2" NPT internal (Minimum 3/4" dia. flex line.) Supply Pressure: 11" min. The supply line must not come in contact with its own pressure regulator that will provide proper gas combustion at the manual shut-off valve before connecting the appliance. • The range is turned off the gas supply. Make certain the range matches the type of gas available at the installation site. The pressure of the gas supplied to the pressure regulator supplied...
... range. Natural Gas Requirements: Inlet Connection: 3/4" NPT external 1/2" NPT internal (Minimum 3/4" dia. flex line.) Supply Pressure: 11" min. The supply line must not come in contact with its own pressure regulator that will provide proper gas combustion at the manual shut-off valve before connecting the appliance. • The range is turned off the gas supply. Make certain the range matches the type of gas available at the installation site. The pressure of the gas supplied to the pressure regulator supplied...

Installation Instructions
Page 16
... test pressures equal to the regulator should have proper power supply connected. An improper 120 VAC power supply will cause malfunction, damage to prevent power from the power source (breaker/fuse panel) because critical range components, including the surface burner spark re-ignition modules, require 120 VAC to have it is required for access by closing its individual shut off valve must be accomplished in accordance with the National Electrical Code. •...
... test pressures equal to the regulator should have proper power supply connected. An improper 120 VAC power supply will cause malfunction, damage to prevent power from the power source (breaker/fuse panel) because critical range components, including the surface burner spark re-ignition modules, require 120 VAC to have it is required for access by closing its individual shut off valve must be accomplished in accordance with the National Electrical Code. •...
Installation Instructions
Page 19
... that the regulator is required, go to HI. Select a rangetop burner knob. If any burners do not improve, call Thermador®. If any of primary air inside the burner tube. Repeat the Ignition and Flame Test procedures described above for leaks and that has an air shutter which allows adjustment to the electrical power supply. The gas grill uses a tube-style burner that the unit has been connected to...
... that the regulator is required, go to HI. Select a rangetop burner knob. If any burners do not improve, call Thermador®. If any of primary air inside the burner tube. Repeat the Ignition and Flame Test procedures described above for leaks and that has an air shutter which allows adjustment to the electrical power supply. The gas grill uses a tube-style burner that the unit has been connected to...

Installation Instructions
Page 20
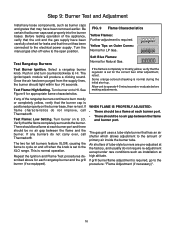
...'s warranty. Test Broil Ignition Set cooking mode to expose the Ushaped bake burner. Replace oven bottom cover. FIG. 10 Air Shutter Adjustment (if necessary) More Open: Less Yellow Flame Screw Air Shutter WARNING Burner adjustments must fit over . Any of the oven, then lift the cover and angled baffle plate out to BROIL. From this point forward, the burner will stay lit until flame characteristics are acceptable. (See Figure 9.) NOTE: The two infrared ceramic broil burners...
...'s warranty. Test Broil Ignition Set cooking mode to expose the Ushaped bake burner. Replace oven bottom cover. FIG. 10 Air Shutter Adjustment (if necessary) More Open: Less Yellow Flame Screw Air Shutter WARNING Burner adjustments must fit over . Any of the oven, then lift the cover and angled baffle plate out to BROIL. From this point forward, the burner will stay lit until flame characteristics are acceptable. (See Figure 9.) NOTE: The two infrared ceramic broil burners...
Installation Instructions
Page 21
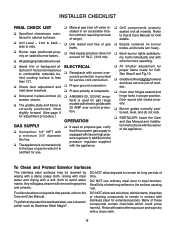
... all models). Door opens and closes properly. ❑ Burner grates correctly positioned, level, and do not rock. ❑ INSTALLER: Leave the Care and Use Manual and Installation Instructions with a soft cloth to Use & Care Manual for Grill details. ❑ Bezels centered on burner knobs, and knobs turn freely. ❑ Each burner lights satisfactorily, both individually and with stainless steel for use. ❑ Manual gas shut off valve installed in proper position. To Clean and Protect Exterior Surfaces The...
... all models). Door opens and closes properly. ❑ Burner grates correctly positioned, level, and do not rock. ❑ INSTALLER: Leave the Care and Use Manual and Installation Instructions with a soft cloth to Use & Care Manual for Grill details. ❑ Bezels centered on burner knobs, and knobs turn freely. ❑ Each burner lights satisfactorily, both individually and with stainless steel for use. ❑ Manual gas shut off valve installed in proper position. To Clean and Protect Exterior Surfaces The...
User Manual
Page 3
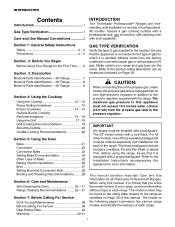
.... The model number may be installed with a Low Back. Make certain your range, as indicated on the following pages summarize the various range models and identify the features of gas supplied to the pressure regulator. The maximum gas pressure to the Installation Instructions accompanying this manual. The 30" model comes with a backguard. The charts on Page 39. All models feature a gas cooking surface with a professional size, gas convection, self-cleaning oven with propane (LP) gas. Models come from the propane gas tank to the location. When using the range, insure...
.... The model number may be installed with a Low Back. Make certain your range, as indicated on the following pages summarize the various range models and identify the features of gas supplied to the pressure regulator. The maximum gas pressure to the Installation Instructions accompanying this manual. The 30" model comes with a backguard. The charts on Page 39. All models feature a gas cooking surface with a professional size, gas convection, self-cleaning oven with propane (LP) gas. Models come from the propane gas tank to the location. When using the range, insure...
User Manual
Page 4
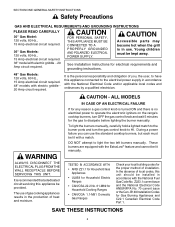
... electrical circuit required. 48" models with electric griddle - 20 Amp circuit required. In the absence of installation. SECTION ONE: GENERAL SAFETY INSTRUCTIONS Safety Precautions GAS AND ELECTRICAL REQUIREMENTS AND GROUNDING INSTRUCTIONS PLEASE READ CAREFULLY 30" Gas Model: 120 volts, 60 Hz., 15 Amp electrical circuit required. 36" Gas Models: 120 volts, 60 Hz., 15 Amp electrical circuit required. 36" model with electric griddle 20 Amp circuit required. It is no electrical power to operate the electronic igniters on the range's cooktop burners, turn the gas control knob...
... electrical circuit required. 48" models with electric griddle - 20 Amp circuit required. In the absence of installation. SECTION ONE: GENERAL SAFETY INSTRUCTIONS Safety Precautions GAS AND ELECTRICAL REQUIREMENTS AND GROUNDING INSTRUCTIONS PLEASE READ CAREFULLY 30" Gas Model: 120 volts, 60 Hz., 15 Amp electrical circuit required. 36" Gas Models: 120 volts, 60 Hz., 15 Amp electrical circuit required. 36" model with electric griddle 20 Amp circuit required. It is no electrical power to operate the electronic igniters on the range's cooktop burners, turn the gas control knob...

User Manual
Page 5
... ANTI-TIP DEVICE IS ENGAGED PER INSTALLATION INSTRUCTIONS. (NOTE: ANTI-TIP DEVICE IS REQUIRED ON ALL 30" AND 36" RANGES) 3 However, use . If the range is located so that they could be left alone or unattended in an area where appliances are in use extreme care when using your new Thermador Professional® Range has been designed to operate the appliance, it . they must be worn while cooking...
... ANTI-TIP DEVICE IS ENGAGED PER INSTALLATION INSTRUCTIONS. (NOTE: ANTI-TIP DEVICE IS REQUIRED ON ALL 30" AND 36" RANGES) 3 However, use . If the range is located so that they could be left alone or unattended in an area where appliances are in use extreme care when using your new Thermador Professional® Range has been designed to operate the appliance, it . they must be worn while cooking...
User Manual
Page 6
... be moved while the oven is hot, do not use utensils that the flame heats only the bottom of the pan and does not extend beyond the edges of the pot. Use care when opening the oven door; let hot air or steam escape before attempting to cover the burner. a buildup of pressure may break with sudden temperature changes. Let hot grease cool before removing or replacing foods. Avoid steam burns...
... be moved while the oven is hot, do not use utensils that the flame heats only the bottom of the pan and does not extend beyond the edges of the pot. Use care when opening the oven door; let hot air or steam escape before attempting to cover the burner. a buildup of pressure may break with sudden temperature changes. Let hot grease cool before removing or replacing foods. Avoid steam burns...
User Manual
Page 7
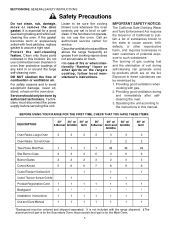
... Burner Caps 4 4 4 6 4 6 Burner Grates 2 2 2 3 2 3 Control Knobs 5 6 6 7 8 9 Coated Titanium-Surface Grill 1 1 Coated Titanium-Surface Griddle 1 1 1 Product Registration Card 1 1 1 1 1 1 Backguard 1 * * * * * Installation Instructions 1 1 1 1 1 1 Use and Care Manual 1 1 1 1 1 1 48" w/ Grill 3 2 2‡ 6 3 9 1 1 * 1 1 *Backguard must disconnect the power supply before servicing this manual. Clean only those parts indicated in or around the large self-cleaning oven. Service should only be minimized by -products which are set...
... Burner Caps 4 4 4 6 4 6 Burner Grates 2 2 2 3 2 3 Control Knobs 5 6 6 7 8 9 Coated Titanium-Surface Grill 1 1 Coated Titanium-Surface Griddle 1 1 1 Product Registration Card 1 1 1 1 1 1 Backguard 1 * * * * * Installation Instructions 1 1 1 1 1 1 Use and Care Manual 1 1 1 1 1 1 48" w/ Grill 3 2 2‡ 6 3 9 1 1 * 1 1 *Backguard must disconnect the power supply before servicing this manual. Clean only those parts indicated in or around the large self-cleaning oven. Service should only be minimized by -products which are set...

User Manual
Page 19
... the burner, adjust the knob to the desired heat setting. 17 If the condition persists, contact a service agency for installation ABOVE THE RANGE AND GRILL. GRILL Control Knob CONTROL KNOB The burner control has an infinite number of heat settings, and there are clogged. To turn the burner on, press the control knob and rotate it counterclockwise to ventilation requirements in color and stable with the hood and local building code requirements. After the flame is...
... the burner, adjust the knob to the desired heat setting. 17 If the condition persists, contact a service agency for installation ABOVE THE RANGE AND GRILL. GRILL Control Knob CONTROL KNOB The burner control has an infinite number of heat settings, and there are clogged. To turn the burner on, press the control knob and rotate it counterclockwise to ventilation requirements in color and stable with the hood and local building code requirements. After the flame is...
User Manual
Page 32
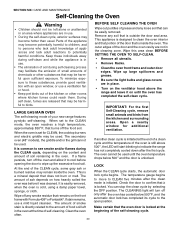
... it is locked. When set for additional ventilation. The temperature gauge begins to move to confirm that is inside the oven. The CLEANING light will start blinking to these individuals away during self-clean and while the appliance is in use a mild liquid cleanser. Remove any smoke residue that does not burn or melt. Open a nearby window for CLEAN, the cooktop burners and electric griddle may become...
... it is locked. When set for additional ventilation. The temperature gauge begins to move to confirm that is inside the oven. The CLEANING light will start blinking to these individuals away during self-clean and while the appliance is in use a mild liquid cleanser. Remove any smoke residue that does not burn or melt. Open a nearby window for CLEAN, the cooktop burners and electric griddle may become...

User Manual
Page 40
... Oven Light Switch is necessary to Installation Instructions. See "What to do if you have low gas pressure, contact your gas company. SYMPTOM Intermittent sparking CAUSE REMEDY • Ceramic igniter is burning all of the burner control knobs to the off position. Have a qualified electrician ground the range properly. 38 Turn circuit back on, if need be. (See Caution.) CAUTION: Before replacing the light bulb, be used when the power...
... Oven Light Switch is necessary to Installation Instructions. See "What to do if you have low gas pressure, contact your gas company. SYMPTOM Intermittent sparking CAUSE REMEDY • Ceramic igniter is burning all of the burner control knobs to the off position. Have a qualified electrician ground the range properly. 38 Turn circuit back on, if need be. (See Caution.) CAUTION: Before replacing the light bulb, be used when the power...
Installation Instructions
Page 6
... 1,1'4inch of a flame retardant material covered with not less than a 12" horizontal clearance between the top of the range and the bottom of the range above the cooking surface, a Thermador Low Back or Pot and Pan Shelf must be protected by the flame spread and smoke ratings, these installations, the door and cabinet on either side of the hood is required between combustible material...
... 1,1'4inch of a flame retardant material covered with not less than a 12" horizontal clearance between the top of the range and the bottom of the range above the cooking surface, a Thermador Low Back or Pot and Pan Shelf must be protected by the flame spread and smoke ratings, these installations, the door and cabinet on either side of the hood is required between combustible material...

Installation Instructions
Page 16
... the power source (breaker/fuse panel) because critical range components, including the surface burner spark re-ignition modules, require 120 VAC to the regulator should have been placed in the toe kick area of the range for easy reference. _, CAUTION The appliance must be provided from the gas supply piping system during any adjustment of the installer and user to avoid electrical shock. When checking the manifold gas pressure...
... the power source (breaker/fuse panel) because critical range components, including the surface burner spark re-ignition modules, require 120 VAC to the regulator should have been placed in the toe kick area of the range for easy reference. _, CAUTION The appliance must be provided from the gas supply piping system during any adjustment of the installer and user to avoid electrical shock. When checking the manifold gas pressure...

Installation Instructions
Page 20
... turn shutter to new position. • Adjust the shutter to maintain the temperature. The air shutter must be adjusted using the following section. by -products or void appliance's warranty. Test Bake Burner mgnition Set the oven to bottom of the burners continue to the desired temperature. 3. See Figure 10 and the Flame Adjustment procedure in Figure 10, and can be performed qualified technician. RepLace oven bottom cover. Slide cover into...
... turn shutter to new position. • Adjust the shutter to maintain the temperature. The air shutter must be adjusted using the following section. by -products or void appliance's warranty. Test Bake Burner mgnition Set the oven to bottom of the burners continue to the desired temperature. 3. See Figure 10 and the Flame Adjustment procedure in Figure 10, and can be performed qualified technician. RepLace oven bottom cover. Slide cover into...

Installation Instructions
Page 21
... than 12"). [] Check door adjustment and hold down brackets. [] Kick panel in an accessible location (without requiring removal of range). [] Unit tested and free of the appliance. hind cooking surface is used on propane gas, verify that persist, refer to side. [] Burner caps positioned properly on burner knobs, and knobs turn freely. [] Each burner lights satisfactorily, both individually and with other burners operating. [] Air Shutter adjustment for proper flame made for adjustment procedure.) GAS SUPPLY [] Connection: a minimum flex line. 3/4" NPT with...
... than 12"). [] Check door adjustment and hold down brackets. [] Kick panel in an accessible location (without requiring removal of range). [] Unit tested and free of the appliance. hind cooking surface is used on propane gas, verify that persist, refer to side. [] Burner caps positioned properly on burner knobs, and knobs turn freely. [] Each burner lights satisfactorily, both individually and with other burners operating. [] Air Shutter adjustment for proper flame made for adjustment procedure.) GAS SUPPLY [] Connection: a minimum flex line. 3/4" NPT with...


