
Installation Instructions
Page 14
... as follows: a) Place bracket on floor in position shown in Figure 7B. Step 4: Installing Anti -Tip Device 30" and 36" Ranges (Figures 7A and 7B) Thermador Service Part No. 415078 487310 Qty Description 4 Screw, Phillips, #10 x 1-1/2" 1 Anti-Tip Bracket, Floor-Mounted IMPORTANT INSTALLATION INFORMATION: •...(2) of drywall, sheet-rock or other than hardwood or metal. • Prepare holes at fastener locations as identified below: - If the range is installed, the adjustable leg will slide under the bracket. c) Later, when the unit is moved to floor or wall stud. For ...
... as follows: a) Place bracket on floor in position shown in Figure 7B. Step 4: Installing Anti -Tip Device 30" and 36" Ranges (Figures 7A and 7B) Thermador Service Part No. 415078 487310 Qty Description 4 Screw, Phillips, #10 x 1-1/2" 1 Anti-Tip Bracket, Floor-Mounted IMPORTANT INSTALLATION INFORMATION: •...(2) of drywall, sheet-rock or other than hardwood or metal. • Prepare holes at fastener locations as identified below: - If the range is installed, the adjustable leg will slide under the bracket. c) Later, when the unit is moved to floor or wall stud. For ...
User Manual
Page 3
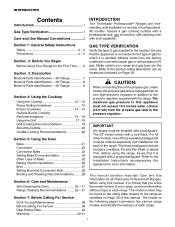
...of this manual, it is critical that the appliance is equipped with a backguard. For all Thermador Professional® Ranges. Refer to the pressure regulator supplied with a proper backguard. Ensure that you know the model number of each...inches water column (34.9 mb) from the factory certified for the First Time ...... 6 Section 3: Description Model & Parts Identification - 48" Range 7 Model & Parts Identification - 36" Range 8 Model & Parts Identification - 30" Range 9 Section 4: Using the Cooktop Using the Cooktop 10 - 12 Flame Setting Guidelines 12 Proper Cookware 13 - 14...
...of this manual, it is critical that the appliance is equipped with a backguard. For all Thermador Professional® Ranges. Refer to the pressure regulator supplied with a proper backguard. Ensure that you know the model number of each...inches water column (34.9 mb) from the factory certified for the First Time ...... 6 Section 3: Description Model & Parts Identification - 48" Range 7 Model & Parts Identification - 36" Range 8 Model & Parts Identification - 30" Range 9 Section 4: Using the Cooktop Using the Cooktop 10 - 12 Flame Setting Guidelines 12 Proper Cookware 13 - 14...
User Manual
Page 4
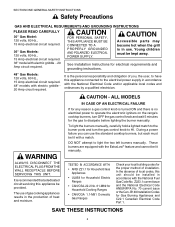
... BE CONNECTED TO A PROPERLY GROUNDED AND POLARIZED ELECTRICAL POWER SUPPLY. It is no electrical power to operate the electronic igniters on the range's cooktop burners, turn the gas control knob to HI. ALL MODELS IN CASE OF AN ELECTRICAL FAILURE If for any reason a gas...burner ports and turn OFF the gas control knob and wait 5 minutes for Gas Burning Appliances and C22.1 Canadian Electrical Code Part 1. CAUTION Accessible parts may become hot when the grill is recommended that a dedicated circuit servicing this unit should be installed in the production of installation...
... BE CONNECTED TO A PROPERLY GROUNDED AND POLARIZED ELECTRICAL POWER SUPPLY. It is no electrical power to operate the electronic igniters on the range's cooktop burners, turn the gas control knob to HI. ALL MODELS IN CASE OF AN ELECTRICAL FAILURE If for any reason a gas...burner ports and turn OFF the gas control knob and wait 5 minutes for Gas Burning Appliances and C22.1 Canadian Electrical Code Part 1. CAUTION Accessible parts may become hot when the grill is recommended that a dedicated circuit servicing this unit should be installed in the production of installation...

User Manual
Page 5
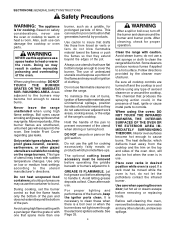
... may melt or ignite. If children are highly flammable and should never be allowed to use extreme care when using your new Thermador Professional® Range has been designed to dissipate. Some synthetic fabrics are allowed to sit or stand on fire. If children should never be a...Wait at the back of the appliance or place anything against the oven. CAUTION: Do not store items of interest to line any part of the range. Turn appliance off the gas to a qualified technician. Do not let potholders touch hot infrared burners, hot burners, or burner grates....
... may melt or ignite. If children are highly flammable and should never be allowed to use extreme care when using your new Thermador Professional® Range has been designed to dissipate. Some synthetic fabrics are allowed to sit or stand on fire. If children should never be a...Wait at the back of the appliance or place anything against the oven. CAUTION: Do not store items of interest to line any part of the range. Turn appliance off the gas to a qualified technician. Do not let potholders touch hot infrared burners, hot burners, or burner grates....
User Manual
Page 6
... to a hot surface. See Inside Front Cover regarding gas leaks. Do not heat unopened food containers; This can damage the cooktop or oven parts. The optional cutting board accessory must be hot when the oven is for proper operation. See Page 35. 4 WARNING After a spill or... boil over or when the burner does not light even though the electronic igniters activate. Clean the range with a pan larger than one that generates harmful by the cleaner manufacturer. ROUNDING AREA. More importantly, if the burner flames are smothered, unburned ...
... to a hot surface. See Inside Front Cover regarding gas leaks. Do not heat unopened food containers; This can damage the cooktop or oven parts. The optional cutting board accessory must be hot when the oven is for proper operation. See Page 35. 4 WARNING After a spill or... boil over or when the burner does not light even though the electronic igniters activate. Clean the range with a pan larger than one that generates harmful by the cleaner manufacturer. ROUNDING AREA. More importantly, if the burner flames are smothered, unburned ...
User Manual
Page 7
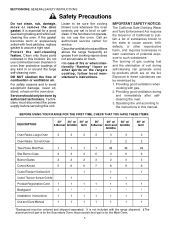
... In case of combustion or ventilation air. Providing good ventilation during self-cleaning can be ordered and shipped separately. Clean only those parts indicated in this manual. Service should only be sure the cooling blower runs whenever the oven controls are on the oven door. Listen... or when intentionally "flaming" liquor or other reporductive harm, and requires businesses to warn customers of potential exposure to broil or selfclean. BEFORE USING YOUR RANGE FOR THE FIRST TIME, CHECK THAT YOU HAVE THESE ITEMS: DESCRIPTION 30" 36" w/ 36" w/ 36" 48" w/ 48" w/ 4-Burner Griddle ...
... In case of combustion or ventilation air. Providing good ventilation during self-cleaning can be ordered and shipped separately. Clean only those parts indicated in this manual. Service should only be sure the cooling blower runs whenever the oven controls are on the oven door. Listen... or when intentionally "flaming" liquor or other reporductive harm, and requires businesses to warn customers of potential exposure to broil or selfclean. BEFORE USING YOUR RANGE FOR THE FIRST TIME, CHECK THAT YOU HAVE THESE ITEMS: DESCRIPTION 30" 36" w/ 36" w/ 36" 48" w/ 48" w/ 4-Burner Griddle ...

User Manual
Page 9
..., Standard Burners (2) 7. Oven Light and Selector Switches, Main and Secondary Ovens 10. Oven Door 11. Range Feet (4) 1 2 2 6 5 12 WARNING: To provide proper ventilation, do NOT remove range feet. 14 16 Main Gas Oven Interior 15. Oven Thermostat 18. Convection Fan Cover 15 19 21 20...13. Oven Interior Lights (2) 16. Kick Panel (Product Rating Label Located Behind Kick Panel) 14. Rack Guides 19. SECTION THREE: DESCRIPTION Model and Parts Identification Key for 48" Models 1. 22" Pot and Pan Shelf, 12" Low Back, or Island Trim - shown (Backguard ordered separately) 2. Gas...
..., Standard Burners (2) 7. Oven Light and Selector Switches, Main and Secondary Ovens 10. Oven Door 11. Range Feet (4) 1 2 2 6 5 12 WARNING: To provide proper ventilation, do NOT remove range feet. 14 16 Main Gas Oven Interior 15. Oven Thermostat 18. Convection Fan Cover 15 19 21 20...13. Oven Interior Lights (2) 16. Kick Panel (Product Rating Label Located Behind Kick Panel) 14. Rack Guides 19. SECTION THREE: DESCRIPTION Model and Parts Identification Key for 48" Models 1. 22" Pot and Pan Shelf, 12" Low Back, or Island Trim - shown (Backguard ordered separately) 2. Gas...

User Manual
Page 11
... Panel) 10. Oven Controls, Temperature Indicator 6. Gas Oven Interior, Please see Page 7. 9 10 9 and Pot and Pan Shelf ordered separately) 2. Oven Light and Selector Switches 7. Range Feet (4) 2 3 5 6 7 8 1 2 4 WARNING: 10 To provide proper ventila- Burner Grates & Burners 3. Oven Door 8. Control Knobs, Standard Burners (2) 5. SECTION THREE: DESCRIPTION Model and...
... Panel) 10. Oven Controls, Temperature Indicator 6. Gas Oven Interior, Please see Page 7. 9 10 9 and Pot and Pan Shelf ordered separately) 2. Oven Light and Selector Switches 7. Range Feet (4) 2 3 5 6 7 8 1 2 4 WARNING: 10 To provide proper ventila- Burner Grates & Burners 3. Oven Door 8. Control Knobs, Standard Burners (2) 5. SECTION THREE: DESCRIPTION Model and...
User Manual
Page 32
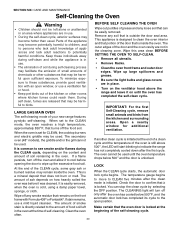
... of the oven is still above the range and leave it is directly related to clean the oven interior and that does not burn or melt. Parts of the appliance may remain inside the ...oven. To minimize exposure to indicate the range has not completely cooled down after the first cycle.... or cloth. It is easily removed, when the oven is a mineral deposit that portion of your new range features pyrolytic self-cleaning. If stain remains, use . • The elimination of food soil left alone ...
... of the oven is still above the range and leave it is directly related to clean the oven interior and that does not burn or melt. Parts of the appliance may remain inside the ...oven. To minimize exposure to indicate the range has not completely cooled down after the first cycle.... or cloth. It is easily removed, when the oven is a mineral deposit that portion of your new range features pyrolytic self-cleaning. If stain remains, use . • The elimination of food soil left alone ...

User Manual
Page 34
... wrong valve shaft. 32 Some cleaners of cleaner. Always rub metal finishes in the local markets. The omission of any part of burner cap. • Liquid cleaners: Kleen King®. • Stiff nylon bristle tooth brush to avoid marring the surface. 3.... only to avoid water marks. effectively. When rinsing is seated on a small area first. 2. SECTION SIX: CARE AND MAINTENANCE Range Cleaning WHEN CLEANING THIS RANGE: CAUTION 1. Control Knobs / Plastic Bezels / Chrome • Hot sudsy water; Use the mildest cleaning procedure Avoid cleaning any ...
... wrong valve shaft. 32 Some cleaners of cleaner. Always rub metal finishes in the local markets. The omission of any part of burner cap. • Liquid cleaners: Kleen King®. • Stiff nylon bristle tooth brush to avoid marring the surface. 3.... only to avoid water marks. effectively. When rinsing is seated on a small area first. 2. SECTION SIX: CARE AND MAINTENANCE Range Cleaning WHEN CLEANING THIS RANGE: CAUTION 1. Control Knobs / Plastic Bezels / Chrome • Hot sudsy water; Use the mildest cleaning procedure Avoid cleaning any ...


