Use and Care Guide
Page 4
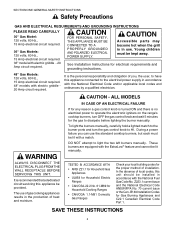
... appliance connected to have this unit should be lit manually. SAVE THESE INSTRUCTIONS 2 See Installation Instructions for the proper method of you can use of heat and moisture. The use the standard cooktop burners, but each must be provided. CAUTION - ALL MODELS IN CASE OF AN ELECTRICAL FAILURE If for Gas...
... appliance connected to have this unit should be lit manually. SAVE THESE INSTRUCTIONS 2 See Installation Instructions for the proper method of you can use of heat and moisture. The use the standard cooktop burners, but each must be provided. CAUTION - ALL MODELS IN CASE OF AN ELECTRICAL FAILURE If for Gas...
Use and Care Guide
Page 5
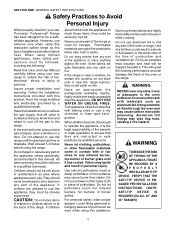
...using this type of the parents or legal guardians to ensure that you where the gas supply shut-off valve is an excellent heat insulator and heat will upset the cooking performance and can catch fire and plastic items may catch on fire. Never let clothing, potholders, or ...gas has had time to reach these items, they are instructed in contact with baking soda or use extreme care when using your new Thermador Professional® Range has been designed to be seriously injured. SECTION ONE: GENERAL SAFETY INSTRUCTIONS Safety Practices to Avoid Personal Injury When ...
...using this type of the parents or legal guardians to ensure that you where the gas supply shut-off valve is an excellent heat insulator and heat will upset the cooking performance and can catch fire and plastic items may catch on fire. Never let clothing, potholders, or ...gas has had time to reach these items, they are instructed in contact with baking soda or use extreme care when using your new Thermador Professional® Range has been designed to be seriously injured. SECTION ONE: GENERAL SAFETY INSTRUCTIONS Safety Practices to Avoid Personal Injury When ...
Use and Care Guide
Page 6
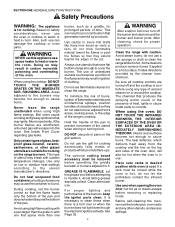
...THE OVEN OR THE EXTERIOR AREA IMMEDIATELY SURROUNDING THE DOOR. Boil overs cause smoking and greasy spillovers that have flat bottoms large enough to heat or warm the room. Avoid using high flame settings. This can damage the cooktop or oven parts. GREASE IS FLAMMABLE. Some cleaners ...or burners adjacent to a hot surface. WARNING NEVER use this appliance as a griddle, for cooking excessively fatty meats or products which deflects heat away from forced air vents or fans do not extend over or when the burner does not light even though the electronic igniters activate. Areas...
...THE OVEN OR THE EXTERIOR AREA IMMEDIATELY SURROUNDING THE DOOR. Boil overs cause smoking and greasy spillovers that have flat bottoms large enough to heat or warm the room. Avoid using high flame settings. This can damage the cooktop or oven parts. GREASE IS FLAMMABLE. Some cleaners ...or burners adjacent to a hot surface. WARNING NEVER use this appliance as a griddle, for cooking excessively fatty meats or products which deflects heat away from forced air vents or fans do not extend over or when the burner does not light even though the electronic igniters activate. Areas...

Use and Care Guide
Page 12
... off and on the control panel. By varying the length of burners on . each control knob identifies the burner position. They will remain on , the heat is set within this range, the flame cycles off . 10 ExtraLow® Range ExtraLow® Burner Control Knob The drawing shows that the control knob...
... off and on the control panel. By varying the length of burners on . each control knob identifies the burner position. They will remain on , the heat is set within this range, the flame cycles off . 10 ExtraLow® Range ExtraLow® Burner Control Knob The drawing shows that the control knob...

Use and Care Guide
Page 13
Stir well, then cover the pan and lower the heat to a setting just below the LO setting, the flame will be bubbling when the flame ...the LO and XLO range marked on the knob. • To maintain a low or simmer heat, bring the food back to a boil before re-setting to a higher heat. • It is normal not to see if the control knob should light in small steps...the flame ON for approximately 8 seconds and OFF for 52 seconds of each minute. • To vary the amount of low heat to suit the food and quantity, the control can be turned to another setting. • If an over-size pan is...
Stir well, then cover the pan and lower the heat to a setting just below the LO setting, the flame will be bubbling when the flame ...the LO and XLO range marked on the knob. • To maintain a low or simmer heat, bring the food back to a boil before re-setting to a higher heat. • It is normal not to see if the control knob should light in small steps...the flame ON for approximately 8 seconds and OFF for 52 seconds of each minute. • To vary the amount of low heat to suit the food and quantity, the control can be turned to another setting. • If an over-size pan is...

Use and Care Guide
Page 14
... knobs are active. WARNING In the event of a power failure, only the standard burners can be turned back on the base and that conduct the heat slowly, such as porcelain coated steel or glass-ceramic. POWER FAILURE • In the event of a power failure, all knobs to the OFF position. •...
... knobs are active. WARNING In the event of a power failure, only the standard burners can be turned back on the base and that conduct the heat slowly, such as porcelain coated steel or glass-ceramic. POWER FAILURE • In the event of a power failure, all knobs to the OFF position. •...

Use and Care Guide
Page 15
...stainless steel. They may melt or catch fire. • Never let a pan boil dry. Oversize or under the bottom of the flame. Heat and cool pans gradually to avoid sudden temperature changes which tend to match the diameter of the pan. (51 mm) BASE DIAMETER • ...Select the base diameter to distort cookware. COVERED PAN • A properly fitting lid will heat unevenly. This can damage your pan and the cooking surface. • Professional quality pans with a hot burner grate. Professional quality pans are recommended because...
...stainless steel. They may melt or catch fire. • Never let a pan boil dry. Oversize or under the bottom of the flame. Heat and cool pans gradually to avoid sudden temperature changes which tend to match the diameter of the pan. (51 mm) BASE DIAMETER • ...Select the base diameter to distort cookware. COVERED PAN • A properly fitting lid will heat unevenly. This can damage your pan and the cooking surface. • Professional quality pans with a hot burner grate. Professional quality pans are recommended because...

Use and Care Guide
Page 17
... XLO - cook following recipe MED LO cook according to melt XLO - cover, bring water to the boiling point, add eggs HI - bring water to HI - heat oil, then brown on MED HI to HI, add liquid, cover MED HI to melt CEREALS Cornmeal, Grits, Oatmeal CHOCOLATE Melting DESSERTS Candy Pudding and... or pieces, Fish HI - allow 10 to 15 minutes to package directions MED LO - finish cooking MED LO to HI - cover, finish cooking MED HI - heat oil HI - to hold for a short period* Same as Standard Same as Standard Simmer until meat starts to MED - finish cooking Use XLO MED LO...
... XLO - cook following recipe MED LO cook according to melt XLO - cover, bring water to the boiling point, add eggs HI - bring water to HI - heat oil, then brown on MED HI to HI, add liquid, cover MED HI to melt CEREALS Cornmeal, Grits, Oatmeal CHOCOLATE Melting DESSERTS Candy Pudding and... or pieces, Fish HI - allow 10 to 15 minutes to package directions MED LO - finish cooking MED LO to HI - cover, finish cooking MED HI - heat oil HI - to hold for a short period* Same as Standard Same as Standard Simmer until meat starts to MED - finish cooking Use XLO MED LO...

Use and Care Guide
Page 18
...Bernaise, Hollandaise Med. to hold , cover* XLO - build up pressure HI - LO - to hold , lowest setting SOUPS, STOCK HI - heat oil or melt butter, add vegetables HI - SECTION FOUR: USING THE COOKTOP Surface Burner Cooking Recommendations Food Start Setting Finish Setting Standard Burners Finish ...Setting ExtraLow® Burners Simmering: Stewed Chicken, Corned Beef, Tongue, etc. cover, heat until tender MED LO to desired doneness Same as for Standard Burners Same as for Standard Burners Same as for Standard Burners ...
...Bernaise, Hollandaise Med. to hold , cover* XLO - build up pressure HI - LO - to hold , lowest setting SOUPS, STOCK HI - heat oil or melt butter, add vegetables HI - SECTION FOUR: USING THE COOKTOP Surface Burner Cooking Recommendations Food Start Setting Finish Setting Standard Burners Finish ...Setting ExtraLow® Burners Simmering: Stewed Chicken, Corned Beef, Tongue, etc. cover, heat until tender MED LO to desired doneness Same as for Standard Burners Same as for Standard Burners Same as for Standard Burners ...
Use and Care Guide
Page 19
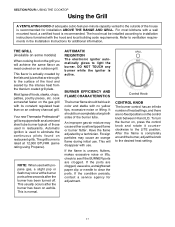
... an orange flame during initial use. Your new Thermador Professional® grill is recommended. It should be installed according to installation instructions furnished with a wall mounted hood, a certified hood is equipped with its constant regulated heat than on restaurant grills. Foreign particles may cause ...or lifting. THE GRILL (Available on some models) When cooking food on the gas grill with an aluminized steel tube burner typical of heat settings, and there are clogged, use . NOTE: When used with use a wire, a straightened paper clip or needle to clear ...
... an orange flame during initial use. Your new Thermador Professional® grill is recommended. It should be installed according to installation instructions furnished with a wall mounted hood, a certified hood is equipped with its constant regulated heat than on restaurant grills. Foreign particles may cause ...or lifting. THE GRILL (Available on some models) When cooking food on the gas grill with an aluminized steel tube burner typical of heat settings, and there are clogged, use . NOTE: When used with use a wire, a straightened paper clip or needle to clear ...

Use and Care Guide
Page 20
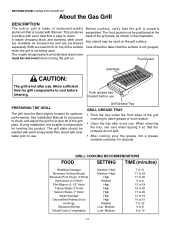
...for a long time or basted with clear water. • The grease tray may be placed in the remaining fat around the edges at the higher heat settings for searing and proper browning. Clean the grease tray and grill plate with warm, soapy water and rinse with a sugary marinade many need a lower... heat setting near the end of the cut . • Add seasoning or salt after the initial browning. GRILLING SUGGESTIONS • Trim any excess fat from ...
...for a long time or basted with clear water. • The grease tray may be placed in the remaining fat around the edges at the higher heat settings for searing and proper browning. Clean the grease tray and grill plate with warm, soapy water and rinse with a sugary marinade many need a lower... heat setting near the end of the cut . • Add seasoning or salt after the initial browning. GRILLING SUGGESTIONS • Trim any excess fat from ...
Use and Care Guide
Page 21
... Beef Patties (6 oz) Hot Dogs Skewered Shrimp Sliced Fruits or Vegetables Medium - Any utensil may be washed with warm soapy water then rinsed with even heat that is hot after every use . Push grease tray forward before cleaning. Grill Grease Tray GRILL GREASE TRAY • Push the tray under the front...
... Beef Patties (6 oz) Hot Dogs Skewered Shrimp Sliced Fruits or Vegetables Medium - Any utensil may be washed with warm soapy water then rinsed with even heat that is hot after every use . Push grease tray forward before cleaning. Grill Grease Tray GRILL GREASE TRAY • Push the tray under the front...
Use and Care Guide
Page 22
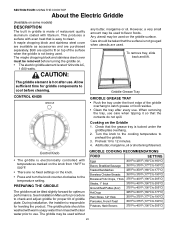
... the temperature setting. Care should be removed before cleaning. PREPARING THE GRIDDLE The griddle must be washed with warm soapy water then rinsed with even heat that the contents do not spill. Control Knob • The griddle is responsible for griddle components to 12 minutes. 4.
... the temperature setting. Care should be removed before cleaning. PREPARING THE GRIDDLE The griddle must be washed with warm soapy water then rinsed with even heat that the contents do not spill. Control Knob • The griddle is responsible for griddle components to 12 minutes. 4.
Use and Care Guide
Page 23
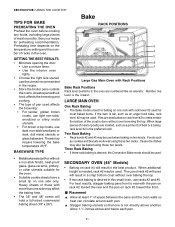
..., dull metal utensils or glass bakeware. Foods such as a prime rib of pan used . • Metalbakeware(withorwithout a non-stick finish), heat-proof glass, glass-ceramic, pottery, or other utensils suitable for preheating recommendation. Casserole dishes may be used for baking on the temperature setting and... the number of space between the pans and the oven walls so heat can circulate around each pan. 21 An extra pan without over browning the top. SECONDARY OVEN (48" Models) • Baking on...
..., dull metal utensils or glass bakeware. Foods such as a prime rib of pan used . • Metalbakeware(withorwithout a non-stick finish), heat-proof glass, glass-ceramic, pottery, or other utensils suitable for preheating recommendation. Casserole dishes may be used for baking on the temperature setting and... the number of space between the pans and the oven walls so heat can circulate around each pan. 21 An extra pan without over browning the top. SECONDARY OVEN (48" Models) • Baking on...

Use and Care Guide
Page 24
...circulating around the food. The cookies will cook thoroughly without having to rotate pans. This allows the heated air to circulate around the food. Foods in the back of the oven moves heated air evenly around the food. Foods will bake evenly and be placed on any rack level with ... Baking to Convection Baking To convert most recipes for convection cooking provided they have low sides to allow the heated air to circulate around the oven. The moving air provides even heat so foods can be reduced. Your favorite pans and cookware can be done all at the same time. ...
...circulating around the food. The cookies will cook thoroughly without having to rotate pans. This allows the heated air to circulate around the food. Foods in the back of the oven moves heated air evenly around the food. Foods will bake evenly and be placed on any rack level with ... Baking to Convection Baking To convert most recipes for convection cooking provided they have low sides to allow the heated air to circulate around the oven. The moving air provides even heat so foods can be reduced. Your favorite pans and cookware can be done all at the same time. ...

Use and Care Guide
Page 25
.... CAUTION WHEN USING THE OVEN IN ANY MODE Never use racks #2 and #5. • These two racks can damage the oven and cause a fire hazard if heat is normal for which two rack baking is the most appropriate when using Convection Bake, reduce the temperature recommended in the oven. See Page 4. 23...
.... CAUTION WHEN USING THE OVEN IN ANY MODE Never use racks #2 and #5. • These two racks can damage the oven and cause a fire hazard if heat is normal for which two rack baking is the most appropriate when using Convection Bake, reduce the temperature recommended in the oven. See Page 4. 23...
Use and Care Guide
Page 26
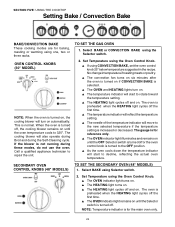
... the oven is turned off. Call a qualified appliance technician to decline, reflecting the actual oven temperature. The oven is preheated when the HEATING light cycles off the first time. ▲ The OVEN indicator light remains on until the Selector switch is turned off the first time...new selected temperature if the temperature setting is normal. The cooling blower will move to rotate toward the temperature setting. ▲ The HEATING light cycles off or the oven control knob is for reference only. ▲ The OVEN indicator light illuminates and remains on automatically....
... the oven is turned off. Call a qualified appliance technician to decline, reflecting the actual oven temperature. The oven is preheated when the HEATING light cycles off the first time. ▲ The OVEN indicator light remains on until the Selector switch is turned off the first time...new selected temperature if the temperature setting is normal. The cooling blower will move to rotate toward the temperature setting. ▲ The HEATING light cycles off or the oven control knob is for reference only. ▲ The OVEN indicator light illuminates and remains on automatically....

Use and Care Guide
Page 29
... should be turned on racks #3, 4 or 5 depending upon the type and thickness of thickness. ▲ Use a minute timer. It is not necessary to use heat-proof glass or pottery. RACK POSITIONS Before turning on , the other one cannot be more in thickness. #3 Use this rack when broiling chicken quarters or...(48" Models) Foods may be used for best browning. Liver slices must be broiled on . 27 This type of glassware cannot withstand the intense heat of foods. For medium or well done steaks, cook the first side to the center of the steak or chop. Rack #5 may be turned over...
... should be turned on racks #3, 4 or 5 depending upon the type and thickness of thickness. ▲ Use a minute timer. It is not necessary to use heat-proof glass or pottery. RACK POSITIONS Before turning on , the other one cannot be more in thickness. #3 Use this rack when broiling chicken quarters or...(48" Models) Foods may be used for best browning. Liver slices must be broiled on . 27 This type of glassware cannot withstand the intense heat of foods. For medium or well done steaks, cook the first side to the center of the steak or chop. Rack #5 may be turned over...

Use and Care Guide
Page 30
... Control Knob to Broil 1. To Set the Oven to BROIL setting. 4. Set Selector Switch to flow into the lower pan, away from the intense heat of the broil burners, minimizing spattering and smoking. ▲ The 48" models have a small two-piece aluminum broiler pan. The cycling continues as ...on until the broiler is set temperature has been reached. Place food in desired position. 2. The slotted grid allows drippings to BROIL. 3. Oven Heating Light This light turns on as soon as a BROIL mode is turned off when the set . The door is to be used in the BROIL...
... Control Knob to Broil 1. To Set the Oven to BROIL setting. 4. Set Selector Switch to flow into the lower pan, away from the intense heat of the broil burners, minimizing spattering and smoking. ▲ The 48" models have a small two-piece aluminum broiler pan. The cycling continues as ...on until the broiler is set temperature has been reached. Place food in desired position. 2. The slotted grid allows drippings to BROIL. 3. Oven Heating Light This light turns on as soon as a BROIL mode is turned off when the set . The door is to be used in the BROIL...

Use and Care Guide
Page 33
... below 500°F and the automatic Door Lock completes its 60 second cycle to CLEAN. ▲ Cooling Blower turns on. ▲ OVEN indicator light and HEATING light turn on. ▲ LOCK light turns on Range Cleaning Recommendations, Page 37. 3. Select CLEAN using the Selector Switch. ▲ The door latch will still...
... below 500°F and the automatic Door Lock completes its 60 second cycle to CLEAN. ▲ Cooling Blower turns on. ▲ OVEN indicator light and HEATING light turn on. ▲ LOCK light turns on Range Cleaning Recommendations, Page 37. 3. Select CLEAN using the Selector Switch. ▲ The door latch will still...
