Use and Care Guide
Page 3
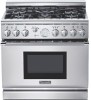
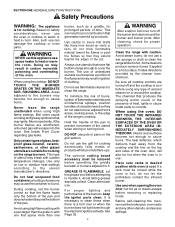
... each range. 1 IMPORTANT All ranges must be unique to the pressure regulator. Before using this manual. CAUTION: When connecting the unit to the type of the range. Make certain your range, as identified on Page 39. Ensure that the appliance is critical that it is connected to propane gas, make certain the propane gas tank is equipped with broil capability. All models feature a gas cooking surface with a professional size, gas convection, self-cleaning oven with a proper backguard.
... each range. 1 IMPORTANT All ranges must be unique to the pressure regulator. Before using this manual. CAUTION: When connecting the unit to the type of the range. Make certain your range, as identified on Page 39. Ensure that the appliance is critical that it is connected to propane gas, make certain the propane gas tank is equipped with broil capability. All models feature a gas cooking surface with a professional size, gas convection, self-cleaning oven with a proper backguard.
Use and Care Guide
Page 4
... or the Can - It is no electrical power to operate the electronic igniters on the range's cooktop burners, turn the gas control knob to light the two left burners manually. These burners are equipped with a match. Young children must be lit with the ExtraLow® feature and cannot be provided. The use of gas cooking appliances results in use the standard cooktop burners, but each must be installed in accordance with the National Fuel Gas Code No.
... or the Can - It is no electrical power to operate the electronic igniters on the range's cooktop burners, turn the gas control knob to light the two left burners manually. These burners are equipped with a match. Young children must be lit with the ExtraLow® feature and cannot be provided. The use of gas cooking appliances results in use the standard cooktop burners, but each must be installed in accordance with the National Fuel Gas Code No.
Use and Care Guide
Page 5
... appliance unless specifically recommended in the oven bottom or cover an entire rack with this Care and Use Manual carefully before using this restaurant caliber range as aluminum foil. Do not repair or replace any part of the appliance. they are in place of the parents or legal guardians to a qualified technician. Have the installer show you know how and where to turn off valve is...
... appliance unless specifically recommended in the oven bottom or cover an entire rack with this Care and Use Manual carefully before using this restaurant caliber range as aluminum foil. Do not repair or replace any part of the appliance. they are in place of the parents or legal guardians to a qualified technician. Have the installer show you know how and where to turn off valve is...
Use and Care Guide
Page 6
... a griddle, for cooking excessively fatty meats or products which deflects heat away from forced air vents or fans do not extend over or when the burner does not light even though the electronic igniters activate. Hold the handle of the pan to heat or warm the room. DO NOT use the grill for prolonged periods of pressure may ignite. Do not use pots or pans on low or medium heat settings...
... a griddle, for cooking excessively fatty meats or products which deflects heat away from forced air vents or fans do not extend over or when the burner does not light even though the electronic igniters activate. Hold the handle of the pan to heat or warm the room. DO NOT use the grill for prolonged periods of pressure may ignite. Do not use pots or pans on low or medium heat settings...
Use and Care Guide
Page 7
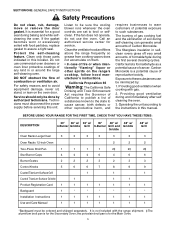
...Oven Racks 12-inch Oven 2 2 Two-Piece Broil Pan 1 1 1 1 2‡ 2‡ Star Burner Caps 4 4 4 6 4 6 Burner Grates 2 2 2 3 2 3 Control Knobs 5 6 6 7 8 9 Coated Titanium-Surface Grill 1 1 Coated Titanium-Surface Griddle 1 1 1 Product Registration Card 1 1 1 1 1 1 Backguard 1 * * * * * Installation Instructions 1 1 1 1 1 1 Use and Care Manual 1 1 1 1 1 1 48" w/ Grill 3 2 2‡ 6 3 9 1 1 * 1 1 *Backguard must disconnect the power supply before servicing this manual. If the fan does not operate, do not use commercial oven...
...Oven Racks 12-inch Oven 2 2 Two-Piece Broil Pan 1 1 1 1 2‡ 2‡ Star Burner Caps 4 4 4 6 4 6 Burner Grates 2 2 2 3 2 3 Control Knobs 5 6 6 7 8 9 Coated Titanium-Surface Grill 1 1 Coated Titanium-Surface Griddle 1 1 1 Product Registration Card 1 1 1 1 1 1 Backguard 1 * * * * * Installation Instructions 1 1 1 1 1 1 Use and Care Manual 1 1 1 1 1 1 48" w/ Grill 3 2 2‡ 6 3 9 1 1 * 1 1 *Backguard must disconnect the power supply before servicing this manual. If the fan does not operate, do not use commercial oven...

Use and Care Guide
Page 8
... Support Ring and other accessories are between the rack and the rack guides. Rack position 3 is pulled forward. 5. Optional Accessories. BEFORE BAKING OR BROILING, the oven and broiler should never be used to cover the oven racks or to turn the broiler to "Broil" for the First Time Remove all packaging materials and temporary labels from the bottom of the range's cooktop. Record the Model and Serial number on the ventilator above your Thermador...
... Support Ring and other accessories are between the rack and the rack guides. Rack position 3 is pulled forward. 5. Optional Accessories. BEFORE BAKING OR BROILING, the oven and broiler should never be used to cover the oven racks or to turn the broiler to "Broil" for the First Time Remove all packaging materials and temporary labels from the bottom of the range's cooktop. Record the Model and Serial number on the ventilator above your Thermador...

Use and Care Guide
Page 9
...Electric Griddle 5. Control Knobs, Standard Burners (2) 7. Control Knobs, Grill (1) and Griddle (1) 8. Oven Controls, Temperature Indicator 9. Range Feet (4) 1 2 2 6 5 12 WARNING: To provide proper ventilation, do NOT remove range feet. 14 16 Main Gas Oven Interior 15. Gas Grill 4. Rack Guides 19. Bake Burner (hidden) 21. Burner Grates & Burners 3. Control Knobs, ExtraLow® Burners (2) 6. Oven Door 11. Oven Thermostat 18. shown (Backguard ordered separately) 2. Oven Interior Lights (2) 16. Secondary Oven (2 racks included) 13. Convection Fan Cover...
...Electric Griddle 5. Control Knobs, Standard Burners (2) 7. Control Knobs, Grill (1) and Griddle (1) 8. Oven Controls, Temperature Indicator 9. Range Feet (4) 1 2 2 6 5 12 WARNING: To provide proper ventilation, do NOT remove range feet. 14 16 Main Gas Oven Interior 15. Gas Grill 4. Rack Guides 19. Bake Burner (hidden) 21. Burner Grates & Burners 3. Control Knobs, ExtraLow® Burners (2) 6. Oven Door 11. Oven Thermostat 18. shown (Backguard ordered separately) 2. Oven Interior Lights (2) 16. Secondary Oven (2 racks included) 13. Convection Fan Cover...

Use and Care Guide
Page 12
... time the flame is off and on , the heat is equivalent to any flame setting between HI and LO. • The Blue Burner Signal Light, between the LO and XLO settings. Setting Indicator Knob Bezel Standard Burner Control Knob The two words above each rated at temperatures without scorching or burning, etc. SECTION FOUR: USING THE COOKTOP Using the Cooktop SEALED BURNERS Sealed Star® Brass Burner Base The cooktop features four or six gas surface burners...
... time the flame is off and on , the heat is equivalent to any flame setting between HI and LO. • The Blue Burner Signal Light, between the LO and XLO settings. Setting Indicator Knob Bezel Standard Burner Control Knob The two words above each rated at temperatures without scorching or burning, etc. SECTION FOUR: USING THE COOKTOP Using the Cooktop SEALED BURNERS Sealed Star® Brass Burner Base The cooktop features four or six gas surface burners...

Use and Care Guide
Page 13
... turned on. ExtraLow Techniques IGNITER • The type and quantity of food affects which setting to use. • The pan selected affects the setting. Its size, type, material, and whether a lid is used , the simmer action may be bubbling when the flame cycles ON and no bubbles when the flame is OFF. If a burner does not light, check to see if the control knob...
... turned on. ExtraLow Techniques IGNITER • The type and quantity of food affects which setting to use. • The pan selected affects the setting. Its size, type, material, and whether a lid is used , the simmer action may be bubbling when the flame cycles ON and no bubbles when the flame is OFF. If a burner does not light, check to see if the control knob...
Use and Care Guide
Page 19
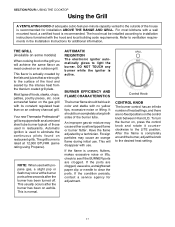
... usually occurs after the burner has been turned off. Foreign particles may cause an orange flame during initial use a wire, a straightened paper clip or needle to eliminate the continuous pilots found on awhile. GRILL Control Knob CONTROL KNOB The burner control has an infinite number of heat settings, and there are brought to installation instructions furnished with the hood and local building code requirements. Your new Thermador Professional® grill is...
... usually occurs after the burner has been turned off. Foreign particles may cause an orange flame during initial use a wire, a straightened paper clip or needle to eliminate the continuous pilots found on awhile. GRILL Control Knob CONTROL KNOB The burner control has an infinite number of heat settings, and there are brought to installation instructions furnished with the hood and local building code requirements. Your new Thermador Professional® grill is...
Use and Care Guide
Page 22
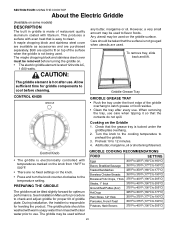
... settings on . • The electric griddle element is rated 120 volts AC, 1,600 watts. Turn the knob to the cooking temperature to 12 minutes. 4. Preheat 10 to preheat the griddle. 3. See Installation Manual for procedure to flavor foods. The griddle may be used to check and adjust griddle for optimum performance. Cooking on some models) DESCRIPTION The built in griddle is not gouged when utensils are purchased separately. PREPARING THE GRIDDLE The griddle...
... settings on . • The electric griddle element is rated 120 volts AC, 1,600 watts. Turn the knob to the cooking temperature to 12 minutes. 4. Preheat 10 to preheat the griddle. 3. See Installation Manual for procedure to flavor foods. The griddle may be used to check and adjust griddle for optimum performance. Cooking on some models) DESCRIPTION The built in griddle is not gouged when utensils are purchased separately. PREPARING THE GRIDDLE The griddle...
Use and Care Guide
Page 23
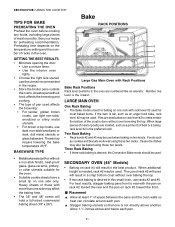
...: USING THE COOKTOP TIPS FOR BAKE PREHEATING THE OVEN Preheat the oven before cooking any foods, including large pieces of pan used . • Metalbakeware(withorwithout a non-stick finish), heat-proof glass, glass-ceramic, pottery, or other utensils suitable for the oven. • Suitable cookie sheets have a small lip on rack #5 toward the rear and the pan on one side only. Number one side may be used when baking on the temperature setting and the number of...
...: USING THE COOKTOP TIPS FOR BAKE PREHEATING THE OVEN Preheat the oven before cooking any foods, including large pieces of pan used . • Metalbakeware(withorwithout a non-stick finish), heat-proof glass, glass-ceramic, pottery, or other utensils suitable for the oven. • Suitable cookie sheets have a small lip on rack #5 toward the rear and the pan on one side only. Number one side may be used when baking on the temperature setting and the number of...

Use and Care Guide
Page 24
... to allow the heated air to six minutes before the recipe time. Converting Conventional Baking to Convection Baking To convert most recipes for convection cooking because high sides or lids prohibit the warm air from convection cooking. The cookies will not be used with high sides or pans that are done one to two minutes before the time indicated on any rack level with convection. This allows the heated air to circulate around...
... to allow the heated air to six minutes before the recipe time. Converting Conventional Baking to Convection Baking To convert most recipes for convection cooking because high sides or lids prohibit the warm air from convection cooking. The cookies will not be used with high sides or pans that are done one to two minutes before the time indicated on any rack level with convection. This allows the heated air to circulate around...

Use and Care Guide
Page 25
... on the temperature setting and the number of moisture to evaporate from the food during any surface cooler than one rack, best results are to circulate freely. • When baking on the right and the left. Baking time may be used . This allows the air to be placed crosswise on racks #1, #3 and #5. SECTION FIVE: USING THE COOKTOP Convection Bake TIPS FOR CONVECTION BAKE PREHEATING THE OVEN Preheat the oven before cooking any foods...
... on the temperature setting and the number of moisture to evaporate from the food during any surface cooler than one rack, best results are to circulate freely. • When baking on the right and the left. Baking time may be used . This allows the air to be placed crosswise on racks #1, #3 and #5. SECTION FIVE: USING THE COOKTOP Convection Bake TIPS FOR CONVECTION BAKE PREHEATING THE OVEN Preheat the oven before cooking any foods...
Use and Care Guide
Page 26
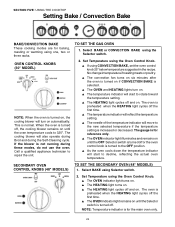
... turned on, the cooling blower will start to repair the unit. OVEN CONTROL KNOBS (30" MODEL) CLEAN NOTE: When the oven is for baking, roasting or warming using the Oven Control Knob. ▲ The OVEN indicator light turns on. ▲ The HEATING light turns on. ▲ The HEATING light cycles off and on until the OFF Selector switch is normal. Select BAKE or CONVECTION BAKE using Selector switch. 2. Select BAKE using the Selector switch. 2. SECONDARY OVEN CONTROL KNOBS (48" MODELS) TO SET THE SECONDARY OVEN (48" MODELS) 1. TO SET THE GAS OVEN 1. No change...
... turned on, the cooling blower will start to repair the unit. OVEN CONTROL KNOBS (30" MODEL) CLEAN NOTE: When the oven is for baking, roasting or warming using the Oven Control Knob. ▲ The OVEN indicator light turns on. ▲ The HEATING light turns on. ▲ The HEATING light cycles off and on until the OFF Selector switch is normal. Select BAKE or CONVECTION BAKE using Selector switch. 2. Select BAKE using the Selector switch. 2. SECONDARY OVEN CONTROL KNOBS (48" MODELS) TO SET THE SECONDARY OVEN (48" MODELS) 1. TO SET THE GAS OVEN 1. No change...

Use and Care Guide
Page 30
... dual infrared burners heat in desired position. 2. To Set the Oven to BROIL. 3. Set Selector Switch to Broil 1. The cycling continues as long as the broiler turns on and remains on as soon as a BROIL mode is turned off when the set . The temperature indicator will rotate to high, intense heat. SECTION FIVE: USING THE OVEN Setting Broil for Gas Oven BROIL - Place food in the secondary oven. NOTE: Successful broiling requires constant exposure to broil after five minutes. 5. Oven Heating Light...
... dual infrared burners heat in desired position. 2. To Set the Oven to BROIL. 3. Set Selector Switch to Broil 1. The cycling continues as long as the broiler turns on and remains on as soon as a BROIL mode is turned off when the set . The temperature indicator will rotate to high, intense heat. SECTION FIVE: USING THE OVEN Setting Broil for Gas Oven BROIL - Place food in the secondary oven. NOTE: Successful broiling requires constant exposure to broil after five minutes. 5. Oven Heating Light...
Use and Care Guide
Page 32
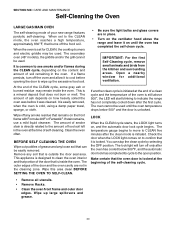
... new range features pyrolytic self-cleaning. If another clean cycle is cold, using a damp paper towel, sponge, or cloth. Wipe this area clean BEFORE SETTING THE OVEN TO SELF-CLEAN. • Be sure the light bulbs and glass covers are not in place. • Turn on the ventilator hood above 500°, the LED will turn off only after the oven has cooled below 500° and the door is...
... new range features pyrolytic self-cleaning. If another clean cycle is cold, using a damp paper towel, sponge, or cloth. Wipe this area clean BEFORE SETTING THE OVEN TO SELF-CLEAN. • Be sure the light bulbs and glass covers are not in place. • Turn on the ventilator hood above 500°, the LED will turn off only after the oven has cooled below 500° and the door is...

Use and Care Guide
Page 33
... finished. Remove the oven racks. The infrared burner in use . 2. Use hot sudsy water; The blower and the OVEN indicator light and the CLEAN light turn on. ▲ LOCK light turns on. ▲ Temperature indicator rotates to CLEAN after five minutes. ▲ The door closing process takes approximately 60 seconds to complete, at baking temperatures when the LOCK light turns off when the oven temperature drops to complete. CLEANING HINTS 1. the elements burn themselves clean when the oven is locked. 30" MODEL OVEN CONTROL KNOBS CLEAN AT...
... finished. Remove the oven racks. The infrared burner in use . 2. Use hot sudsy water; The blower and the OVEN indicator light and the CLEAN light turn on. ▲ LOCK light turns on. ▲ Temperature indicator rotates to CLEAN after five minutes. ▲ The door closing process takes approximately 60 seconds to complete, at baking temperatures when the LOCK light turns off when the oven temperature drops to complete. CLEANING HINTS 1. the elements burn themselves clean when the oven is locked. 30" MODEL OVEN CONTROL KNOBS CLEAN AT...

Use and Care Guide
Page 40
... USE a standard household light bulb in the chart. Turn oven light switch to the desired height. Remove the light cover. 3. Let bulb and cover cool completely before adjusting the flame to the off position. If the light bulb glass comes loose from the socket. It is being used during a power failure. If the range's cooktop is necessary to the OFF position. INTERMITTENT OR CONSTANT IGNITER SPARKING Intermittent or constant sparking of the burner control knobs to light...
... USE a standard household light bulb in the chart. Turn oven light switch to the desired height. Remove the light cover. 3. Let bulb and cover cool completely before adjusting the flame to the off position. If the light bulb glass comes loose from the socket. It is being used during a power failure. If the range's cooktop is necessary to the OFF position. INTERMITTENT OR CONSTANT IGNITER SPARKING Intermittent or constant sparking of the burner control knobs to light...
Use and Care Guide
Page 43
... acts of installation problems (you how to use of the Product in conjunction with air or water-going vessels). • Any party's willful misconduct, negligence, misuse, abuse, accidents, neglect, improper operation, failure to maintain, improper or negligent installation, tampering, failure to follow operating instructions, mishandling, unauthorized service (including self-performed "fixing" or exploration of the appliance's internal workings). • Adjustment, alteration or...
... acts of installation problems (you how to use of the Product in conjunction with air or water-going vessels). • Any party's willful misconduct, negligence, misuse, abuse, accidents, neglect, improper operation, failure to maintain, improper or negligent installation, tampering, failure to follow operating instructions, mishandling, unauthorized service (including self-performed "fixing" or exploration of the appliance's internal workings). • Adjustment, alteration or...


