Installation Instructions
Page 4
... DEFINITIONS Safety 3 Important safety instructions 3 Installation instructions 6 Planning information 6 Ventilation requirements 6 Installation clearances 7 Gas and electric locations 12 Unpacking and moving the range 13 Installing the anti-tip bracket (required 14 Gas requirements and hookup 15 Electrical requirements and connection for GAS models 16 Electrical requirements and connection for DUAL FUEL models 17 Backguard installation 19 Door removal and adjustment 20 Placing and leveling the range 21 Data rating label 22 Burner test 22 Installer checklist 25 Final check...
... DEFINITIONS Safety 3 Important safety instructions 3 Installation instructions 6 Planning information 6 Ventilation requirements 6 Installation clearances 7 Gas and electric locations 12 Unpacking and moving the range 13 Installing the anti-tip bracket (required 14 Gas requirements and hookup 15 Electrical requirements and connection for GAS models 16 Electrical requirements and connection for DUAL FUEL models 17 Backguard installation 19 Door removal and adjustment 20 Placing and leveling the range 21 Data rating label 22 Burner test 22 Installer checklist 25 Final check...
Installation Instructions
Page 5
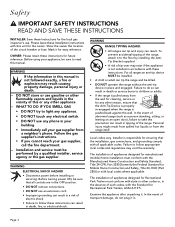
... that the installation, gas connections, and grounding comply with all ranges an anti-tip device MUST be installed. • A child or adult can result in your building. • Immediately call your gas supplier, call the fire department. -- WARNING ELECTRICAL SHOCK HAZARD • Disconnect power before installing or servicing. For all applicable codes. In the event of the circuit breaker or fuse. Safety 9 IMPORTANT SAFETY INSTRUCTIONS READ...
... that the installation, gas connections, and grounding comply with all ranges an anti-tip device MUST be installed. • A child or adult can result in your building. • Immediately call your gas supplier, call the fire department. -- WARNING ELECTRICAL SHOCK HAZARD • Disconnect power before installing or servicing. For all applicable codes. In the event of the circuit breaker or fuse. Safety 9 IMPORTANT SAFETY INSTRUCTIONS READ...
Installation Instructions
Page 6
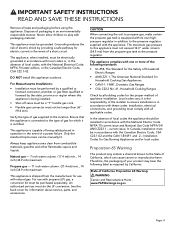
... and National Gas Code NFPA 54/ ANSI Z223.1 - The maximum gas pressure to the type of gas for use with propane (LP) gas, a conversion kit must not be performed by a qualified or licensed contractor, plumber or gas fitter qualified or licensed by California: State of being installed. • Shut-off valve must be a "T" handle gas cock. • Flexible gas connector must be in accordance with natural gas. Installation, electrical connections, and grounding...
... and National Gas Code NFPA 54/ ANSI Z223.1 - The maximum gas pressure to the type of gas for use with propane (LP) gas, a conversion kit must not be performed by a qualified or licensed contractor, plumber or gas fitter qualified or licensed by California: State of being installed. • Shut-off valve must be a "T" handle gas cock. • Flexible gas connector must be in accordance with natural gas. Installation, electrical connections, and grounding...
Installation Instructions
Page 8
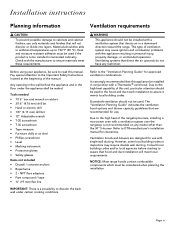
... finishes that direct the air upwards do not have any model other than the 30'' 5-burner. Installation instructions Planning information Ventilation requirements 9 CAUTION To prevent possible damage to cabinets and cabinet finishes, use with single wall ducting. Check with a Thermador® vent hood. Ventilating systems that will meet these requirements. 9 WARNING This appliance should be paid to the hood and duct work installation to assure...
... finishes that direct the air upwards do not have any model other than the 30'' 5-burner. Installation instructions Planning information Ventilation requirements 9 CAUTION To prevent possible damage to cabinets and cabinet finishes, use with single wall ducting. Check with a Thermador® vent hood. Ventilating systems that will meet these requirements. 9 WARNING This appliance should be paid to the hood and duct work installation to assure...

Installation Instructions
Page 9
... clearance from non-combustible materials are required. A Thermador low backguard must be installed 30'' (762 mm) above the cooking surface. 3. Refer to the high heat of 3'' (76 mm) on any combustible materials (i.e. The level of the range top must be 13" (330 mm). • Wall cabinets within the zones shown in the "Gas and electric locations" section. • The shaded area behind...
... clearance from non-combustible materials are required. A Thermador low backguard must be installed 30'' (762 mm) above the cooking surface. 3. Refer to the high heat of 3'' (76 mm) on any combustible materials (i.e. The level of the range top must be 13" (330 mm). • Wall cabinets within the zones shown in the "Gas and electric locations" section. • The shaded area behind...
Installation Instructions
Page 18
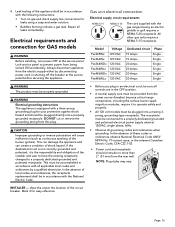
... circuit breaker. Mark it to operate safely and properly. • All 120 volt models must be connected to a properly dedicated grounded and polarized receptacle. Repair all controls are in accordance with the gas ranges having an electric griddle or grill requires a NEMA 5-20 receptacle. INSTALLER - 4. show the owner the location of the installer and user to have the existing receptacle changed to a properly dedicated grounded and polarized electrical power supply rated...
... circuit breaker. Mark it to operate safely and properly. • All 120 volt models must be connected to a properly dedicated grounded and polarized receptacle. Repair all controls are in accordance with the gas ranges having an electric griddle or grill requires a NEMA 5-20 receptacle. INSTALLER - 4. show the owner the location of the installer and user to have the existing receptacle changed to a properly dedicated grounded and polarized electrical power supply rated...
Installation Instructions
Page 24
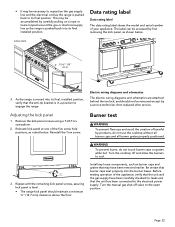
... creation of your appliance. Be certain that may have been carefully checked for leaks and that the anti-tip bracket is moved into the burner bases. Page. 22 Turn the manual gas shut-off and allow the burners to the open position. As the range is in a position to the electrical power supply. Electric wiring diagrams and schematics The electric wiring diagrams and schematics are attached behind the toe kick, and should maintain...
... creation of your appliance. Be certain that may have been carefully checked for leaks and that the anti-tip bracket is moved into the burner bases. Page. 22 Turn the manual gas shut-off and allow the burners to the open position. As the range is in a position to the electrical power supply. Electric wiring diagrams and schematics The electric wiring diagrams and schematics are attached behind the toe kick, and should maintain...
Installation Instructions
Page 27
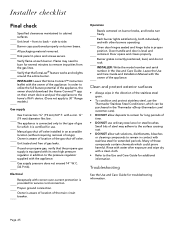
... the Home Connect™ instruction leaflet with its own high pressure regulator in addition to remain in place and screws secure. with other burners operating. Troubleshooting See the Use and Care Guide for several minutes to 30'' Range models.) Gas supply Gas Connection: ¾'' (19 mm) N.P.T. Verify that the propane gas supply is aware of location of the gas shut-off valve installed in an accessible location (without requiring removal of time. • DO NOT use the Thermador Stainless Steel...
... the Home Connect™ instruction leaflet with its own high pressure regulator in addition to remain in place and screws secure. with other burners operating. Troubleshooting See the Use and Care Guide for several minutes to 30'' Range models.) Gas supply Gas Connection: ¾'' (19 mm) N.P.T. Verify that the propane gas supply is aware of location of the gas shut-off valve installed in an accessible location (without requiring removal of time. • DO NOT use the Thermador Stainless Steel...
Instructions for Use
Page 8
... part of gas supplied to HI. water column (27.4 mb) min., 14 in. (34.9 mb) maximum Verify the type of the appliance unless specifically recommended in this product. Refer to light the XLO® burners manually. Wait at service panel and lock service panel. During a power failure, you can use the appliance until the operation of the converted appliance is being switched on the burners, turn the gas control knob to the location...
... part of gas supplied to HI. water column (27.4 mb) min., 14 in. (34.9 mb) maximum Verify the type of the appliance unless specifically recommended in this product. Refer to light the XLO® burners manually. Wait at service panel and lock service panel. During a power failure, you can use the appliance until the operation of the converted appliance is being switched on the burners, turn the gas control knob to the location...
Instructions for Use
Page 9
... reach these items, they are located so you where the electric circuit breaker and the gas supply shut off valve are instructed in use . This can cause cancer or reproductive harm. Always disconnect the electrical plug from non-combustible materials are not part of the ANSI Z21.1 scope and are not certified by California: State of Household Electric Ranges • ANSI Z21.1, The American...
... reach these items, they are located so you where the electric circuit breaker and the gas supply shut off valve are instructed in use . This can cause cancer or reproductive harm. Always disconnect the electrical plug from non-combustible materials are not part of the ANSI Z21.1 scope and are not certified by California: State of Household Electric Ranges • ANSI Z21.1, The American...
Instructions for Use
Page 11
... operating the griddle or any type of time. The vent is a boil over , turn off and the appliance is hot. Avoid steam burns; Use only on or around the burner and burner ports. GREASE IS FLAMMABLE. WARNING During cooking, set the burner control so that may break with caution. For proper lighting and performance of the appliance. Also, if the burner flames and igniter are turned off the burner...
... operating the griddle or any type of time. The vent is a boil over , turn off and the appliance is hot. Avoid steam burns; Use only on or around the burner and burner ports. GREASE IS FLAMMABLE. WARNING During cooking, set the burner control so that may break with caution. For proper lighting and performance of the appliance. Also, if the burner flames and igniter are turned off the burner...
Instructions for Use
Page 12
... the self-cleaning feature. If a rack must be installed with materials such as the alcohol vapors may also trap heat, causing a fire hazard. Use care when opening the oven door; Please note that those parts indicated in this appliance. Use caution when cooking foods with food particles, replace gasket to cool. Alcohol evaporates at high temperatures. It is hot, do not let the potholders contact the broiler element. The use , do...
... the self-cleaning feature. If a rack must be installed with materials such as the alcohol vapors may also trap heat, causing a fire hazard. Use care when opening the oven door; Please note that those parts indicated in this appliance. Use caution when cooking foods with food particles, replace gasket to cool. Alcohol evaporates at high temperatures. It is hot, do not let the potholders contact the broiler element. The use , do...
Instructions for Use
Page 18
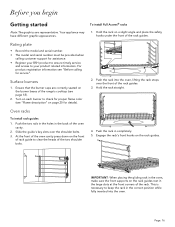
... rack guide to keep the rack in completely. 5. Turn on each burner to your BSH product to ensure timely service and access to check for proper flame color (see page 18). 2. Hold the rack straight. Surface burners 1. At the front of the oven cavity press down on the front of the two shoulder bolts. 4. To install Full Access® racks 1. Before you begin Getting started...
... rack guide to keep the rack in completely. 5. Turn on each burner to your BSH product to ensure timely service and access to check for proper flame color (see page 18). 2. Hold the rack straight. Surface burners 1. At the front of the oven cavity press down on the front of the two shoulder bolts. 4. To install Full Access® racks 1. Before you begin Getting started...

Instructions for Use
Page 19
... the recipe and the cooking mode. • The rack positions are numbered from the oven vent. Initial start-up to broil for 20 to self-clean (select models). then turn the broiler to allow stop into rack guide. Turn the oven on the oven. Remove oven racks. 3. It is the most frequently used . The fan can be heard when it is running, and warm air may be felt as it is opened. Oven operation 9 WARNING To help prevent...
... the recipe and the cooking mode. • The rack positions are numbered from the oven vent. Initial start-up to broil for 20 to self-clean (select models). then turn the broiler to allow stop into rack guide. Turn the oven on the oven. Remove oven racks. 3. It is the most frequently used . The fan can be heard when it is running, and warm air may be felt as it is opened. Oven operation 9 WARNING To help prevent...
Instructions for Use
Page 33
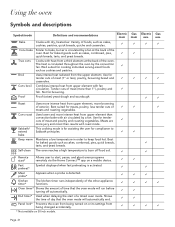
... descriptions Symbol/mode Definitions and recommendations Electric Gas Electric Gas main main aux. Not for compliance to extend Sabbath principles. bake Keep warm Maintains a low temperature in order to keep food hot. Sabbath/ This cooking mode is circulated by a fan at the back of day that the oven mode will automatically end. Panel lock* Prevents the oven from being turned on or its settings from being changed accidentally...
... descriptions Symbol/mode Definitions and recommendations Electric Gas Electric Gas main main aux. Not for compliance to extend Sabbath principles. bake Keep warm Maintains a low temperature in order to keep food hot. Sabbath/ This cooking mode is circulated by a fan at the back of day that the oven mode will automatically end. Panel lock* Prevents the oven from being turned on or its settings from being changed accidentally...
Instructions for Use
Page 39
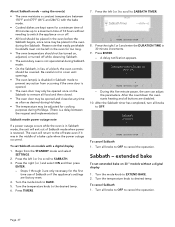
... to cancel the operation. After the countdown the oven starts heating and all knobs to OFF to SABBATH. 3. Turn the temperature knob to BAKE. 5. Please note that easily perishable foodstuffs must not be left in the oven for too long. • The oven temperature should be turned on models with the bake mode. • Cooked dishes are kept warm for the first time use of a bake cycle when the power outage occurred. The...
... to cancel the operation. After the countdown the oven starts heating and all knobs to OFF to SABBATH. 3. Turn the temperature knob to BAKE. 5. Please note that easily perishable foodstuffs must not be left in the oven for too long. • The oven temperature should be turned on models with the bake mode. • Cooked dishes are kept warm for the first time use of a bake cycle when the power outage occurred. The...
Instructions for Use
Page 41
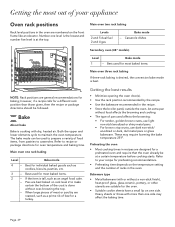
... general recommendations for oven temperature and baking time. Bake About bake Bake is cooking with or without a non-stick finish), heat-proof glass, glass-ceramic, pottery, or other utensils are suitable for the oven. • Suitable cookie sheets have a small lip on one level is the lowest and number five level is at a certain temperature before cooking starts. The bake mode can be used for most baked items. 2 -- Refer to recipe or package directions for baking; Main oven...
... general recommendations for oven temperature and baking time. Bake About bake Bake is cooking with or without a non-stick finish), heat-proof glass, glass-ceramic, pottery, or other utensils are suitable for the oven. • Suitable cookie sheets have a small lip on one level is the lowest and number five level is at a certain temperature before cooking starts. The bake mode can be used for most baked items. 2 -- Refer to recipe or package directions for baking; Main oven...
Instructions for Use
Page 52
... the user tries to enable a self-clean function in an oven where the self-clean function has been restricted, the oven lights will be wiped up and not allowed to set end time of this appliance • Use the mildest cleaning procedure that will open automatically when the oven is shut. 2. After the information text, press ENTER. Turn the mode knob to SELF CLEAN and the temperature knob to SELF CLEAN. 3. The door latch will do not require cleaning...
... the user tries to enable a self-clean function in an oven where the self-clean function has been restricted, the oven lights will be wiped up and not allowed to set end time of this appliance • Use the mildest cleaning procedure that will open automatically when the oven is shut. 2. After the information text, press ENTER. Turn the mode knob to SELF CLEAN and the temperature knob to SELF CLEAN. 3. The door latch will do not require cleaning...
Instructions for Use
Page 57
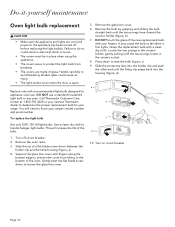
... screw driver between the holder clip and the lamp housing (figure, a). 4. Broken glass could result in electrical shock or burns. • The covers must be in place when using the appliance. • The covers serve to protect the light bulb from falling to the appliance has been turned off circuit breaker. 2. Call Thermador Customer Care Center at 1-800-735-4328 or your range's model number and serial number. Locate...
... screw driver between the holder clip and the lamp housing (figure, a). 4. Broken glass could result in electrical shock or burns. • The covers must be in place when using the appliance. • The covers serve to protect the light bulb from falling to the appliance has been turned off circuit breaker. 2. Call Thermador Customer Care Center at 1-800-735-4328 or your range's model number and serial number. Locate...
Instructions for Use
Page 58
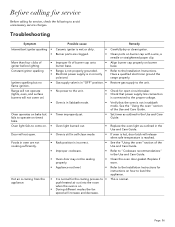
... gas supply to the Installation Instructions for instructions on burner base. Range will not operate (lights, oven, and surface burners will increase and decrease. range properly. Hot air is coming from the appliance. • It is normal for the cooling process to the proper voltage. • Oven is in Sabbath mode. • Verify that the oven is not in self-clean mode. • If oven is hot, door latch will not open circuit breaker. • Check that power supply line connection is connected...
... gas supply to the Installation Instructions for instructions on burner base. Range will not operate (lights, oven, and surface burners will increase and decrease. range properly. Hot air is coming from the appliance. • It is normal for the cooling process to the proper voltage. • Oven is in Sabbath mode. • Verify that the oven is not in self-clean mode. • If oven is hot, door latch will not open circuit breaker. • Check that power supply line connection is connected...


