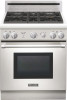
Design Guide - Pro Harmony Ranges
Page 5
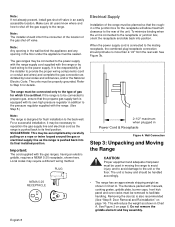
.... Installation, electrical and gas connections, and grounding must be connected to a 120V AC, 60 Hz, single-phase power supply. to 14" max. Before installing a Thermador Pro Harmony Range, be connected to either 208/240V AC, 60 Hz, 4 wire, single-phase power supply. MODEL PRD304GHu PRD364GDHu PRD366GHu...NEMA 5-20 receptacle as shown here. A dedicated circuit breaker is properly installed and grounded by qualified service personnel only. MODEL PRG304GH PRL304GH PRG366GH PRL366GH PRG364GDH PRL364GDH REQuiRED ciRcuiT BREAkER 120V AC, 60 Hz 15 Amp 15 Amp 15 Amp 15 Amp 20 Amp 20 ...
.... Installation, electrical and gas connections, and grounding must be connected to a 120V AC, 60 Hz, single-phase power supply. to 14" max. Before installing a Thermador Pro Harmony Range, be connected to either 208/240V AC, 60 Hz, 4 wire, single-phase power supply. MODEL PRD304GHu PRD364GDHu PRD366GHu...NEMA 5-20 receptacle as shown here. A dedicated circuit breaker is properly installed and grounded by qualified service personnel only. MODEL PRG304GH PRL304GH PRG366GH PRL366GH PRG364GDH PRL364GDH REQuiRED ciRcuiT BREAkER 120V AC, 60 Hz 15 Amp 15 Amp 15 Amp 15 Amp 20 Amp 20 ...
Installation Instructions
Page 2
... Gas Requirements and Hookup 11 Step 6: Electrical Requirements, Connection & Grounding 12 Step 7: Backguard Installation 13 Step 8: Door Removal and Reinstallation 14 Step 9: Placing and Leveling the Range 15 Step 10: Burner Test and Adjustment 17 Installer Checklist 18 To Clean and Protect Exterior Surfaces ...18 This Thermador Appliance is made by BSH Home Appliances Corporation 5551 McFadden Ave. Huntington Beach, CA 92649 Questions? 1-800-735-4328 www.thermador.com We look forward to hearing from you!
... Gas Requirements and Hookup 11 Step 6: Electrical Requirements, Connection & Grounding 12 Step 7: Backguard Installation 13 Step 8: Door Removal and Reinstallation 14 Step 9: Placing and Leveling the Range 15 Step 10: Burner Test and Adjustment 17 Installer Checklist 18 To Clean and Protect Exterior Surfaces ...18 This Thermador Appliance is made by BSH Home Appliances Corporation 5551 McFadden Ave. Huntington Beach, CA 92649 Questions? 1-800-735-4328 www.thermador.com We look forward to hearing from you!
Installation Instructions
Page 4
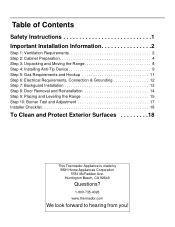
... 12" clearance, an optional stainless steel Island Trim is available to combustible surfaces specified in the Cabinet Preparation instructions on page 14, for the correct backguard models that are recommended for use it meets local building codes. Installation, electrical connections and grounding must...codes the appliance should be paid to the hood and duct work installation to Step 5 on safety considerations, never use with all Thermador ranges. 1. This appliance has been tested in accordance with ANSI Z21.1, Standard for Household Cooking Appliances (USA) and in accordance ...
... 12" clearance, an optional stainless steel Island Trim is available to combustible surfaces specified in the Cabinet Preparation instructions on page 14, for the correct backguard models that are recommended for use it meets local building codes. Installation, electrical connections and grounding must...codes the appliance should be paid to the hood and duct work installation to Step 5 on safety considerations, never use with all Thermador ranges. 1. This appliance has been tested in accordance with ANSI Z21.1, Standard for Household Cooking Appliances (USA) and in accordance ...
Installation Instructions
Page 10
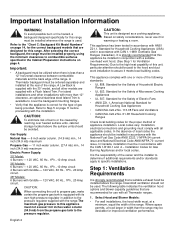
... may be planned so that the propane gas supply tank is pushed back to its own high pressure regulator in Chart A. See Figure 2 on page 14). Refer to shut off valve in Chart A. Note: If not already present, install gas shut-off the gas supply to the range. PLUG NEMA 5-20...
... may be planned so that the propane gas supply tank is pushed back to its own high pressure regulator in Chart A. See Figure 2 on page 14). Refer to shut off valve in Chart A. Note: If not already present, install gas shut-off the gas supply to the range. PLUG NEMA 5-20...
Installation Instructions
Page 13
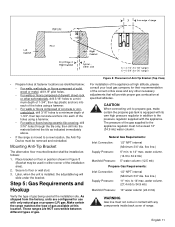
...with its own high pressure regulator in either corner of range. CAUTION When connecting unit to the pressure regulator supplied with the appliance. to 14" max. water column. (14.9 to floor or wall stud. 3. Secure to 34.9 mb) 5" water column (12.5 mb) Propane Gas Requirements: Inlet Connection:...tap concrete anchors into each of concrete or concrete block, drill 3/16" holes to a new location, the Anti-Tip Device must not exceed 14" (34.9 mb) water column. Figure 8: Placement of Anti-Tip Bracket (Top View) For installation of the appliance at fastener locations as identified...
...with its own high pressure regulator in either corner of range. CAUTION When connecting unit to the pressure regulator supplied with the appliance. to 14" max. water column. (14.9 to floor or wall stud. 3. Secure to 34.9 mb) 5" water column (12.5 mb) Propane Gas Requirements: Inlet Connection:...tap concrete anchors into each of concrete or concrete block, drill 3/16" holes to a new location, the Anti-Tip Device must not exceed 14" (34.9 mb) water column. Figure 8: Placement of Anti-Tip Bracket (Top View) For installation of the appliance at fastener locations as identified...
Installation Instructions
Page 14
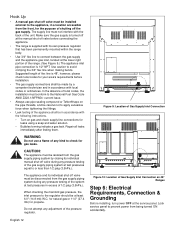
... Do not use pipe sealing compound or Teflon® tape on 48" Ranges Step 6: Electrical Requirements, Connection & Grounding Before installing, turn power OFF at least 6.0" (14.9 mb) W.C. Hook Up • A manual gas shut-off valve must be disconnected from the gas supply piping system during any pressure testing of the system...
... Do not use pipe sealing compound or Teflon® tape on 48" Ranges Step 6: Electrical Requirements, Connection & Grounding Before installing, turn power OFF at least 6.0" (14.9 mb) W.C. Hook Up • A manual gas shut-off valve must be disconnected from the gas supply piping system during any pressure testing of the system...
Installation Instructions
Page 16
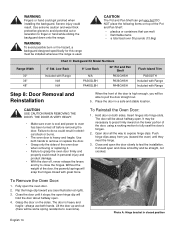
... weight of the door, the powerful springs will hold the door about halfway open. the open hinge clip will snap the hinges closed position English 14 WARNING Fingers or hand could result. DO NOT place the following items on both hands. Use both hands to do so could result in electrical...
... weight of the door, the powerful springs will hold the door about halfway open. the open hinge clip will snap the hinges closed position English 14 WARNING Fingers or hand could result. DO NOT place the following items on both hands. Use both hands to do so could result in electrical...
Installation Instructions
Page 17
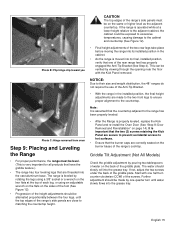
... an adjustable wrench on the flats on the sides of the foot (See Figure 12). • Progression of the height adjustments should be on page 14). Start with the Kick Panel removed. Photo C: Hinge removed from oven Step 9: Placing and Leveling the Range • For proper performance, the range must be...
... an adjustable wrench on the flats on the sides of the foot (See Figure 12). • Progression of the height adjustments should be on page 14). Start with the Kick Panel removed. Photo C: Hinge removed from oven Step 9: Placing and Leveling the Range • For proper performance, the range must be...
Installation Instructions
Page 20
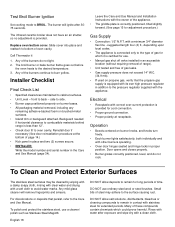
... and protect the stainless steel, use ordinary steel wool or steel brushes. Small bits of gas leaks. • Gas supply pressure does not exceed 14" W.C. (34.9 mb). • If used on propane gas, verify that persist, refer to combustible materials behind range is provided. front to cabinet... have an air shutter, so no adjustment is less than 12". • Check door fit to avoid water marks. Replace oven bottom cover. Call Thermador if: 1. Any of the appliance. • The griddle plate is correctly positioned, tilted slightly forward. (See page 15 for extended periods. side...
... and protect the stainless steel, use ordinary steel wool or steel brushes. Small bits of gas leaks. • Gas supply pressure does not exceed 14" W.C. (34.9 mb). • If used on propane gas, verify that persist, refer to combustible materials behind range is provided. front to cabinet... have an air shutter, so no adjustment is less than 12". • Check door fit to avoid water marks. Replace oven bottom cover. Call Thermador if: 1. Any of the appliance. • The griddle plate is correctly positioned, tilted slightly forward. (See page 15 for extended periods. side...

User Manual
Page 4
... circuit required. CAUTION: FOR PERSONAL SAFETY, THIS APPLIANCE MUST BE CONNECTED TO A PROPERLY GROUNDED AND POLARIZED ELECTRICAL POWER SUPPLY. Important: All ranges must not exceed 14.0 inches water column (34.9 mb) from the factory certified for use of gas cooking appliances results in the production of gas for which can be...
... circuit required. CAUTION: FOR PERSONAL SAFETY, THIS APPLIANCE MUST BE CONNECTED TO A PROPERLY GROUNDED AND POLARIZED ELECTRICAL POWER SUPPLY. Important: All ranges must not exceed 14.0 inches water column (34.9 mb) from the factory certified for use of gas cooking appliances results in the production of gas for which can be...
User Manual
Page 10
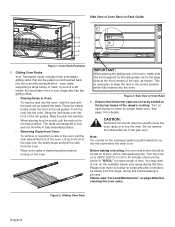
Gliding Oven Racks Your Thermador range includes three extendable, gliding racks that can be turned on a rack, pull the rack out to the stop position. Lift up toward the front ... insert a rack into position. Slide the rack into the oven, hold the rack with minimum effort - even while supporting a large turkey or roast. See page 14 for the cooling process to be used to cover the oven racks or to line the oven. Do not remove the infrared burner in the...
Gliding Oven Racks Your Thermador range includes three extendable, gliding racks that can be turned on a rack, pull the rack out to the stop position. Lift up toward the front ... insert a rack into position. Slide the rack into the oven, hold the rack with minimum effort - even while supporting a large turkey or roast. See page 14 for the cooling process to be used to cover the oven racks or to line the oven. Do not remove the infrared burner in the...
User Manual
Page 11
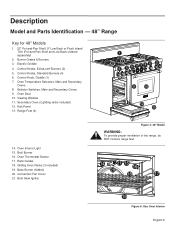
... Light 15. Convection Fan Cover 21. Control Knob, Griddle (1) 7. Range Feet (4) 1 2 2 2 3 4 5 8 7786 5 9 10 11 12 13 14. Selector Switches, Main and Secondary Ovens 9. Oven Door 10. Oven Thermostat Sensor 17. Broil Burner 16. Description Model and Parts Identification - 48" Range Key for... Burners (4) 6. Broil Glow Igniter Figure 4: 48" Model WARNING: To provide proper ventilation of the range, do NOT remove range feet. 14 21 15 16 20 18 17 19 Figure 5: Gas Oven Interior English 9 Electric Griddle 4. Kick Panel 13. Control Knobs, ExtraLow®...
... Light 15. Convection Fan Cover 21. Control Knob, Griddle (1) 7. Range Feet (4) 1 2 2 2 3 4 5 8 7786 5 9 10 11 12 13 14. Selector Switches, Main and Secondary Ovens 9. Oven Door 10. Oven Thermostat Sensor 17. Broil Burner 16. Description Model and Parts Identification - 48" Range Key for... Burners (4) 6. Broil Glow Igniter Figure 4: 48" Model WARNING: To provide proper ventilation of the range, do NOT remove range feet. 14 21 15 16 20 18 17 19 Figure 5: Gas Oven Interior English 9 Electric Griddle 4. Kick Panel 13. Control Knobs, ExtraLow®...
User Manual
Page 15
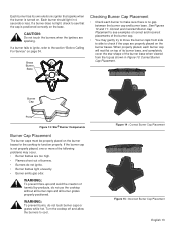
... unevenly. • Burner emits gas odor. Turn the cooktop off and allow the burners to the section "Before Calling For Service" on the base. Figure 14 : Correct Burner Cap Placement Figure 15 : Incorrect Burner Cap Placement English 13 When properly placed, each burner to make sure there is turned on the...
... unevenly. • Burner emits gas odor. Turn the cooktop off and allow the burners to the section "Before Calling For Service" on the base. Figure 14 : Correct Burner Cap Placement Figure 15 : Incorrect Burner Cap Placement English 13 When properly placed, each burner to make sure there is turned on the...
User Manual
Page 16
... beyond the base of the pan. • Use a low or medium flame for its intended purpose, facilitates emission of chemicals or other reproductive harm. English 14 this manual. Wait until the knob is a slight sound associated with Gas. 3.Always operate the unit according to the position. Do not touch the burners...
... beyond the base of the pan. • Use a low or medium flame for its intended purpose, facilitates emission of chemicals or other reproductive harm. English 14 this manual. Wait until the knob is a slight sound associated with Gas. 3.Always operate the unit according to the position. Do not touch the burners...

User Manual
Page 27
... minutes 25 to 35 minutes 30 to 40 minutes 60 to 75 minutes 20 to 25 minutes 10 to 15 minutes 55 to 70 minutes 14 to 19 minutes 35 to 45 minutes 25 to 30 minutes 25 to 30 minutes 12 to 18 minutes 25 to 30 minutes 20 to...
... minutes 25 to 35 minutes 30 to 40 minutes 60 to 75 minutes 20 to 25 minutes 10 to 15 minutes 55 to 70 minutes 14 to 19 minutes 35 to 45 minutes 25 to 30 minutes 25 to 30 minutes 12 to 18 minutes 25 to 30 minutes 20 to...