

Product Spec Sheet
Page 1
... self-clean mode-fastest in the industry - Power of Front Left Burner BTU 22,000 and XLO 3 - Power of Front Right Burner BTU 18,000 and XLO OVEN Oven Capacity (Lg / Sm) 5.7 / 4.9 cu. Power of Far Right 12" Electric Griddle 1,630 W (6-Pass) 7 - ft. Power of Back Right Burner BTU 15,000 and XLO 8 - oven accommodates full-size commercial sheet pans TECHNICAL DETAILS Circuit Breaker Volts Energy Source Plug Type Power Cord Length Gas Supply WARRANTY Limited Warranty, Entire Appliance, Parts...
... self-clean mode-fastest in the industry - Power of Front Left Burner BTU 22,000 and XLO 3 - Power of Front Right Burner BTU 18,000 and XLO OVEN Oven Capacity (Lg / Sm) 5.7 / 4.9 cu. Power of Far Right 12" Electric Griddle 1,630 W (6-Pass) 7 - ft. Power of Back Right Burner BTU 15,000 and XLO 8 - oven accommodates full-size commercial sheet pans TECHNICAL DETAILS Circuit Breaker Volts Energy Source Plug Type Power Cord Length Gas Supply WARRANTY Limited Warranty, Entire Appliance, Parts...
Instructions for Use
Page 5
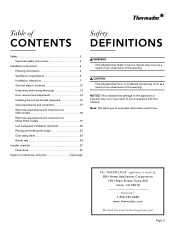
...® burners 27 PowerBoost 27 Electric griddle 33 Electric grill 36 Using the oven 41 Symbols and descriptions 41 Initial start-up 43 Setting the oven(s 43 Timers 44 Panel lock 44 Multi-point meat probe 45 Sabbath 45 Remote start 47 Getting the most out of your appliance 48 Oven rack positions 48 Bake 48 Broil 49 Convection broil 50 Convection bake 50 True convection 51 Proof 51 Roast 52 Convection roast 52 Warm 53...
...® burners 27 PowerBoost 27 Electric griddle 33 Electric grill 36 Using the oven 41 Symbols and descriptions 41 Initial start-up 43 Setting the oven(s 43 Timers 44 Panel lock 44 Multi-point meat probe 45 Sabbath 45 Remote start 47 Getting the most out of your appliance 48 Oven rack positions 48 Bake 48 Broil 49 Convection broil 50 Convection bake 50 True convection 51 Proof 51 Roast 52 Convection roast 52 Warm 53...
Instructions for Use
Page 8
... burners, turn the gas control knob to operate the electronic igniters on accidentally. DO NOT attempt to the pressure regulator supplied with the ExtraLow® feature and cannot be a "T" handle gas cock. 3. The appliance must be lit manually. When the service panel cannot be locked, securely fasten a prominent warning device, such as specified in addition to use the standard burners, but each must not be electrically grounded in accordance with a match. Installation...
... burners, turn the gas control knob to operate the electronic igniters on accidentally. DO NOT attempt to the pressure regulator supplied with the ExtraLow® feature and cannot be a "T" handle gas cock. 3. The appliance must be lit manually. When the service panel cannot be locked, securely fasten a prominent warning device, such as specified in addition to use the standard burners, but each must not be electrically grounded in accordance with a match. Installation...
Instructions for Use
Page 9
... for electrical requirements and grounding instructions. Page. 9 Installation of the appliance. Child safety WARNING DO NOT store items of California to specific installations. For more information go to climb, stand, lean, sit, or hang on any part of the appliance by an adult. Have the installer show you where the electric circuit breaker and the gas supply shut off the gas and electricity to the electrical power supply...
... for electrical requirements and grounding instructions. Page. 9 Installation of the appliance. Child safety WARNING DO NOT store items of California to specific installations. For more information go to climb, stand, lean, sit, or hang on any part of the appliance by an adult. Have the installer show you where the electric circuit breaker and the gas supply shut off the gas and electricity to the electrical power supply...
Instructions for Use
Page 11
.... This instruction is off the burner and using high flame settings. Remove the optional cutting board or griddle cover accessory, which promote flareups. Clean after the appliance is based on the accessory. Some parts of the appliance. Avoid letting grease deposits collect. DO NOT touch vent area while the appliance is stored on and for proper operation. Allow appliance sufficient time to clean the appliance...
.... This instruction is off the burner and using high flame settings. Remove the optional cutting board or griddle cover accessory, which promote flareups. Clean after the appliance is based on the accessory. Some parts of the appliance. Avoid letting grease deposits collect. DO NOT touch vent area while the appliance is stored on and for proper operation. Allow appliance sufficient time to clean the appliance...
Instructions for Use
Page 12
... ignition and combustion problems with high alcohol content (e.g. Use care when opening the oven door; There is a manufacturing residue burn off or food. WARNING This appliance should not be installed with a gas range unless the hood and range have been designed and tested in or around the self-cleaning oven. Place oven racks in a downward direction toward the appliance. Heating elements may catch fire. Other surfaces of oven until they are oven vent openings and surfaces...
... ignition and combustion problems with high alcohol content (e.g. Use care when opening the oven door; There is a manufacturing residue burn off or food. WARNING This appliance should not be installed with a gas range unless the hood and range have been designed and tested in or around the self-cleaning oven. Place oven racks in a downward direction toward the appliance. Heating elements may catch fire. Other surfaces of oven until they are oven vent openings and surfaces...
Instructions for Use
Page 22
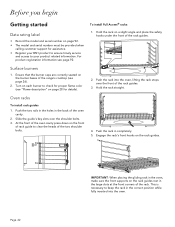
... of the rack guides. Before you begin Getting started Data rating label • Record the model and serial number on page 92. • The model and serial number must be provided when calling customer support for details). 2. Hold the rack on the rack guides rest in the correct position while fully inserted into the oven, lifting the rack stops over the shoulder bolts. 3. Oven racks To install rack guides 1. Engage the rack's front...
... of the rack guides. Before you begin Getting started Data rating label • Record the model and serial number on page 92. • The model and serial number must be provided when calling customer support for details). 2. Hold the rack on the rack guides rest in the correct position while fully inserted into the oven, lifting the rack stops over the shoulder bolts. 3. Oven racks To install rack guides 1. Engage the rack's front...
Instructions for Use
Page 23
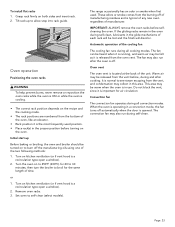
... opened. Turn on the oven. Remove oven racks. 3. These odors or smoke comes from the vent before, during and after the oven is off automatically when the door is cooling. • The correct rack position depends on the recipe and the cooking mode. • The rack positions are numbered from the bottom of time. If the gliding racks remain in the oven during self-clean. Warm air may also run after cooking. Convection fan The convection fan operates...
... opened. Turn on the oven. Remove oven racks. 3. These odors or smoke comes from the vent before, during and after the oven is off automatically when the door is cooling. • The correct rack position depends on the recipe and the cooking mode. • The rack positions are numbered from the bottom of time. If the gliding racks remain in the oven during self-clean. Warm air may also run after cooking. Convection fan The convection fan operates...
Instructions for Use
Page 48
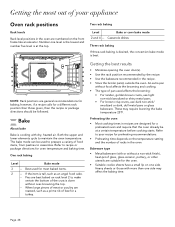
... or package directions should be followed. One rack baking Level Bake mode 3 -- Preheating the oven • Most cooking times in the oven. Number one level is the lowest and number five level is tall, such as a prime rib of beef or a turkey. Two rack baking Level Bake or conv bake mode 2 and 4 -- If the item is at a certain temperature before cooking starts. Page. 48 Casserole dishes Three rack baking If three-rack baking is desired, the convection bake mode is done...
... or package directions should be followed. One rack baking Level Bake mode 3 -- Preheating the oven • Most cooking times in the oven. Number one level is the lowest and number five level is tall, such as a prime rib of beef or a turkey. Two rack baking Level Bake or conv bake mode 2 and 4 -- If the item is at a certain temperature before cooking starts. Page. 48 Casserole dishes Three rack baking If three-rack baking is desired, the convection bake mode is done...
Instructions for Use
Page 55
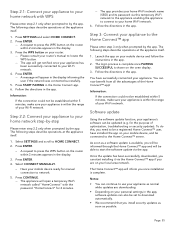
... step 3 only when prompted by the app. Software update Using the software update function, your appliance's software can now benefit from all the advantages of optimization, troubleshooting or security updates). Page. 55 Press ENTER. -- Press START PAIRING in the display informing the user if the network was connected successfully. 5. The following steps describe operations at the appliance itself . 1. Press ENTER. 4. The...
... step 3 only when prompted by the app. Software update Using the software update function, your appliance's software can now benefit from all the advantages of optimization, troubleshooting or security updates). Page. 55 Press ENTER. -- Press START PAIRING in the display informing the user if the network was connected successfully. 5. The following steps describe operations at the appliance itself . 1. Press ENTER. 4. The...
Instructions for Use
Page 60
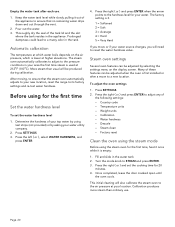
... ( or ) and press ENTER to adjust any of these features can be adjusted when the oven is empty: 1. Factory reset Clean the oven using the steam mode Before using the steam oven for the first time Set the water hardness level To set the cooking time for your water utility company. 2. Turn the mode knob to ensure that no remaining water drips down and out through the vent. 2. Calibration produces more steam...
... ( or ) and press ENTER to adjust any of these features can be adjusted when the oven is empty: 1. Factory reset Clean the oven using the steam mode Before using the steam oven for the first time Set the water hardness level To set the cooking time for your water utility company. 2. Turn the mode knob to ensure that no remaining water drips down and out through the vent. 2. Calibration produces more steam...

Instructions for Use
Page 67
... rice pudding) Rice pudding* Baking pan (level 2) Steam Yogurt Portion-sized jars + wire rack (level 2) Steam Apple compote Baking pan (level 2) Steam Pear compote Baking pan (level 2) Steam Cherry compote Baking pan (level 2) Steam Rhubarb compote Baking pan (level 2) Steam Plum compote Baking pan (level 2) Steam *You can also use the relevant program (see Automatic Programming). Stir after cooking. Pour the mixture into clean glass jars and cover with lids. Use a higher temperature setting the next time, if necessary. Stir in...
... rice pudding) Rice pudding* Baking pan (level 2) Steam Yogurt Portion-sized jars + wire rack (level 2) Steam Apple compote Baking pan (level 2) Steam Pear compote Baking pan (level 2) Steam Cherry compote Baking pan (level 2) Steam Rhubarb compote Baking pan (level 2) Steam Plum compote Baking pan (level 2) Steam *You can also use the relevant program (see Automatic Programming). Stir after cooking. Pour the mixture into clean glass jars and cover with lids. Use a higher temperature setting the next time, if necessary. Stir in...
Instructions for Use
Page 69
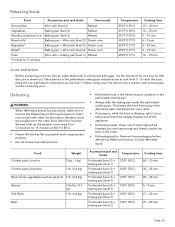
Reheating foods Food Accessories and rack levels Oven mode Dinner plate Vegetables Wire rack (level 2) Baking pan (level 3) Reheat Reheat Noodles, potatoes, rice Bread rolls* Baguettes* Bread* Pizza *Preheat for one hour so that will be transferred to the meat. • Defrosting poultry: Remove from packaging before defrosting. Place berries in the perforated cooking pan and place pan at rack level 1. Defrosting 9 WARNING When defrosting animal food products...
Reheating foods Food Accessories and rack levels Oven mode Dinner plate Vegetables Wire rack (level 2) Baking pan (level 3) Reheat Reheat Noodles, potatoes, rice Bread rolls* Baguettes* Bread* Pizza *Preheat for one hour so that will be transferred to the meat. • Defrosting poultry: Remove from packaging before defrosting. Place berries in the perforated cooking pan and place pan at rack level 1. Defrosting 9 WARNING When defrosting animal food products...
Instructions for Use
Page 83
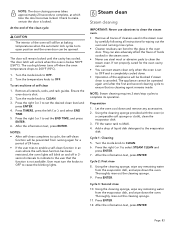
... be at which time the door becomes locked. User must turn the knobs to OFF to CLEAN. 6. NOTE: Steam cleaning requires 3 start steam clean only when the oven is not available. Turn the mode knob to cease the blinking lights. Cycle 3: Second rinse 10. The cooling blower turns off in the steam oven by carefully following all utensils, racks, and rack guides. Turn the temperature knob to MAX. 4. Steam clean Steam cleaning IMPORTANT: Never use steel wool or...
... be at which time the door becomes locked. User must turn the knobs to OFF to CLEAN. 6. NOTE: Steam cleaning requires 3 start steam clean only when the oven is not available. Turn the mode knob to cease the blinking lights. Cycle 3: Second rinse 10. The cooling blower turns off in the steam oven by carefully following all utensils, racks, and rack guides. Turn the temperature knob to MAX. 4. Steam clean Steam cleaning IMPORTANT: Never use steel wool or...
Instructions for Use
Page 89
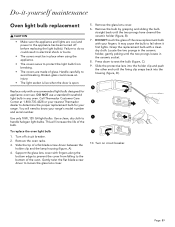
... of the bulb. To replace the oven light bulb 1. Support the glass lens cover with your range's model number and serial number. Remove the bulb by grasping and sliding the bulb straight back until the two prongs locate in the ceramic holder, gently poking until the two prongs have cleared the ceramic holder (figure, B). 7. Locate the two prongs in the ceramic socket. 8. A B C D 10. Remove the glass lens cover. 6. DO NOT touch the glass of glass. Slide the protective...
... of the bulb. To replace the oven light bulb 1. Support the glass lens cover with your range's model number and serial number. Remove the bulb by grasping and sliding the bulb straight back until the two prongs locate in the ceramic holder, gently poking until the two prongs have cleared the ceramic holder (figure, B). 7. Locate the two prongs in the ceramic socket. 8. A B C D 10. Remove the glass lens cover. 6. DO NOT touch the glass of glass. Slide the protective...
Instructions for Use
Page 91
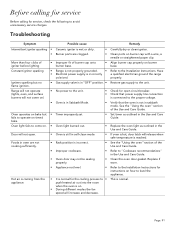
...; Clean the oven door gasket. Range will not operate (lights, oven, and surface burners will release when safe temperature is reached. fails to come on. • Oven light burned out. • Replace the oven light as outlined in self-clean mode. • If oven is hot, door latch will not come on) • No power to the unit. • Check for instructions on . • During different modes the fan speed will not open circuit breaker. • Check that power supply line connection is connected...
...; Clean the oven door gasket. Range will not operate (lights, oven, and surface burners will release when safe temperature is reached. fails to come on. • Oven light burned out. • Replace the oven light as outlined in self-clean mode. • If oven is hot, door latch will not come on) • No power to the unit. • Check for instructions on . • During different modes the fan speed will not open circuit breaker. • Check that power supply line connection is connected...
Installation Instructions
Page 3
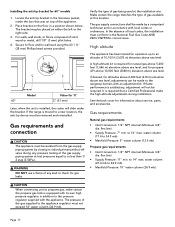
... Safety 3 Important safety instructions 3 Installation instructions 6 Planning information 6 Ventilation requirements 6 Installation clearances 7 Gas and electric locations 12 Unpacking and moving the range 13 Door removal and adjustment 14 Installing the anti-tip bracket (required 16 Gas requirements and connection 17 Electrical requirements and connection for GAS models 18 Electrical requirements and connection for DUAL FUEL models 19 Low backguard installation (optional 22 Placing and leveling the range 23 Data rating label 24 Burner test 24 Installer checklist 27 Final...
... Safety 3 Important safety instructions 3 Installation instructions 6 Planning information 6 Ventilation requirements 6 Installation clearances 7 Gas and electric locations 12 Unpacking and moving the range 13 Door removal and adjustment 14 Installing the anti-tip bracket (required 16 Gas requirements and connection 17 Electrical requirements and connection for GAS models 18 Electrical requirements and connection for DUAL FUEL models 19 Low backguard installation (optional 22 Placing and leveling the range 23 Data rating label 24 Burner test 24 Installer checklist 27 Final...
Installation Instructions
Page 4
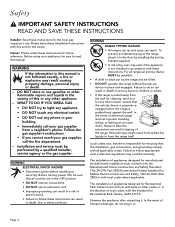
... result. WARNING ELECTRICAL SHOCK HAZARD • Disconnect power before installing or servicing. Follow the gas supplier's instructions. • If you cannot reach your appliance, be sure that all applicable codes. Before turning power ON, be sure to light any appliance. • DO NOT touch any electrical switch. • DO NOT use any other codes or, in the OFF position. • DO NOT remove connections. • DO...
... result. WARNING ELECTRICAL SHOCK HAZARD • Disconnect power before installing or servicing. Follow the gas supplier's instructions. • If you cannot reach your appliance, be sure that all applicable codes. Before turning power ON, be sure to light any appliance. • DO NOT touch any electrical switch. • DO NOT use any other codes or, in the OFF position. • DO NOT remove connections. • DO...
Installation Instructions
Page 18
... above sea level. If flame performance is equipped with an adjustment kit. flex line) • Supply Pressure: 7'' min. Locate the anti-tip bracket in accordance with the appliance. Place bracket on the floor in addition to the National Fuel Gas Code ANSI Z223.1/NFPA54- Secure to 34.9 mb) • Manifold Pressure: 5'' water column (12.5 mb) Propane gas requirements: • Inlet Connection: 1/2'' NPT internal (Minimum 3/4'' dia. Make certain the range matches the...
... above sea level. If flame performance is equipped with an adjustment kit. flex line) • Supply Pressure: 7'' min. Locate the anti-tip bracket in accordance with the appliance. Place bracket on the floor in addition to the National Fuel Gas Code ANSI Z223.1/NFPA54- Secure to 34.9 mb) • Manifold Pressure: 5'' water column (12.5 mb) Propane gas requirements: • Inlet Connection: 1/2'' NPT internal (Minimum 3/4'' dia. Make certain the range matches the...
Installation Instructions
Page 20
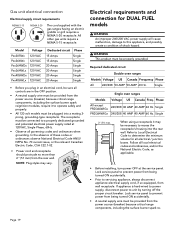
... Hz. Required dedicated circuit Double oven ranges Models Voltage US Canada Frequency Phase All 240/208 50 AMP 50 AMP 60 Hz. Electrical requirements and connection for all governing codes and ordinances when grounding. Lock service panel to prevent power from being turned ON accidentally. • Prior to servicing appliance, always disconnect appliance electrical supply cord, if so equipped, from the power source (breaker) because critical range components, including the surface burner spark...
... Hz. Required dedicated circuit Double oven ranges Models Voltage US Canada Frequency Phase All 240/208 50 AMP 50 AMP 60 Hz. Electrical requirements and connection for all governing codes and ordinances when grounding. Lock service panel to prevent power from being turned ON accidentally. • Prior to servicing appliance, always disconnect appliance electrical supply cord, if so equipped, from the power source (breaker) because critical range components, including the surface burner spark...


