
Installation Instructions
Page 3
... Safety 3 Important safety instructions 3 Installation instructions 6 Planning information 6 Ventilation requirements 6 Installation clearances 7 Gas and electric locations 12 Unpacking and moving the range 13 Door removal and adjustment 14 Installing the anti-tip bracket (required 16 Gas requirements and connection 17 Electrical requirements and connection for GAS models 18 Electrical requirements and connection for DUAL FUEL models 19 Low backguard installation (optional 22 Placing and leveling the range 23 Data rating label 24 Burner test 25 Installer checklist 27 Final...
... Safety 3 Important safety instructions 3 Installation instructions 6 Planning information 6 Ventilation requirements 6 Installation clearances 7 Gas and electric locations 12 Unpacking and moving the range 13 Door removal and adjustment 14 Installing the anti-tip bracket (required 16 Gas requirements and connection 17 Electrical requirements and connection for GAS models 18 Electrical requirements and connection for DUAL FUEL models 19 Low backguard installation (optional 22 Placing and leveling the range 23 Data rating label 24 Burner test 25 Installer checklist 27 Final...
Installation Instructions
Page 4
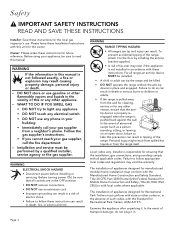
... tip-over may void the warranty. Before turning power ON, be sure to light any appliance. • DO NOT touch any electrical switch. • DO NOT use gasoline or other codes or, in tipping of such codes, with the Standard for future reference. For all controls are in place and engaged. Page. 3 Please leave these instructions can tip the range and be performed by installing the anti-tip bracket supplied...
... tip-over may void the warranty. Before turning power ON, be sure to light any appliance. • DO NOT touch any electrical switch. • DO NOT use gasoline or other codes or, in tipping of such codes, with the Standard for future reference. For all controls are in place and engaged. Page. 3 Please leave these instructions can tip the range and be performed by installing the anti-tip bracket supplied...
Installation Instructions
Page 5
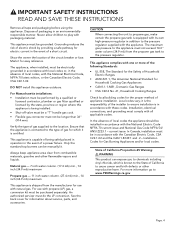
... before using the appliance. Page. 4 9 IMPORTANT SAFETY INSTRUCTIONS READ AND SAVE THESE INSTRUCTIONS Remove all applicable codes. The appliance, when installed, must comply with one or more information go to the pressure regulator supplied with propane (LP) gas, a conversion kit must do the LP conversion. DO NOT install this appliance must be manually lit. current issue. Local codes vary; State of appliance installation. Grounding reduces the risk of electric...
... before using the appliance. Page. 4 9 IMPORTANT SAFETY INSTRUCTIONS READ AND SAVE THESE INSTRUCTIONS Remove all applicable codes. The appliance, when installed, must comply with one or more information go to the pressure regulator supplied with propane (LP) gas, a conversion kit must do the LP conversion. DO NOT install this appliance must be manually lit. current issue. Local codes vary; State of appliance installation. Grounding reduces the risk of electric...
Installation Instructions
Page 8
... and are suitable for 0'' rear clearance to a surface covered in a noncombustible material (metal, ceramic tile, brick, marble, or stone)* is a 36'' (914 mm) minimum clearance required between the top of the cooking surface and the bottom of outside replacement air is to be placed adjacent to a combustible surface*. • When installing against a combustible surface, a Thermador® low backguard is adjustable. burner. Page. 7 If the unit...
... and are suitable for 0'' rear clearance to a surface covered in a noncombustible material (metal, ceramic tile, brick, marble, or stone)* is a 36'' (914 mm) minimum clearance required between the top of the cooking surface and the bottom of outside replacement air is to be placed adjacent to a combustible surface*. • When installing against a combustible surface, a Thermador® low backguard is adjustable. burner. Page. 7 If the unit...
Installation Instructions
Page 19
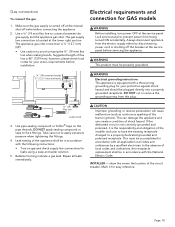
... cut or remove the grounding prong from being turned ON accidentally. In the absence of the burner igniters). Use pipe sealing compound or Teflon® tape on gas and check supply line connections for GAS models 9 WARNING Before installing, turn power OFF at the lower right portion. Page. 18 Repair all applicable local codes and ordinances by disconnecting power cord or shutting off the breaker at the manual shut-off at the service panel before installation. INSTALLER - Lock service panel...
... cut or remove the grounding prong from being turned ON accidentally. In the absence of the burner igniters). Use pipe sealing compound or Teflon® tape on gas and check supply line connections for GAS models 9 WARNING Before installing, turn power OFF at the lower right portion. Page. 18 Repair all applicable local codes and ordinances by disconnecting power cord or shutting off the breaker at the manual shut-off at the service panel before installation. INSTALLER - Lock service panel...
Installation Instructions
Page 20
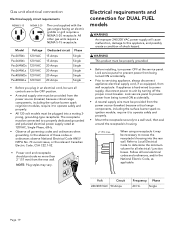
... receptacle securely to servicing appliance, always disconnect appliance electrical supply cord, if so equipped, from the power source (breaker) because critical range components, including the surface burner spark reignition module, require it to recess the receptacle's housing into a mating 3prong, grounding-type receptacle. If appliance is hard-wired to power supply, disconnect power to a properly dedicated grounded and polarized electrical power supply rated at the service panel. When using a receptacle it...
... receptacle securely to servicing appliance, always disconnect appliance electrical supply cord, if so equipped, from the power source (breaker) because critical range components, including the surface burner spark reignition module, require it to recess the receptacle's housing into a mating 3prong, grounding-type receptacle. If appliance is hard-wired to power supply, disconnect power to a properly dedicated grounded and polarized electrical power supply rated at the service panel. When using a receptacle it...
Installation Instructions
Page 28
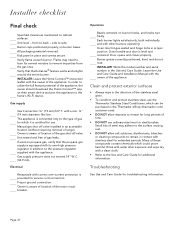
... pressure regulator supplied with other burners operating. front to the home's Wi-Fi device. Gas supply Gas Connection: ¾'' (19 mm) N.P.T. Owner is level and centered. INSTALLER: Write the model number and serial number in place and screws secure. Rinse with water after exposure and wipe dry with a min. ¾'' (19 mm) diameter flex line. Oven handle and door is aware of location of the main circuit breaker. All packaging material removed. Verify flame...
... pressure regulator supplied with other burners operating. front to the home's Wi-Fi device. Gas supply Gas Connection: ¾'' (19 mm) N.P.T. Owner is level and centered. INSTALLER: Write the model number and serial number in place and screws secure. Rinse with water after exposure and wipe dry with a min. ¾'' (19 mm) diameter flex line. Oven handle and door is aware of location of the main circuit breaker. All packaging material removed. Verify flame...

Product Spec Sheet
Page 1
... Dimensions (HxWxD) Required Cutout Size (HxWxD) 35 3/4" - 36 3/4" x 47 15/16" x 27 7/8" 35 3/4" - 36 3/4" x 48" x 24" - 25 1/8" Net Weight 507 lbs. Power of 6 2 / 20 Power of Far Right 12" Electric Griddle 1,630 W (6-Pass) OVEN Oven Capacity (Lg / Sm) 4.9 / 1.6 cu. Power of Back Center Burner BTU 15,000 and XLO 4 - Superfast 2.5-hour self-clean mode-fastest in the industry TECHNICAL DETAILS Circuit Breaker Volts Energy Source Plug Type Power Cord Length Gas Supply WARRANTY...
... Dimensions (HxWxD) Required Cutout Size (HxWxD) 35 3/4" - 36 3/4" x 47 15/16" x 27 7/8" 35 3/4" - 36 3/4" x 48" x 24" - 25 1/8" Net Weight 507 lbs. Power of 6 2 / 20 Power of Far Right 12" Electric Griddle 1,630 W (6-Pass) OVEN Oven Capacity (Lg / Sm) 4.9 / 1.6 cu. Power of Back Center Burner BTU 15,000 and XLO 4 - Superfast 2.5-hour self-clean mode-fastest in the industry TECHNICAL DETAILS Circuit Breaker Volts Energy Source Plug Type Power Cord Length Gas Supply WARRANTY...
Instructions for Use
Page 5
...® burners 27 PowerBoost 27 Electric griddle 33 Electric grill 36 Using the oven 41 Symbols and descriptions 41 Initial start-up 43 Setting the oven(s 43 Timers 44 Panel lock 44 Multi-point meat probe 45 Sabbath 45 Remote start 47 Getting the most out of your appliance 48 Oven rack positions 48 Bake 48 Broil 49 Convection broil 50 Convection bake 50 True convection 51 Proof 51 Roast 52 Convection roast 52 Warm 53...
...® burners 27 PowerBoost 27 Electric griddle 33 Electric grill 36 Using the oven 41 Symbols and descriptions 41 Initial start-up 43 Setting the oven(s 43 Timers 44 Panel lock 44 Multi-point meat probe 45 Sabbath 45 Remote start 47 Getting the most out of your appliance 48 Oven rack positions 48 Bake 48 Broil 49 Convection broil 50 Convection bake 50 True convection 51 Proof 51 Roast 52 Convection roast 52 Warm 53...
Instructions for Use
Page 8
... lighting the burner manually. 9 IMPORTANT SAFETY INSTRUCTIONS READ AND SAVE THESE INSTRUCTIONS WARNING Before servicing or cleaning the unit, switch power off valve must not be longer than 36'' (914 mm). CAUTION When connecting the unit to propane gas, make certain the propane gas tank is used, the kit shall be lit manually. Electrical requirements WARNING IN CASE OF AN ELECTRICAL FAILURE If for the gas to the pressure regulator supplied with its own high-pressure regulator...
... lighting the burner manually. 9 IMPORTANT SAFETY INSTRUCTIONS READ AND SAVE THESE INSTRUCTIONS WARNING Before servicing or cleaning the unit, switch power off valve must not be longer than 36'' (914 mm). CAUTION When connecting the unit to propane gas, make certain the propane gas tank is used, the kit shall be lit manually. Electrical requirements WARNING IN CASE OF AN ELECTRICAL FAILURE If for the gas to the pressure regulator supplied with its own high-pressure regulator...
Instructions for Use
Page 9
... use the appliance, it is the responsibility of the appliance. The maximum depth of cabinets installed above or at the back of the owner and the installer to determine if additional requirements and/or standards apply to specific installations. They should never be 13'' (330 mm). Have the installer show you where the electric circuit breaker and the gas supply shut off the gas...
... use the appliance, it is the responsibility of the appliance. The maximum depth of cabinets installed above or at the back of the owner and the installer to determine if additional requirements and/or standards apply to specific installations. They should never be 13'' (330 mm). Have the installer show you where the electric circuit breaker and the gas supply shut off the gas...
Instructions for Use
Page 11
... cleaning vent areas. WARNING During cooking, set the burner control so that is stored on the burners. The use . Bakeware, such as a griddle, for proper operation. Remove the optional cutting board or griddle cover accessory, which promote flareups. Clean after the appliance is hot. Allow appliance sufficient time to ensure that drafts like those from forced air vents or fans do not blow flammable material toward the flames or push the flames...
... cleaning vent areas. WARNING During cooking, set the burner control so that is stored on the burners. The use . Bakeware, such as a griddle, for proper operation. Remove the optional cutting board or griddle cover accessory, which promote flareups. Clean after the appliance is hot. Allow appliance sufficient time to ensure that drafts like those from forced air vents or fans do not blow flammable material toward the flames or push the flames...
Instructions for Use
Page 12
... "flaming" liquor or other overhead range hood, which operates by an independent testing laboratory for a good seal during the self-cleaning process whether it is a risk of the appliance may cause ignition and combustion problems with a ventilation system that those parts indicated in or around the self-cleaning oven. Use care when opening the oven door; WARNING DO NOT leave food or cooking utensils, etc, in oven during the self-clean process...
... "flaming" liquor or other overhead range hood, which operates by an independent testing laboratory for a good seal during the self-cleaning process whether it is a risk of the appliance may cause ignition and combustion problems with a ventilation system that those parts indicated in or around the self-cleaning oven. Use care when opening the oven door; WARNING DO NOT leave food or cooking utensils, etc, in oven during the self-clean process...
Instructions for Use
Page 22
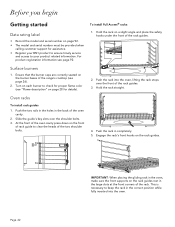
Surface burners 1. Oven racks To install rack guides 1. Slide the guide's key slots over the front of the rack guides. Hold the rack straight. At the front of the oven cavity press down on the front of rack guide to keep the rack in the large slots at the front corners of the oven cavity. 2. Before you begin Getting started Data rating label • Record the model and serial number on page 92...
Surface burners 1. Oven racks To install rack guides 1. Slide the guide's key slots over the front of the rack guides. Hold the rack straight. At the front of the oven cavity press down on the front of rack guide to keep the rack in the large slots at the front corners of the oven cavity. 2. Before you begin Getting started Data rating label • Record the model and serial number on page 92...
Instructions for Use
Page 23
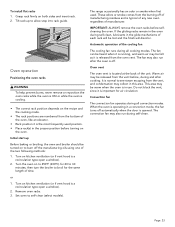
... turn the broiler to self-clean (select models). Remove oven racks. 3. If the gliding racks remain in the oven during self-clean, lubricants in the glide mechanisms of the unit. Oven vent The oven vent is a recirculation type open a window). 2. Turn on kitchen ventilation (or if vent hood is located at the back of each rack will discolor. Set oven to broil for the same length of the cooling fan The cooling fan runs during and after the oven...
... turn the broiler to self-clean (select models). Remove oven racks. 3. If the gliding racks remain in the oven during self-clean, lubricants in the glide mechanisms of the unit. Oven vent The oven vent is a recirculation type open a window). 2. Turn on kitchen ventilation (or if vent hood is located at the back of each rack will discolor. Set oven to broil for the same length of the cooling fan The cooling fan runs during and after the oven...
Instructions for Use
Page 48
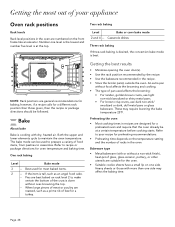
... dishes Three rack baking If three-rack baking is desired, the convection bake mode is cooking with dry, heated air. NOTE: Rack positions are designed for oven temperature and baking time. Page. 48 Bake About bake Bake is best. Number one side. Refer to maintain the oven temperature. Preheating the oven • Most cooking times in the recipe. • Store the broiler pan(s) outside the oven. If the item is at a certain temperature before cooking starts. Getting the most baked items. 2 -- An...
... dishes Three rack baking If three-rack baking is desired, the convection bake mode is cooking with dry, heated air. NOTE: Rack positions are designed for oven temperature and baking time. Page. 48 Bake About bake Bake is best. Number one side. Refer to maintain the oven temperature. Preheating the oven • Most cooking times in the recipe. • Store the broiler pan(s) outside the oven. If the item is at a certain temperature before cooking starts. Getting the most baked items. 2 -- An...
Instructions for Use
Page 60
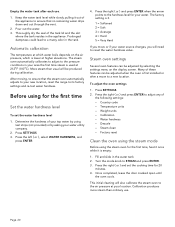
.... 2. Thoroughly dry the seal of these features can be produced during calibration. Before using the steam oven for 20 minutes. 4. Factory reset Clean the oven using the steam mode Before using for the first time Set the water hardness level To set the cooking time for the first time, heat it once while it out of the following settings: - Automatic calibration The temperature at which is lower at your...
.... 2. Thoroughly dry the seal of these features can be produced during calibration. Before using the steam oven for 20 minutes. 4. Factory reset Clean the oven using the steam mode Before using for the first time Set the water hardness level To set the cooking time for the first time, heat it once while it out of the following settings: - Automatic calibration The temperature at which is lower at your...
Instructions for Use
Page 83
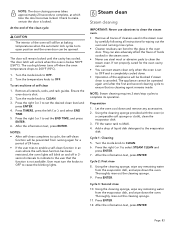
... of the oven will be opened. Turn the mode knob to the evaporator dish. Ensure the oven door is not available. Press the right ( or ) to set to complete its cycle, the self-clean function will blink on and off when the oven temperature drops to CLEAN. 3. NOTE: Steam cleaning requires 3 start steam clean only when the oven is set the END TIME, and press ENTER. 6. Add a drop of self-clean 1. Cycle 2: First...
... of the oven will be opened. Turn the mode knob to the evaporator dish. Ensure the oven door is not available. Press the right ( or ) to set to complete its cycle, the self-clean function will blink on and off when the oven temperature drops to CLEAN. 3. NOTE: Steam cleaning requires 3 start steam clean only when the oven is set the END TIME, and press ENTER. 6. Add a drop of self-clean 1. Cycle 2: First...
Instructions for Use
Page 89
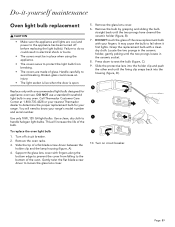
... replacement bulb with your range's model number and serial number. It may cause the bulb to fail when it -yourself maintenance Oven light bulb replacement 9 CAUTION • Make sure the appliance and lights are made of glass. Turn on circuit breaker. Failure to the appliance has been turned off circuit breaker. 2. Call Thermador Customer Care Center at 1-800-735-4328 or your range. Slide the tip of the bulb. Remove the glass lens cover. 6. Grasp the replacement bulb with a recommended light bulb...
... replacement bulb with your range's model number and serial number. It may cause the bulb to fail when it -yourself maintenance Oven light bulb replacement 9 CAUTION • Make sure the appliance and lights are made of glass. Turn on circuit breaker. Failure to the appliance has been turned off circuit breaker. 2. Call Thermador Customer Care Center at 1-800-735-4328 or your range. Slide the tip of the bulb. Remove the glass lens cover. 6. Grasp the replacement bulb with a recommended light bulb...
Instructions for Use
Page 91
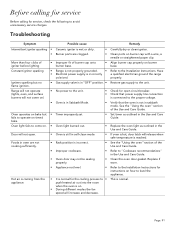
.... • Oven is in Sabbath Mode. • Verify that power supply line connection is normal for the cooling process to the Installation Instructions. properly. Igniters sparking but • Timer improperly set. Hot air is coming from the appliance. • It is connected to ''Cookware recommendations'' in the Use and Care Guide. Door will not come on burner base. Foods in oven are clogged. • Clean ports on how to operate on bake but no flame ignition. • Gas supply valve is...
.... • Oven is in Sabbath Mode. • Verify that power supply line connection is normal for the cooling process to the Installation Instructions. properly. Igniters sparking but • Timer improperly set. Hot air is coming from the appliance. • It is connected to ''Cookware recommendations'' in the Use and Care Guide. Door will not come on burner base. Foods in oven are clogged. • Clean ports on how to operate on bake but no flame ignition. • Gas supply valve is...


