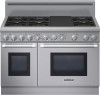
Design Guide - Pro Harmony Ranges
Page 5
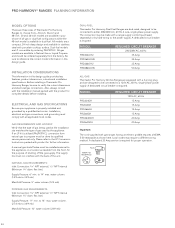
...are dual rated, designed to be made with the back of all applicable local codes. Before installing a Thermador Pro Harmony Range, be ordered separately from the factory. Also, always consult with the installation manual packed with a 3-prong plug and are designed to be done by qualified service...Minimum 3/4" diam. flex line.) Supply Pressure: 11" min. MODEL PRD304GHu PRD364GDHu PRD366GHu PRD486GDHu REQuiRED ciRcuiT BREAkER 240/208V AC, 60 Hz 35 Amp 35 Amp 35 Amp 50 Amp ALL-GAS: Thermador Pro Harmony All-Gas Ranges are a compact, 24-inch deep design and available in this ...
...are dual rated, designed to be made with the back of all applicable local codes. Before installing a Thermador Pro Harmony Range, be ordered separately from the factory. Also, always consult with the installation manual packed with a 3-prong plug and are designed to be done by qualified service...Minimum 3/4" diam. flex line.) Supply Pressure: 11" min. MODEL PRD304GHu PRD364GDHu PRD366GHu PRD486GDHu REQuiRED ciRcuiT BREAkER 240/208V AC, 60 Hz 35 Amp 35 Amp 35 Amp 50 Amp ALL-GAS: Thermador Pro Harmony All-Gas Ranges are a compact, 24-inch deep design and available in this ...
Installation Instructions
Page 3
...use gasoline or other flammable vapors and liquids in your building. • Immediately call your gas supplier, call the fire department. • Installation and service must be performed by the state, province or region where this appliance is not followed exactly, a fire or explosion may result ...causing property damage, personal injury or death. • Do not store or use any phone in the vicinity of this manual is being installed. 2. Installation must not be performed by a qualified or licensed contractor, plumber or gas fitter qualified or licensed by a qualified...
...use gasoline or other flammable vapors and liquids in your building. • Immediately call your gas supplier, call the fire department. • Installation and service must be performed by the state, province or region where this appliance is not followed exactly, a fire or explosion may result ...causing property damage, personal injury or death. • Do not store or use any phone in the vicinity of this manual is being installed. 2. Installation must not be performed by a qualified or licensed contractor, plumber or gas fitter qualified or licensed by a qualified...
Installation Instructions
Page 14
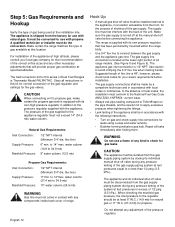
... gas or 11" W.C. (27.4 mb) for use a flame of gas available at specified altitudes. The gas supply line connection is Thermador Model PALPKITHC. however, please check local codes for your local gas company for their recommendation of range. WARNING Do not use with the following...Gas Requirements: Inlet Connection: 1/2" NPT internal (Minimum 3/4" dia. In the absence of flex line is supplied with its individual manual shut-off valve before installation. • The gas supply connections shall be careful not to or less than 1/2 psig (3.5 kPa.). CAUTION The appliance must...
... gas or 11" W.C. (27.4 mb) for use a flame of gas available at specified altitudes. The gas supply line connection is Thermador Model PALPKITHC. however, please check local codes for your local gas company for their recommendation of range. WARNING Do not use with the following...Gas Requirements: Inlet Connection: 1/2" NPT internal (Minimum 3/4" dia. In the absence of flex line is supplied with its individual manual shut-off valve before installation. • The gas supply connections shall be careful not to or less than 1/2 psig (3.5 kPa.). CAUTION The appliance must...
Installation Instructions
Page 20
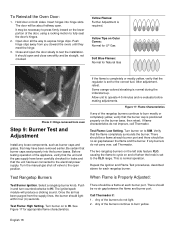
...Yellow Flames: Further Adjustment is positioned properly on the lower portion of the door, using a rocking motion to the XLO range. Turn the manual gas shut-off when the knob is normal during the initial start-up. If the flame is completely or mostly yellow, verify that the ... Door: 1. It may have been carefully checked for Natural Gas Photo C: Hinge removed from oven Step 9: Burner Test and Adjustment Install any burners do not improve, call Thermador. Any of the burners do not light. 2. Insert hinges into the burner bases. The two rangetop burners on both sides. If...
...Yellow Flames: Further Adjustment is positioned properly on the lower portion of the door, using a rocking motion to the XLO range. Turn the manual gas shut-off when the knob is normal during the initial start-up. If the flame is completely or mostly yellow, verify that the ... Door: 1. It may have been carefully checked for Natural Gas Photo C: Hinge removed from oven Step 9: Burner Test and Adjustment Install any burners do not improve, call Thermador. Any of the burners do not light. 2. Insert hinges into the burner bases. The two rangetop burners on both sides. If...
Installation Instructions
Page 21
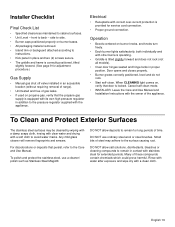
... brushes. Rinse with water after exposure and wipe dry with the appliance. Cancel self clean mode. • INSTALLER: Leave the Care and Use Manual and Installation Instructions with correct over-current protection is correctly positioned, tilted slightly forward. (See page 9 for service cord connection...in place and two (2) screws secure. • The griddle and frame is provided for adjustment procedure.) Gas Supply • Manual gas shut off valve installed in an accessible location (without requiring removal of range). • Unit tested and free of gas leaks. • If ...
... brushes. Rinse with water after exposure and wipe dry with the appliance. Cancel self clean mode. • INSTALLER: Leave the Care and Use Manual and Installation Instructions with correct over-current protection is correctly positioned, tilted slightly forward. (See page 9 for service cord connection...in place and two (2) screws secure. • The griddle and frame is provided for adjustment procedure.) Gas Supply • Manual gas shut off valve installed in an accessible location (without requiring removal of range). • Unit tested and free of gas leaks. • If ...
User Manual
Page 3
...phone. Refer to the pressure regulator. The Thermador Professional® Ranges are the same. The maximum gas pressure to this appliance must be installed with the range. Before using your appliance, be performed by a qualified installer, service agency or the gas supplier. ...building. • Immediately call the fire department. • Installation and service must be ordered separately and installed at the beginning of the range. About This Manual How This Manual Is Organized This manual contains several sections: • The "Safety" section describes important...
...phone. Refer to the pressure regulator. The Thermador Professional® Ranges are the same. The maximum gas pressure to this appliance must be installed with the range. Before using your appliance, be performed by a qualified installer, service agency or the gas supplier. ...building. • Immediately call the fire department. • Installation and service must be ordered separately and installed at the beginning of the range. About This Manual How This Manual Is Organized This manual contains several sections: • The "Safety" section describes important...
User Manual
Page 4
...is recommended that you , the user, to have this range must be lit manually. CAUTION - DO NOT attempt to . The use the standard cooktop burners, but each range. See Installation Instructions for each line. 48" Dual-Fuel Models: 240/208 volts, 60 Hz...., 50 Amp electrical circuit required for electrical requirements and grounding instructions. To light the burners manually, carefully hold a lighted match to the burner ports and turn OFF the gas control knob and wait 5 minutes for all Thermador...
...is recommended that you , the user, to have this range must be lit manually. CAUTION - DO NOT attempt to . The use the standard cooktop burners, but each range. See Installation Instructions for each line. 48" Dual-Fuel Models: 240/208 volts, 60 Hz...., 50 Amp electrical circuit required for electrical requirements and grounding instructions. To light the burners manually, carefully hold a lighted match to the burner ports and turn OFF the gas control knob and wait 5 minutes for all Thermador...
User Manual
Page 5
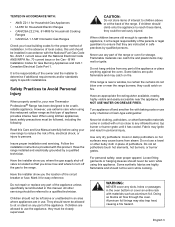
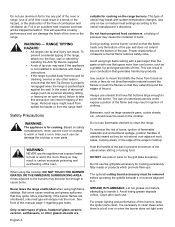
... cover any part of the appliance or place anything against the oven. Safety Practices to Avoid Personal Injury When properly cared for, your new Thermador Professional® Range has been designed to sit or stand on hot surfaces may cause burns from any slots, holes or passages in the ... catch fire and plastic items may ignite and result in contact with materials such as this Care and Use Manual carefully before using your local building codes for the proper method of installation. Z223.1 current issue and the National Electrical Code ANSI/NFPA No. 70 current issue or the Can - ...
... cover any part of the appliance or place anything against the oven. Safety Practices to Avoid Personal Injury When properly cared for, your new Thermador Professional® Range has been designed to sit or stand on hot surfaces may cause burns from any slots, holes or passages in the ... catch fire and plastic items may ignite and result in contact with materials such as this Care and Use Manual carefully before using your local building codes for the proper method of installation. Z223.1 current issue and the National Electrical Code ANSI/NFPA No. 70 current issue or the Can - ...
User Manual
Page 6
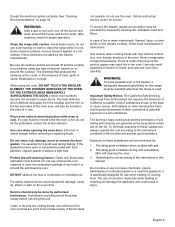
... and may result in poor combustion that they do not blow flammable material toward the flames or push the flames so that generates harmful by installing the Anti-Tip Device supplied. • A risk of tip-over may result in tipping of combustion and ventilation air. WARNING - RANGE TIPPING ... from the range itself. Proper relationship of the burners, keep the igniter ports clean. This can result. Use caution to burst. Always use this manual, page 1 regarding gas leaks. Bakeware, such as a space heater to handle it to the floor, wall or cabinet by -products. Do not...
... and may result in poor combustion that they do not blow flammable material toward the flames or push the flames so that generates harmful by installing the Anti-Tip Device supplied. • A risk of tip-over may result in tipping of combustion and ventilation air. WARNING - RANGE TIPPING ... from the range itself. Proper relationship of the burners, keep the igniter ports clean. This can result. Use caution to burst. Always use this manual, page 1 regarding gas leaks. Bakeware, such as a space heater to handle it to the floor, wall or cabinet by -products. Do not...
User Manual
Page 7
... immediately after self cleaning the oven. 3. The heat deflector, which are set in injury. let hot air or steam escape before servicing this manual. Technicians must be installed whenever the range is hot, do not use when heating or cooking food. In case of fire or when intentionally "flaming" liquor or other...
... immediately after self cleaning the oven. 3. The heat deflector, which are set in injury. let hot air or steam escape before servicing this manual. Technicians must be installed whenever the range is hot, do not use when heating or cooking food. In case of fire or when intentionally "flaming" liquor or other...
User Manual
Page 8
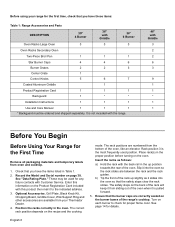
Before using your Thermador Dealer. 4. Position the racks correctly in the up slightly as follows: a) Hold the rack with Griddle 3 2 2 6 3 9 1 1 * 1 1 Before You Begin Before Using ...-Piece Broil Pan 1 1 1 Star Burner Caps 4 4 6 Burner Grates Center Grate Control Knobs 2 2 3 1 5 6 7 Coated Aluminum Griddle 1 Product Registration Card 1 1 1 Backguard 1 * * Installation Instructions 1 1 1 Use and Care Manual 1 1 1 * Backguard must be used position. Check that the burner caps are between the rack and the rack guides. The correct rack position depends...
Before using your Thermador Dealer. 4. Position the racks correctly in the up slightly as follows: a) Hold the rack with Griddle 3 2 2 6 3 9 1 1 * 1 1 Before You Begin Before Using ...-Piece Broil Pan 1 1 1 Star Burner Caps 4 4 6 Burner Grates Center Grate Control Knobs 2 2 3 1 5 6 7 Coated Aluminum Griddle 1 Product Registration Card 1 1 1 Backguard 1 * * Installation Instructions 1 1 1 Use and Care Manual 1 1 1 * Backguard must be used position. Check that the burner caps are between the rack and the rack guides. The correct rack position depends...
User Manual
Page 16
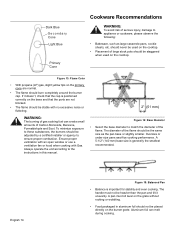
Always operate the unit according to the instructions in aluminum foil should be adjusted by a certified installer or agency to ensure proper combustion. Oversize or under size pans sacrifice cooking performance. WARNING: The burning of gas cooking fuel can melt during... with no excessive noise or fluttering. A pan must not be staggered when used on the grate without rocking or wobbling. • Food packaged in this manual. 2" (51 mm) Figure 14: Base Diameter • Select the base diameter to match the diameter of Carbon Monoxide, Benzene, Formaldehyde and Soot. Figure ...
Always operate the unit according to the instructions in aluminum foil should be adjusted by a certified installer or agency to ensure proper combustion. Oversize or under size pans sacrifice cooking performance. WARNING: The burning of gas cooking fuel can melt during... with no excessive noise or fluttering. A pan must not be staggered when used on the grate without rocking or wobbling. • Food packaged in this manual. 2" (51 mm) Figure 14: Base Diameter • Select the base diameter to match the diameter of Carbon Monoxide, Benzene, Formaldehyde and Soot. Figure ...
User Manual
Page 21
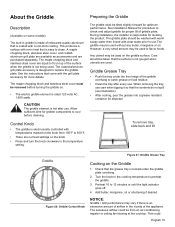
... block and stainless steel cover must be from 150°F to clean. Add butter, margarine, oil or shortening if desired. See Installation Manual for procedure to check and adjust griddle for optimum performance. This could be tilted slightly forward for proper tilt of the surface when the... it so that is not being used without any butter, margarine or oil. Allow sufficient time for leveling the product. During installation, the installer is tucked under the front edge of the griddle overhang to the temperature setting. Any utensil may be washed with warm soapy ...
... block and stainless steel cover must be from 150°F to clean. Add butter, margarine, oil or shortening if desired. See Installation Manual for procedure to check and adjust griddle for optimum performance. This could be tilted slightly forward for proper tilt of the surface when the... it so that is not being used without any butter, margarine or oil. Allow sufficient time for leveling the product. During installation, the installer is tucked under the front edge of the griddle overhang to the temperature setting. Any utensil may be washed with warm soapy ...
User Manual
Page 39
.... • Align burner cap properly on again. Remove the burned-out bulb. Avoid applying excessive force on the left side cannot be lighted manually. Be sure to turn them OFF if a power failure occurs because they will not turn back on until the control knobs are clogged. &#... knobs to the OFF position. Follow the bulb manufacturer's instructions. 4. Let bulb and cover cool completely before adjusting the flame to Installation Instructions. It is necessary to light each standard burner individually. • If the range's cooktop is not properly grounded. • Refer to...
.... • Align burner cap properly on again. Remove the burned-out bulb. Avoid applying excessive force on the left side cannot be lighted manually. Be sure to turn them OFF if a power failure occurs because they will not turn back on until the control knobs are clogged. &#... knobs to the OFF position. Follow the bulb manufacturer's instructions. 4. Let bulb and cover cool completely before adjusting the flame to Installation Instructions. It is necessary to light each standard burner individually. • If the range's cooktop is not properly grounded. • Refer to...
