
Use and Care Guide
Page 3
...27 Broil 28 Setting Broil and Convection Broil 29 Broiling and Roasting Recommendations ....... 30 Section 6: Care and Maintenance Self-Cleaning the Oven 31 - 32 Range Cleaning Recommendations ........ 33- 38 Section 7: Before Calling For Service Do-It-Yourself Maintenance 39 Before Calling For... Service 40 Data Rating Plate 40 Warranty 41-42 Introduction The Thermador ProfessionaP Ranges are certified for all other models, one of three available backguards must be unique to the type of the Pot...
...27 Broil 28 Setting Broil and Convection Broil 29 Broiling and Roasting Recommendations ....... 30 Section 6: Care and Maintenance Self-Cleaning the Oven 31 - 32 Range Cleaning Recommendations ........ 33- 38 Section 7: Before Calling For Service Do-It-Yourself Maintenance 39 Before Calling For... Service 40 Data Rating Plate 40 Warranty 41-42 Introduction The Thermador ProfessionaP Ranges are certified for all other models, one of three available backguards must be unique to the type of the Pot...
Use and Care Guide
Page 5
... other flammable materials come in contact with or too close to any part of the range or oven for , your new Thermador Professional ® Range has been designed to be left alone or unattended in an area where appliances are in use. If children are ...IN- Insure proper installation and servicing, Follow the installation instructions provided with baking soda or use a towel or other bulky cloth in place of the oven or the range. to a qualified Children should be followed, including the following: Read this appliance. Flammable materials can damage the finish of potholders....
... other flammable materials come in contact with or too close to any part of the range or oven for , your new Thermador Professional ® Range has been designed to be left alone or unattended in an area where appliances are in use. If children are ...IN- Insure proper installation and servicing, Follow the installation instructions provided with baking soda or use a towel or other bulky cloth in place of the oven or the range. to a qualified Children should be followed, including the following: Read this appliance. Flammable materials can damage the finish of potholders....

Use and Care Guide
Page 6
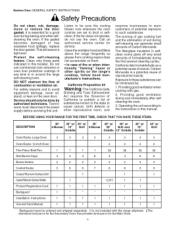
... When using the cooktop: DO NOT TOUCH THE BURNER GRATES OR THE IMMEDIATE SUR- contact the broiler Use care when opening the oven door; See Inside Front Cover regarding gas leaks. To minimize the risk of burns, ignition of flammable materials and unintentional spillage, ... The optional cutting board accessory must be removed before attempting to cause bu rns. For proper lighting and performance of time. Place oven racks in ignition of the flame and may break with caution. Section One: GENERAL SAFETY INSTRUCTIONS Safety Precautions WARNING The appliance is ...
... When using the cooktop: DO NOT TOUCH THE BURNER GRATES OR THE IMMEDIATE SUR- contact the broiler Use care when opening the oven door; See Inside Front Cover regarding gas leaks. To minimize the risk of burns, ignition of flammable materials and unintentional spillage, ... The optional cutting board accessory must be removed before attempting to cause bu rns. For proper lighting and performance of time. Place oven racks in ignition of the flame and may break with caution. Section One: GENERAL SAFETY INSTRUCTIONS Safety Precautions WARNING The appliance is ...
Use and Care Guide
Page 7
...12" Grill 6-Burner Griddle 48" w/ 48" w/ 24" Grill and Griddle 12" Griddle 48" w/ 12" Griddle 48" w/ Grill Oven Racks LargeOven 3 Oven Racks 12-inch Oven Two-Piece Broil Pan 1 Star Burner Caps 4 Burner Grates 2 Control Knobs 5 CoatedTitanium-SurfaceGrill CoateTditanium-SurfaGceriddle Product Registration Card 1 Backguard 1 ...safety reasons and to broil or self- If the fan does not operate, do not use commercial oven cleaners or oven liner protective coatings of cancer. California Proposition 65 Warning: The California Safe Drinking and Toxic Enforcement Act ...
...12" Grill 6-Burner Griddle 48" w/ 48" w/ 24" Grill and Griddle 12" Griddle 48" w/ 12" Griddle 48" w/ Grill Oven Racks LargeOven 3 Oven Racks 12-inch Oven Two-Piece Broil Pan 1 Star Burner Caps 4 Burner Grates 2 Control Knobs 5 CoatedTitanium-SurfaceGrill CoateTditanium-SurfaGceriddle Product Registration Card 1 Backguard 1 ...safety reasons and to broil or self- If the fan does not operate, do not use commercial oven cleaners or oven liner protective coatings of cancer. California Proposition 65 Warning: The California Safe Drinking and Toxic Enforcement Act ...
Use and Care Guide
Page 8
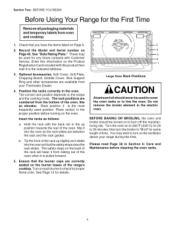
...used for same length of the oven. Place rack(s) in Section 6: Care and Maintenance before turning on the ventilator above your Thermador Dealer. . Ensure that the burner caps are available from the bottom of the oven, like an elevator. Optional Accessories.... Position the racks correctly in the electric oven. Rack position 3 is pulled forward. . See Page 12 ...
...used for same length of the oven. Place rack(s) in Section 6: Care and Maintenance before turning on the ventilator above your Thermador Dealer. . Ensure that the burner caps are available from the bottom of the oven, like an elevator. Optional Accessories.... Position the racks correctly in the electric oven. Rack position 3 is pulled forward. . See Page 12 ...
Use and Care Guide
Page 9
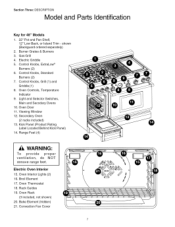
...shown (Backguard ordered separately) 2. Control Knobs, ExtraLow _ Burners (2) 6. Control Knobs, Grill (1) and Griddle (1) 8. Electric Oven Interior 15. Oven Controls, Temperature Indicator 9. Oven Door 11. Kick Panel (Product Rating Label Located Behind Kick Panel) 14. Oven Rack (3 included, not shown) 20. Gas Grill 4. Light and Selector Switches, Main and Secodary... Ovens 10. Bake Element (hidden) 21. Section Three: DESCRIPTION Model and Parts Identification Key for 48" Models 1. 22" Pot...
...shown (Backguard ordered separately) 2. Control Knobs, ExtraLow _ Burners (2) 6. Control Knobs, Grill (1) and Griddle (1) 8. Electric Oven Interior 15. Oven Controls, Temperature Indicator 9. Oven Door 11. Kick Panel (Product Rating Label Located Behind Kick Panel) 14. Oven Rack (3 included, not shown) 20. Gas Grill 4. Light and Selector Switches, Main and Secodary... Ovens 10. Bake Element (hidden) 21. Section Three: DESCRIPTION Model and Parts Identification Key for 48" Models 1. 22" Pot...
Use and Care Guide
Page 10
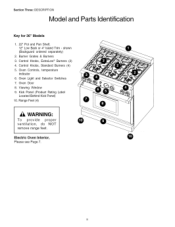
..." Models 1. 22" Pot and Pan Shelf, 12" Low Back or 4" Island Trim - Burner Grates & Burners 3. Viewing Window 9. Control Knobs, Standard Burners (4) 5. Oven Controls, temperature indicator 6. Electric Oven Interior, Please see Page 7. shown (Backguard ordered separately) 2. Oven Light and Selector Switches 7. Oven Door 8. Range Feet (4) WARNING: To provide proper ventilation, do NOT remove range feet.
..." Models 1. 22" Pot and Pan Shelf, 12" Low Back or 4" Island Trim - Burner Grates & Burners 3. Viewing Window 9. Control Knobs, Standard Burners (4) 5. Oven Controls, temperature indicator 6. Electric Oven Interior, Please see Page 7. shown (Backguard ordered separately) 2. Oven Light and Selector Switches 7. Oven Door 8. Range Feet (4) WARNING: To provide proper ventilation, do NOT remove range feet.
Use and Care Guide
Page 11
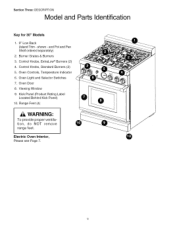
...; Burners (2) 4. Control Knobs, Standard Burners (2) 5. Section Three: DESCRIPTION Model and Parts Identification Key for 30" Models 1. 9" Low Back (Island Trim - Viewing Window 9. Burner Grates & Burners 3. Oven Door 8. Range Feet (4) _k WARNING: To provide proper ventilation, do NOT remove range feet. and Pot and Pan Shelf ordered separately) 2. Electric...
...; Burners (2) 4. Control Knobs, Standard Burners (2) 5. Section Three: DESCRIPTION Model and Parts Identification Key for 30" Models 1. 9" Low Back (Island Trim - Viewing Window 9. Burner Grates & Burners 3. Oven Door 8. Range Feet (4) _k WARNING: To provide proper ventilation, do NOT remove range feet. and Pot and Pan Shelf ordered separately) 2. Electric...
Use and Care Guide
Page 23
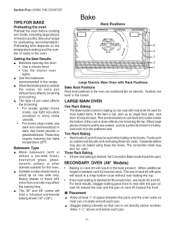
...• For brown crisp crusts, use of rack #2 with pies will result in the recipe. • Storethe broiler pan(s) outside the ovens. LARGE MAIN OVEN One Rack Baking • The Bake mode is best for baking on one rack with the pan on rack #2 toward the rear and the...turkey, rack level #2 is the lowest. Allow 1-1/2" above another. Heavy sheets or those with Rack Positions Bake Rack Positions Rack level positions in this small oven, use racks #2 and #5. Two Rack Baking • Rack levels #2 and #5 may also be used for most baked items. If the item is tall...
...• For brown crisp crusts, use of rack #2 with pies will result in the recipe. • Storethe broiler pan(s) outside the ovens. LARGE MAIN OVEN One Rack Baking • The Bake mode is best for baking on one rack with the pan on rack #2 toward the rear and the...turkey, rack level #2 is the lowest. Allow 1-1/2" above another. Heavy sheets or those with Rack Positions Bake Rack Positions Rack level positions in this small oven, use racks #2 and #5. Two Rack Baking • Rack levels #2 and #5 may also be used for most baked items. If the item is tall...

Use and Care Guide
Page 24
...should be used with consistent results. The larger the piece of foods can be used . 22 The same temperature recommended in the backofthe oven moves heated air evenly around the food. In the convection system, a fan in recipes and cooking charts for convection cooking provided they are... to 30 minutes less than the "minute per pound" method. Foodswill cookthoroughlywithout having to six minutes before the recipe time. reduce the oven temperature by baking an entire batch of meat and poultry will bake evenly and be cooked at the same time. Large meat or poultry...
...should be used with consistent results. The larger the piece of foods can be used . 22 The same temperature recommended in the backofthe oven moves heated air evenly around the food. In the convection system, a fan in recipes and cooking charts for convection cooking provided they are... to 30 minutes less than the "minute per pound" method. Foodswill cookthoroughlywithout having to six minutes before the recipe time. reduce the oven temperature by baking an entire batch of meat and poultry will bake evenly and be cooked at the same time. Large meat or poultry...

Use and Care Guide
Page 25
... on more than the inside of cookies are most appropriate rack. Cake pans should be baked, use aluminum foil to cover the oven racks or to be placed crosswise on the rack with only two sides give the best results. Bakeware Type • Aluminum bakeware...either BAKE or CONVECTION BAKE, recipes and baking times vary. Section Five: USING THE COOKTOP Convection Bake TIPS FOR CONVECTION BAKE Preheating the Oven Preheat the oven before cooking any cooking process. Preheating time depends on racks #1, #3,and #5. Rack #2 is normal for cakes, cookies, biscuits and other...
... on more than the inside of cookies are most appropriate rack. Cake pans should be baked, use aluminum foil to cover the oven racks or to be placed crosswise on the rack with only two sides give the best results. Bakeware Type • Aluminum bakeware...either BAKE or CONVECTION BAKE, recipes and baking times vary. Section Five: USING THE COOKTOP Convection Bake TIPS FOR CONVECTION BAKE Preheating the Oven Preheat the oven before cooking any cooking process. Preheating time depends on racks #1, #3,and #5. Rack #2 is normal for cakes, cookies, biscuits and other...
Use and Care Guide
Page 26
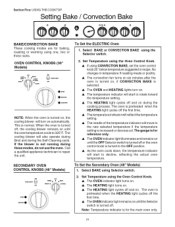
...will also operate during Broil and during these modes, do not usethe oven. OVEN CONTROL KNOBS (30" Models) OVEN _ HEATING NOTE: When the oven is turned off, the cooling blower remains on , if CONVECTION selected. When the oven is turned on, the cooling blower will turn on automatically. Select... the Selector switch. 2. The cooling blower will move to the new selected temperature if the temperature setting is • The OVEN and HEATING lights turn on . • The temperature indicator will start to 325°F. BAKE is increased or decreased. To Set the...
...will also operate during Broil and during these modes, do not usethe oven. OVEN CONTROL KNOBS (30" Models) OVEN _ HEATING NOTE: When the oven is turned off, the cooling blower remains on , if CONVECTION selected. When the oven is turned on, the cooling blower will turn on automatically. Select... the Selector switch. 2. The cooling blower will move to the new selected temperature if the temperature setting is • The OVEN and HEATING lights turn on . • The temperature indicator will start to 325°F. BAKE is increased or decreased. To Set the...

Use and Care Guide
Page 27
...at low temperatures to keep hot, cooked foods at serving temperature, to dehydrate food and to warm plates. HEATING • OVEN HEATING CLEANING 25 Cooking raw foods below 275°F is not recommended. • Hot cooked foods can be kept at ...°F 175°F Pizza (covered Pork 225°F 150°F Poultry (covered 175 ° - 200°F Vegetables (covered 175°F OVEN CONTROL SECONDARY ELECTRIC OVEN KNOBS LARGE ELECTRIC MAIN OVEN OVEN LIGHT ON _ OFF WARM • OFF • BAKE • PROOF • _ • BROIL CONY BAKE _ • BAKE ...
...at low temperatures to keep hot, cooked foods at serving temperature, to dehydrate food and to warm plates. HEATING • OVEN HEATING CLEANING 25 Cooking raw foods below 275°F is not recommended. • Hot cooked foods can be kept at ...°F 175°F Pizza (covered Pork 225°F 150°F Poultry (covered 175 ° - 200°F Vegetables (covered 175°F OVEN CONTROL SECONDARY ELECTRIC OVEN KNOBS LARGE ELECTRIC MAIN OVEN OVEN LIGHT ON _ OFF WARM • OFF • BAKE • PROOF • _ • BROIL CONY BAKE _ • BAKE ...

Use and Care Guide
Page 28
...the food warm will reduce the temperature of the air inthe oven and lengthen the proofing time. The warming oven mode is turned off . , Do not open the oven door unnecessarily. Proof (Secondary Oven) SECONDARY OVEN (Only on 48" Models) This feature maintains the warm ...8226; • BROIL 1. Check bread product early to warm about 10 minutes before using the large oven at safe temperatures. Section Five: USING THE COOKTOP Warm (Secondary Oven) SECONDARY OVEN (Only on 48" Models) The proof feature maintains the warm, non-drafty environment for proofing yeast leavened...
...the food warm will reduce the temperature of the air inthe oven and lengthen the proofing time. The warming oven mode is turned off . , Do not open the oven door unnecessarily. Proof (Secondary Oven) SECONDARY OVEN (Only on 48" Models) This feature maintains the warm ...8226; • BROIL 1. Check bread product early to warm about 10 minutes before using the large oven at safe temperatures. Section Five: USING THE COOKTOP Warm (Secondary Oven) SECONDARY OVEN (Only on 48" Models) The proof feature maintains the warm, non-drafty environment for proofing yeast leavened...
Use and Care Guide
Page 30
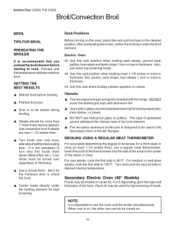
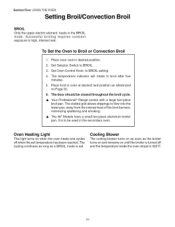
...offish, etc.). Set it for the minimum time to check the food. • Center foods directly under the broil element. Before turning on the oven, place the rack and broil pan in thickness. For rare steaks, cook the first side to desired internal temperature. Rack #5 may be broiled on ...of the meat to the center of doneness for best browning. Turn and cook the second side to 90°F. Section Five: USING THE OVEN Broil/Convection Broil BROIL Rack Positions TIPS FOR BROIL PREHEATING THE BROILER It is recommended that you preheat the broil element before broiling. •...
...offish, etc.). Set it for the minimum time to check the food. • Center foods directly under the broil element. Before turning on the oven, place the rack and broil pan in thickness. For rare steaks, cook the first side to desired internal temperature. Rack #5 may be broiled on ...of the meat to the center of doneness for best browning. Turn and cook the second side to 90°F. Section Five: USING THE OVEN Broil/Convection Broil BROIL Rack Positions TIPS FOR BROIL PREHEATING THE BROILER It is recommended that you preheat the broil element before broiling. •...
Use and Care Guide
Page 31
...Convection Broil . The temperature minutes. The cycling continues as long as the broiler turns on and remains on when the oven heats and cycles off and the temperature inside the oven drops to flow into the lower pan, away from the intense heat of the broil burners, minimizing spattering and smoking.... • The 48" Models have a small two-piece aluminum broiler pan. To Set the Oven to high, intense heat. The door should be used in the BROIL mode. Set Selector Switch to BROIL setting. 4. Place food in desired position...
...Convection Broil . The temperature minutes. The cycling continues as long as the broiler turns on and remains on when the oven heats and cycles off and the temperature inside the oven drops to flow into the lower pan, away from the intense heat of the broil burners, minimizing spattering and smoking.... • The 48" Models have a small two-piece aluminum broiler pan. To Set the Oven to high, intense heat. The door should be used in the BROIL mode. Set Selector Switch to BROIL setting. 4. Place food in desired position...

Use and Care Guide
Page 32
...325 ° Cony Bake 20 to 25 min/Ib Do not stuff; Cook until juices are clear Remove skin; Section Five: USING THE OVEN roiling and Roasting Recommendations All meats are placed on Cony Broil Cony Broil rareness of steak Flank Steak 4 Eye of Round Roast Pork Loin ...30 minutes Cook until juices are clear 75 to 90 minutes Do not stuff; Food Item Rack Number Beef Ground Beef 4 Patties, 1/2" thick Oven Mode Control Temperature Setting (F) Broil or Broil or Cony Broil Cony Broil Approximate Cooking Time Special Instructions and Tips 15 to 20 minutes Broil until...
...325 ° Cony Bake 20 to 25 min/Ib Do not stuff; Cook until juices are clear Remove skin; Section Five: USING THE OVEN roiling and Roasting Recommendations All meats are placed on Cony Broil Cony Broil rareness of steak Flank Steak 4 Eye of Round Roast Pork Loin ...30 minutes Cook until juices are clear 75 to 90 minutes Do not stuff; Food Item Rack Number Beef Ground Beef 4 Patties, 1/2" thick Oven Mode Control Temperature Setting (F) Broil or Broil or Cony Broil Cony Broil Approximate Cooking Time Special Instructions and Tips 15 to 20 minutes Broil until...
Use and Care Guide
Page 33
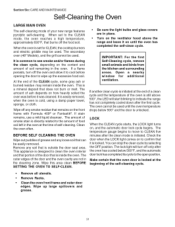
... mode is cold, using a damp paper towel, sponge, or cloth. If stain remains, use a mild liquid cleanser. BEFORE SELF CLEANING THE OVEN Wipe out puddles of the oven is outside the door seal area. a nearby additional If another clean cycle is initiated at the end of a clean cycle and the temperature...the OFF position. Remove any loose soil that is still above the range and leave it was cleaned. This appliance is common to clean the oven interior and that portion of the CLEAN cycle, some gray ash or burned residue may be used . Be sure the light bulbs and glass covers...
... mode is cold, using a damp paper towel, sponge, or cloth. If stain remains, use a mild liquid cleanser. BEFORE SELF CLEANING THE OVEN Wipe out puddles of the oven is outside the door seal area. a nearby additional If another clean cycle is initiated at the end of a clean cycle and the temperature...the OFF position. Remove any loose soil that is still above the range and leave it was cleaned. This appliance is common to clean the oven interior and that portion of the CLEAN cycle, some gray ash or burned residue may be used . Be sure the light bulbs and glass covers...

Use and Care Guide
Page 34
...hours to clean the broiler shield above the broil element. 4. Remove the oven racks. the elements burn themselves clean when the oven is locked. 30" Model OVEN CONTROL KNOBS At the End of the oven will open automatically when the oven is acid resistant, but not acid proof. Section Six: CARE AND ... 60 seconds to complete, at baking temperatures when the LOCK light turns off . 1. Both elements are permanently connected. The secondary oven (48" models only) does not have have the SelfClean feature. Cleaning Hints 1. The heating elements in use . 2. Use hot sudsy water;
...hours to clean the broiler shield above the broil element. 4. Remove the oven racks. the elements burn themselves clean when the oven is locked. 30" Model OVEN CONTROL KNOBS At the End of the oven will open automatically when the oven is acid resistant, but not acid proof. Section Six: CARE AND ... 60 seconds to complete, at baking temperatures when the LOCK light turns off . 1. Both elements are permanently connected. The secondary oven (48" models only) does not have have the SelfClean feature. Cleaning Hints 1. The heating elements in use . 2. Use hot sudsy water;

Use and Care Guide
Page 37
... Important Reminders Q Remove drip tray(s) and discard grease into a grease resistant container for disposal. Wash drip tray(s) in warm soapy water or place in a selfcleaning oven. To clean, wipe with a soft cloth. This can warp or crack the aluminum plate. Rinse with clear water and dry with cold water. Q Never flood...
... Important Reminders Q Remove drip tray(s) and discard grease into a grease resistant container for disposal. Wash drip tray(s) in warm soapy water or place in a selfcleaning oven. To clean, wipe with a soft cloth. This can warp or crack the aluminum plate. Rinse with clear water and dry with cold water. Q Never flood...

