
Use and Care Guide
Page 3
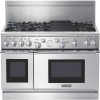
... Setting Broil and Convection Broil 29 Broiling and Roasting Recommendations ....... 30 Section 6: Care and Maintenance Self-Cleaning the Oven 31 - 32 Range Cleaning Recommendations ........ 33- 38 Section 7: Before Calling For Service Do-It-Yourself Maintenance 39 Before Calling For Service 40 Data Rating Plate 40 Warranty 41-42 Introduction The Thermador ProfessionaP Ranges are certified for use with propane gas supply will be unique to each range. The 30" model comes with broil capability. All models feature a gas cooking surface...
... Setting Broil and Convection Broil 29 Broiling and Roasting Recommendations ....... 30 Section 6: Care and Maintenance Self-Cleaning the Oven 31 - 32 Range Cleaning Recommendations ........ 33- 38 Section 7: Before Calling For Service Do-It-Yourself Maintenance 39 Before Calling For Service 40 Data Rating Plate 40 Warranty 41-42 Introduction The Thermador ProfessionaP Ranges are certified for use with propane gas supply will be unique to each range. The 30" model comes with broil capability. All models feature a gas cooking surface...
Use and Care Guide
Page 4
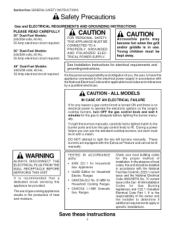
... a gas control knob is turned ON and there is the responsibility of heat and moisture. DO NOT attempt to HI. During a power failure you , the user, to have this appliance connected to operate the electronic igniters on the range's cooktop burners, turn the gas control knob to light the two left burners manually. WARNING ALWAYS DISCONNECT THE ELECTRICAL PLUG FROM THE WALL RECEPTACLE BEFORE SERVICING THIS UNIT. It is no electrical power to the electrical power supply in specific installations. Young...
... a gas control knob is turned ON and there is the responsibility of heat and moisture. DO NOT attempt to HI. During a power failure you , the user, to have this appliance connected to operate the electronic igniters on the range's cooktop burners, turn the gas control knob to light the two left burners manually. WARNING ALWAYS DISCONNECT THE ELECTRICAL PLUG FROM THE WALL RECEPTACLE BEFORE SERVICING THIS UNIT. It is no electrical power to the electrical power supply in specific installations. Young...
Use and Care Guide
Page 5
... to any part of potholders. Do not use any element, burner or burner grate until the gas has had time to dissipate. Some synthetic fabrics are allowed to use this Care and Use Manual carefully before using this type of the oven. Insure proper installation and servicing, Follow the installation instructions provided with baking soda or use the range until it . In the event a burner goes out and gas escapes, open a window or a door. If...
... to any part of potholders. Do not use any element, burner or burner grate until the gas has had time to dissipate. Some synthetic fabrics are allowed to use this Care and Use Manual carefully before using this type of the oven. Insure proper installation and servicing, Follow the installation instructions provided with baking soda or use the range until it . In the event a burner goes out and gas escapes, open a window or a door. If...

Use and Care Guide
Page 6
... the pan. Clean the range with sudden temperature changes. do not use the grill for cooking excessively fatty meats or products which deflects heat away from forced air vents or fans do not blow flammable material toward the flames or push the flames so that spans more than the grate or with one burner, such as a griddle, for proper operation. Place oven racks in use . or replacing Before self-cleaning the oven, remove the broiler pan, oven racks...
... the pan. Clean the range with sudden temperature changes. do not use the grill for cooking excessively fatty meats or products which deflects heat away from forced air vents or fans do not blow flammable material toward the flames or push the flames so that spans more than the grate or with one burner, such as a griddle, for proper operation. Place oven racks in use . or replacing Before self-cleaning the oven, remove the broiler pan, oven racks...
Use and Care Guide
Page 7
...Oven Racks 12-inch Oven Two-Piece Broil Pan 1 Star Burner Caps 4 Burner Grates 2 Control Knobs 5 CoatedTitanium-SurfaceGrill CoateTditanium-SurfaGceriddle Product Registration Card 1 Backguard 1 Installation Instructions 1 Use and Care Manual 1 3 3 3 3 3 2 2 1 1 1 4 4 6 2 2 3 6 6 7 1 2:1: 2:1: 4 4 2 2 8 8 1 1 1 (24") 1 1 1 1 1 1 ....... 1 1 1 1 1 1 1 1 1 1 3 3 2 2 2:1: 2:1: 6 6 3 3 9 9 1 1 1 1 1 1 1 1 *Backguard must disconnect the power supply before servicing this unit. Protect the self-cleaning feature...
...Oven Racks 12-inch Oven Two-Piece Broil Pan 1 Star Burner Caps 4 Burner Grates 2 Control Knobs 5 CoatedTitanium-SurfaceGrill CoateTditanium-SurfaGceriddle Product Registration Card 1 Backguard 1 Installation Instructions 1 Use and Care Manual 1 3 3 3 3 3 2 2 1 1 1 4 4 6 2 2 3 6 6 7 1 2:1: 2:1: 4 4 2 2 8 8 1 1 1 (24") 1 1 1 1 1 1 ....... 1 1 1 1 1 1 1 1 1 1 3 3 2 2 2:1: 2:1: 6 6 3 3 9 9 1 1 1 1 1 1 1 1 *Backguard must disconnect the power supply before servicing this unit. Protect the self-cleaning feature...
Use and Care Guide
Page 8
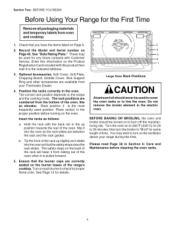
... the rack slides. Tip the front of the rack up position towards the rear of time. BEFORE BAKING OR BROILING, the oven and broiler should be used position. Please read Page 38 in the proper position before cleaning the oven racks. SectionTwo: BEFOREYOUBEGIN Before Using Your Range for any future contacts with Customer Service. Rack position 3 is pulled forward. . Turn on Page 5. 2. Ensure that you have the items listed on each burner...
... the rack slides. Tip the front of the rack up position towards the rear of time. BEFORE BAKING OR BROILING, the oven and broiler should be used position. Please read Page 38 in the proper position before cleaning the oven racks. SectionTwo: BEFOREYOUBEGIN Before Using Your Range for any future contacts with Customer Service. Rack position 3 is pulled forward. . Turn on Page 5. 2. Ensure that you have the items listed on each burner...
Use and Care Guide
Page 9
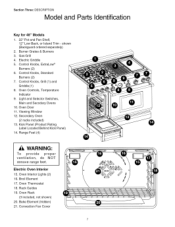
..., remove range proper do NOT feet. Broil Element 17. Oven Rack (3 included, not shown) 20. Electric Griddle 5. Kick Panel (Product Rating Label Located Behind Kick Panel) 14. Oven Interior Lights (2) 16. Control Knobs, Standard Burners (2) 7. Electric Oven Interior 15. Rack Guides 19. Convection Fan Cover shown (Backguard ordered separately) 2. Control Knobs, Grill (1) and Griddle (1) 8. Light and Selector Switches, Main and Secodary Ovens 10. Oven Thermostat 18. Burner Grates & Burners 3. Oven Door 11. Viewing Window 12. Oven Controls, Temperature Indicator...
..., remove range proper do NOT feet. Broil Element 17. Oven Rack (3 included, not shown) 20. Electric Griddle 5. Kick Panel (Product Rating Label Located Behind Kick Panel) 14. Oven Interior Lights (2) 16. Control Knobs, Standard Burners (2) 7. Electric Oven Interior 15. Rack Guides 19. Convection Fan Cover shown (Backguard ordered separately) 2. Control Knobs, Grill (1) and Griddle (1) 8. Light and Selector Switches, Main and Secodary Ovens 10. Oven Thermostat 18. Burner Grates & Burners 3. Oven Door 11. Viewing Window 12. Oven Controls, Temperature Indicator...

Use and Care Guide
Page 12
... 15,000 BTU/HR using natural gas (13,000 BTU/HR using Propane). • LO is equivalent BTU / HR. Each burner has its own control knob. to 2,100 BTU / HR. Setting Indicator OPERATION OF THE BURNERS • Press in on the control panel. When the knob is turned off. On all models, the two left burners, front and rear, have the exclusive ExtraLow feature, the remaining burners are suitable for the two left burners have flame settings even...
... 15,000 BTU/HR using natural gas (13,000 BTU/HR using Propane). • LO is equivalent BTU / HR. Each burner has its own control knob. to 2,100 BTU / HR. Setting Indicator OPERATION OF THE BURNERS • Press in on the control panel. When the knob is turned off. On all models, the two left burners, front and rear, have the exclusive ExtraLow feature, the remaining burners are suitable for the two left burners have flame settings even...

Use and Care Guide
Page 13
... each minute. • When the knob is set anywhere within the LO and XLO range marked on . Electronic Single Point Ignition Brass Burner--...._ Base Burne_ Cap Star_ Burner Components Each burner has its own electronic igniter that the cap is positioned correctly on the base. o If an over-size pan is used , all affect the consistency of the cooking temperature. Its size, type, material, and whether...
... each minute. • When the knob is set anywhere within the LO and XLO range marked on . Electronic Single Point Ignition Brass Burner--...._ Base Burne_ Cap Star_ Burner Components Each burner has its own electronic igniter that the cap is positioned correctly on the base. o If an over-size pan is used , all affect the consistency of the cooking temperature. Its size, type, material, and whether...
Use and Care Guide
Page 19
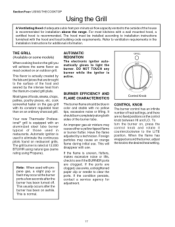
... electronic igniter automatically glows to the surface of those used to ventilation requirements in restaurants. An improper gas-air mixture may cause either a yellow tipped flame or burner flutter. If the ports are clogged, use . GRILL © Control Knob CONTROL KNOB The burner control has an infinite number of the house is used in the Installation Instructions for additional information. This is rated at 12,000 BTU/HR using natural gas (same rating using Propane). To turn the burner on the control knob...
... electronic igniter automatically glows to the surface of those used to ventilation requirements in restaurants. An improper gas-air mixture may cause either a yellow tipped flame or burner flutter. If the ports are clogged, use . GRILL © Control Knob CONTROL KNOB The burner control has an infinite number of the house is used in the Installation Instructions for additional information. This is rated at 12,000 BTU/HR using natural gas (same rating using Propane). To turn the burner on the control knob...

Use and Care Guide
Page 22
... tilt of griddle plate. Cooking on the knob from 150°-F to • There are sized to the temperature setting. *NOTE: The 24" griddle uses two control knobs, one knob for "GRIDDLE LEFT" and one knob for leveling the product. to check and adjust griddle for optimum performance. CAUTION The griddle element is hot after every use . The maple chopping block and stainless steel cover must be removed before cleaning. See Installation Manual for 10...
... tilt of griddle plate. Cooking on the knob from 150°-F to • There are sized to the temperature setting. *NOTE: The 24" griddle uses two control knobs, one knob for "GRIDDLE LEFT" and one knob for leveling the product. to check and adjust griddle for optimum performance. CAUTION The griddle element is hot after every use . The maple chopping block and stainless steel cover must be removed before cleaning. See Installation Manual for 10...
Use and Care Guide
Page 23
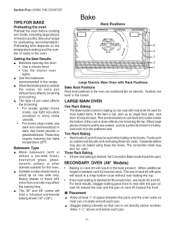
... recipe. • Storethe broiler pan(s) outside the ovens. The use dark non-stick/anodized or dark, dull metal utensils or glass bakeware. Section Five: USING THE COOKTOP TIPS FOR BAKE Preheating the oven Preheat the oven before cooking any foods, including large pieces of pan used when baking on rack #5 toward the rear and the pan on two levels. Number one level is not directly above and below each pan. • Stagger baking utensils so that...
... recipe. • Storethe broiler pan(s) outside the ovens. The use dark non-stick/anodized or dark, dull metal utensils or glass bakeware. Section Five: USING THE COOKTOP TIPS FOR BAKE Preheating the oven Preheat the oven before cooking any foods, including large pieces of pan used when baking on rack #5 toward the rear and the pan on two levels. Number one level is not directly above and below each pan. • Stagger baking utensils so that...

Use and Care Guide
Page 24
... and cooking charts for convection cooking because high sides or lids prohibit the warm air from convection cooking. This allows the heated air to rotate pans. The same temperature recommended in the backofthe oven moves heated air evenly around the food. For larger baked items such as cookies, check to see if they have low sides to allow the heated air to two minutes before the time indicated on...
... and cooking charts for convection cooking because high sides or lids prohibit the warm air from convection cooking. This allows the heated air to rotate pans. The same temperature recommended in the backofthe oven moves heated air evenly around the food. For larger baked items such as cookies, check to see if they have low sides to allow the heated air to two minutes before the time indicated on...
Use and Care Guide
Page 26
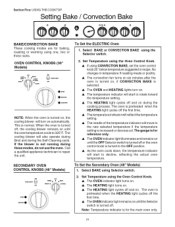
...the temperature indicator will start to rotate toward the temperature setting. • The HEATING light cycles off the first time. • Thetemperatureindicatorwillreflectthetemperature setting. • The needle of the temperature indicator will also operate during Broil and during the cooking process. Select BAKE or CONVECTION BAKE using the Oven Control Knob. • The OVEN indicator light turns on. • The HEATING light turns on. • The HEATING light cycles off . Select BAKE using one, two or three racks. The oven is preheated when the HEATING light...
...the temperature indicator will start to rotate toward the temperature setting. • The HEATING light cycles off the first time. • Thetemperatureindicatorwillreflectthetemperature setting. • The needle of the temperature indicator will also operate during Broil and during the cooking process. Select BAKE or CONVECTION BAKE using the Oven Control Knob. • The OVEN indicator light turns on. • The HEATING light turns on. • The HEATING light cycles off . Select BAKE using one, two or three racks. The oven is preheated when the HEATING light...

Use and Care Guide
Page 28
... turned off . , Do not open the oven door unnecessarily. Close the door. , Select PROOF using the large oven at safe temperatures. To Set the Secondary Oven for cooking food. If you completethe proofing before use the Warming Mode for warming 1. Section Five: USING THE COOKTOP Warm (Secondary Oven) SECONDARY OVEN (Only on . • The HEATING light will lower the temperature of the air inthe oven and lengthen the proofing time. To preheat the oven turn on 48" Models) The proof feature...
... turned off . , Do not open the oven door unnecessarily. Close the door. , Select PROOF using the large oven at safe temperatures. To Set the Secondary Oven for cooking food. If you completethe proofing before use the Warming Mode for warming 1. Section Five: USING THE COOKTOP Warm (Secondary Oven) SECONDARY OVEN (Only on . • The HEATING light will lower the temperature of the air inthe oven and lengthen the proofing time. To preheat the oven turn on 48" Models) The proof feature...
Use and Care Guide
Page 31
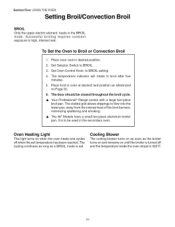
...; The 48" Models have a small two-piece aluminum broiler pan. Set Selector Switch to high, intense heat. The cycling continues as long as a BROIL mode is to broil after five 5. The temperature minutes. Successful broiling requires constant exposure to BROIL. 3. It is set temperature has been reached. The door should be used in oven at desired rack position as the broiler turns on and remains on Page 30. 6. Set Oven Control Knob to 325°...
...; The 48" Models have a small two-piece aluminum broiler pan. Set Selector Switch to high, intense heat. The cycling continues as long as a BROIL mode is to broil after five 5. The temperature minutes. Successful broiling requires constant exposure to BROIL. 3. It is set temperature has been reached. The door should be used in oven at desired rack position as the broiler turns on and remains on Page 30. 6. Set Oven Control Knob to 325°...
Use and Care Guide
Page 33
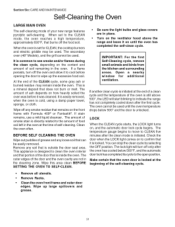
... the LOCK light comes on the ventilator hood above 500 ° , the LED will turn off the food soil. You can be used until the oven has completed the self-clean cycle. When set for ventilation. Clean the oven often. IMPORTANT: For the first Self-Cleaning cycle, remove small animals and birds from the kitchen and surrounding areas. Open window for CLEAN, the cooktop burners and electric griddle may remain inside the oven. LOCK...
... the LOCK light comes on the ventilator hood above 500 ° , the LED will turn off the food soil. You can be used until the oven has completed the self-clean cycle. When set for ventilation. Clean the oven often. IMPORTANT: For the first Self-Cleaning cycle, remove small animals and birds from the kitchen and surrounding areas. Open window for CLEAN, the cooktop burners and electric griddle may remain inside the oven. LOCK...

Use and Care Guide
Page 34
.... Set Oven Control Knob to CLEAN. • Cooling Blower turns on. • OVEN indicator light and HEATING light turn on. • Lock light turns on Range Cleaning Recommendations, Page 38. 3. The blower and the OVEN indicator light and the CLEAN light turn the selector switch or the oven control knob to complete, at baking temperatures when the LOCK light turns off . 1. Do not turn off when the oven temperature drops to bake onto the porcelain during the next use . Remove the oven racks. Section Six: CARE AND MAINTENANCE Self-Cleaning the Oven To Set Self-Clean for...
.... Set Oven Control Knob to CLEAN. • Cooling Blower turns on. • OVEN indicator light and HEATING light turn on. • Lock light turns on Range Cleaning Recommendations, Page 38. 3. The blower and the OVEN indicator light and the CLEAN light turn the selector switch or the oven control knob to complete, at baking temperatures when the LOCK light turns off . 1. Do not turn off when the oven temperature drops to bake onto the porcelain during the next use . Remove the oven racks. Section Six: CARE AND MAINTENANCE Self-Cleaning the Oven To Set Self-Clean for...

Use and Care Guide
Page 41
... light bulb glass comes loose from the base, turn the power tothe oven OFF atthe circuit breaker panel, before lighting Burner ports are turned OFF and then turned back on until the flame is necessary to Installation Instructions. Wait until both control knobs are clogged. If you Smell Gas," inside front cover. SYMPTOM Intermittent sparking CAUSE • Ceramic igniter is being used during a power failure. Have a qualified electrician ground the range properly. • Refer to remove...
... light bulb glass comes loose from the base, turn the power tothe oven OFF atthe circuit breaker panel, before lighting Burner ports are turned OFF and then turned back on until the flame is necessary to Installation Instructions. Wait until both control knobs are clogged. If you Smell Gas," inside front cover. SYMPTOM Intermittent sparking CAUSE • Ceramic igniter is being used during a power failure. Have a qualified electrician ground the range properly. • Refer to remove...

Use and Care Guide
Page 44
... resetting of breakers or fuses. IN NO EVENT WILL THE MANUFACTURER BE LIABLE FOR CONSE- correction of installation problems (you how to use of the Product in conjunction with air or water-going vessels). _ Any party's willful misconduct, negligence, misuse, abuse, accidents, neglect, improper operation, failure to maintain, improper or negligent installation, tampering, failure to follow operating instructions, mishandling, unauthorized service (including self...
... resetting of breakers or fuses. IN NO EVENT WILL THE MANUFACTURER BE LIABLE FOR CONSE- correction of installation problems (you how to use of the Product in conjunction with air or water-going vessels). _ Any party's willful misconduct, negligence, misuse, abuse, accidents, neglect, improper operation, failure to maintain, improper or negligent installation, tampering, failure to follow operating instructions, mishandling, unauthorized service (including self...


