Installation Manual
Page 7
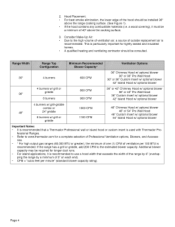
...w/optional blower 42" Island Hood w/optional blower 4 burners w/grill-griddle combo or 48" 24" griddle 6 burners w/grill or griddle 1000 CFM 1100 CFM 48" Chimney Hood w/optional blower 48" or 54" Pro Wall Hood 48" Custom Insert w/optional blower 54" Island Hood w/optional blower Important Notes: It is...of ventilation air, a source of the hood should be installed 36" above the cooking surface. 3, Consider Make-Up Air: Due to www.thermador.com for a complete selection of Professional Ventilation options, Blowers, and Accessories. * For high output gas ranges (60,000 BTU or greater), ...
...w/optional blower 42" Island Hood w/optional blower 4 burners w/grill-griddle combo or 48" 24" griddle 6 burners w/grill or griddle 1000 CFM 1100 CFM 48" Chimney Hood w/optional blower 48" or 54" Pro Wall Hood 48" Custom Insert w/optional blower 54" Island Hood w/optional blower Important Notes: It is...of ventilation air, a source of the hood should be installed 36" above the cooking surface. 3, Consider Make-Up Air: Due to www.thermador.com for a complete selection of Professional Ventilation options, Blowers, and Accessories. * For high output gas ranges (60,000 BTU or greater), ...

Installation Manual
Page 9
... of the range top must be at the same level or above the countertop level. of CombustibleMaterial A 0 30" Range-30" 36" Range - 36" 48" Range -48" 13" Max. to combustible sidewall material A, (bothsides) CAUTION: See Figs. 2A and 2B 40" Min. Range Height Current Edition). *The range height ...fully extended. 30"or36"Wide Hood For 30" Ranges { 36"or42"forlsland For 36" Ranges { 36"or42"WideHood 42" or48" for Island For 48" Ranges { 48", 54", or 60" Wide Hood 54" or 60" for Island t OO T 3H6o"ofdrotmo cboootktoingn osfuorfvaecrehead (40" min. The level with Leveling Legs...
... of the range top must be at the same level or above the countertop level. of CombustibleMaterial A 0 30" Range-30" 36" Range - 36" 48" Range -48" 13" Max. to combustible sidewall material A, (bothsides) CAUTION: See Figs. 2A and 2B 40" Min. Range Height Current Edition). *The range height ...fully extended. 30"or36"Wide Hood For 30" Ranges { 36"or42"forlsland For 36" Ranges { 36"or42"WideHood 42" or48" for Island For 48" Ranges { 48", 54", or 60" Wide Hood 54" or 60" for Island t OO T 3H6o"ofdrotmo cboootktoingn osfuorfvaecrehead (40" min. The level with Leveling Legs...
Installation Manual
Page 10
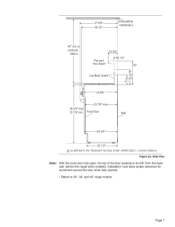
... 1/4" Pan Shelf _ - to_ combust- Figure 2a: Side View Note: With the oven door fully open, the top of the door extends to 30", 36" and 48" range models. I I I I ; ,,_ 27 5/8" 26 1/2" combustible materials z& 40" min. Front Face J Wall _4 3/4': _4_22 1/2'-' /'_ as defined in the "National Fuel Gas Code" (ANSI Z223.1, Current Edition...
... 1/4" Pan Shelf _ - to_ combust- Figure 2a: Side View Note: With the oven door fully open, the top of the door extends to 30", 36" and 48" range models. I I I I ; ,,_ 27 5/8" 26 1/2" combustible materials z& 40" min. Front Face J Wall _4 3/4': _4_22 1/2'-' /'_ as defined in the "National Fuel Gas Code" (ANSI Z223.1, Current Edition...
Installation Manual
Page 12
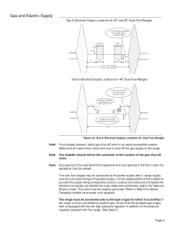
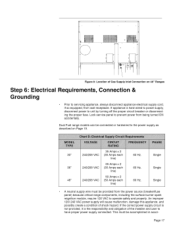
... Locations for 30" and 36" Dual Fuel Ranges electrical supply zone gas supply zon 30 1/4" (30" models) 36 1/4" (36" models) Gas & Electrical Supply Locations for 48" Dual Fuel Ranges °F R_eptacle or Junction Box 48-1/4' Figure 3a: Gas & Electrical Supply Locations for details.
... Locations for 30" and 36" Dual Fuel Ranges electrical supply zone gas supply zon 30 1/4" (30" models) 36 1/4" (36" models) Gas & Electrical Supply Locations for 48" Dual Fuel Ranges °F R_eptacle or Junction Box 48-1/4' Figure 3a: Gas & Electrical Supply Locations for details.
Installation Manual
Page 13
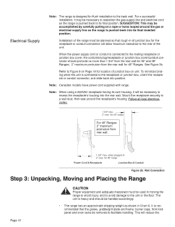
...plug/receptacle or junction box cover/conduit connector should be handled accordingly. Note: When using a 240VAC receptacle having its final position. I For 48" Ranges: 2" maximum protrusion from rear wall. ! ..... 1 3/4" max. The unit is connected to the rear of the unit. The... max .... _,_ 2" max. Note: Canadian models have power cord supplied with range. Follow all local electrical codes. for 48" Ranges. when plugged in Chart A. for 48" range Power Cord & Receptacle Junction Box & Conduit Figure 3b: Wall Connection Step 3: Unpacking, Moving and Placing the Range...
...plug/receptacle or junction box cover/conduit connector should be handled accordingly. Note: When using a 240VAC receptacle having its final position. I For 48" Ranges: 2" maximum protrusion from rear wall. ! ..... 1 3/4" max. The unit is connected to the rear of the unit. The... max .... _,_ 2" max. Note: Canadian models have power cord supplied with range. Follow all local electrical codes. for 48" Ranges. when plugged in Chart A. for 48" range Power Cord & Receptacle Junction Box & Conduit Figure 3b: Wall Connection Step 3: Unpacking, Moving and Placing the Range...

Installation Manual
Page 19
.... Leaktestingoftheapplianceshallbein accordancweiththefollowinginstructions. Channel for gas leaks. AlwaysusepipesealingcompoundorTeflon®tapeonthepipethreadsa, ndbe carefunl ottoapplyexcessivepressurewhentighteningthefittings. Turnongasandchecksupplylineconnectionfsorleaksusinga soapand watersolution. Suggestedlengthofflexlineis 48";howeverp,leasechecklocalcodesforyour area'srequirementbseforeinstallation. Photo A: Appliance Manifold Pipe Connection Page16 theabsenceoflocalcodest,he installatiomn ustconformtotheNationaFl uelGasCodeANSIZ223.1/NFPA54currenitssue. Use3...
.... Leaktestingoftheapplianceshallbein accordancweiththefollowinginstructions. Channel for gas leaks. AlwaysusepipesealingcompoundorTeflon®tapeonthepipethreadsa, ndbe carefunl ottoapplyexcessivepressurewhentighteningthefittings. Turnongasandchecksupplylineconnectionfsorleaksusinga soapand watersolution. Suggestedlengthofflexlineis 48";howeverp,leasechecklocalcodesforyour area'srequirementbseforeinstallation. Photo A: Appliance Manifold Pipe Connection Page16 theabsenceoflocalcodest,he installatiomn ustconformtotheNationaFl uelGasCodeANSIZ223.1/NFPA54currenitssue. Use3...
Installation Manual
Page 20
...supply connected. This must be accomplished in accor- Dual Fuel range models can be connected or hardwired to the power supply as described on 48" Ranges Step 6: Electrical Requirements, Connection & Grounding Prior to unit by turning off the proper circuit breaker or disconnecting the proper fuse. line...) 50 Amps x 2 48 _' 240/208 VAC (50 Amps each 60 Hz. line) 35 Amps x 2 36 _' 240/208 VAC (35 Amps each 60 Hz. If appliance...
...supply connected. This must be accomplished in accor- Dual Fuel range models can be connected or hardwired to the power supply as described on 48" Ranges Step 6: Electrical Requirements, Connection & Grounding Prior to unit by turning off the proper circuit breaker or disconnecting the proper fuse. line...) 50 Amps x 2 48 _' 240/208 VAC (50 Amps each 60 Hz. line) 35 Amps x 2 36 _' 240/208 VAC (35 Amps each 60 Hz. If appliance...

Installation Manual
Page 22
Figure 9: Location of Junction Box on 30" and 36" Ranges Location of junction box on 48" Ranges Figure 10: Location of Junction Box on 48" Ranges Page19
Figure 9: Location of Junction Box on 30" and 36" Ranges Location of junction box on 48" Ranges Figure 10: Location of Junction Box on 48" Ranges Page19

Installation Manual
Page 26
....OBSERVCEAUTIONSCONCERNINIGTEMS PLACEDONTOPOFTHESHELF. ,_ TChAeUPToIOt aNnd Pan Shelf can melt flammable items a total load over 30 pounds (13.6kg) Included with 30" N/A PAD30EHSH Range 36" N/A PAD36ELBH PAD36EHSH 48" N/A PAD48ELBH PAD48EHSH PAD30EITH PAD36EtTH PAD48EITH Page 23 Tosecurethefrontofthebackguard,instaltlhree(3)ofthe Torxheadscrews throughthelowerfrontpaneol fthebackguardin, totheflangeatthebackofthe range'scooktop. Thecenterofthestripmaybesupportedbya tabfromthebackpanel,andnot requirea screw.
....OBSERVCEAUTIONSCONCERNINIGTEMS PLACEDONTOPOFTHESHELF. ,_ TChAeUPToIOt aNnd Pan Shelf can melt flammable items a total load over 30 pounds (13.6kg) Included with 30" N/A PAD30EHSH Range 36" N/A PAD36ELBH PAD36EHSH 48" N/A PAD48ELBH PAD48EHSH PAD30EITH PAD36EtTH PAD48EITH Page 23 Tosecurethefrontofthebackguard,instaltlhree(3)ofthe Torxheadscrews throughthelowerfrontpaneol fthebackguardin, totheflangeatthebackofthe range'scooktop. Thecenterofthestripmaybesupportedbya tabfromthebackpanel,andnot requirea screw.