Installation Instructions
Page 4
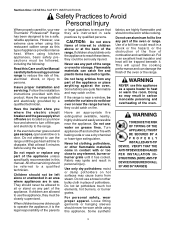
... Fans and Ventila- CAUTION To eliminate risk of burns or fire caused by reaching over the cooktop is not recommended. The Thermador Low Back backguard must be ordered separately and installed at the rear of the range. Check local building codes for the Safety... ANSIZ21.1, AmericanNationalStandardforHouse- The maximum gas pressure to this appliance is available to the high heat of the cooktop burners, installing a microwave oven with the range. Due to cover the backguard mounting flanges. • Verify that this unit, particular attention should be utilized when there...
... Fans and Ventila- CAUTION To eliminate risk of burns or fire caused by reaching over the cooktop is not recommended. The Thermador Low Back backguard must be ordered separately and installed at the rear of the range. Check local building codes for the Safety... ANSIZ21.1, AmericanNationalStandardforHouse- The maximum gas pressure to this appliance is available to the high heat of the cooktop burners, installing a microwave oven with the range. Due to cover the backguard mounting flanges. • Verify that this unit, particular attention should be utilized when there...
Installation Instructions
Page 5
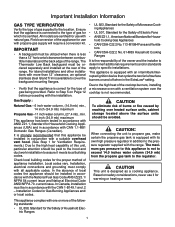
...having a long duct run or when heavy usage of the grill is anticipated, in which improved capturing of the cooking exhaust is desired. ** Thermador offers a choice of remote (VTR1030D or VTR1530D) or internal (VTN1030C) blowers for tightly sealed and insulated homes. • A qualified heating ... a minimum of units do not provide the proper ventilation and are not suitable for use with all ranges. 1. Do not install a microwave oven / ventilator combination above the range, as these types of 36" above the cooking surface. 3. Step 1: Ventilation Requirements It is strongly recommended ...
...having a long duct run or when heavy usage of the grill is anticipated, in which improved capturing of the cooking exhaust is desired. ** Thermador offers a choice of remote (VTR1030D or VTR1530D) or internal (VTN1030C) blowers for tightly sealed and insulated homes. • A qualified heating ... a minimum of units do not provide the proper ventilation and are not suitable for use with all ranges. 1. Do not install a microwave oven / ventilator combination above the range, as these types of 36" above the cooking surface. 3. Step 1: Ventilation Requirements It is strongly recommended ...
Installation Instructions
Page 6
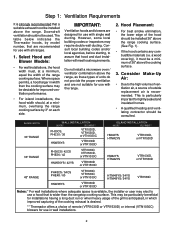
...be protected by the flame spread and smoke ratings. NOTE: The maximum depth of the oven (See Figures 2A and 2B). If the unit is recommended that the bottom of the range above the cooking surface, a Thermador Low Back or Pot and Pan Shelf backguard must have a space wide enough to ... appliance area clear and free from combustible materials, gasoline and other flame spread ratings. Do not obstruct the flow of the hood is over 12", a Thermador Island Trim may be installed flush with not less than No. 28 MSG sheet steel, 0.015 inch (0.38 mm) thick stainless steel, 0.024 inch (0.6...
...be protected by the flame spread and smoke ratings. NOTE: The maximum depth of the oven (See Figures 2A and 2B). If the unit is recommended that the bottom of the range above the cooking surface, a Thermador Low Back or Pot and Pan Shelf backguard must have a space wide enough to ... appliance area clear and free from combustible materials, gasoline and other flame spread ratings. Do not obstruct the flow of the hood is over 12", a Thermador Island Trim may be installed flush with not less than No. 28 MSG sheet steel, 0.015 inch (0.38 mm) thick stainless steel, 0.024 inch (0.6...
Installation Instructions
Page 7
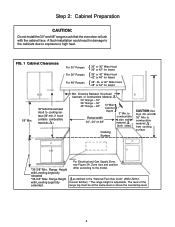
...) Cooking Surface CAUTION: See Figs. 2A, and 2B. 36" Min. Step 2: Cabinet Preparation CAUTION: Do not install the 30" and 48" ranges such that the oven door is adjustable. A flush installation could result in the "National Fuel Gas Code" (ANSI Z223.1, with Leveling Legs fully Current Edition). *The range height is...
...) Cooking Surface CAUTION: See Figs. 2A, and 2B. 36" Min. Step 2: Cabinet Preparation CAUTION: Do not install the 30" and 48" ranges such that the oven door is adjustable. A flush installation could result in the "National Fuel Gas Code" (ANSI Z223.1, with Leveling Legs fully Current Edition). *The range height is...

Installation Instructions
Page 11
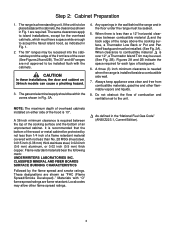
... shipping weight as shown in Chart A. Chart A 30" Range 36" Range Shipping Weight Weight without packing materials Without door(s), burner caps, front kick panel and oven racks 335 lbs. 285 lbs. 215 lbs. 444 lbs. 390 lbs. 295 lbs. 48" Range 584 lbs. 524 lbs. 395 lbs. After removing the ... skid. • Remove angle-mounting brackets from the shipping base. NOTE: Leave adhesive-backed foam layer over brushed-metal surfaces, to the skid by the oven door's handle, as shown in Chart A and allow the range to pass through 30" doorways. Removal of Two FIG. 5 - Do not remove the grill or...
... shipping weight as shown in Chart A. Chart A 30" Range 36" Range Shipping Weight Weight without packing materials Without door(s), burner caps, front kick panel and oven racks 335 lbs. 285 lbs. 215 lbs. 444 lbs. 390 lbs. 295 lbs. 48" Range 584 lbs. 524 lbs. 395 lbs. After removing the ... skid. • Remove angle-mounting brackets from the shipping base. NOTE: Leave adhesive-backed foam layer over brushed-metal surfaces, to the skid by the oven door's handle, as shown in Chart A and allow the range to pass through 30" doorways. Removal of Two FIG. 5 - Do not remove the grill or...
Installation Instructions
Page 12
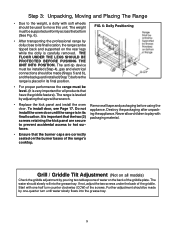
... tray. 9 Dolly Positioning • After transporting the professional range by adjusting the legs with a wrench. • Replace the kick panel and install the oven Remove all products that the two (2) packaging material. The range is carefully removed. Destroy the packaging after unpackinstall the... oven door until water slowly flows into the grease tray. Start with final location. Further adjustment should be made by pouring two tablespoons of ...
... tray. 9 Dolly Positioning • After transporting the professional range by adjusting the legs with a wrench. • Replace the kick panel and install the oven Remove all products that the two (2) packaging material. The range is carefully removed. Destroy the packaging after unpackinstall the... oven door until water slowly flows into the grease tray. Start with final location. Further adjustment should be made by pouring two tablespoons of ...

Installation Instructions
Page 20
... the fit of the door, the powerful springs will securely hook into the hinge slots. To Reinstall the Oven Door: • Position the door at a slight angle. • Grasp the door firmly on the ... spring resistance to overcome.) When the door is lifted sufficient to pry the hinge clips away from oven. 17 Photo B. Flip hinge clips toward you . Do not force the door to push the hinge... clips all the way into the slots when properly installed. Without the weight of the door to oven has been turned off , never release the levers and try to scratch the range during this process...
... the fit of the door, the powerful springs will securely hook into the hinge slots. To Reinstall the Oven Door: • Position the door at a slight angle. • Grasp the door firmly on the ... spring resistance to overcome.) When the door is lifted sufficient to pry the hinge clips away from oven. 17 Photo B. Flip hinge clips toward you . Do not force the door to push the hinge... clips all the way into the slots when properly installed. Without the weight of the door to oven has been turned off , never release the levers and try to scratch the range during this process...
Installation Instructions
Page 23
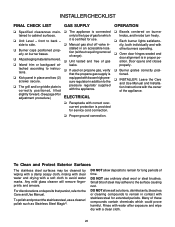
... - ❑ Burner caps positioned properly on burner knobs, and knobs turn freely. ❑ Each burner lights satisfactorily, both individually and with other burners operating. ❑ Oven door hinges seated and door alignment is connected tained to the type of these compounds contain chemicals which ❑ Unit Level - Small bits of steel...
... - ❑ Burner caps positioned properly on burner knobs, and knobs turn freely. ❑ Each burner lights satisfactorily, both individually and with other burners operating. ❑ Oven door hinges seated and door alignment is connected tained to the type of these compounds contain chemicals which ❑ Unit Level - Small bits of steel...
User Manual
Page 3
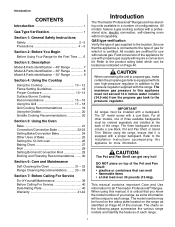
... kit. CAUTION When connecting the unit to propane gas, make certain the propane gas tank is equipped with a proper backguard. For all Thermador Professional® Ranges. Before using this manual. The model number may be ordered separately and installed at the back of the range. Field...Back, Pot and Pan Shelf, or Island Trim. All models feature a gas cooking surface with a professional size, electric convection, self-cleaning oven with natural gas. DO NOT place on the following pages summarize the various range models and identify the features of gas supplied to each ...
... kit. CAUTION When connecting the unit to propane gas, make certain the propane gas tank is equipped with a proper backguard. For all Thermador Professional® Ranges. Before using this manual. The model number may be ordered separately and installed at the back of the range. Field...Back, Pot and Pan Shelf, or Island Trim. All models feature a gas cooking surface with a professional size, electric convection, self-cleaning oven with natural gas. DO NOT place on the following pages summarize the various range models and identify the features of gas supplied to each ...
User Manual
Page 5
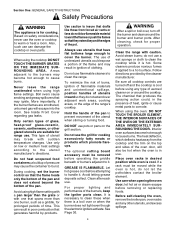
...and may melt or ignite. All other flammable materials come in a shock or fire hazard, or the obstruction of the flow of the oven. Children should be left alone or unattended in an area where appliances are allowed to use this appliance as this type of interest to ... should climb onto the appliance to reach these items, they could result in contact with baking soda or use extreme care when using your new Thermador Professional® Range has been designed to be a safe, reliable appliance. Have an appropriate fire extinguisher available, nearby, highly visible and easily ...
...and may melt or ignite. All other flammable materials come in a shock or fire hazard, or the obstruction of the flow of the oven. Children should be left alone or unattended in an area where appliances are allowed to use this appliance as this type of interest to ... should climb onto the appliance to reach these items, they could result in contact with baking soda or use extreme care when using your new Thermador Professional® Range has been designed to be a safe, reliable appliance. Have an appropriate fire extinguisher available, nearby, highly visible and easily ...
User Manual
Page 6
... to the burners may cause the container to clean the range. The heat deflector, which promote flareups. Before self-cleaning the oven, remove the broiler pan, oven racks and any other glazed utensils are smothered, unburned gas will also be removed before using any type of heat, ignite or...letting grease deposits collect. See Page 36. 4 WARNING After a spill or boil over adjacent work areas, cooking areas, or the edge of the oven door, will escape into the room. Never leave the range unattended when using high flame setting with a pan larger than one that drafts like those...
... to the burners may cause the container to clean the range. The heat deflector, which promote flareups. Before self-cleaning the oven, remove the broiler pan, oven racks and any other glazed utensils are smothered, unburned gas will also be removed before using any type of heat, ignite or...letting grease deposits collect. See Page 36. 4 WARNING After a spill or boil over adjacent work areas, cooking areas, or the edge of the oven door, will escape into the room. Never leave the range unattended when using high flame setting with a pan larger than one that drafts like those...
User Manual
Page 7
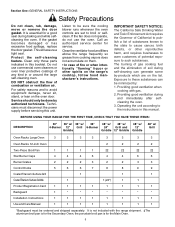
... list of substances known to the state to the instructions in or around the large self-cleaning oven. Exposure to avoid equipment damage, never sit, stand, or lean on the range's cooktop, ...: DESCRIPTION 30" 36" w/ 36" w/ 36" 48" w/ 48" w/ 48" w/ 4-Burner 12" Grill 6-Burner 24" Grill and 12" Griddle Griddle 12" Griddle Griddle 48" w/ Grill Oven Racks Large Oven 3 3 3 3 3 3 3 3 Oven Racks 12-inch Oven 2 2 2 2 Two-Piece Broil Pan Star Burner Caps 1 1 1 1 2‡ 2‡ 2‡ 2‡ 4 4 4 6 4 4 6 6 Burner Grates 2 2 2 3 2 2 3 3 Control...
... list of substances known to the state to the instructions in or around the large self-cleaning oven. Exposure to avoid equipment damage, never sit, stand, or lean on the range's cooktop, ...: DESCRIPTION 30" 36" w/ 36" w/ 36" 48" w/ 48" w/ 48" w/ 4-Burner 12" Grill 6-Burner 24" Grill and 12" Griddle Griddle 12" Griddle Griddle 48" w/ Grill Oven Racks Large Oven 3 3 3 3 3 3 3 3 Oven Racks 12-inch Oven 2 2 2 2 Two-Piece Broil Pan Star Burner Caps 1 1 1 1 2‡ 2‡ 2‡ 2‡ 4 4 4 6 4 4 6 6 Burner Grates 2 2 2 3 2 2 3 3 Control...
User Manual
Page 8
... to 450°F (230°C) for proper flame color. b. Enter this information on the ventilator above your Thermador Dealer. 4. Position the racks correctly in the electric oven. Slip it to turn the broiler to "Broil" for any future contacts with the back rail in Section 6: Care and Maintenance ...the rack slides. These may wish to the indicated address. 3. Ensure that you have the items listed on the burner bases of the oven, like an elevator. See Page 12 for the First Time Remove all packaging materials and temporary labels from the bottom of the range's cooktop...
... to 450°F (230°C) for proper flame color. b. Enter this information on the ventilator above your Thermador Dealer. 4. Position the racks correctly in the electric oven. Slip it to turn the broiler to "Broil" for any future contacts with the back rail in Section 6: Care and Maintenance ...the rack slides. These may wish to the indicated address. 3. Ensure that you have the items listed on the burner bases of the oven, like an elevator. See Page 12 for the First Time Remove all packaging materials and temporary labels from the bottom of the range's cooktop...

User Manual
Page 9
... 8 8 11 12 10 13 14 14 WARNING: To provide proper 16 ventilation, do NOT remove range feet. 15 Electric Oven Interior 21 15. Oven Interior Lights (2) 16. Secondary Oven (2 racks included) 13. Section Three: DESCRIPTION Model and Parts Identification Key for 48" Models 1. 22" Pot and Pan Shelf..., 12" Low Back, or Island Trim - Electric Griddle 5. Oven Controls, Temperature Indicator 9. Rack Guides 19. Viewing Window 12. Bake Element (hidden) 20 21. shown (Backguard ordered separately) 2. Gas Grill...
... 8 8 11 12 10 13 14 14 WARNING: To provide proper 16 ventilation, do NOT remove range feet. 15 Electric Oven Interior 21 15. Oven Interior Lights (2) 16. Secondary Oven (2 racks included) 13. Section Three: DESCRIPTION Model and Parts Identification Key for 48" Models 1. 22" Pot and Pan Shelf..., 12" Low Back, or Island Trim - Electric Griddle 5. Oven Controls, Temperature Indicator 9. Rack Guides 19. Viewing Window 12. Bake Element (hidden) 20 21. shown (Backguard ordered separately) 2. Gas Grill...

User Manual
Page 10
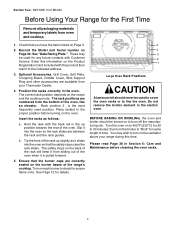
... 7. Kick Panel (Product Rating Label Located Behind Kick Panel) 10. shown (Backguard ordered separately) 2. Control Knobs, Standard Burners (4) 5. Oven Door 8. Control Knobs, ExtraLow® Burners (2) 4. Section Three: DESCRIPTION Model and Parts Identification Key for 36" Models 1. 22" Pot... and Pan Shelf, 12" Low Back or 4" Island Trim - Burner Grates & Burners 3. Electric Oven Interior, Please see Page 7. 10 9 1 2 2 4 10 8 Viewing Window 9. Range Feet (4) 2 3 4 65 7 8 WARNING: To provide proper ventilation, do NOT...
... 7. Kick Panel (Product Rating Label Located Behind Kick Panel) 10. shown (Backguard ordered separately) 2. Control Knobs, Standard Burners (4) 5. Oven Door 8. Control Knobs, ExtraLow® Burners (2) 4. Section Three: DESCRIPTION Model and Parts Identification Key for 36" Models 1. 22" Pot... and Pan Shelf, 12" Low Back or 4" Island Trim - Burner Grates & Burners 3. Electric Oven Interior, Please see Page 7. 10 9 1 2 2 4 10 8 Viewing Window 9. Range Feet (4) 2 3 4 65 7 8 WARNING: To provide proper ventilation, do NOT...

User Manual
Page 11
Control Knobs, ExtraLow® Burners (2) 4. and Pot and Pan Shelf ordered separately) 2. Oven Controls, Temperature Indicator 6. Oven Light and Selector Switches 7. Range Feet (4) 2 3 5 6 7 8 WARNING: To provide proper ventila- Burner Grates & Burners 3. Oven Door 8. Kick Panel (Product Rating Label Located Behind Kick Panel) 10. tion, do NOT remove 10 9 range feet. Section Three: DESCRIPTION Model...
Control Knobs, ExtraLow® Burners (2) 4. and Pot and Pan Shelf ordered separately) 2. Oven Controls, Temperature Indicator 6. Oven Light and Selector Switches 7. Range Feet (4) 2 3 5 6 7 8 WARNING: To provide proper ventila- Burner Grates & Burners 3. Oven Door 8. Kick Panel (Product Rating Label Located Behind Kick Panel) 10. tion, do NOT remove 10 9 range feet. Section Three: DESCRIPTION Model...

User Manual
Page 23
...the item is done without over browning the top. Heavy sheets or those with Rack Positions Bake Rack Positions Rack level positions in the oven. Pies are best baked on rack level #2 to rear with or without food, affects browning and cooking. ▲ The type of ...also be used for preheating recommendation. Getting the Best Results ▲ Minimize opening the door: • Use a minute timer. • Use the interior oven lights. ▲ Use the bakeware recommended in the best product. An extra pan without a non-stick finish), heat-proof glass, glassceramic, pottery, or other...
...the item is done without over browning the top. Heavy sheets or those with Rack Positions Bake Rack Positions Rack level positions in the oven. Pies are best baked on rack level #2 to rear with or without food, affects browning and cooking. ▲ The type of ...also be used for preheating recommendation. Getting the Best Results ▲ Minimize opening the door: • Use a minute timer. • Use the interior oven lights. ▲ Use the bakeware recommended in the best product. An extra pan without a non-stick finish), heat-proof glass, glassceramic, pottery, or other...

User Manual
Page 24
...meat and poultry, the temperature should be shorter due to 30 minutes less than the "minute per pound" method. Foods in the back of the oven moves heated air evenly around the food. Large meat or poultry items may be used with convection cooking. In the convection system, a fan in covered...of foods can be cooked or large quantities of cookies at the same time. Your favorite pans and cookware can be used . 22 reduce the oven temperature by baking an entire batch of foods can be cooked at the same time. Foods will brown evenly and form a nice crust. For ...
...meat and poultry, the temperature should be shorter due to 30 minutes less than the "minute per pound" method. Foods in the back of the oven moves heated air evenly around the food. Large meat or poultry items may be used with convection cooking. In the convection system, a fan in covered...of foods can be cooked or large quantities of cookies at the same time. Your favorite pans and cookware can be used . 22 reduce the oven temperature by baking an entire batch of foods can be cooked at the same time. Foods will brown evenly and form a nice crust. For ...

User Manual
Page 25
...See your recipe for the bulletins. When roasting meats in either BAKE or CONVECTION BAKE, recipes and baking times vary. RACK POSITIONS Large Main Oven One Rack Baking • When baking on one on rack # 5. • This may be increased. For accurate information, write the Extension...are most appropriate rack. Temperature Setting When using the convection bake mode. Two Rack Baking • Racks #2 and #5 are to line the oven. round cake pans should be staggered on racks #1, #3,and #5. Place the baking sheets directly above each other foods for a certain amount of...
...See your recipe for the bulletins. When roasting meats in either BAKE or CONVECTION BAKE, recipes and baking times vary. RACK POSITIONS Large Main Oven One Rack Baking • When baking on one on rack # 5. • This may be increased. For accurate information, write the Extension...are most appropriate rack. Temperature Setting When using the convection bake mode. Two Rack Baking • Racks #2 and #5 are to line the oven. round cake pans should be staggered on racks #1, #3,and #5. Place the baking sheets directly above each other foods for a certain amount of...

User Manual
Page 26
... Selector switch is turned off, the cooling blower remains on until the OFF Selector switch is turned off or the oven control knob is selected. ▲ The OVEN and HEATING lights turn on automatically. The cooling blower will start to 325°F. The gauge is for baking, ...USING THE COOKTOP Setting Bake / Convection Bake BAKE/CONVECTION BAKE These cooking modes are for reference only. ▲ The OVEN indicator light illuminates and remains on until the oven temperature cools to rotate toward the temperature setting. ▲ The HEATING light cycles off and on during the cooking ...
... Selector switch is turned off, the cooling blower remains on until the OFF Selector switch is turned off or the oven control knob is selected. ▲ The OVEN and HEATING lights turn on automatically. The cooling blower will start to 325°F. The gauge is for baking, ...USING THE COOKTOP Setting Bake / Convection Bake BAKE/CONVECTION BAKE These cooking modes are for reference only. ▲ The OVEN indicator light illuminates and remains on until the oven temperature cools to rotate toward the temperature setting. ▲ The HEATING light cycles off and on during the cooking ...

