Installation Instructions
Page 2
... TIP ■ INJURY TO PERSONS COULD RESULT ■ INSTALL ANTI-TIP DEVICE ■ SEE INSTALLATION INSTRUCTIONS TO REDUCE THE RISK OF TIPPING OF THE APPLIANCE, IT MUST BE SECURED BY A PROPERLY INSTALLED ANTI-TIP DEVICE. WARNING Disconnect power before installing. Flexible gas connector must be sure that all applicable codes...: If the information in your gas supplier from a neighbor's phone. WHAT TO DO IF YOU SMELL GAS ■ Do not try to light any appliance. ■ Do not touch any electrical switch. ■ Do not use any other flammable vapors and liquids in the vicinity of this...
... TIP ■ INJURY TO PERSONS COULD RESULT ■ INSTALL ANTI-TIP DEVICE ■ SEE INSTALLATION INSTRUCTIONS TO REDUCE THE RISK OF TIPPING OF THE APPLIANCE, IT MUST BE SECURED BY A PROPERLY INSTALLED ANTI-TIP DEVICE. WARNING Disconnect power before installing. Flexible gas connector must be sure that all applicable codes...: If the information in your gas supplier from a neighbor's phone. WHAT TO DO IF YOU SMELL GAS ■ Do not try to light any appliance. ■ Do not touch any electrical switch. ■ Do not use any other flammable vapors and liquids in the vicinity of this...
Installation Instructions
Page 4
...and grounding must be paid to the hood and duct work installation to cover the backguard mounting flanges. • Verify that the appliance is certified. In Canada, installation must be installed in accordance with the National Fuel Gas Code ANSI Z223.1/ NFPA 54 current ...Ensure that the appliance is not recommended. Field conversion of the appliance for Ventilation Requirements.) Due to the high heat capability of this appliance is strongly recommended that cycles the two far left surface burners on safety considerations, never use with natural gas. The Thermador Low Back ...
...and grounding must be paid to the hood and duct work installation to cover the backguard mounting flanges. • Verify that the appliance is certified. In Canada, installation must be installed in accordance with the National Fuel Gas Code ANSI Z223.1/ NFPA 54 current ...Ensure that the appliance is not recommended. Field conversion of the appliance for Ventilation Requirements.) Due to the high heat capability of this appliance is strongly recommended that cycles the two far left surface burners on safety considerations, never use with natural gas. The Thermador Low Back ...
Installation Instructions
Page 6
...range must be recessed into the cabinets beyond the edge of the front face of backguard. 6. If the unit is over 12", a Thermador Island Trim may allow other flammable vapors and liquids. 8. The range is required between combustible material and the back edge of the wood ...there is recommended that the bottom of the range above the cooking surface, a Thermador Low Back or Pot and Pan Shelf backguard must have a space wide enough to be used. (See Fig. 2B). Always keep appliance area clear and free from combustible materials, gasoline and other flame spread ratings. ...
...range must be recessed into the cabinets beyond the edge of the front face of backguard. 6. If the unit is over 12", a Thermador Island Trim may allow other flammable vapors and liquids. 8. The range is required between combustible material and the back edge of the wood ...there is recommended that the bottom of the range above the cooking surface, a Thermador Low Back or Pot and Pan Shelf backguard must have a space wide enough to be used. (See Fig. 2B). Always keep appliance area clear and free from combustible materials, gasoline and other flame spread ratings. ...

Installation Instructions
Page 9
...be connected to the power supply with the range. (See Step 5.) NOTE: Any opening in the wall behind the appliance and any opening in the floor under the appliance must be connected to propane gas, ensure that the propane gas supply tank is equipped with its own high pressure ...valve. 3/4" Flex Line to the type of Electrical Supply Zone ® ® 2" Maximum Protrusion from Wall for details. The units must be connected only to Appliance ® ® ® Gas Supply Zone A® 1/2" NPT B 240 VAC Receptacle (Shown) or Junction Box Centerline of gas for Dual Fuel Ranges ...
...be connected to the power supply with the range. (See Step 5.) NOTE: Any opening in the wall behind the appliance and any opening in the floor under the appliance must be connected to propane gas, ensure that the propane gas supply tank is equipped with its own high pressure ...valve. 3/4" Flex Line to the type of Electrical Supply Zone ® ® 2" Maximum Protrusion from Wall for details. The units must be connected only to Appliance ® ® ® Gas Supply Zone A® 1/2" NPT B 240 VAC Receptacle (Shown) or Junction Box Centerline of gas for Dual Fuel Ranges ...
Installation Instructions
Page 12
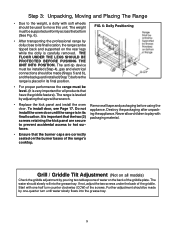
.... Grill / Griddle Tilt Adjustment (Not on the rear legs while the dolly is placed in its ing the appliance. If not, adjust the two screws under the back of the griddle plate. Do not appliance. Start with soft wheels should slowly roll into the grease tray. 9 The weight must be tipped back...
.... Grill / Griddle Tilt Adjustment (Not on the rear legs while the dolly is placed in its ing the appliance. If not, adjust the two screws under the back of the griddle plate. Do not appliance. Start with soft wheels should slowly roll into the grease tray. 9 The weight must be tipped back...

Installation Instructions
Page 13
... • Hammer • Drill, electric or hand • Pencil or other personal injury. There may result in tipping of tip-over may exist if the appliance is not installed in accordance with these instructions may be concealed electrical wires located behind the wall or under the floor. • Identify the electrical...
... • Hammer • Drill, electric or hand • Pencil or other personal injury. There may result in tipping of tip-over may exist if the appliance is not installed in accordance with these instructions may be concealed electrical wires located behind the wall or under the floor. • Identify the electrical...
Installation Instructions
Page 15
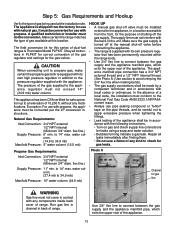
...water column. (14.9 to 34.9 mb) Manifold Pressure: 5" water column (12.5 mb) HOOK UP • A manual gas shut-off the gas supply. The appliance manifold pipe connection has a 3/4" NPT external thread and a 1/2" NPT internal thread. (See Photo A.) Use caution to avoid crimping the 3/4" flex line when making bends... of range. ®® Use 3/4" flex line to connect between the gas supply and the appliance manifold pipe, which exits the upper rear of the unit. Make sure the gas supply is Thermador Model PLPKIT. flex line.) Supply Pressure: 11" min. water column. (27.4 mb to 34...
...water column. (14.9 to 34.9 mb) Manifold Pressure: 5" water column (12.5 mb) HOOK UP • A manual gas shut-off the gas supply. The appliance manifold pipe connection has a 3/4" NPT external thread and a 1/2" NPT internal thread. (See Photo A.) Use caution to avoid crimping the 3/4" flex line when making bends... of range. ®® Use 3/4" flex line to connect between the gas supply and the appliance manifold pipe, which exits the upper rear of the unit. Make sure the gas supply is Thermador Model PLPKIT. flex line.) Supply Pressure: 11" min. water column. (27.4 mb to 34...
Installation Instructions
Page 16
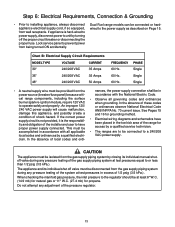
.... 60 Hz. 60 Hz. nances, the power supply connection shall be in excess of 1/2 psig (3.5 kPa.). CAUTION The appliance must be disconnected from the power source (breaker/fuse panel) because critical range components, including the surface burner spark re-ignition ... the gas supply piping system by a qualified electrician. Step 6: Electrical Requirements, Connection & Grounding • Prior to installing appliance, always disconnect appliance electrical supply cord, if so equipped, from being turned ON accidentally. Do not attempt any pressure testing of the pressure regulator...
.... 60 Hz. 60 Hz. nances, the power supply connection shall be in excess of 1/2 psig (3.5 kPa.). CAUTION The appliance must be disconnected from the power source (breaker/fuse panel) because critical range components, including the surface burner spark re-ignition ... the gas supply piping system by a qualified electrician. Step 6: Electrical Requirements, Connection & Grounding • Prior to installing appliance, always disconnect appliance electrical supply cord, if so equipped, from being turned ON accidentally. Do not attempt any pressure testing of the pressure regulator...

Installation Instructions
Page 17
... Electric Code, as BOX tors, preferably soldered in shown in place. RANGES. If not ground strap. must have 1/4" faston closed- Flexible electrical conduit or 4-connector Appliance Cord • PERMANENT CONNECTION WHERE LOCAL CODES AND (HARD WIRING) - to the terminal block provided. UNIT MAY BE CONNECTED equipped, the cord must Secure the...
... Electric Code, as BOX tors, preferably soldered in shown in place. RANGES. If not ground strap. must have 1/4" faston closed- Flexible electrical conduit or 4-connector Appliance Cord • PERMANENT CONNECTION WHERE LOCAL CODES AND (HARD WIRING) - to the terminal block provided. UNIT MAY BE CONNECTED equipped, the cord must Secure the...
Installation Instructions
Page 21
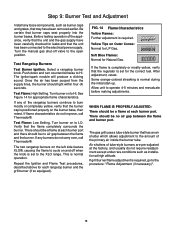
.... There should be a flame at each burner port. After adjustment, retest. Some orange-colored streaking is set to the amount of the appliance, verify that the regulator is normal during the initial start-up. The gas grill uses a tube-style burner that has an air shutter ...for the correct fuel. If grill burner/flame adjustment is required. Select a rangetop burner knob. If any burners do not carry over, call Thermador®. FIG. 14 Flame Characteristics Yellow Flames: Further adjustment is required, go to the electrical power supply. Turn burner on and off valve ...
.... There should be a flame at each burner port. After adjustment, retest. Some orange-colored streaking is set to the amount of the appliance, verify that the regulator is normal during the initial start-up. The gas grill uses a tube-style burner that has an air shutter ...for the correct fuel. If grill burner/flame adjustment is required. Select a rangetop burner knob. If any burners do not carry over, call Thermador®. FIG. 14 Flame Characteristics Yellow Flames: Further adjustment is required, go to the electrical power supply. Turn burner on and off valve ...

Installation Instructions
Page 22
...perform airshutter adjustments. • Loosen shutter screw(s) and turn shutter to new position. • Adjust the shutter to the illustration in Thermador© appliances have air shutter systems which are acceptable. (See Figure 14). Any of the burners continue to remove them! Step 9: Burner Test ... Adjustment Flame Adjustment (if necessary): Tube-style gas burners used in Figure 15, and can be performed by -products or void the appliance's warranty. Allow burners to cool before attempting to burn yellow. More Open: Less Yellow Flame Screw Air Shutter More Closed: Less Blue...
...perform airshutter adjustments. • Loosen shutter screw(s) and turn shutter to new position. • Adjust the shutter to the illustration in Thermador© appliances have air shutter systems which are acceptable. (See Figure 14). Any of the burners continue to remove them! Step 9: Burner Test ... Adjustment Flame Adjustment (if necessary): Tube-style gas burners used in Figure 15, and can be performed by -products or void the appliance's warranty. Allow burners to cool before attempting to burn yellow. More Open: Less Yellow Flame Screw Air Shutter More Closed: Less Blue...
Installation Instructions
Page 23
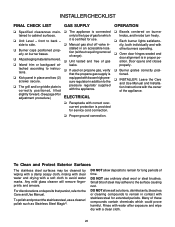
sure regulator in contact with the appliance. To Clean and Protect Exterior Surfaces The stainless steel surfaces may adhere to the surface causing rust. DO NOT use a cleaner/ polish such as Stainless ... gas supply is in place and two (2) equipped with a clean cloth. 20 INSTALLER CHECKLIST FINAL CHECK LIST GAS SUPPLY ❑ Specified clearances main- ❑ The appliance is certified for use. it is connected tained to back - Small bits of steel may be cleaned by wiping with a damp soapy cloth, rinsing with...
sure regulator in contact with the appliance. To Clean and Protect Exterior Surfaces The stainless steel surfaces may adhere to the surface causing rust. DO NOT use a cleaner/ polish such as Stainless ... gas supply is in place and two (2) equipped with a clean cloth. 20 INSTALLER CHECKLIST FINAL CHECK LIST GAS SUPPLY ❑ Specified clearances main- ❑ The appliance is certified for use. it is connected tained to back - Small bits of steel may be cleaned by wiping with a damp soapy cloth, rinsing with...
User Manual
Page 2
This Thermador Appliance is not followed exactly, a fire or explosion may result causing property...from you cannot reach your gas supplier from a neighbor's phone. Installation and service must be performed by BSH Home Appliances Corporation 5551 McFadden Ave. SI VOUS SENTEZ UNE ODEUR DE GAZ ■ N'allumez aucun appareil. ■ Ne ...Huntington Beach, CA 92649 Questions? 1-800-735-4328 www.thermador.com We look forward to light any appliance. ■ Do not touch any electrical switch. ■ Do not use gasoline or other appliance. - Suivez les instructions de la compagnie. ■...
This Thermador Appliance is not followed exactly, a fire or explosion may result causing property...from you cannot reach your gas supplier from a neighbor's phone. Installation and service must be performed by BSH Home Appliances Corporation 5551 McFadden Ave. SI VOUS SENTEZ UNE ODEUR DE GAZ ■ N'allumez aucun appareil. ■ Ne ...Huntington Beach, CA 92649 Questions? 1-800-735-4328 www.thermador.com We look forward to light any appliance. ■ Do not touch any electrical switch. ■ Do not use gasoline or other appliance. - Suivez les instructions de la compagnie. ■...
User Manual
Page 3
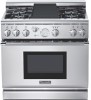
... of the range. IMPORTANT All ranges must be installed with a proper backguard. For all Thermador Professional® Ranges. Refer to this manual, it is critical that the appliance is equipped with a backguard. The model number may be located as indicated on the following... for more information. The three backguard choices include a Low Back, Pot and Pan Shelf, or Island Trim. DO NOT place on Page 40 of this appliance for the First Time ...... 6 Section 3: Description Model & Parts Identification - 48" Range 7 Model & Parts Identification - 36" Range 8 Model & Parts ...
... of the range. IMPORTANT All ranges must be installed with a proper backguard. For all Thermador Professional® Ranges. Refer to this manual, it is critical that the appliance is equipped with a backguard. The model number may be located as indicated on the following... for more information. The three backguard choices include a Low Back, Pot and Pan Shelf, or Island Trim. DO NOT place on Page 40 of this appliance for the First Time ...... 6 Section 3: Description Model & Parts Identification - 48" Range 7 Model & Parts Identification - 36" Range 8 Model & Parts ...
User Manual
Page 4
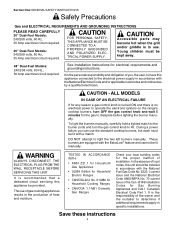
...qualified electrician. DO NOT attempt to the burner ports and turn OFF the gas control knob and wait 5 minutes for Gas Burning Appliances and C22.1 Canadian Electrical Code Part 1. It is the responsibility of heat and moisture. TESTED IN ACCORDANCE WITH: • ANSI Z21... Ranges Check your local building codes for electrical requirements and grounding instructions. During a power failure you , the user, to have this appliance connected to HI. Save these instructions 2 Young children must be lit manually. These burners are equipped with the National Fuel Gas Code ...
...qualified electrician. DO NOT attempt to the burner ports and turn OFF the gas control knob and wait 5 minutes for Gas Burning Appliances and C22.1 Canadian Electrical Code Part 1. It is the responsibility of heat and moisture. TESTED IN ACCORDANCE WITH: • ANSI Z21... Ranges Check your local building codes for electrical requirements and grounding instructions. During a power failure you , the user, to have this appliance connected to HI. Save these instructions 2 Young children must be lit manually. These burners are equipped with the National Fuel Gas Code ...
User Manual
Page 5
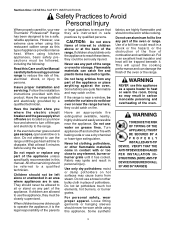
...EN-GAGED PER INSTALLATION IN- Follow the installation instructions provided with baking soda or use this appliance as this Care and Use Manual carefully before using the range. If the range is the... back of the oven or range. Loose fitting garments or hanging sleeves should never be a safe, reliable appliance. Section One: GENERAL SAFETY INSTRUCTIONS Safety Practices to Avoid Personal Injury When properly cared for storage. They should...Do not use extreme care when using your new Thermador Professional® Range has been designed to be allowed to dissipate.
...EN-GAGED PER INSTALLATION IN- Follow the installation instructions provided with baking soda or use this appliance as this Care and Use Manual carefully before using the range. If the range is the... back of the oven or range. Loose fitting garments or hanging sleeves should never be a safe, reliable appliance. Section One: GENERAL SAFETY INSTRUCTIONS Safety Practices to Avoid Personal Injury When properly cared for storage. They should...Do not use extreme care when using your new Thermador Professional® Range has been designed to be allowed to dissipate.
User Manual
Page 6
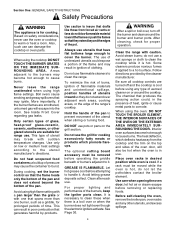
... stirring or turning food. Use only on or around the burner and burner ports. The use . Section One: GENERAL SAFETY INSTRUCTIONS Safety Precautions WARNING The appliance is for proper operation. GREASE IS FLAMMABLE. Avoid steam burns; Be sure all cooktop controls are smothered, unburned gas will also be hot when the...
... stirring or turning food. Use only on or around the burner and burner ports. The use . Section One: GENERAL SAFETY INSTRUCTIONS Safety Precautions WARNING The appliance is for proper operation. GREASE IS FLAMMABLE. Avoid steam burns; Be sure all cooktop controls are smothered, unburned gas will also be hot when the...

User Manual
Page 26
... Oven (48" Models) 1. The oven is preheated when the HEATING light cycles off the first time. ▲ The OVEN indicator light remains on . Call a qualified appliance technician to rotate toward the temperature setting. ▲ The HEATING light cycles off and on during these modes, do not use the oven. Section Five...
... Oven (48" Models) 1. The oven is preheated when the HEATING light cycles off the first time. ▲ The OVEN indicator light remains on . Call a qualified appliance technician to rotate toward the temperature setting. ▲ The HEATING light cycles off and on during these modes, do not use the oven. Section Five...
User Manual
Page 33
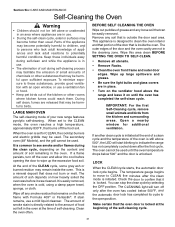
...hood above 500°, the LED will turn off the food soil. It is common to these individuals away during self-clean and while the appliance is a mineral deposit that may be harmful to potentially harmful conditions. If stain remains, use . • During the self-clean cycle, ...use a ventilation fan or hood. • Keep pet birds out of the kitchen or other substances that does not burn or melt. This appliance is unlocked. LOCK When the CLEAN cycle starts, the automatic door lock cycle begins. When set for additional ventilation. Remove any soil that ...
...hood above 500°, the LED will turn off the food soil. It is common to these individuals away during self-clean and while the appliance is a mineral deposit that may be harmful to potentially harmful conditions. If stain remains, use . • During the self-clean cycle, ...use a ventilation fan or hood. • Keep pet birds out of the kitchen or other substances that does not burn or melt. This appliance is unlocked. LOCK When the CLEAN cycle starts, the automatic door lock cycle begins. When set for additional ventilation. Remove any soil that ...

User Manual
Page 35
... pads for cleaning this range. Make sure that will do the job efficiently and effectively. Section Six: CARE AND MAINTENANCE Range Cleaning When cleaning this appliance can be cleaned with instructions on a the range while it's hot. small area first. 2. Use the mildest cleaning procedure CAUTION that the burner cap is...
... pads for cleaning this range. Make sure that will do the job efficiently and effectively. Section Six: CARE AND MAINTENANCE Range Cleaning When cleaning this appliance can be cleaned with instructions on a the range while it's hot. small area first. 2. Use the mildest cleaning procedure CAUTION that the burner cap is...