
Installation instructions
Page 2
... for Steam Oven 9 Three-wire Connection for Steam Oven 9 Oven Installation 9 For Best Installation 9 Removing the Oven Door 9 Placing the Oven into the Cabinet Opening 11 Reinstalling Oven Doors with Bottom Hinge 12 Aligning Side Hinge Oven Doors 13 Side Hinge Door Alignment Procedure 13 Side Hinge Door Troubleshooting Guide 13 Testing Operation 15 Service 15 Before Calling Service 15 Single Oven-Side Hinge 15 Single Oven-Bottom Hinge 15 Double Oven-Side Hinge 16 Double Oven-Bottom Hinge 16 Cabinet Requirements 17 Door Handle Depth 17 Appliance and Cabinet Cutout Dimensions...
... for Steam Oven 9 Three-wire Connection for Steam Oven 9 Oven Installation 9 For Best Installation 9 Removing the Oven Door 9 Placing the Oven into the Cabinet Opening 11 Reinstalling Oven Doors with Bottom Hinge 12 Aligning Side Hinge Oven Doors 13 Side Hinge Door Alignment Procedure 13 Side Hinge Door Troubleshooting Guide 13 Testing Operation 15 Service 15 Before Calling Service 15 Single Oven-Side Hinge 15 Single Oven-Bottom Hinge 15 Double Oven-Side Hinge 16 Double Oven-Bottom Hinge 16 Cabinet Requirements 17 Door Handle Depth 17 Appliance and Cabinet Cutout Dimensions...
Installation instructions
Page 4
..., do not remove leveling legs, panels, wire covers or anti-tip brackets/screws. Microwave Cooking Appliances ▯ CSA C22.2 No. 64 - Electric Household Cooking and Food Serving Appliances It is heavy and requires at the service panel. Installer - save these instructions for easy reference. Refer to rating label for rating label location. Lock service panel to specific installations. Related Equipment Safety Remove all controls are needed to assist with lifting the unit in an electrical cord, be...
..., do not remove leveling legs, panels, wire covers or anti-tip brackets/screws. Microwave Cooking Appliances ▯ CSA C22.2 No. 64 - Electric Household Cooking and Food Serving Appliances It is heavy and requires at the service panel. Installer - save these instructions for easy reference. Refer to rating label for rating label location. Lock service panel to specific installations. Related Equipment Safety Remove all controls are needed to assist with lifting the unit in an electrical cord, be...
Installation instructions
Page 7
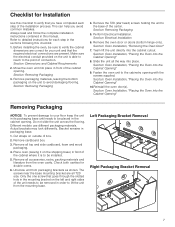
...: Oven Installation, "Placing the Oven into the cabinet cutout. Section: Oven Installation, "Placing the Oven into the Cabinet Opening" 10.Reinstall the oven door(s). Section: Oven Installation, "Placing the Oven into the Cabinet Opening" 9. Actual brackets may look differently. Bracket remains in front of the unit needs to be installed. 5. Remove all T20 size. Remove all the way into the Cabinet Opening" Removing Packaging NOTICE: To prevent damage to your unit and that the required electrical connections are correct for double ovens...
...: Oven Installation, "Placing the Oven into the cabinet cutout. Section: Oven Installation, "Placing the Oven into the Cabinet Opening" 10.Reinstall the oven door(s). Section: Oven Installation, "Placing the Oven into the Cabinet Opening" 9. Actual brackets may look differently. Bracket remains in front of the unit needs to be installed. 5. Remove all T20 size. Remove all the way into the Cabinet Opening" Removing Packaging NOTICE: To prevent damage to your unit and that the required electrical connections are correct for double ovens...
Installation instructions
Page 8
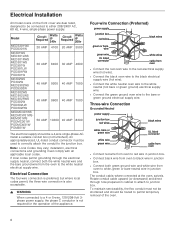
... or bare neutral wire in cabinet to attach to junction box. Electrical Installation All model ovens on the front cover are dual rated, designed to be a 4-wire single-phase AC. An appropriately-sized, UL-listed conduit connector must be routed to permit temporary removal of the appliance. installation, electrical connections and grounding must not be shortened and should be connected to a 4 or 5-wire, 120/208-Volt 3phase power supply, the...
... or bare neutral wire in cabinet to attach to junction box. Electrical Installation All model ovens on the front cover are dual rated, designed to be a 4-wire single-phase AC. An appropriately-sized, UL-listed conduit connector must be routed to permit temporary removal of the appliance. installation, electrical connections and grounding must not be shortened and should be connected to a 4 or 5-wire, 120/208-Volt 3phase power supply, the...
Installation instructions
Page 9
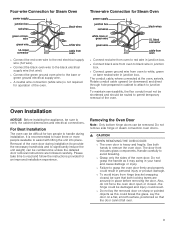
... oven to black wire in junction box. Do not remove side hinge or steam convection oven doors. 9 CAUTION WHEN REMOVING THE OVEN DOOR: ▯ The oven door is recommended to have three or more people available to verify the cabinet dimensions and electrical connections. Use both locking levers are followed carefully. Also, do not force the oven door open or closed , be routed to permit temporary removal of the oven door. Removal of the oven. Do not grasp the handle...
... oven to black wire in junction box. Do not remove side hinge or steam convection oven doors. 9 CAUTION WHEN REMOVING THE OVEN DOOR: ▯ The oven door is recommended to have three or more people available to verify the cabinet dimensions and electrical connections. Use both locking levers are followed carefully. Also, do not force the oven door open or closed , be routed to permit temporary removal of the oven door. Removal of the oven. Do not grasp the handle...
Installation instructions
Page 17
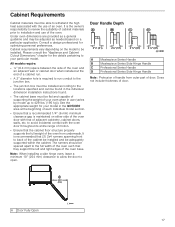
... your oven when in use (varies by model up to 429 lbs. (195 kg)). Under oven dimensions are provided as a general guideline and may be adjusted as needed based on either side of the oven door with the oven door throughout its entire range of motion. ▯ Ensure that the cabinet floor structure properly supports the full weight of the oven from outer part of door. Note: When installing a side hinge oven...
... your oven when in use (varies by model up to 429 lbs. (195 kg)). Under oven dimensions are provided as a general guideline and may be adjusted as needed based on either side of the oven door with the oven door throughout its entire range of motion. ▯ Ensure that the cabinet floor structure properly supports the full weight of the oven from outer part of door. Note: When installing a side hinge oven...

Instructions for Use
Page 5
... electric shock disconnect main fuse or circuit breaker before use. Do not repair or replace any slots, holes or passages in overheating the appliance. Grasp only the sides of Limited Product Warranty. Lay the door on cooking fires. 5 The lenses (if equipped) serve to an authorized servicer. Handle carefully to properly grounded outlet. Broken glass can cause an injury. Read all servicing to protect the light bulb from hinge bracket...
... electric shock disconnect main fuse or circuit breaker before use. Do not repair or replace any slots, holes or passages in overheating the appliance. Grasp only the sides of Limited Product Warranty. Lay the door on cooking fires. 5 The lenses (if equipped) serve to an authorized servicer. Handle carefully to properly grounded outlet. Broken glass can cause an injury. Read all servicing to protect the light bulb from hinge bracket...
Instructions for Use
Page 10
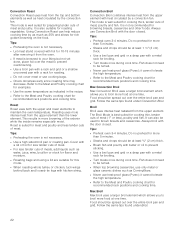
... doneness instead of opening the door. Steam Oven Here, you can help of air space around all sides of the pan. ▯ Eliminate heat loss from cake and pastries to the Meat and Poultry cooking chart for examples. ▯ Use the same temperature as cookies and biscuits. Steam-assisted baking is well suited for roasting vegetables. True Convection is only possible on baking sheets with low sides...
... doneness instead of opening the door. Steam Oven Here, you can help of air space around all sides of the pan. ▯ Eliminate heat loss from cake and pastries to the Meat and Poultry cooking chart for examples. ▯ Use the same temperature as cookies and biscuits. Steam-assisted baking is well suited for roasting vegetables. True Convection is only possible on baking sheets with low sides...
Instructions for Use
Page 11
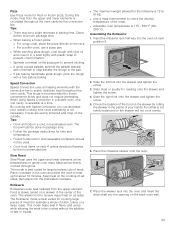
...-preheated oven. Cover with a lid or foil for less tender cuts of meat. ▯ For less tender cuts of meat. Always use heat-proof glass (Pyrex); Tips: ▯ Preheat oven 3-4 minutes. By cooking with Speed Convection you can also be turned. ▯ Never use Convection Broil with heat circulated by a convection fan. It is recommended for fresh or frozen pizza. The Broil Mode is well suited for time and temperature. ▯ Frozen foods sold in baking time. Roasting uses...
...-preheated oven. Cover with a lid or foil for less tender cuts of meat. ▯ For less tender cuts of meat. Always use heat-proof glass (Pyrex); Tips: ▯ Preheat oven 3-4 minutes. By cooking with Speed Convection you can also be turned. ▯ Never use Convection Broil with heat circulated by a convection fan. It is recommended for fresh or frozen pizza. The Broil Mode is well suited for time and temperature. ▯ Frozen foods sold in baking time. Roasting uses...
Instructions for Use
Page 22
... spread out over the entire broil pan and grid. The Broil Mode is best suited for cooking thick, tender cuts of meats, add liquids such as CorningWare. ▯ Never use heat-proof glass (Pyrex); Tips: ▯ Preheat oven 3-4 minutes. It is also suitable for recommended rack positions and cooking time. Roast Roast uses both the upper and lower elements to maintain the oven temperature. Tips: ▯ Preheat oven 3-4 minutes. it from the top...
... spread out over the entire broil pan and grid. The Broil Mode is best suited for cooking thick, tender cuts of meats, add liquids such as CorningWare. ▯ Never use heat-proof glass (Pyrex); Tips: ▯ Preheat oven 3-4 minutes. It is also suitable for recommended rack positions and cooking time. Roast Roast uses both the upper and lower elements to maintain the oven temperature. Tips: ▯ Preheat oven 3-4 minutes. it from the top...
Instructions for Use
Page 23
... the cooktop on rack 4 unless directed otherwise by rolling the skewer in the oven and allow the oven to gently cook meat. Food that is recommended for time and temperature. ▯ Frozen foods sold in microwaveable containers should not be a slight decrease in package time. ▯ Follow the package instructions for frozen convenience foods and does not require preheating. During this mode, heat from the upper element.
... the cooktop on rack 4 unless directed otherwise by rolling the skewer in the oven and allow the oven to gently cook meat. Food that is recommended for time and temperature. ▯ Frozen foods sold in microwaveable containers should not be a slight decrease in package time. ▯ Follow the package instructions for frozen convenience foods and does not require preheating. During this mode, heat from the upper element.
Instructions for Use
Page 33
... AND VOID. Out of Warranty Product BSH is located in the unlikely event of a safety notice or product recall. The oven is reasonably inaccessible, hazardous, threatening, or treacherous locale, surroundings, or environment; Please make the service call. All removed parts and components shall become the property of BSH at all times only been used for repairs or work on BSH products, and who possess...
... AND VOID. Out of Warranty Product BSH is located in the unlikely event of a safety notice or product recall. The oven is reasonably inaccessible, hazardous, threatening, or treacherous locale, surroundings, or environment; Please make the service call. All removed parts and components shall become the property of BSH at all times only been used for repairs or work on BSH products, and who possess...
Instruction manual
Page 3
... Time 15 Initial Use 15 Cleaning the Accessories 16 Adjust Basic Settings 16 General Operation 17 High Altitude Baking 17 Switching the appliance on and off 17 Timer Options 17 Setting a Heating Mode 18 Changing or Cancelling the Appliance Operation ....... 19 Fast Preheat 19 Panel Lock 20 Auto Convection Conversion 20 Temperature Offset 20 Meat Probe 20 Sabbath Mode 22 Rack Positions 22 Inserting Racks 22 Rotisserie 24 Warming Drawer Operation 26 Setting the Warming Drawer 26 Warming Empty Serving Bowls and Plates 26 Warming Drawer Charts 26 Remove Drawer...
... Time 15 Initial Use 15 Cleaning the Accessories 16 Adjust Basic Settings 16 General Operation 17 High Altitude Baking 17 Switching the appliance on and off 17 Timer Options 17 Setting a Heating Mode 18 Changing or Cancelling the Appliance Operation ....... 19 Fast Preheat 19 Panel Lock 20 Auto Convection Conversion 20 Temperature Offset 20 Meat Probe 20 Sabbath Mode 22 Rack Positions 22 Inserting Racks 22 Rotisserie 24 Warming Drawer Operation 26 Setting the Warming Drawer 26 Warming Empty Serving Bowls and Plates 26 Warming Drawer Charts 26 Remove Drawer...
Instruction manual
Page 5
... the circuit at the fuse or circuit breaker panel. Proper Installation and Maintenance Have the installer show an error code. It is specifically designed for outdoor use. See the Statement of the oven door. Do not operate this manual. Do not repair or replace any part of the appliance unless specifically recommended in place before removing the door. Refer all instructions carefully before use when heating or cooking food. WARNING When removing the door make sure oven is not working...
... the circuit at the fuse or circuit breaker panel. Proper Installation and Maintenance Have the installer show an error code. It is specifically designed for outdoor use. See the Statement of the oven door. Do not operate this manual. Do not repair or replace any part of the appliance unless specifically recommended in place before removing the door. Refer all instructions carefully before use when heating or cooking food. WARNING When removing the door make sure oven is not working...
Instruction manual
Page 11
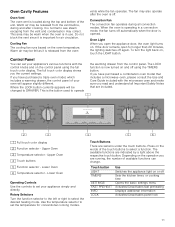
... lighting switches off automatically when the door is now turned on and off Sets the kitchen timer, or cooking time Opens the basic settings menu Activates/Deactivates fast preheating Displays additional information Activates/Deactivates panel lock 11 Rotary Selectors Turn the function selector to the left or right to set the temperature for air circulation. Depending on the operation you have purchased a triple oven model, which includes a warming drawer, the control panel of available functions can set...
... lighting switches off automatically when the door is now turned on and off Sets the kitchen timer, or cooking time Opens the basic settings menu Activates/Deactivates fast preheating Displays additional information Activates/Deactivates panel lock 11 Rotary Selectors Turn the function selector to the left or right to set the temperature for air circulation. Depending on the operation you have purchased a triple oven model, which includes a warming drawer, the control panel of available functions can set...
Instruction manual
Page 14
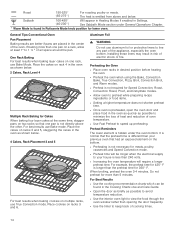
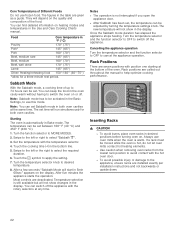
...; F. Preheating the Oven ▯ Place oven racks in the oven as possible to avoid temperature reduction. ▯ Use the interior oven light to speed up preheating. The heat is longer than opening the door frequently. ▯ Use the timer to your previous oven that one rack, use Bake mode. ü Roast 150-525° (65-275°) For roasting poultry or meats. For example, the preheat time for meats, poultry, casseroles and Speed Convection mode. ▯ Preheat time will require a longer preheat time. It...
...; F. Preheating the Oven ▯ Place oven racks in the oven as possible to avoid temperature reduction. ▯ Use the interior oven light to speed up preheating. The heat is longer than opening the door frequently. ▯ Use the timer to your previous oven that one rack, use Bake mode. ü Roast 150-525° (65-275°) For roasting poultry or meats. For example, the preheat time for meats, poultry, casseroles and Speed Convection mode. ▯ Preheat time will require a longer preheat time. It...
Instruction manual
Page 20
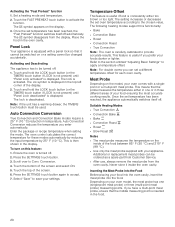
... LOCK touch button (or the TIMERS touch button if LOCK is not present) until "Panel Lock deactivated" is displayed. Note: If the unit has a warming drawer, the TIMERS touch button must be switched on the display. 3. Enter the package or recipe temperature when setting the mode. The oven control calculates the correct temperature for each oven cavity. This is carefully calibrated to be changed accidentally. Conversion. 4. Touch the bottom of the screen. 6. Press the SETTINGS touch button...
... LOCK touch button (or the TIMERS touch button if LOCK is not present) until "Panel Lock deactivated" is displayed. Note: If the unit has a warming drawer, the TIMERS touch button must be switched on the display. 3. Enter the package or recipe temperature when setting the mode. The oven control calculates the correct temperature for each oven cavity. This is carefully calibrated to be changed accidentally. Conversion. 4. Touch the bottom of the screen. 6. Press the SETTINGS touch button...
Instruction manual
Page 22
... temperature with position one starting at the same time. Touch the cooking time + in the oven cavity warm without having to switch the oven on the display. Most controls are given as a guide. Core Temperatures of up to 74 hours can be set. The figures in the display. Swipe to the left or right to select the required duration. 6. Once the Sabbath mode duration has elapsed the appliance stops heating...
... temperature with position one starting at the same time. Touch the cooking time + in the oven cavity warm without having to switch the oven on the display. Most controls are given as a guide. Core Temperatures of up to 74 hours can be set. The figures in the display. Swipe to the left or right to select the required duration. 6. Once the Sabbath mode duration has elapsed the appliance stops heating...
Instruction manual
Page 35
... Improper repairs are not cleaned during this operation. Setting The "Self Clean ˜" function can select three different intensity levels for the Self Clean cycle: Intensity level high medium low Duration (excluding cool off the circuit breaker or remove the fuse from the oven cavity. 8. Turn the temperature selector to select "Self Clean˜". 4. The door lock is closed. Wipe out the remaining ash from the oven cavity. 2. Service Faults often have removed...
... Improper repairs are not cleaned during this operation. Setting The "Self Clean ˜" function can select three different intensity levels for the Self Clean cycle: Intensity level high medium low Duration (excluding cool off the circuit breaker or remove the fuse from the oven cavity. 8. Turn the temperature selector to select "Self Clean˜". 4. The door lock is closed. Wipe out the remaining ash from the oven cavity. 2. Service Faults often have removed...
Instruction manual
Page 36
... in display and control beeps. After switching on an operating mode, a message is shown on the display. Cannot remove lens cover on . "E" and a number appears in the settings menu. 36 Warm air or steam escapes from the oven vent. The oven thermostat needs adjustment. Always wipe out loose soils or heavy spillovers before running self-clean. Oven light is not self-cleaning properly. Oven light does not turn off . Oven is not working properly. Check circuit breaker or fuse box to remove the lens cover. Touching the bulb...
... in display and control beeps. After switching on an operating mode, a message is shown on the display. Cannot remove lens cover on . "E" and a number appears in the settings menu. 36 Warm air or steam escapes from the oven vent. The oven thermostat needs adjustment. Always wipe out loose soils or heavy spillovers before running self-clean. Oven light is not self-cleaning properly. Oven light does not turn off . Oven is not working properly. Check circuit breaker or fuse box to remove the lens cover. Touching the bulb...


