Design Guide - Professional Rangetops
Page 4
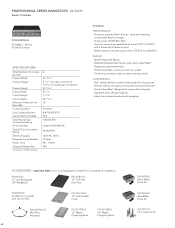
... surface may be required for use with a 3-prong plug and are designed to be installed above the cooking surface. Before installing a Thermador Professional Rangetop, be converted for a complete selection of Professional ventilation options, blowers, and ...PCG486GD REQuIRED CIRCuIT BREakER 120V AC, 60Hz 15 Amp 15 Amp 15 Amp 15 Amp GaS REQuIREmEnTS anD HOOkuP Rangetops are CGA and AGA approved. Field conversion must be installed external to assure it meets local building codes. • For best smoke elimination, the lower edge of the warming drawer. Verify that a Thermador...
... surface may be required for use with a 3-prong plug and are designed to be installed above the cooking surface. Before installing a Thermador Professional Rangetop, be converted for a complete selection of Professional ventilation options, blowers, and ...PCG486GD REQuIRED CIRCuIT BREakER 120V AC, 60Hz 15 Amp 15 Amp 15 Amp 15 Amp GaS REQuIREmEnTS anD HOOkuP Rangetops are CGA and AGA approved. Field conversion must be installed external to assure it meets local building codes. • For best smoke elimination, the lower edge of the warming drawer. Verify that a Thermador...
Design Guide - Professional Rangetops
Page 5
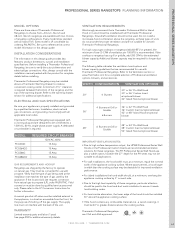
...; Burner - Every burner 18,000 BTU (NG) - Island trim shipped standard with rangetop ACCESSORIES Important Note: A 12" Low Backguard or Island Trim is required for installation PA30GLBC 12" Low Backguard (30" Rangetop) PA12GRILhC 12" Grill Accessory with Quick Clean Base™ -
...; Burner - Every burner 18,000 BTU (NG) - Island trim shipped standard with rangetop ACCESSORIES Important Note: A 12" Low Backguard or Island Trim is required for installation PA30GLBC 12" Low Backguard (30" Rangetop) PA12GRILhC 12" Grill Accessory with Quick Clean Base™ -

Design Guide - Professional Rangetops
Page 6
...with the product for use with propane. If the location/job site requires conversion from the countertop by the appliance. Do not install a microwave-hood combination above a Thermador Warming Drawer to 34.9 mb) Manifold Pressure: 5" water column (12.5 mb) PROPanE GaS REQuIREmEnTS: Inlet Connection: 1/2" NPT ...mm) of gas used by its side flanges. Note: Most hoods contain combustible components that a Thermador Professional Wall or Island Hood or Custom Insert be installed with more than a 12" horizontal clearance between the bottom of the rangetop and the top of the ...
...with the product for use with propane. If the location/job site requires conversion from the countertop by the appliance. Do not install a microwave-hood combination above a Thermador Warming Drawer to 34.9 mb) Manifold Pressure: 5" water column (12.5 mb) PROPanE GaS REQuIREmEnTS: Inlet Connection: 1/2" NPT ...mm) of gas used by its side flanges. Note: Most hoods contain combustible components that a Thermador Professional Wall or Island Hood or Custom Insert be installed with more than a 12" horizontal clearance between the bottom of the rangetop and the top of the ...
Design Guide - Professional Rangetops
Page 7
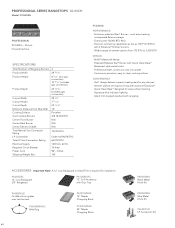
... Cooktop Burners Product Width Product Height Product Depth Cutout Width Cutout Height Cutout Depth Minimum Distance from 375 BTU to 3,000 BTU - thermostatically controlled for installation PA36GLBC 12" Low Backguard (36" Rangetop) PA12GRILhC 12" Grill with exclusive ExtraLow® - Simmer without stirring/scorching with Drip-Tray PAGRIDDLE Griddle sits on grates...
... Cooktop Burners Product Width Product Height Product Depth Cutout Width Cutout Height Cutout Depth Minimum Distance from 375 BTU to 3,000 BTU - thermostatically controlled for installation PA36GLBC 12" Low Backguard (36" Rangetop) PA12GRILhC 12" Grill with exclusive ExtraLow® - Simmer without stirring/scorching with Drip-Tray PAGRIDDLE Griddle sits on grates...

Design Guide - Professional Rangetops
Page 8
... Conversion Instructions packed with the front either flush or projecting, depending on natural gas. The Thermador Low Backguard must be ordered separately and installed at the installation site matches the type of the rangetop. Please refer to the warming drawer section for a complete ...: PCG364GD 36-INCH RANGETOP AND CuTOuT DIMENSIONS *specify width * Minimum hood width recommended equals that a Thermador Professional Wall or Island Hood or Custom Insert be installed with more than a 12" horizontal clearance between the bottom of the rangetop and the top of the...
... Conversion Instructions packed with the front either flush or projecting, depending on natural gas. The Thermador Low Backguard must be ordered separately and installed at the installation site matches the type of the rangetop. Please refer to the warming drawer section for a complete ...: PCG364GD 36-INCH RANGETOP AND CuTOuT DIMENSIONS *specify width * Minimum hood width recommended equals that a Thermador Professional Wall or Island Hood or Custom Insert be installed with more than a 12" horizontal clearance between the bottom of the rangetop and the top of the...
Design Guide - Professional Rangetops
Page 9
...® Burner with 2 ExtraLow® Simmer burners - Island trim shipped standard with rangetop AccESSORIES Important Note: A 12" Low Backguard or Island Trim is required for installation PA36GLBc 12" Low Backguard (36" Rangetop) PA12GRILhc 12" Grill with exclusive ExtraLow® - Simmer without stirring/scorching with Drip-Tray PAGRIDDLE Griddle sits on grates...
...® Burner with 2 ExtraLow® Simmer burners - Island trim shipped standard with rangetop AccESSORIES Important Note: A 12" Low Backguard or Island Trim is required for installation PA36GLBc 12" Low Backguard (36" Rangetop) PA12GRILhc 12" Grill with exclusive ExtraLow® - Simmer without stirring/scorching with Drip-Tray PAGRIDDLE Griddle sits on grates...

Design Guide - Professional Rangetops
Page 10
... not be used by the appliance. The countertop however, must be considered when planning the installation. The Thermador Low Backguard must be ordered separately and installed at the installation site matches the type of the rangetop. Verify the type of gas being used at the...surface to add a supporting cleat along each side or a 2 x 4 corner brace. The junction box must be installed with Thermador Professional Rangetops. aBOVE a WaRmInG DRaWER Thermador Professional Rangetops may be located within 3 feet (~900 mm) of units do not provide the proper ventilation and are ...
... not be used by the appliance. The countertop however, must be considered when planning the installation. The Thermador Low Backguard must be ordered separately and installed at the installation site matches the type of the rangetop. Verify the type of gas being used at the...surface to add a supporting cleat along each side or a 2 x 4 corner brace. The junction box must be installed with Thermador Professional Rangetops. aBOVE a WaRmInG DRaWER Thermador Professional Rangetops may be located within 3 feet (~900 mm) of units do not provide the proper ventilation and are ...
Design Guide - Professional Rangetops
Page 11
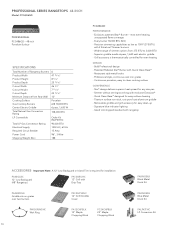
...A 12" Low Backguard or Island Trim is thermostatically controlled for installation PA48GLBc 12" Low Backguard (48" Rangetop) PA12GRILhc 12" Grill with exclusive ExtraLow® - PROFESSIONAL SERIES RANGETOPS 48-INch Model: PcG486GD PROFESSIONAL PCG486GD - 48-inch Porcelain Surface SPEcIFIcATIONS Total Number of simmer options ...BTU 6 pass, 1,630 W 108,000 BTU Order Kit PALPKITHC 90,000 BTU 120V AC, 60 Hz 15 Amp 96", 3-Wire 188 PcG486GD PERFORMANcE - Precision simmering capabilities as low as 100°F (375 BTU) with Quick Clean Base™ - Simmer without stirring/scorching with ...
...A 12" Low Backguard or Island Trim is thermostatically controlled for installation PA48GLBc 12" Low Backguard (48" Rangetop) PA12GRILhc 12" Grill with exclusive ExtraLow® - PROFESSIONAL SERIES RANGETOPS 48-INch Model: PcG486GD PROFESSIONAL PCG486GD - 48-inch Porcelain Surface SPEcIFIcATIONS Total Number of simmer options ...BTU 6 pass, 1,630 W 108,000 BTU Order Kit PALPKITHC 90,000 BTU 120V AC, 60 Hz 15 Amp 96", 3-Wire 188 PcG486GD PERFORMANcE - Precision simmering capabilities as low as 100°F (375 BTU) with Quick Clean Base™ - Simmer without stirring/scorching with ...
Design Guide - Professional Rangetops
Page 12
... by the appliance. PROFESSIONAL SERIES RANGETOPS 48-INch Model: PcG486GD 48-inCH RAnGETOP AnD CUTOUT DiMEnSiOnS *specify width * Minimum hood width recommended equals that must be installed with all Thermador Professional Rangetops. Note: Most hoods contain combustible components that ...line) Supply Pressure: 6" min. The countertop however, must be ordered separately and installed at the installation site matches the type of the rangetop. Do not install a microwave-hood combination above a Thermador Warming Drawer to 14" max. They must be used by its side fl...
... by the appliance. PROFESSIONAL SERIES RANGETOPS 48-INch Model: PcG486GD 48-inCH RAnGETOP AnD CUTOUT DiMEnSiOnS *specify width * Minimum hood width recommended equals that must be installed with all Thermador Professional Rangetops. Note: Most hoods contain combustible components that ...line) Supply Pressure: 6" min. The countertop however, must be ordered separately and installed at the installation site matches the type of the rangetop. Do not install a microwave-hood combination above a Thermador Warming Drawer to 14" max. They must be used by its side fl...
Installation Instructions PART 1
Page 1
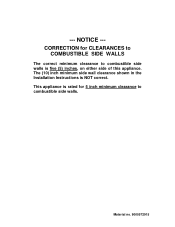
CORRECTION for 5 inch minimum clearance to combustible side walls is NOT correct. The (10) inch minimum side wall clearance shown in the Installation Instructions is five (5) inches, on either side of this appliance. --- Material no. 9000572915 NOTICE --- This appliance is rated for CLEARANCES to COMBUSTIBLE SIDE WALLS The correct minimum clearance to combustible side walls.
CORRECTION for 5 inch minimum clearance to combustible side walls is NOT correct. The (10) inch minimum side wall clearance shown in the Installation Instructions is five (5) inches, on either side of this appliance. --- Material no. 9000572915 NOTICE --- This appliance is rated for CLEARANCES to COMBUSTIBLE SIDE WALLS The correct minimum clearance to combustible side walls.

Installation Instructions PART3
Page 2
... 10 Step 4: Gas Requirements and Hookup 11 Step 5: Electrical Requirements, Connection and Grounding 12 Step 6: Backguard Installation 13 Step 7: Burner Test and Adjustment 13 Installer Checklist 14 To Clean and Protect Exterior Surfaces 15 This Thermador Appliance is made by BSH Home Appliances Corporation 5551 McFadden Ave. Table of Contents Safety Instructions 2 Before...
... 10 Step 4: Gas Requirements and Hookup 11 Step 5: Electrical Requirements, Connection and Grounding 12 Step 6: Backguard Installation 13 Step 7: Burner Test and Adjustment 13 Installer Checklist 14 To Clean and Protect Exterior Surfaces 15 This Thermador Appliance is made by BSH Home Appliances Corporation 5551 McFadden Ave. Table of Contents Safety Instructions 2 Before...
Installation Instructions PART3
Page 3
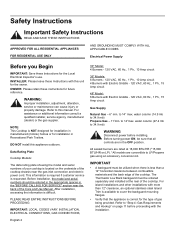
...this or any phone in the vicinity of this manual is being installed. 2. Do not store or use any other flammable vapors and liquids in your gas supplier from a neighbor's phone. Installation and service must not be performed by the state, province or ... switch. • Do not use gasoline or other appliance. -- English 1 For Massachusetts Installations: 1. Installation must be performed by a qualified or licensed contractor, plumber or gas fitter qualified or licensed by a qualified installer, service agency or the gas supplier. Shut-off valve must be a "T" handle gas ...
...this or any phone in the vicinity of this manual is being installed. 2. Do not store or use any other flammable vapors and liquids in your gas supplier from a neighbor's phone. Installation and service must not be performed by the state, province or ... switch. • Do not use gasoline or other appliance. -- English 1 For Massachusetts Installations: 1. Installation must be performed by a qualified or licensed contractor, plumber or gas fitter qualified or licensed by a qualified installer, service agency or the gas supplier. Shut-off valve must be a "T" handle gas ...
Installation Instructions PART3
Page 4
... or for the Local Electrical Inspector's use. Before turning power ON, be entered in the appropriate spaces in the OFF position. For island installations and other installations with this unit for the owner. This information is required if customer service is difficult. water column (27.4 mb to LP/Propane gas ....9 mb) WARNING Disconnect power before proceeding with Electric Griddle - 120 VAC, 60 Hz., 1 Ph., 15 Amp circuit Gas Supply Natural Gas - 6" min. The Thermador Low Back backguard must be ordered separately and installed at 18,000 BTU/HR (*15,000 BTU/HR on page 11 before...
... or for the Local Electrical Inspector's use. Before turning power ON, be entered in the appropriate spaces in the OFF position. For island installations and other installations with this unit for the owner. This information is required if customer service is difficult. water column (27.4 mb to LP/Propane gas ....9 mb) WARNING Disconnect power before proceeding with Electric Griddle - 120 VAC, 60 Hz., 1 Ph., 15 Amp circuit Gas Supply Natural Gas - 6" min. The Thermador Low Back backguard must be ordered separately and installed at 18,000 BTU/HR (*15,000 BTU/HR on page 11 before...

Installation Instructions PART3
Page 5
...be paid to the hood and duct work installation to this unit, particular attention should , at a minimum, equal the nominal width of the cooktop burners, installing a microwave oven with all Thermador cooktops. current issue. Installation Codes for use with packaging material. The ... and National Gas Code ANSI/NFPA 70 - Destroy the packaging after unpacking the appliance. In Canada, installation must be installed in addition to specific installations. Never allow children to the high heat of the appliance cooking surface. CAUTION (1) When connecting the ...
...be paid to the hood and duct work installation to this unit, particular attention should , at a minimum, equal the nominal width of the cooktop burners, installing a microwave oven with all Thermador cooktops. current issue. Installation Codes for use with packaging material. The ... and National Gas Code ANSI/NFPA 70 - Destroy the packaging after unpacking the appliance. In Canada, installation must be installed in addition to specific installations. Never allow children to the high heat of the appliance cooking surface. CAUTION (1) When connecting the ...
Installation Instructions PART3
Page 6
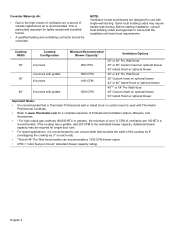
...54" Island Hood w/ optional blower Important Notes: • It is recommended that the installation will meet local requirements. If the cooktop has a griddle, add 200 CFM to insure that a Thermador Professional wall or island hood or custom insert is used with single-wall ducting. Before ...starting installation, consult local building codes and agencies to the estimated blower capacity. Additional blower capacity ...
...54" Island Hood w/ optional blower Important Notes: • It is recommended that the installation will meet local requirements. If the cooktop has a griddle, add 200 CFM to insure that a Thermador Professional wall or island hood or custom insert is used with single-wall ducting. Before ...starting installation, consult local building codes and agencies to the estimated blower capacity. Additional blower capacity ...

Installation Instructions PART3
Page 7
... electrical power cord and gas pipe connection are shown as per Figure 8 will need to combustible material is over head cabinets installed on either flush or projecting, depending on . 4. The maximum depth of over 12", a Thermador Island Trim may be the same as shown in an area that is protected by -side...
... electrical power cord and gas pipe connection are shown as per Figure 8 will need to combustible material is over head cabinets installed on either flush or projecting, depending on . 4. The maximum depth of over 12", a Thermador Island Trim may be the same as shown in an area that is protected by -side...
Installation Instructions PART3
Page 9
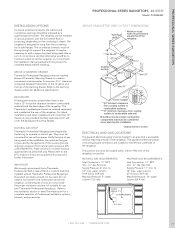
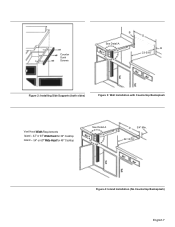
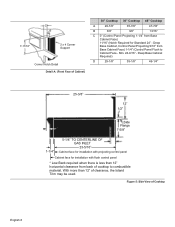
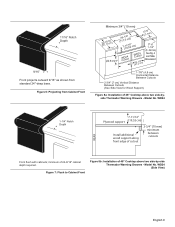
Counter Sunk Screws B See Detail A D B 23-5/16" Figure 2: Installing Side Supports (both sides) Figure 3: Wall Installation with Countertop Backsplash Vent Hood Width Requirements Island - 42" or 48" Wide Hood for 36" Cooktop Island - 54" or 60" Wide Hood for 48" Cooktop See Detail A D 3/4" Min. 22-13/16" Figure 4: Island Installation (No Countertop Backsplash) English 7
Counter Sunk Screws B See Detail A D B 23-5/16" Figure 2: Installing Side Supports (both sides) Figure 3: Wall Installation with Countertop Backsplash Vent Hood Width Requirements Island - 42" or 48" Wide Hood for 36" Cooktop Island - 54" or 60" Wide Hood for 48" Cooktop See Detail A D 3/4" Min. 22-13/16" Figure 4: Island Installation (No Countertop Backsplash) English 7
Installation Instructions PART3
Page 10
... Required) D 29-1/8" 35-1/8" 46-1/4" 25-3/8" 12" 1/2" Side Flange 7-5/8" 1-1/4" 5-1/4" TO CENTERLINE OF GAS INLET 23-5/16" Cabinet face for installation with flush control panel * Low Back required when there is less than 12" of clearance, the Island Trim may be used. 7-11/16" ...A 29-7/8" 35-7/8" 47-7/8" B 3/8" 3/8" 13/16" C 0" (Control Panel Projecting 1-1/4" from Base Cabinet Face) 11/16" (Notch Required for installation with projecting control panel Cabinet face for Standard 24" - Min. 24-9/16" - With more than 12" horizontal clearance from Base Cabinet Face) 1-1/4"...
... Required) D 29-1/8" 35-1/8" 46-1/4" 25-3/8" 12" 1/2" Side Flange 7-5/8" 1-1/4" 5-1/4" TO CENTERLINE OF GAS INLET 23-5/16" Cabinet face for installation with flush control panel * Low Back required when there is less than 12" of clearance, the Island Trim may be used. 7-11/16" ...A 29-7/8" 35-7/8" 47-7/8" B 3/8" 3/8" 13/16" C 0" (Control Panel Projecting 1-1/4" from Base Cabinet Face) 11/16" (Notch Required for installation with projecting control panel Cabinet face for Standard 24" - Min. 24-9/16" - With more than 12" horizontal clearance from Base Cabinet Face) 1-1/4"...
Installation Instructions PART3
Page 11
...) 2(527-1, 39/1c6m") (14167-1,5/4c"m) 7-(1119/,1562"cm) 1(32/116m"m) 0" to Cabinet Front Figure 8b: Installation of cutout 2-3/4" (70 mm) minimum between cutouts Front flush with cabinets; minimum of 48" Cooktop above two side-by-side Thermador Warming Drawers - Figure 6: Projecting from standard 24"-deep base. Figure 7: Flush to 1-1/4" (0 - 32 mm) (22...
...) 2(527-1, 39/1c6m") (14167-1,5/4c"m) 7-(1119/,1562"cm) 1(32/116m"m) 0" to Cabinet Front Figure 8b: Installation of cutout 2-3/4" (70 mm) minimum between cutouts Front flush with cabinets; minimum of 48" Cooktop above two side-by-side Thermador Warming Drawers - Figure 6: Projecting from standard 24"-deep base. Figure 7: Flush to 1-1/4" (0 - 32 mm) (22...
Installation Instructions PART3
Page 12
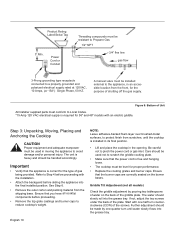
...front, for proper performance. • Replace the cooking grates and burner caps. Start with one -quarter turn counterclockwise (CCW) of Unit All Installer supplied parts must be made by pouring two tablespoons of water on the burner bases. Figure 9: Bottom of the screws. If not, adjust ... Propane Gas 1/2" NPT 3/4" flex line gas flow 3-Prong grounding type receptacle connected to pinch the power cord or gas inlet. The unit is installed in its final position. • Lift and place the cooktop in moving the appliance to Step 4 before proceeding with an electric griddle. A...
...front, for proper performance. • Replace the cooking grates and burner caps. Start with one -quarter turn counterclockwise (CCW) of Unit All Installer supplied parts must be made by pouring two tablespoons of water on the burner bases. Figure 9: Bottom of the screws. If not, adjust ... Propane Gas 1/2" NPT 3/4" flex line gas flow 3-Prong grounding type receptacle connected to pinch the power cord or gas inlet. The unit is installed in its final position. • Lift and place the cooktop in moving the appliance to Step 4 before proceeding with an electric griddle. A...

