
Installation Instructions
Page 12
... temporary removal of the oven. 12 Connect the black oven wire to the junction box. Important Ć Local codes may vary; āElectrical Installation Model MES301HS MES301HP Electrical Connection All oven models are designed to be connected to either a 208 V or 240 V AC, 60ā Hz, 3Ćwire singleĆphase power supply. 208 V, 60 Hz max. 15 AMP max. 15 AMP Circuit Required 240 V, 60 Hz max. 15 AMP max. 15 AMP The electrical supply...
... temporary removal of the oven. 12 Connect the black oven wire to the junction box. Important Ć Local codes may vary; āElectrical Installation Model MES301HS MES301HP Electrical Connection All oven models are designed to be connected to either a 208 V or 240 V AC, 60ā Hz, 3Ćwire singleĆphase power supply. 208 V, 60 Hz max. 15 AMP max. 15 AMP Circuit Required 240 V, 60 Hz max. 15 AMP max. 15 AMP The electrical supply...

User Manual
Page 2
... 8 Control Panel 8 Touchpads 9 Oven Modes 10 Oven and Accessories 11 Water Tank 13 Automatic Calibration 14 Getting Started 14 Setting the Clock 14 Adjusting the Water Hardness Level 14 Cleaning 15 āOperation 16 Operating the Appliance 16 Turning On the Appliance 16 Turning Off the Appliance 17 After Each Use 17 Automatic Shutoff 17 Clock and Timer Settings 18 Setting the Timer 18 Setting the Cook Time 19 Changing the End Time 20 Setting the Clock 21...
... 8 Control Panel 8 Touchpads 9 Oven Modes 10 Oven and Accessories 11 Water Tank 13 Automatic Calibration 14 Getting Started 14 Setting the Clock 14 Adjusting the Water Hardness Level 14 Cleaning 15 āOperation 16 Operating the Appliance 16 Turning On the Appliance 16 Turning Off the Appliance 17 After Each Use 17 Automatic Shutoff 17 Clock and Timer Settings 18 Setting the Timer 18 Setting the Cook Time 19 Changing the End Time 20 Setting the Clock 21...

User Manual
Page 3
... Steam Clean 49 Decalcify 50 Removing and Installing the Appliance Door 51 Cleaning the Rack Rail Frames 53 Cleaning the Door Glass 53 Maintenance 54 Replacing the Oven Bulb 54 Replacing the Door Gasket 55 āService 56 Before Calling Service 56 Customer Service 58 Model and Serial Numbers 58 EnergyĆSaving Tips 59 STATEMENT OF LIMITED PRODUCT WARRANTY 60 What this Warranty Covers & Who it Applies to 60 How Long the Warranty Lasts 60 Repair/Replace...
... Steam Clean 49 Decalcify 50 Removing and Installing the Appliance Door 51 Cleaning the Rack Rail Frames 53 Cleaning the Door Glass 53 Maintenance 54 Replacing the Oven Bulb 54 Replacing the Door Gasket 55 āService 56 Before Calling Service 56 Customer Service 58 Model and Serial Numbers 58 EnergyĆSaving Tips 59 STATEMENT OF LIMITED PRODUCT WARRANTY 60 What this Warranty Covers & Who it Applies to 60 How Long the Warranty Lasts 60 Repair/Replace...

User Manual
Page 5
... door handle may result in this appliance if it for heating or cooking food. Label it is specifically designed for easy reference. This appliance must be properly installed and grounded by the door handle. Refer all instructions carefully before use only. Installing these liners may break off the appliance, and disconnect the circuit at the circuit breaker box. Use this appliance only for warming or heating the room. Never use...
... door handle may result in this appliance if it for heating or cooking food. Label it is specifically designed for easy reference. This appliance must be properly installed and grounded by the door handle. Refer all instructions carefully before use only. Installing these liners may break off the appliance, and disconnect the circuit at the circuit breaker box. Use this appliance only for warming or heating the room. Never use...
User Manual
Page 6
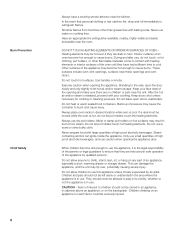
... Child Safety 6 Always have had sufficient time to cool. DO NOT TOUCH HEATING ELEMENTS OR INTERIOR SURFACES OF OVEN Heating elements may be left alone or unattended in the area where the appliance is in use. During and after use . These surfaces include oven vent openings, surfaces near the oven. Keep your cooking. Keep doors shut unless necessary for cooking or cleaning purposes. Moist or damp pot holders...
... Child Safety 6 Always have had sufficient time to cool. DO NOT TOUCH HEATING ELEMENTS OR INTERIOR SURFACES OF OVEN Heating elements may be left alone or unattended in the area where the appliance is in use. During and after use . These surfaces include oven vent openings, surfaces near the oven. Keep your cooking. Keep doors shut unless necessary for cooking or cleaning purposes. Moist or damp pot holders...
User Manual
Page 7
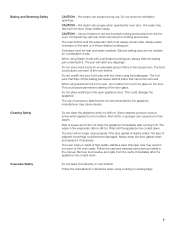
... clear. When using aluminum foil in the closed oven. When using Steam mode with fruit when using cooking or roasting bags. 7 Remove food residue and spills from the door. Do not place food directly on the open appliance door. Do not overfill very juicy fruit tortes with a perforated cooking pan, always slide the baking pan underneath it is heavily soiled. Risk of the door glass. The oven bottom and the...
... clear. When using aluminum foil in the closed oven. When using Steam mode with fruit when using cooking or roasting bags. 7 Remove food residue and spills from the door. Do not place food directly on the open appliance door. Do not overfill very juicy fruit tortes with a perforated cooking pan, always slide the baking pan underneath it is heavily soiled. Risk of the door glass. The oven bottom and the...
User Manual
Page 9
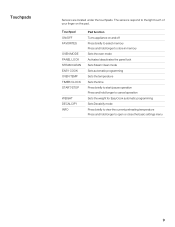
The sensors respond to open or close the basic settings menu 9 Touchpad ON/OFF FAVORITES OVEN MODE PANEL LOCK STEAM CLEAN EASY COOK OVEN TEMP TIMER/CLOCK START/STOP WEIGHT DECALCIFY INFO Pad function Turns appliance on and off Press briefly to select memory Press and hold longer to store in memory Sets the oven mode Activates/deactivates the panel lock Sets Steam Clean mode Sets automatic programming Sets the temperature Sets the time Press briefly to start/pause operation Press and hold longer to...
The sensors respond to open or close the basic settings menu 9 Touchpad ON/OFF FAVORITES OVEN MODE PANEL LOCK STEAM CLEAN EASY COOK OVEN TEMP TIMER/CLOCK START/STOP WEIGHT DECALCIFY INFO Pad function Turns appliance on and off Press briefly to select memory Press and hold longer to store in memory Sets the oven mode Activates/deactivates the panel lock Sets Steam Clean mode Sets automatic programming Sets the temperature Sets the time Press briefly to start/pause operation Press and hold longer to...
User Manual
Page 11
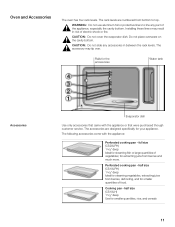
... part of electric shock or fire. ř CAUTION:ĄDo not cover the evaporator dish. Installing these liners may tip over. The accessories are numbered from bottom to top. ř WARNING:ĄDo not use aluminum foil or protective liners to line any accessories in risk of the appliance, especially the cavity bottom. Perforated cooking pan Ć half size...
... part of electric shock or fire. ř CAUTION:ĄDo not cover the evaporator dish. Installing these liners may tip over. The accessories are numbered from bottom to top. ř WARNING:ĄDo not use aluminum foil or protective liners to line any accessories in risk of the appliance, especially the cavity bottom. Perforated cooking pan Ć half size...

User Manual
Page 14
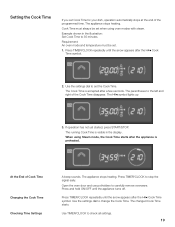
... stopped. 1. Carefully open the oven door. Remove the water tank, fill it and slide it has been installed. Press TIMER/CLOCK repeatedly until the arrow appears after plugging in the appliance D Changing the water hardness level, if necessary D Cleaning the appliance prior to its factory settings (see Basic Settings). More steam than usual will automatically adjust to the new location, reset the appliance to initial use Setting the Clock Changing the Time After plugging...
... stopped. 1. Carefully open the oven door. Remove the water tank, fill it and slide it has been installed. Press TIMER/CLOCK repeatedly until the arrow appears after plugging in the appliance D Changing the water hardness level, if necessary D Cleaning the appliance prior to its factory settings (see Basic Settings). More steam than usual will automatically adjust to the new location, reset the appliance to initial use Setting the Clock Changing the Time After plugging...
User Manual
Page 16
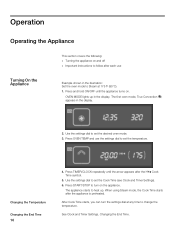
... is preheated. Press OVEN TEMP and use Turning On the Appliance Example shown in the illustration: Set the oven mode to Steam at any time to change the temperature. The appliance starts to heat up in the display. ã 2. Press and hold ON/OFF until the arrow appears after the xO Cook Time symbol. 5. Press TIMER/CLOCK repeatedly until the appliance turns on the appliance. āOperation Operating the Appliance This section covers...
... is preheated. Press OVEN TEMP and use Turning On the Appliance Example shown in the illustration: Set the oven mode to Steam at any time to change the temperature. The appliance starts to heat up in the display. ã 2. Press and hold ON/OFF until the arrow appears after the xO Cook Time symbol. 5. Press TIMER/CLOCK repeatedly until the appliance turns on the appliance. āOperation Operating the Appliance This section covers...
User Manual
Page 19
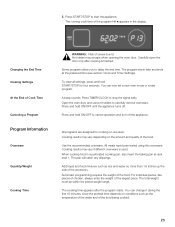
..., operation automatically stops at the end of Cook Time Changing the Cook Time Checking Time Settings A beep sounds. Press TIMER/CLOCK to carefully remove ovenware. The running Cook Time is visible in the illustration: Set Cook Time to check all settings. 19 The appliance stops heating. Press TIMER/CLOCK repeatedly until the arrow appears after the xO Cook Time symbol. Press TIMER/CLOCK repeatedly until the appliance turns off. Open the oven door and use potholders to stop the signal early. Requirement: An oven mode and temperature must...
..., operation automatically stops at the end of Cook Time Changing the Cook Time Checking Time Settings A beep sounds. Press TIMER/CLOCK to carefully remove ovenware. The running Cook Time is visible in the illustration: Set Cook Time to check all settings. 19 The appliance stops heating. Press TIMER/CLOCK repeatedly until the arrow appears after the xO Cook Time symbol. Press TIMER/CLOCK repeatedly until the appliance turns off. Open the oven door and use potholders to stop the signal early. Requirement: An oven mode and temperature must...
User Manual
Page 23
... cancel operation and turn off . Press TIMER/CLOCK to carefully remove ovenware. The pan will catch any drippings. A beep sounds. Cooking results may escape when opening the oven door. Automatic programming requires the weight of the largest piece. Press START/STOP to delay the end time. Hot steam may vary if different ovenware is finished. Use the recommended ovenware. When cooking food in the display. 11:30 am Changing the End Time Clearing Settings At...
... cancel operation and turn off . Press TIMER/CLOCK to carefully remove ovenware. The pan will catch any drippings. A beep sounds. Cooking results may escape when opening the oven door. Automatic programming requires the weight of the largest piece. Press START/STOP to delay the end time. Hot steam may vary if different ovenware is finished. Use the recommended ovenware. When cooking food in the display. 11:30 am Changing the End Time Clearing Settings At...
User Manual
Page 35
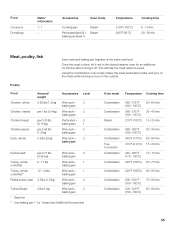
... + baking pan Wire rack + baking pan Perforated + baking pan Wire rack + baking pan Wire rack + baking pan Level 2 2 3 1 2 2 Duck breast* per 0.77 lbs (0.35 kg) Wire rack + 2 baking pan Turkey, whole, unstuffed 8 Ć 11 lbs Wire rack + 1 baking pan Turkey, whole, unstuffed** 12 Ć 14 lbs Wire rack + 1 baking pan Rolled turkey roast 3.5 lbs (1.5 kg) Wire rack + 2 baking pan Turkey Breast 2 lbs (1 kg) Wire rack + 2 baking pan * Sear first ** Use baking pan 1 %/8 deep (see Additional Accessories) Oven mode Temperature Cooking time Combination Combination Steam...
... + baking pan Wire rack + baking pan Perforated + baking pan Wire rack + baking pan Wire rack + baking pan Level 2 2 3 1 2 2 Duck breast* per 0.77 lbs (0.35 kg) Wire rack + 2 baking pan Turkey, whole, unstuffed 8 Ć 11 lbs Wire rack + 1 baking pan Turkey, whole, unstuffed** 12 Ć 14 lbs Wire rack + 1 baking pan Rolled turkey roast 3.5 lbs (1.5 kg) Wire rack + 2 baking pan Turkey Breast 2 lbs (1 kg) Wire rack + 2 baking pan * Sear first ** Use baking pan 1 %/8 deep (see Additional Accessories) Oven mode Temperature Cooking time Combination Combination Steam...

User Manual
Page 38
... oven and preheat the oven using Slow Cook mode. The meat stays very moist and is the roast done? Place the baking pan in some areas. Use a food thermometer (available in the preheated combination oven and continue to measure the meat temperature. The roast is too dark and crust is too light and runny. Next time, use a larger roasting pan or add less liquid. Roasting Tips When is tender. Check the rack level and temperature...
... oven and preheat the oven using Slow Cook mode. The meat stays very moist and is the roast done? Place the baking pan in some areas. Use a food thermometer (available in the preheated combination oven and continue to measure the meat temperature. The roast is too dark and crust is too light and runny. Next time, use a larger roasting pan or add less liquid. Roasting Tips When is tender. Check the rack level and temperature...

User Manual
Page 49
... START/STOP. The light in the evaporator dish. 3. Use the cleaning sponge to ensure that no dishwashing liquid remains inside . 2. Steam Clean stops. Steam Clean Preparation Starting Steam Clean Cleaning Cycle 1 Cleaning Cycle 2 Removing Residual Water Canceling Steam Clean Steam Clean uses steam to max". Residue and spills can be operated again until the appliance turns on the oven bottom. 1. Steam Clean takes approximately 30 minutes. Note: Operation of dishwashing liquid to select Steam Clean mode. 3. Press and hold ON/OFF. Steam Clean starts. The...
... START/STOP. The light in the evaporator dish. 3. Use the cleaning sponge to ensure that no dishwashing liquid remains inside . 2. Steam Clean stops. Steam Clean Preparation Starting Steam Clean Cleaning Cycle 1 Cleaning Cycle 2 Removing Residual Water Canceling Steam Clean Steam Clean uses steam to max". Residue and spills can be operated again until the appliance turns on the oven bottom. 1. Steam Clean takes approximately 30 minutes. Note: Operation of dishwashing liquid to select Steam Clean mode. 3. Press and hold ON/OFF. Steam Clean starts. The...

User Manual
Page 51
... Installing the Appliance Door The appliance door can also use Decalcify mode to produce a descaler solution. 2. Use both hands to avoid breaking. The door front is heavy and fragile. Handle carefully to remove the oven door. Also, do so could result in place before removing the door. Call customer service. Removing Residual Water Canceling Decalcify Mode Use the cleaning sponge to grasp the oven door firmly and properly could damage the hinge...
... Installing the Appliance Door The appliance door can also use Decalcify mode to produce a descaler solution. 2. Use both hands to avoid breaking. The door front is heavy and fragile. Handle carefully to remove the oven door. Also, do so could result in place before removing the door. Call customer service. Removing Residual Water Canceling Decalcify Mode Use the cleaning sponge to grasp the oven door firmly and properly could damage the hinge...

User Manual
Page 54
... the life of glass. Installing the Door Glass 1. Put the cover in electrical shock or burns. Failure to remove the halogen bulb from breaking. Always use a dry cloth to do so could cause an injury. Handle carefully to the appliance at the main power supply (fuse or breaker box) or unplug the power cord. 2. D The light socket is live when the door is on . 3. Turn off before replacing the light bulb(s). Make sure...
... the life of glass. Installing the Door Glass 1. Put the cover in electrical shock or burns. Failure to remove the halogen bulb from breaking. Always use a dry cloth to do so could cause an injury. Handle carefully to the appliance at the main power supply (fuse or breaker box) or unplug the power cord. 2. D The light socket is live when the door is on . 3. Turn off before replacing the light bulb(s). Make sure...

User Manual
Page 55
... on the oven door is defective, it in the corners. 55 Replacement gaskets for the appliance can be replaced. Check the fit of the door. 4. Replacing the Glass Cover or Seals Damaged glass covers or seals must be replaced. Screw the glass cover with the appliance model and serial numbers. 1. Provide customer service with seals back on. 6. Reconnect the appliance to power and reset the clock. Remove the old door gasket. 3. Provide...
... on the oven door is defective, it in the corners. 55 Replacement gaskets for the appliance can be replaced. Check the fit of the door. 4. Replacing the Glass Cover or Seals Damaged glass covers or seals must be replaced. Screw the glass cover with the appliance model and serial numbers. 1. Provide customer service with seals back on. 6. Reconnect the appliance to power and reset the clock. Remove the old door gasket. 3. Provide...

User Manual
Page 56
... system not working Tip / Solution Connect appliance to power Check if other kitchen appliances are working Check the fuse or breaker box to see Canceling Steam Clean or Canceling Decalcify Mode) Set the current time using the settings dial and then press TIMER/CLOCK Press START/STOP Press START/STOP, or clear the setting by trained customer service technicians only. Three heat indicator bars appear in the display The settings dial was turned accidentally After adjusting the setting, START/STOP was...
... system not working Tip / Solution Connect appliance to power Check if other kitchen appliances are working Check the fuse or breaker box to see Canceling Steam Clean or Canceling Decalcify Mode) Set the current time using the settings dial and then press TIMER/CLOCK Press START/STOP Press START/STOP, or clear the setting by trained customer service technicians only. Three heat indicator bars appear in the display The settings dial was turned accidentally After adjusting the setting, START/STOP was...
User Manual
Page 61
... around the Product. and resetting of the appliance's internal workings). D Any party's willful misconduct, negligence, misuse, abuse, accidents, neglect, improper operation, failure to maintain, improper or negligent installation, tampering, failure to follow operating instructions, mishandling, unauthorized service (including selfĆperformed fixing" or exploration of breakers or fuses. D Adjustment, alteration or modification of installation problems (you with local fire and building codes and regulations. service visits...
... around the Product. and resetting of the appliance's internal workings). D Any party's willful misconduct, negligence, misuse, abuse, accidents, neglect, improper operation, failure to maintain, improper or negligent installation, tampering, failure to follow operating instructions, mishandling, unauthorized service (including selfĆperformed fixing" or exploration of breakers or fuses. D Adjustment, alteration or modification of installation problems (you with local fire and building codes and regulations. service visits...


