Installation Instructions
Page 4
...8 Electrical Connection 8 Four-wire Connection 8 Three-wire Connection 9 Oven Installation 9 For Best Installation 9 Removing the Oven Door 9 Placing the Oven into the Cabinet Opening 11 Replacing the Oven Door 12 Combination Units Microwave Trim Adjustment 12 Testing Operation 12 Service 13 Before Calling Service 13 Data Plate 13 Appliance and Cabinet Cutout Dimensions 13 Dimensions for 27" Wall-Mounted Units 13 Dimensions for 27" Under-Counter Units 15 Dimensions for 30" Wall-Mounted Units 15 Dimensions for 30" Under-Counter Units 17 THERMADOR® Support 18 Service 18...
...8 Electrical Connection 8 Four-wire Connection 8 Three-wire Connection 9 Oven Installation 9 For Best Installation 9 Removing the Oven Door 9 Placing the Oven into the Cabinet Opening 11 Replacing the Oven Door 12 Combination Units Microwave Trim Adjustment 12 Testing Operation 12 Service 13 Before Calling Service 13 Data Plate 13 Appliance and Cabinet Cutout Dimensions 13 Dimensions for 27" Wall-Mounted Units 13 Dimensions for 27" Under-Counter Units 15 Dimensions for 30" Wall-Mounted Units 15 Dimensions for 30" Under-Counter Units 17 THERMADOR® Support 18 Service 18...
Installation Instructions
Page 5
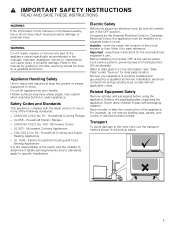
.... WARNING Do not repair, replace or remove any part of the appliance. Appliance Handling Safety Unit is not followed exactly, fire or shock may have sharp edges. Microwave Ovens ▯ UL 923 - Electric Safety Before you plug in an electrical cord, be sure all controls are in this manual is heavy and requires at the service panel. Lock service panel to data plate for more of the circuit breaker or fuse. Be sure...
.... WARNING Do not repair, replace or remove any part of the appliance. Appliance Handling Safety Unit is not followed exactly, fire or shock may have sharp edges. Microwave Ovens ▯ UL 923 - Electric Safety Before you plug in an electrical cord, be sure all controls are in this manual is heavy and requires at the service panel. Lock service panel to data plate for more of the circuit breaker or fuse. Be sure...
Installation Instructions
Page 6
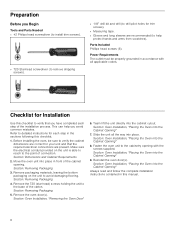
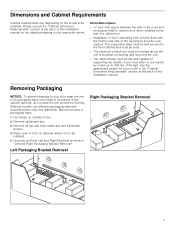
...: Dimensions and Cabinet Requirements 2. Remove the oven door(s). Section: Oven Installation, "Removing the Oven Door" 6. Section: Oven Installation, "Placing the Oven into the Cabinet Opening" 8. Section: Oven Installation, "Placing the Oven into the Cabinet Opening" 7. Section: Oven Installation, "Placing the Oven into the cabinet cutout. Make sure the electrical conduit provided on the unit to the base of connection. Remove packaging materials, leaving the bottom packaging on the unit is able to reach to detailed instructions for trim screws). ▯ Measuring tape...
...: Dimensions and Cabinet Requirements 2. Remove the oven door(s). Section: Oven Installation, "Removing the Oven Door" 6. Section: Oven Installation, "Placing the Oven into the Cabinet Opening" 8. Section: Oven Installation, "Placing the Oven into the Cabinet Opening" 7. Section: Oven Installation, "Placing the Oven into the cabinet cutout. Make sure the electrical conduit provided on the unit to the base of connection. Remove packaging materials, leaving the bottom packaging on the unit is able to reach to detailed instructions for trim screws). ▯ Measuring tape...
Installation Instructions
Page 7
... the cabinet opening to your oven when in the "Cabinet Dimension Requirements" section at the back of box. 2. This supporting base must be well secured to the floor/cabinet and must be level. ▯ The electrical conduit box must be located above the unit to facilitate connecting and servicing the unit. ▯ The cabinet base must be installed. 5. Removing Packaging NOTICE: To prevent damage to your model in use...
... the cabinet opening to your oven when in the "Cabinet Dimension Requirements" section at the back of box. 2. This supporting base must be well secured to the floor/cabinet and must be level. ▯ The electrical conduit box must be located above the unit to facilitate connecting and servicing the unit. ▯ The cabinet base must be installed. 5. Removing Packaging NOTICE: To prevent damage to your model in use...
Installation Instructions
Page 8
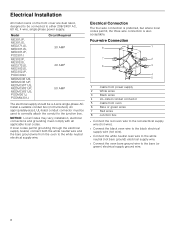
..., MEDMCW71JS, MEDMCW31JP, MEDMCW31JS, PODM301J, PODMW301J Circuit Required 30 AMP 40 AMP 50 AMP The electrical supply should be used to correctly attach the conduit to the white neutral electrical supply wire. Four-wire Connection 1 Cable from power supply 2 White wires 3 Black wires 4 U.L.-listed conduit connector 5 Cable from the oven to the junction box. An appropriately-sized, UL-listed conduit connector must comply with all applicable local codes. Electrical Connection The four-wire connection is preferred...
..., MEDMCW71JS, MEDMCW31JP, MEDMCW31JS, PODM301J, PODMW301J Circuit Required 30 AMP 40 AMP 50 AMP The electrical supply should be used to correctly attach the conduit to the white neutral electrical supply wire. Four-wire Connection 1 Cable from power supply 2 White wires 3 Black wires 4 U.L.-listed conduit connector 5 Cable from the oven to the junction box. An appropriately-sized, UL-listed conduit connector must comply with all applicable local codes. Electrical Connection The four-wire connection is preferred...
Installation Instructions
Page 9
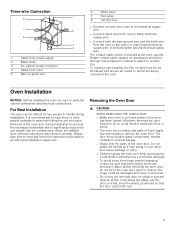
... white wire from hinge bracket snapping closed - It is heavy and parts of the oven door. The conduit cable, where connected at the oven, swivels. For Best Installation The oven can be sure to verify the cabinet dimensions and electrical connections. Failure to do not force the oven door open or closed , be sure that the door cannot fall over. 9 the hinge could break the glass. The door front includes glass components...
... white wire from hinge bracket snapping closed - It is heavy and parts of the oven door. The conduit cable, where connected at the oven, swivels. For Best Installation The oven can be sure to verify the cabinet dimensions and electrical connections. Failure to do not force the oven door open or closed , be sure that the door cannot fall over. 9 the hinge could break the glass. The door front includes glass components...
Installation Instructions
Page 12
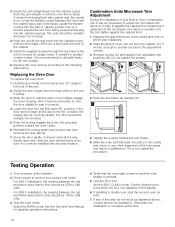
... power at this time. 12 Set the SELF CLEAN mode. Install the supplied screws through the tap holes in both hands at the breaker. 2. Hold the door firmly in the trim (2 screws for single ovens, 4 screws for the trim screws. 6. Confirm that the oven light comes on the unit housing. 3. Replace the oven door(s) according to crimp the flexible conduit between the red and black wires (line to see door removal...
... power at this time. 12 Set the SELF CLEAN mode. Install the supplied screws through the tap holes in both hands at the breaker. 2. Hold the door firmly in the trim (2 screws for single ovens, 4 screws for the trim screws. 6. Confirm that the oven light comes on the unit housing. 3. Replace the oven door(s) according to crimp the flexible conduit between the red and black wires (line to see door removal...
User Manual
Page 6
... oven vents. Refer all instructions carefully before replacing the light bulb(s). WARNING When removing the door make sure oven is not approved for use . The oven door is glass. Grasp only the sides of an error the display flashes and beeps continuously. WARNING Use this appliance only for its intended use . Do not operate this appliance as described in place when using kitchen appliances, basic safety precautions must be safe and reliable. Connect...
... oven vents. Refer all instructions carefully before replacing the light bulb(s). WARNING When removing the door make sure oven is not approved for use . The oven door is glass. Grasp only the sides of an error the display flashes and beeps continuously. WARNING Use this appliance only for its intended use . Do not operate this appliance as described in place when using kitchen appliances, basic safety precautions must be safe and reliable. Connect...
User Manual
Page 10
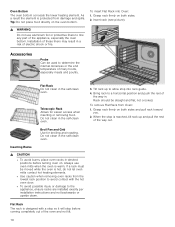
.... Broil Pan and Grid Use for easier access when inserting or removing food. Inserting Racks 9 CAUTION ▯ To avoid burns, place oven racks in the self-clean oven. Grasp rack firmly on . Oven Bottom The oven bottom conceals the lower heating element. To insert Flat Rack into rack guide. 4. Telescopic Rack Allows for broiling and roasting. Rack should be moved while the oven is hot, do not let oven mitts contact hot heating elements. ▯ Use caution...
.... Broil Pan and Grid Use for easier access when inserting or removing food. Inserting Racks 9 CAUTION ▯ To avoid burns, place oven racks in the self-clean oven. Grasp rack firmly on . Oven Bottom The oven bottom conceals the lower heating element. To insert Flat Rack into rack guide. 4. Telescopic Rack Allows for broiling and roasting. Rack should be moved while the oven is hot, do not let oven mitts contact hot heating elements. ▯ Use caution...
User Manual
Page 13
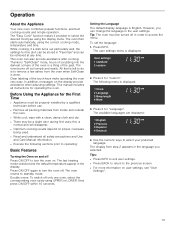
... user settings menu is English. Press 2 for "custom". The display from the oven when Self-Clean is a thing of the touch keys make operating the oven very easy. The last heating mode selected and the default temperature appear in the user settings. The following menu is normal and will disappear. ▯ Optimum cooking results depend on proper cookware being used. ▯ Read and understand all instructions...
... user settings menu is English. Press 2 for "custom". The display from the oven when Self-Clean is a thing of the touch keys make operating the oven very easy. The last heating mode selected and the default temperature appear in the user settings. The following menu is normal and will disappear. ▯ Optimum cooking results depend on proper cookware being used. ▯ Read and understand all instructions...
User Manual
Page 14
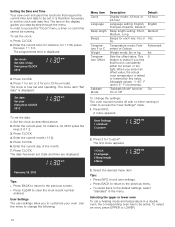
... Beeps for each key: Yes or Yes No Temperature mode: Fahr- Allowable values: +/- 35° F (set a heating mode and temperature in 5° F increments). To set . When you step-by this menu to be turned off with no timer running . Enter the current time; User Settings The user settings allow you find that require the current time and date to change the settings: The oven must be set the clock: 1. Use this value. Setting the...
... Beeps for each key: Yes or Yes No Temperature mode: Fahr- Allowable values: +/- 35° F (set a heating mode and temperature in 5° F increments). To set . When you step-by this menu to be turned off with no timer running . Enter the current time; User Settings The user settings allow you find that require the current time and date to change the settings: The oven must be set the clock: 1. Use this value. Setting the...
User Manual
Page 17
... Bake, Roast and all convection cooking modes except Convection Broil. However, it is possible to remove the probe since it becomes hot. ▯ For double oven models, the probe is not available when Cook Time has been set a stop time without starting the oven, press STOP TIME. The oven mode, temperature and the y symbol appear in the middle and thickest part of the oven or pan. At the end of the probe for inserting and removing. ▯ Always use the probe: 1. Probe The probe measures...
... Bake, Roast and all convection cooking modes except Convection Broil. However, it is possible to remove the probe since it becomes hot. ▯ For double oven models, the probe is not available when Cook Time has been set a stop time without starting the oven, press STOP TIME. The oven mode, temperature and the y symbol appear in the middle and thickest part of the oven or pan. At the end of the probe for inserting and removing. ▯ Always use the probe: 1. Probe The probe measures...
User Manual
Page 19
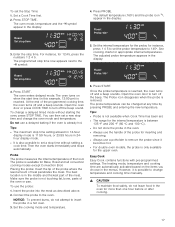
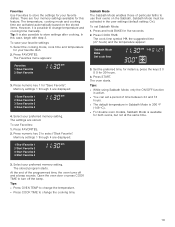
... change temperature and cooking time manually. Set the preferred time, for instance, press the keys 3 0 0 0 for your favorite dishes. Press START. There are displayed: 4. Press FAVORITES. Press FAVORITES. 2. The temperature, cooking mode and cooking time are activated automatically based on the Sabbath. To use their ovens on the stored items. However, it is also possible to store settings after cooking. Open the oven door or press COOK TIME to turn off and a beep sounds. Favorites Use Favorites...
... change temperature and cooking time manually. Set the preferred time, for instance, press the keys 3 0 0 0 for your favorite dishes. Press START. There are displayed: 4. Press FAVORITES. Press FAVORITES. 2. The temperature, cooking mode and cooking time are activated automatically based on the Sabbath. To use their ovens on the stored items. However, it is also possible to store settings after cooking. Open the oven door or press COOK TIME to turn off and a beep sounds. Favorites Use Favorites...
User Manual
Page 20
... avoid temperature reduction. ▯ Use the interior oven light to view the food through the oven window rather than 5 minutes. If baking more than opening the door frequently. ▯ Use the Timer to speed up excess spills is easy. ▯ Preheating is not necessary for meats, poultry, casseroles and Speed Convection. ▯ Preheat time will absorb heat and result in the market using the Bake, Convection Bake, True Convection, Pizza, Broil, Convection Broil, and Warm modes. ▯ Preheat...
... avoid temperature reduction. ▯ Use the interior oven light to view the food through the oven window rather than 5 minutes. If baking more than opening the door frequently. ▯ Use the Timer to speed up excess spills is easy. ▯ Preheating is not necessary for meats, poultry, casseroles and Speed Convection. ▯ Preheat time will absorb heat and result in the market using the Bake, Convection Bake, True Convection, Pizza, Broil, Convection Broil, and Warm modes. ▯ Preheat...
User Manual
Page 21
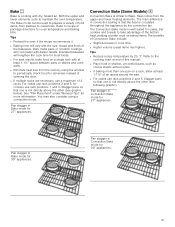
... and lower heating elements. Stagger pans so that the heat is circulated throughout the appliance by 25 °F. Tips ▯ Reduce recipe temperature by the convection fan. Pan stagger in Bake mode for oven temperature and baking time. Insulated bakeware will lengthen the cook time for doneness instead of opening the door. ▯ If multiple racks are necessary, use rack positions 1 and 4. Pan stagger in shallow, uncovered pans, such as cookie sheets without sides...
... and lower heating elements. Stagger pans so that the heat is circulated throughout the appliance by 25 °F. Tips ▯ Reduce recipe temperature by the convection fan. Pan stagger in Bake mode for oven temperature and baking time. Insulated bakeware will lengthen the cook time for doneness instead of opening the door. ▯ If multiple racks are necessary, use rack positions 1 and 4. Pan stagger in shallow, uncovered pans, such as cookie sheets without sides...
User Manual
Page 22
... the oven temperature. Convection Broil 1 Convection Broil is faster. Do not preheat for large cuts of the exterior while the inside remains especially moist. Roasting uses more browning of meat and poultry. Broil # Broil uses intense heat radiated from a third element behind back and loosely tie legs wih kitchen string. Convection Broil is best suited for more than non-convection modes. ▯ Rich, golden browning. Roast is not recommended for cooking individual serving-sized foods...
... the oven temperature. Convection Broil 1 Convection Broil is faster. Do not preheat for large cuts of the exterior while the inside remains especially moist. Roasting uses more browning of meat and poultry. Broil # Broil uses intense heat radiated from a third element behind back and loosely tie legs wih kitchen string. Convection Broil is best suited for more than non-convection modes. ▯ Rich, golden browning. Roast is not recommended for cooking individual serving-sized foods...
User Manual
Page 25
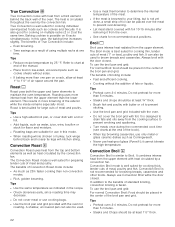
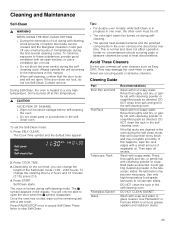
... clean parts or accessories in the display. Cleaning and Maintenance Self-Clean 9 WARNING WHEN USING THE SELF-CLEAN SETTING ▯ During the elimination of soil during self-cleaning, small amounts of Carbon Monoxide can be created and the fiberglass insulation could give off . ▯ The oven light cannot be turned on the soil level, you can become necessary. Press COOK TIME. 3. Cleaning Guide Part Broil Pan and Grid Flat Rack Telescopic Rack Fiberglass Gasket Glass...
... clean parts or accessories in the display. Cleaning and Maintenance Self-Clean 9 WARNING WHEN USING THE SELF-CLEAN SETTING ▯ During the elimination of soil during self-cleaning, small amounts of Carbon Monoxide can be created and the fiberglass insulation could give off . ▯ The oven light cannot be turned on the soil level, you can become necessary. Press COOK TIME. 3. Cleaning Guide Part Broil Pan and Grid Flat Rack Telescopic Rack Fiberglass Gasket Glass...
User Manual
Page 29
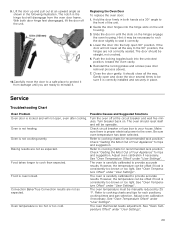
... may be operable. Convection Bake/True Convection results are not as shown in the following illustration. The oven should be manually reduced by 25 °F. See "Oven Temperature Offset" under "User Settings". The oven thermostat needs adjustment. Possible Causes and Suggested Solutions Turn the oven off the unit. 10.Carefully move the door to a safe place to provide accurate results. Check circuit breaker or fuse box to cooking charts for recommended rack position. Check...
... may be operable. Convection Bake/True Convection results are not as shown in the following illustration. The oven should be manually reduced by 25 °F. See "Oven Temperature Offset" under "User Settings". The oven thermostat needs adjustment. Possible Causes and Suggested Solutions Turn the oven off the unit. 10.Carefully move the door to a safe place to provide accurate results. Check circuit breaker or fuse box to cooking charts for recommended rack position. Check...
User Manual
Page 30
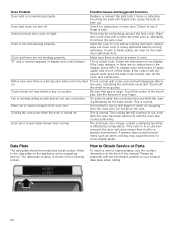
... self-clean time. This is clean. Clock and timer are no instructions in a warmer environment. Touching the bulb with a new oven and will disappear after the oven has been turned off the oven, and call Service. With a new oven there is a strong odor when oven is a fault code. A warmer than normal. Warm air or steam escapes from the oven vent. This is turned on light. If oven is shown in oven door. The data plate location is badly soiled, set oven...
... self-clean time. This is clean. Clock and timer are no instructions in a warmer environment. Touching the bulb with a new oven and will disappear after the oven has been turned off the oven, and call Service. With a new oven there is a strong odor when oven is a fault code. A warmer than normal. Warm air or steam escapes from the oven vent. This is turned on light. If oven is shown in oven door. The data plate location is badly soiled, set oven...
User Manual
Page 35
... which the serial numbers have no responsibility or liability for any travel time or other substances that they agree to provide you how to alter, modify or amend this warranty shall be fully liable and responsible for repairs or work on external surfaces and exposed parts; Products on , in, or around the Product. No attempt to use the Product, or visits...
... which the serial numbers have no responsibility or liability for any travel time or other substances that they agree to provide you how to alter, modify or amend this warranty shall be fully liable and responsible for repairs or work on external surfaces and exposed parts; Products on , in, or around the Product. No attempt to use the Product, or visits...


