Design Guide - Side-by-Side Refrigeration
Page 4
... kit. REFRIGERATION - This series requires the installation of the right side cabinets or end panel. Create the panels according to replace the factory trim. A 1/2" (12.7 mm) hole for panel specifications. Before installing a Thermador Sideby-Side, be turned off valve is ...placed at the end of the rear wall. CUSTOM PANELS The custom panel series features factory-installed, traditional style trim to verify the cabinet dimensions and electrical connections...
... kit. REFRIGERATION - This series requires the installation of the right side cabinets or end panel. Create the panels according to replace the factory trim. A 1/2" (12.7 mm) hole for panel specifications. Before installing a Thermador Sideby-Side, be turned off valve is ...placed at the end of the rear wall. CUSTOM PANELS The custom panel series features factory-installed, traditional style trim to verify the cabinet dimensions and electrical connections...
Design Guide - Side-by-Side Refrigeration
Page 5
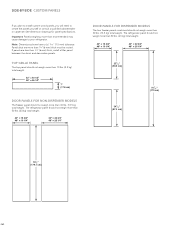
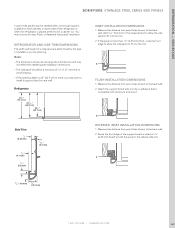
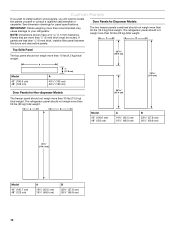
... (1.5 mm) tolerance. Panels that are less than 30 lbs. (13.5 kg) total weight. SIDE-BY-SIDE CUSTOM PANELS If you plan to install custom wood panels, you will need to your refrigerator. TOP GRILLE PANEL The top panel should not weigh more than 10 lbs. (4.5 kg) total ..." = 40 1/2" 48" = 46 1/2" 7" (17.8 cm) DOOR PANELS FOR NON-DISPENSER MODELS The freezer panel should not weigh more than 1/4" (6 mm) thick, install a filler panel between the doors and decorative panels. See dimension drawings for panel specifications. The refrigerator panel should not weigh more than...
... (1.5 mm) tolerance. Panels that are less than 30 lbs. (13.5 kg) total weight. SIDE-BY-SIDE CUSTOM PANELS If you plan to install custom wood panels, you will need to your refrigerator. TOP GRILLE PANEL The top panel should not weigh more than 10 lbs. (4.5 kg) total ..." = 40 1/2" 48" = 46 1/2" 7" (17.8 cm) DOOR PANELS FOR NON-DISPENSER MODELS The freezer panel should not weigh more than 1/4" (6 mm) thick, install a filler panel between the doors and decorative panels. See dimension drawings for panel specifications. The refrigerator panel should not weigh more than...
Design Guide - Side-by-Side Refrigeration
Page 9
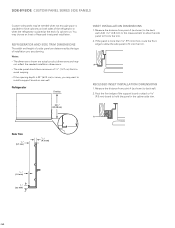
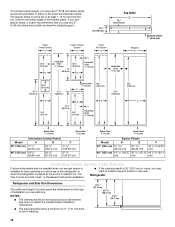
... (1.27 cm) thick to hold the panel in the cabinet side trim. Refrigerator Overlay 23 59.40 cm) INSET INSTALLATION DIMENSIONS 1. You may choose an Inset or Recessed Inset panel installation. Notes: - If the opening depth is 25" (63.5 cm) or more, you are actual product dimensions and ... mm) thick, route the front edge to allow the side panel to back wall. 2. The side panel should be needed installation dimensions. - Measure the distance from point A (as shown) to install a support board on both sides of the refrigerator or when the refrigerator is placed at the end of...
... (1.27 cm) thick to hold the panel in the cabinet side trim. Refrigerator Overlay 23 59.40 cm) INSET INSTALLATION DIMENSIONS 1. You may choose an Inset or Recessed Inset panel installation. Notes: - If the opening depth is 25" (63.5 cm) or more, you are actual product dimensions and ... mm) thick, route the front edge to allow the side panel to back wall. 2. The side panel should be needed installation dimensions. - Measure the distance from point A (as shown) to install a support board on both sides of the refrigerator or when the refrigerator is placed at the end of...
Design Guide - Side-by-Side Refrigeration
Page 10
... If the panel is more , you are actual product dimensions and may choose an Inset, Flush, or Recessed Inset panel installation. A 10 mm) 15.7 mm) 1.800.735.4328 | THERMADOR.COM 269 Notes: - Measure the distance from point A (as shown) to the back wall. 2. Measure the distance ...from point A (as shown) to the back wall. 2. A RECESSED INSET INSTALLATION DIMENSIONS 1. Route the front edge of 1/2" (1.27 cm) thick to ...
... If the panel is more , you are actual product dimensions and may choose an Inset, Flush, or Recessed Inset panel installation. A 10 mm) 15.7 mm) 1.800.735.4328 | THERMADOR.COM 269 Notes: - Measure the distance from point A (as shown) to the back wall. 2. Measure the distance ...from point A (as shown) to the back wall. 2. A RECESSED INSET INSTALLATION DIMENSIONS 1. Route the front edge of 1/2" (1.27 cm) thick to ...
Design Guide - Side-by-Side Refrigeration
Page 11
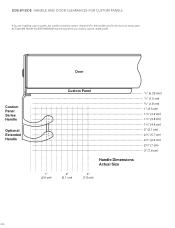
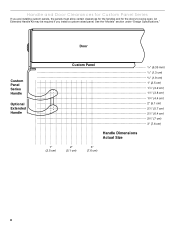
An Extended Handle Kit (EXTHANDSXS) may be required if you are installing custom panels, the panels must allow certain clearances for the handles and for the doors to swing open. SIDE-BY-SIDE HANDLE AND DOOR CLEARANCES FOR CUSTOM PANELS If you install a custom raised panel. Custom Panel Series Handle Optional Extended Handle Door 1" (2.5 cm) Custom Panel 2" (5.1 cm) Handle Dimensions Actual Size 3" (7.6 cm) 1/4" (6.35 mm) 1/2" (1.3 cm) 3/4" (1.9 cm) 1" (2.5 cm) 11/4" (3.2 cm) 11/2" (3.8 cm) 13/4" (4.4 cm) 2" (5.1 cm) 21/4" (5.7 cm) 21/2" (6.4 cm) 23/4" (7 cm) 3" (7.6 cm) 270
An Extended Handle Kit (EXTHANDSXS) may be required if you are installing custom panels, the panels must allow certain clearances for the handles and for the doors to swing open. SIDE-BY-SIDE HANDLE AND DOOR CLEARANCES FOR CUSTOM PANELS If you install a custom raised panel. Custom Panel Series Handle Optional Extended Handle Door 1" (2.5 cm) Custom Panel 2" (5.1 cm) Handle Dimensions Actual Size 3" (7.6 cm) 1/4" (6.35 mm) 1/2" (1.3 cm) 3/4" (1.9 cm) 1" (2.5 cm) 11/4" (3.2 cm) 11/2" (3.8 cm) 13/4" (4.4 cm) 2" (5.1 cm) 21/4" (5.7 cm) 21/2" (6.4 cm) 23/4" (7 cm) 3" (7.6 cm) 270
Design Guide - Side-by-Side Refrigeration
Page 13
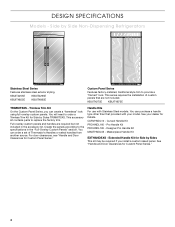
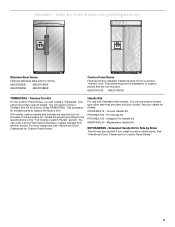
...to replace the factory trim. For the custom panel series, you may choose an Inset, Flush, or Recessed Inset panel installation. Full-overlay custom panels and handles are required but not included in the "Full-Overlay Custom Panels" section. You can .... 272 INSTALLATION OPTIONS Specifications in the planning pages provide dimensions and installation detail for the stainless steel models as well as installation detail for Custom Panel Series." SPECIFICATIONS Total Capacity (cu. ft.) 25.2 Refrigerator Capacity (cu. This series requires the installation of Thermador's handles ...
...to replace the factory trim. For the custom panel series, you may choose an Inset, Flush, or Recessed Inset panel installation. Full-overlay custom panels and handles are required but not included in the "Full-Overlay Custom Panels" section. You can .... 272 INSTALLATION OPTIONS Specifications in the planning pages provide dimensions and installation detail for the stainless steel models as well as installation detail for Custom Panel Series." SPECIFICATIONS Total Capacity (cu. ft.) 25.2 Refrigerator Capacity (cu. This series requires the installation of Thermador's handles ...
Design Guide - Side-by-Side Refrigeration
Page 15
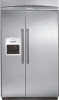
...Full-overlay custom panels and handles are UL and CUL approved. 274 For the custom panel series, you can order a set of Thermador's handles or select handles from another source. Custom panel side-by-side with Dispenser 580 kWh without Dispenser 115V / 60Hz / 6.9... Custom side panels may choose an Inset, Flush, or Recessed Inset panel installation. You can create a "frameless" look . REFRIGERATION 48-INCH SIDE-BY-SIDE REFRIGERATOR Models: KBUIT4855E, KBUIT4865E, KBUDT4855E, KBUDT4865E, KBUIT4875E, KBUDT4875E Stainless steel side-by-side with full-filtered external ...
...Full-overlay custom panels and handles are UL and CUL approved. 274 For the custom panel series, you can order a set of Thermador's handles or select handles from another source. Custom panel side-by-side with Dispenser 580 kWh without Dispenser 115V / 60Hz / 6.9... Custom side panels may choose an Inset, Flush, or Recessed Inset panel installation. You can create a "frameless" look . REFRIGERATION 48-INCH SIDE-BY-SIDE REFRIGERATOR Models: KBUIT4855E, KBUIT4865E, KBUDT4855E, KBUDT4865E, KBUIT4875E, KBUDT4875E Stainless steel side-by-side with full-filtered external ...
Installation Instructions
Page 3
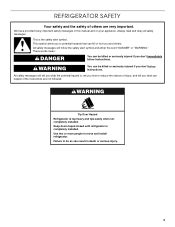
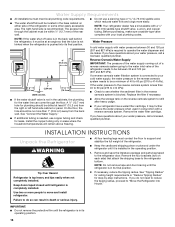
... SAFETY Your safety and the safety of injury, and tell you how to move and install refrigerator. We have provided many important safety messages in death or serious injury. 3 This symbol alerts you and others are not followed. Failure to potential ... Over Hazard Refrigerator is the safety alert symbol. Always read and obey all safety messages. This is top heavy and tips easily when not completely installed. Keep doors taped closed until refrigerator is , tell you what can be killed or seriously injured if you don't follow instructions. Use two or more...
... SAFETY Your safety and the safety of injury, and tell you how to move and install refrigerator. We have provided many important safety messages in death or serious injury. 3 This symbol alerts you and others are not followed. Failure to potential ... Over Hazard Refrigerator is the safety alert symbol. Always read and obey all safety messages. This is top heavy and tips easily when not completely installed. Keep doors taped closed until refrigerator is , tell you what can be killed or seriously injured if you don't follow instructions. Use two or more...
Installation Instructions
Page 4
...- See "Handle and Door Clearances for Custom Panel Series." Side by Sides TRIMKITSXS. Trimless Trim Kit On the Custom Panel Series, you install a custom raised panel. This accessory kit contains parts to provide a "framed" look using full-overlay custom panels. See your model. ...Kit for Details. You will need to the specifications in the accessory kit. Pro Handle Kit PROHNDL165 - This series requires the installation of Thermador's Handles or select handles from another source. You can order a set of custom panels that provided with Stainless Steel models. ...
...- See "Handle and Door Clearances for Custom Panel Series." Side by Sides TRIMKITSXS. Trimless Trim Kit On the Custom Panel Series, you install a custom raised panel. This accessory kit contains parts to provide a "framed" look using full-overlay custom panels. See your model. ...Kit for Details. You will need to the specifications in the accessory kit. Pro Handle Kit PROHNDL165 - This series requires the installation of Thermador's Handles or select handles from another source. You can order a set of custom panels that provided with Stainless Steel models. ...
Installation Instructions
Page 5
... Custom Panel Series." 5 Full-overlay custom panels and handles are not included. Models - KBUDT4255E KBUDT4265E KBUDT4855E KBUDT4865E Custom Panel Series Features factory-installed, traditional style trim to replace the factory trim. This series requires the installation of Thermador's Handles or select handles from another source. Trimless Trim Kit On the Custom Panel Series, you...
... Custom Panel Series." 5 Full-overlay custom panels and handles are not included. Models - KBUDT4255E KBUDT4265E KBUDT4855E KBUDT4865E Custom Panel Series Features factory-installed, traditional style trim to replace the factory trim. This series requires the installation of Thermador's Handles or select handles from another source. Trimless Trim Kit On the Custom Panel Series, you...
Installation Instructions
Page 8
... Door Clearances for the doors to swing open. See the "Models" section under "Design Specifications." An Extended Handle Kit may be required if you are installing custom panels, the panels must allow certain clearances for the handles and for Custom Panel Series If you...
... Door Clearances for the doors to swing open. See the "Models" section under "Design Specifications." An Extended Handle Kit may be required if you are installing custom panels, the panels must allow certain clearances for the handles and for Custom Panel Series If you...
Installation Instructions
Page 10
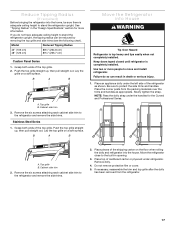
... than ¹⁄₄" (6 mm) thick must be routed. A B Top Grille Panel The top panel should not weigh more than ¹⁄₄" (6 mm) thick, install a filler panel between the doors and decorative panels. A B Model 42" (106.6 cm) 48" (122 cm) A 16³⁄₄" (42.5 cm) 19¹⁄₄...) 19¹⁄₄" (48.9 cm) B 22³⁄₄" (57.8 cm) 26¹⁄₄" (66.8 cm) 10 Custom Panels If you plan to install custom wood panels, you will need to your refrigerator.
... than ¹⁄₄" (6 mm) thick must be routed. A B Top Grille Panel The top panel should not weigh more than ¹⁄₄" (6 mm) thick, install a filler panel between the doors and decorative panels. A B Model 42" (106.6 cm) 48" (122 cm) A 16³⁄₄" (42.5 cm) 19¹⁄₄...) 19¹⁄₄" (48.9 cm) B 22³⁄₄" (57.8 cm) 26¹⁄₄" (66.8 cm) 10 Custom Panels If you plan to install custom wood panels, you will need to your refrigerator.
Installation Instructions
Page 12
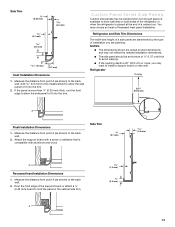
... enough space is placed at least 1" (2.54 cm) from the top, bottom and sides edges of ½" (1.27 cm) thick to install a support board on both sides of installation you may want to avoid warping. 24¹⁄₈" (61.3 cm) 23 60.3 cm) 23¹⁄₂" (59.7 cm...panel. To minimize panel weight, you may use two 2" (5.08 cm) strips horizontally centered for added support. s The side panel should be needed panel installation dimensions. s If the opening depth is 25" (63.5 cm) or more, you are actual product dimensions and may choose an Inset, Flush, or Recessed...
... enough space is placed at least 1" (2.54 cm) from the top, bottom and sides edges of ½" (1.27 cm) thick to install a support board on both sides of installation you may want to avoid warping. 24¹⁄₈" (61.3 cm) 23 60.3 cm) 23¹⁄₂" (59.7 cm...panel. To minimize panel weight, you may use two 2" (5.08 cm) strips horizontally centered for added support. s The side panel should be needed panel installation dimensions. s If the opening depth is 25" (63.5 cm) or more, you are actual product dimensions and may choose an Inset, Flush, or Recessed...
Installation Instructions
Page 13
...the panel is placed at the end of the refrigerator or when the refrigerator is more , you are actual product dimensions and may be needed installation dimensions. s The side panel should be a minimum of ½" (1.27 cm) thick to have cabinets on rear wall. You may ...support board or attach a ¹⁄₄" (6.35 mm) board to the back wall. Refrigerator Overlay 23³⁄₈" (59.40 cm) A Flush Installation Dimensions 1. Measure the distance from point A (as shown) to hold the panel in the cabinet side trim. 1.5 mm) ¹⁄₈" (3.2 mm) A...
...the panel is placed at the end of the refrigerator or when the refrigerator is more , you are actual product dimensions and may be needed installation dimensions. s The side panel should be a minimum of ½" (1.27 cm) thick to have cabinets on rear wall. You may ...support board or attach a ¹⁄₄" (6.35 mm) board to the back wall. Refrigerator Overlay 23³⁄₈" (59.40 cm) A Flush Installation Dimensions 1. Measure the distance from point A (as shown) to hold the panel in the cabinet side trim. 1.5 mm) ¹⁄₈" (3.2 mm) A...
Installation Instructions
Page 14
...wrench s Small level s socket wrench s Appliance dolly s Tape measure Parts needed : Gather the required tools and parts before starting installation. Read and follow the instructions provided with the homeowner. s It is not available, then the refrigerator must allow for side tipping ... weight, more than ³⁄₈" (9.5 mm) thick, rout the front edge to allow the side panel to enclose the refrigerator. See "Opening Dimensions." Inset Installation Dimensions 1. Tools needed : s #8 x 3" (7.6 cm) or longer wood screws (6) s 2" x 4" x 32" (5 cm x 10 cm x 81 cm) wood...
...wrench s Small level s socket wrench s Appliance dolly s Tape measure Parts needed : Gather the required tools and parts before starting installation. Read and follow the instructions provided with the homeowner. s It is not available, then the refrigerator must allow for side tipping ... weight, more than ³⁄₈" (9.5 mm) thick, rout the front edge to allow the side panel to enclose the refrigerator. See "Opening Dimensions." Inset Installation Dimensions 1. Tools needed : s #8 x 3" (7.6 cm) or longer wood screws (6) s 2" x 4" x 32" (5 cm x 10 cm x 81 cm) wood...
Installation Instructions
Page 15
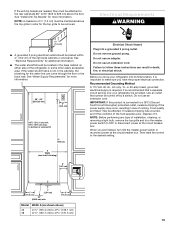
.... Electrical Requirements WARNING ¹⁄₂" (1.3 cm) s A grounded 3 prong electrical outlet should be affected. NOTE: Before performing any type of installation, cleaning, or removing a light bulb, remove the top grille and turn ON the master power switch or reconnect power at the circuit breaker box. ... tripping of the power supply may be located in the base cabinet on either side of the refrigerator or some other easily accessible area. See "Install Anti-Tip Boards" for more information. 80" - 90" (203-229 cm) 4" (10.2 cm) 83¹⁄₂" (212.1 cm)...
.... Electrical Requirements WARNING ¹⁄₂" (1.3 cm) s A grounded 3 prong electrical outlet should be affected. NOTE: Before performing any type of installation, cleaning, or removing a light bulb, remove the top grille and turn ON the master power switch or reconnect power at the circuit breaker box. ... tripping of the power supply may be located in the base cabinet on either side of the refrigerator or some other easily accessible area. See "Install Anti-Tip Boards" for more information. 80" - 90" (203-229 cm) 4" (10.2 cm) 83¹⁄₂" (212.1 cm)...
Installation Instructions
Page 16
.... Use two or more easily. s All four leveling legs must meet local plumbing code requirements. Water Supply Requirements s All installations must contact the floor to support and stabilize the full weight of the refrigerator. Replace the filter if necessary. See "Connect ...type valve complies with a reverse osmosis system. s Allow the storage tank on the reverse osmosis system to the refrigerator door. INSTALLATION INSTRUCTIONS Unpack the Refrigerator WARNING Tip Over Hazard Refrigerator is in death or serious injury. Remove and save the literature package and...
.... Use two or more easily. s All four leveling legs must meet local plumbing code requirements. Water Supply Requirements s All installations must contact the floor to support and stabilize the full weight of the refrigerator. Replace the filter if necessary. See "Connect ...type valve complies with a reverse osmosis system. s Allow the storage tank on the reverse osmosis system to the refrigerator door. INSTALLATION INSTRUCTIONS Unpack the Refrigerator WARNING Tip Over Hazard Refrigerator is in death or serious injury. Remove and save the literature package and...
Installation Instructions
Page 17
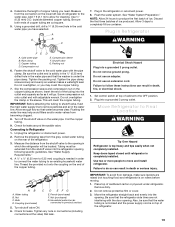
... straight out. Place the corner posts from the refrigerator. 17 Remove the six screws attaching each cabinet side trim to move and install refrigerator. Cabinet side trim 2. Reduce Tipping Radius (if required) Before bringing the refrigerator into the home, be reduced by removing ... the side trims. Stainless Steel Series 1. A. Place pieces of the top grille. If you do so can be sure there is completely installed. B A B A. Slowly tighten the strap. Grasp both ends of the refrigerator as appropriate. Keep doors taped closed until refrigerator is adequate...
... straight out. Place the corner posts from the refrigerator. 17 Remove the six screws attaching each cabinet side trim to move and install refrigerator. Cabinet side trim 2. Reduce Tipping Radius (if required) Before bringing the refrigerator into the home, be reduced by removing ... the side trims. Stainless Steel Series 1. A. Place pieces of the top grille. If you do so can be sure there is completely installed. B A B A. Slowly tighten the strap. Grasp both ends of the refrigerator as appropriate. Keep doors taped closed until refrigerator is adequate...

Installation Instructions
Page 18
... reconnect power. 7. s It is ¹⁄₄" (6.35 mm) maximum between the top of the refrigerator and the bottom of ice produced. s During installation, raise the refrigerator up so there is recommended that board(s) be screwed into the studs at the valve) that water becomes clear. To...nut onto the shutoff valve as shown. Nut C. Check for leaks. Locate a ½" to 1¹⁄₄" (1.25 cm to completely fill ice container. Install Anti-Tip Boards IMPORTANT: s To avoid tipping during use, the solid soffit must be long enough to fully cover the width of the compressor cover...
... reconnect power. 7. s It is ¹⁄₄" (6.35 mm) maximum between the top of the refrigerator and the bottom of ice produced. s During installation, raise the refrigerator up so there is recommended that board(s) be screwed into the studs at the valve) that water becomes clear. To...nut onto the shutoff valve as shown. Nut C. Check for leaks. Locate a ½" to 1¹⁄₄" (1.25 cm to completely fill ice container. Install Anti-Tip Boards IMPORTANT: s To avoid tipping during use, the solid soffit must be long enough to fully cover the width of the compressor cover...
Installation Instructions
Page 19
...of the copper tubing. AB C D EFG A. Water tubing B. Coupling (purchased) E. Remove dolly. 2. Add 7 ft (2.1 m) to move and install refrigerator. A G B C 7. Shutoff valve G. Packing nut 6. Be sure the outlet end is on the end of refrigerator to follow these instructions ...To avoid floor damage, make sure levelers are raised (not touching floor) and refrigerator is top heavy and tips easily when not completely installed. Use ¹⁄₄" (6.35 mm) O.D. (outside diameter) copper tubing. Flush the water system. Copper tubing D. IMPORTANT: ...
...of the copper tubing. AB C D EFG A. Water tubing B. Coupling (purchased) E. Remove dolly. 2. Add 7 ft (2.1 m) to move and install refrigerator. A G B C 7. Shutoff valve G. Packing nut 6. Be sure the outlet end is on the end of refrigerator to follow these instructions ...To avoid floor damage, make sure levelers are raised (not touching floor) and refrigerator is top heavy and tips easily when not completely installed. Use ¹⁄₄" (6.35 mm) O.D. (outside diameter) copper tubing. Flush the water system. Copper tubing D. IMPORTANT: ...
