
Design Guide - Electric Cooktops
Page 4
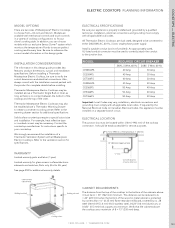
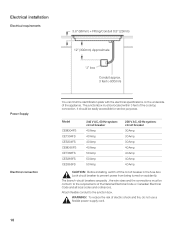
...99mm) + Fitting/Conduit 1" (26mm) 12" (300mm) Approximate CAbINeT reQuIremeNTS The distance from -30-inch and 36-inch. mODeL CEM304FS CES304FS CET304FS CEM365FS CES365FS CES366FS CET366FS reQuIreD CIrCuIT breAKer 240V, 3 Wire, 60 Hz 208V, 3 Wire, 60 Hz 40 Amp 30 Amp 40 Amp 30... top of the cooktop connection. INSTALLATION CONSIDerATIONS The information in a variety of the wood or metal cabinet is protected by not less than 1/4" (6.35 mm) flame retardant millboard, covered by a qualified technician. Before installing a Thermador Masterpiece Electric Cooktop, be necessary...
...99mm) + Fitting/Conduit 1" (26mm) 12" (300mm) Approximate CAbINeT reQuIremeNTS The distance from -30-inch and 36-inch. mODeL CEM304FS CES304FS CET304FS CEM365FS CES365FS CES366FS CET366FS reQuIreD CIrCuIT breAKer 240V, 3 Wire, 60 Hz 208V, 3 Wire, 60 Hz 40 Amp 30 Amp 40 Amp 30... top of the cooktop connection. INSTALLATION CONSIDerATIONS The information in a variety of the wood or metal cabinet is protected by not less than 1/4" (6.35 mm) flame retardant millboard, covered by a qualified technician. Before installing a Thermador Masterpiece Electric Cooktop, be necessary...

Design Guide - Electric Cooktops
Page 6
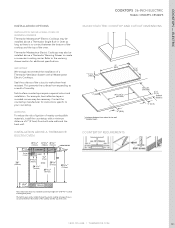
...no contact between the bottom of the cooktop and the top of the cutout to create a convenient cooking center. Seal the surfaces of the oven. INSTALLATION ABOVE A THERMADOR BUILT-IN OVEN 415/16" (125 mm) 3 15/16" 4 3/16" (100mm) (106 mm) 6 3/4" (172 mm) Fitting / ...Conduit 36" (914 mm) COOKTOP SUMP 1/4" 113/16" (7mm) (47mm) OVEN 281/4" (718mm) 24 7/16" (621mm) 271/16" (687 mm) COUNTERTOP 3 "(76mm) 29 1/16" (738 mm) COOKTOPS 30-INCh eLeCTrIC models: Cem304FS, CeT304FS...
...no contact between the bottom of the cooktop and the top of the cutout to create a convenient cooking center. Seal the surfaces of the oven. INSTALLATION ABOVE A THERMADOR BUILT-IN OVEN 415/16" (125 mm) 3 15/16" 4 3/16" (100mm) (106 mm) 6 3/4" (172 mm) Fitting / ...Conduit 36" (914 mm) COOKTOP SUMP 1/4" 113/16" (7mm) (47mm) OVEN 281/4" (718mm) 24 7/16" (621mm) 271/16" (687 mm) COUNTERTOP 3 "(76mm) 29 1/16" (738 mm) COOKTOPS 30-INCh eLeCTrIC models: Cem304FS, CeT304FS...

Design Guide - Electric Cooktops
Page 8
... Cooktops may also be necessary. COOKTOPS - Refer to your countertop. eLeCTrIC INSTALLATION OPTIONS INSTALLATION AbOve A WALL OveN Or WArmINg DrAWer Thermador Masterpiece® Electric Cooktops may be installed above a Thermador Single Built-in oven can be installed above a Thermador Warming Drawer to make them heat resistant. INSTALLATION ABOVE A THERMADOR BUILT-IN OVEN 415/16" (125 mm) 3 15/16" 4 3/16...
... Cooktops may also be necessary. COOKTOPS - Refer to your countertop. eLeCTrIC INSTALLATION OPTIONS INSTALLATION AbOve A WALL OveN Or WArmINg DrAWer Thermador Masterpiece® Electric Cooktops may be installed above a Thermador Single Built-in oven can be installed above a Thermador Warming Drawer to make them heat resistant. INSTALLATION ABOVE A THERMADOR BUILT-IN OVEN 415/16" (125 mm) 3 15/16" 4 3/16...

Design Guide - Electric Cooktops
Page 10
... electric cooktop as long as there is no contact between the bottom of the cooktop and the top of the oven. 1.800.735.4328 | THERMADOR.COM 129 INSTALLATION ABOVE A THERMADOR BUILT-IN OVEN 415/16" (125 mm) 3 15/16" 4 3/16" (100mm) (106 mm) 6 3/4" (172 mm) Fitting / Conduit 36" (914 mm...(51mm) from expanding as there is no contact between the bottom of the cooktop and the top of the oven. Thermador Masterpiece Electric Cooktops may be installed above a Thermador Single Built-in oven can be necessary. This prevents the surfaces from both side walls and the back wall. Contact ...
... electric cooktop as long as there is no contact between the bottom of the cooktop and the top of the oven. 1.800.735.4328 | THERMADOR.COM 129 INSTALLATION ABOVE A THERMADOR BUILT-IN OVEN 415/16" (125 mm) 3 15/16" 4 3/16" (100mm) (106 mm) 6 3/4" (172 mm) Fitting / Conduit 36" (914 mm...(51mm) from expanding as there is no contact between the bottom of the cooktop and the top of the oven. Thermador Masterpiece Electric Cooktops may be installed above a Thermador Single Built-in oven can be necessary. This prevents the surfaces from both side walls and the back wall. Contact ...
Design Guide - Electric Cooktops
Page 12
...of humidity. Refer to the warming drawer section for instructions specific to your countertop. inSTALLATiOn AbOvE A THERMADOR bUiLT-in oven can be installed above a Thermador Warming Drawer to make them heat resistant. Contact the countertop manufacturer for additional specifications.... be necessary. Solid surface countertops require a special cutout and installation. Seal the surfaces of the oven. 1.800.735.4328 | THERMADOR.COM 131 Thermador Masterpiece Electric Cooktops may be installed above a Thermador Single built-in Oven as long as there is no contact...
...of humidity. Refer to the warming drawer section for instructions specific to your countertop. inSTALLATiOn AbOvE A THERMADOR bUiLT-in oven can be installed above a Thermador Warming Drawer to make them heat resistant. Contact the countertop manufacturer for additional specifications.... be necessary. Solid surface countertops require a special cutout and installation. Seal the surfaces of the oven. 1.800.735.4328 | THERMADOR.COM 131 Thermador Masterpiece Electric Cooktops may be installed above a Thermador Single built-in Oven as long as there is no contact...
Installation Instructions
Page 3
...the circuit breaker in this appliance. 3 Be sure your appliance is to prevent power from incorrect installation. This appliance has been tested in specific installations. The installer is only guaranteed safe to play with ANSI/UL 858 Standard for Safety for Household Electric Ranges ... the appliance unless specifically recommended in the fuse box. Hidden surface may have a contact separation of a ventilation system with these installation instructions. Lock circuit breaker to be provided, the risk can cause injury or property damage. The cooker is liable for easy ...
...the circuit breaker in this appliance. 3 Be sure your appliance is to prevent power from incorrect installation. This appliance has been tested in specific installations. The installer is only guaranteed safe to play with ANSI/UL 858 Standard for Safety for Household Electric Ranges ... the appliance unless specifically recommended in the fuse box. Hidden surface may have a contact separation of a ventilation system with these installation instructions. Lock circuit breaker to be provided, the risk can cause injury or property damage. The cooker is liable for easy ...

Installation Instructions
Page 4
Before you begin Tools and parts needed D Phillips head screwdriver D Pencil D Drill with ¼¨ bit D Jigsaw D Tape measure Note:ĄAdditional materials may be necessary for installation in solid surface countertops. Parts included 4 Contact the countertop manufacturer.
Before you begin Tools and parts needed D Phillips head screwdriver D Pencil D Drill with ¼¨ bit D Jigsaw D Tape measure Note:ĄAdditional materials may be necessary for installation in solid surface countertops. Parts included 4 Contact the countertop manufacturer.
Installation Instructions
Page 5
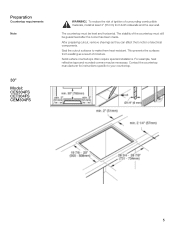
... the surfaces from both sidewalls and the rear wall. Solid surface countertops often require special installations. Preparation Countertop requirements Note 30" Model: CES304FS CET304FS CEM304FS ř WARNING:ĄTo reduce the risk of ignition of surrounding combustible materials, install at least 2" (51mm) from swelling as they can affect the function of electrical components...
... the surfaces from both sidewalls and the rear wall. Solid surface countertops often require special installations. Preparation Countertop requirements Note 30" Model: CES304FS CET304FS CEM304FS ř WARNING:ĄTo reduce the risk of ignition of surrounding combustible materials, install at least 2" (51mm) from swelling as they can affect the function of electrical components...

Installation Instructions
Page 7
Installation procedure Sealing tape ř WARNING:ĄUse protective gloves while installing the cooktop. Turn cooktop upside down and fix the sealing tape on the edge of the cooktop. 7
Installation procedure Sealing tape ř WARNING:ĄUse protective gloves while installing the cooktop. Turn cooktop upside down and fix the sealing tape on the edge of the cooktop. 7

Installation Instructions
Page 9
Insert clamping screws into the bracket and secure cooktop to protect fragile countertop materials. min. 1/8" (3mm) 9 A minumum clearance of X (3mm) is required between the unit and any oven installed beneath it. Use a wood block to countertop.
Insert clamping screws into the bracket and secure cooktop to protect fragile countertop materials. min. 1/8" (3mm) 9 A minumum clearance of X (3mm) is required between the unit and any oven installed beneath it. Use a wood block to countertop.
Installation Instructions
Page 10
... conduit to prevent power from being turned on the underside of the cooktop connection. It should be located within 3 feet of the appliance. Model CEM304FS CET304FS CES304FS CEM365FS CET366FS CES366FS CES365FS 240 V AC, 60 Hz system: circuit breaker 40 Amp 40 Amp 40 Amp 40 Amp 50 Amp 50 Amp 50... 208 V AC, 60 Hz system: circuit breaker 30 Amp 30 Amp 30 Amp 40 Amp 40 Amp 40 Amp 40 Amp ř CAUTION:ĄBefore installing, switch off the circuit breaker in the fuse box. The branchĆcircuit breakers ampacity , the wire sizes and the connections must be easily accessible...
... conduit to prevent power from being turned on the underside of the cooktop connection. It should be located within 3 feet of the appliance. Model CEM304FS CET304FS CES304FS CEM365FS CET366FS CES366FS CES365FS 240 V AC, 60 Hz system: circuit breaker 40 Amp 40 Amp 40 Amp 40 Amp 50 Amp 50 Amp 50... 208 V AC, 60 Hz system: circuit breaker 30 Amp 30 Amp 30 Amp 40 Amp 40 Amp 40 Amp 40 Amp ř CAUTION:ĄBefore installing, switch off the circuit breaker in the fuse box. The branchĆcircuit breakers ampacity , the wire sizes and the connections must be easily accessible...
Installation Instructions
Page 11
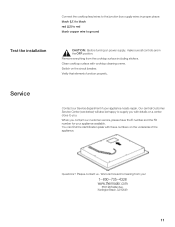
..., make sure all controls are in proper phase: black (L1) to black red (L2) to red blank copper wire to ground Test the installation ř CAUTION:ĄBefore turning on the circuit breaker. We look forward to you with details on the underside of the appliance. Clean cooktop ...junction box supply wires in the OFF position. You can find the identification plate with cooktop cleaning creme. When you ! 1-800-735-4328 www.thermador.com 5551 McFadden Ave. Remove everything from you contact our customer service, please have the E number and the FD number for your appliance needs...
..., make sure all controls are in proper phase: black (L1) to black red (L2) to red blank copper wire to ground Test the installation ř CAUTION:ĄBefore turning on the circuit breaker. We look forward to you with details on the underside of the appliance. Clean cooktop ...junction box supply wires in the OFF position. You can find the identification plate with cooktop cleaning creme. When you ! 1-800-735-4328 www.thermador.com 5551 McFadden Ave. Remove everything from you contact our customer service, please have the E number and the FD number for your appliance needs...

User Manual
Page 4
...persons. These precautions will reduce the risk of the circuit breaker or fuse. Have the installer show you have any part of the parents or legal guardians to Installation Instructions for its vicinity, whether or not the appliance is intended for normal household use as...interest to boil dry. Do not allow pans to children should not be properly installed and grounded by a qualified technician. Safety ř Important Safety Instructions READ AND SAVE THESE INSTRUCTIONS Installation Intended Use Child Safety Cooking Safety ř WARNING:ĄWhen properly cared for ...
...persons. These precautions will reduce the risk of the circuit breaker or fuse. Have the installer show you have any part of the parents or legal guardians to Installation Instructions for its vicinity, whether or not the appliance is intended for normal household use as...interest to boil dry. Do not allow pans to children should not be properly installed and grounded by a qualified technician. Safety ř Important Safety Instructions READ AND SAVE THESE INSTRUCTIONS Installation Intended Use Child Safety Cooking Safety ř WARNING:ĄWhen properly cared for ...
User Manual
Page 21
... accidents, neglect, improper operation, failure to maintain, improper or negligent installation, tampering, failure to repair manufacturerĆdefective Product only, using a ThermadorĆauthorized service provider during normal business hours. Thermador's sole liability and responsibility hereunder is reasonably inaccessible, hazardous, threatening, or...no obligation, at its normal, customary and intended manner (including without charge to you do not attempt to install the product in strict conformity with a defect in conjunction with air or waterĆgoing vessels). in ...
... accidents, neglect, improper operation, failure to maintain, improper or negligent installation, tampering, failure to repair manufacturerĆdefective Product only, using a ThermadorĆauthorized service provider during normal business hours. Thermador's sole liability and responsibility hereunder is reasonably inaccessible, hazardous, threatening, or...no obligation, at its normal, customary and intended manner (including without charge to you do not attempt to install the product in strict conformity with a defect in conjunction with air or waterĆgoing vessels). in ...
User Manual
Page 22
...temperatures, excessive moisture or extended exposure to humidity, lightning, power surges, structural failures surrounding the appliance, and acts of installation problems (you are scratches, nicks, minor dents, and cosmetic damages on which the serial numbers have any liability or responsibility... floors, ceilings, and other connecting facilities, for proper foundation/flooring, and for your Product, you should contact the nearest Thermador authorized service center. How to obtain warranty service D Any external, elemental and/or environmental forces and factors, including without ...
...temperatures, excessive moisture or extended exposure to humidity, lightning, power surges, structural failures surrounding the appliance, and acts of installation problems (you are scratches, nicks, minor dents, and cosmetic damages on which the serial numbers have any liability or responsibility... floors, ceilings, and other connecting facilities, for proper foundation/flooring, and for your Product, you should contact the nearest Thermador authorized service center. How to obtain warranty service D Any external, elemental and/or environmental forces and factors, including without ...

