
User Manual
Page 1
Voyage™ 200 Graphing Calculator 1
Voyage™ 200 Graphing Calculator 1

User Manual
Page 2
... purpose, regarding any programs or book materials and makes such materials available solely on an "as-is connected. Important Information Texas Instruments makes no warranty, either express or implied, including but not limited to any implied warranties of these materials, and the ... for a Class B digital device, pursuant to which the receiver is " basis. Moreover, Texas Instruments shall not be determined by turning the equipment off and on, you can be liable for any claim of any other party. Voyage™ 200 Graphing Calculator Graphing Calculator 2 If this product.
... purpose, regarding any programs or book materials and makes such materials available solely on an "as-is connected. Important Information Texas Instruments makes no warranty, either express or implied, including but not limited to any implied warranties of these materials, and the ... for a Class B digital device, pursuant to which the receiver is " basis. Moreover, Texas Instruments shall not be determined by turning the equipment off and on, you can be liable for any claim of any other party. Voyage™ 200 Graphing Calculator Graphing Calculator 2 If this product.

User Manual
Page 3
• Consult the dealer or an experienced radio/television technician for help. Caution: Any changes or modifications to this equipment not expressly approved by Texas Instruments may void your authority to operate the equipment. © 2005 Texas Instruments Incorporated Windows and Macintosh are trademarks of their respective owners. Voyage™ 200 Graphing Calculator Graphing Calculator 3
• Consult the dealer or an experienced radio/television technician for help. Caution: Any changes or modifications to this equipment not expressly approved by Texas Instruments may void your authority to operate the equipment. © 2005 Texas Instruments Incorporated Windows and Macintosh are trademarks of their respective owners. Voyage™ 200 Graphing Calculator Graphing Calculator 3
User Manual
Page 4
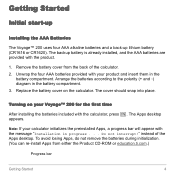
... insert them in the battery compartment. Replace the battery cover on your calculator initializes the preinstalled Apps, a progress bar will appear with the calculator, press ´. Note: If your Voyage™ 200 for the first time After installing the batteries included with the message "... Arrange the batteries according to the polarity (+ and -) diagram in progress . . . Turning on the calculator. Getting Started Initial start-up Installing the AAA Batteries The Voyage™ 200 uses four AAA alkaline batteries and a back-up lithium battery (CR1616 or CR1620). instead of the...
... insert them in the battery compartment. Replace the battery cover on your calculator initializes the preinstalled Apps, a progress bar will appear with the calculator, press ´. Note: If your Voyage™ 200 for the first time After installing the batteries included with the message "... Arrange the batteries according to the polarity (+ and -) diagram in progress . . . Turning on the calculator. Getting Started Initial start-up Installing the AAA Batteries The Voyage™ 200 uses four AAA alkaline batteries and a back-up lithium battery (CR1616 or CR1620). instead of the...

User Manual
Page 5
Your installed Apps appear on the Apps desktop as icons organized in categories for operating your calculator. • View the full name of the Apps installed on your Voyage™ 200. Adjusting the contrast • To lighten the display, press and hold 8 and tap C H A R «. From the Apps desktop, you can: • Open Apps...
Your installed Apps appear on the Apps desktop as icons organized in categories for operating your calculator. • View the full name of the Apps installed on your Voyage™ 200. Adjusting the contrast • To lighten the display, press and hold 8 and tap C H A R «. From the Apps desktop, you can: • Open Apps...
User Manual
Page 8
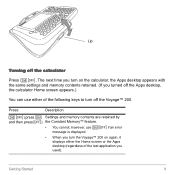
... Constant Memory™ feature. • You cannot, however, use 2 ® if an error message is displayed. • When you turn the Voyage™ 200 on the calculator, the Apps desktop appears with the same settings and memory contents retained. (If you turned off the Apps desktop, the... calculator Home screen appears.) You can use either the Home screen or the Apps desktop (regardless of the last application you turn on again, it displays either of the following keys to turn off the calculator Press 2 ®. Lip Turning off the Voyage™ 200. Getting Started ...
... Constant Memory™ feature. • You cannot, however, use 2 ® if an error message is displayed. • When you turn the Voyage™ 200 on the calculator, the Apps desktop appears with the same settings and memory contents retained. (If you turned off the Apps desktop, the... calculator Home screen appears.) You can use either the Home screen or the Apps desktop (regardless of the last application you turn on again, it displays either of the following keys to turn off the calculator Press 2 ®. Lip Turning off the Voyage™ 200. Getting Started ...
User Manual
Page 9
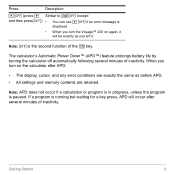
...; All settings and memory contents are exactly the same as you turn the Voyage™ 200 on the calculator after several minutes of the ´ key. The calculator's Automatic Power Down™ (APD™) feature prolongs battery life by turning the calculator off automatically following several minutes of inactivity. When you left it will occur...
...; All settings and memory contents are exactly the same as you turn the Voyage™ 200 on the calculator after several minutes of the ´ key. The calculator's Automatic Power Down™ (APD™) feature prolongs battery life by turning the calculator off automatically following several minutes of inactivity. When you left it will occur...
User Manual
Page 23
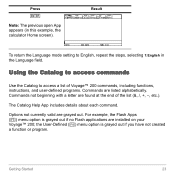
Using the Catalog to access commands Use the Catalog to English, repeat the steps, selecting 1:English in this example, the calculator Home screen). Getting Started 23 Commands not beginning with a letter are listed alphabetically. For example, the Flash Apps ( ...) menu option is ... ¸ Note: The previous open App appears (in the Language field. Result To return the Language mode setting to access a list of Voyage™ 200 commands, including functions, instructions, and user-defined programs. Commands are found at the end of the list etc.). Options not currently valid are ...
Using the Catalog to access commands Use the Catalog to English, repeat the steps, selecting 1:English in this example, the calculator Home screen). Getting Started 23 Commands not beginning with a letter are listed alphabetically. For example, the Flash Apps ( ...) menu option is ... ¸ Note: The previous open App appears (in the Language field. Result To return the Language mode setting to access a list of Voyage™ 200 commands, including functions, instructions, and user-defined programs. Commands are found at the end of the list etc.). Options not currently valid are ...
User Manual
Page 30
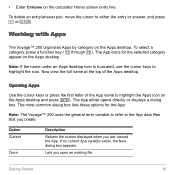
... Apps Use the cursor keys or press the first letter of the Apps desktop. The App icons for the App: Note: The Voyage™ 200 uses the general term variable to refer to either opens directly or displays a dialog box. If no current App variable exists, the...„ through Š). Option Current Open Description Returns the screen displayed when you open an existing file. Working with Apps The Voyage™ 200 organizes Apps by category on the calculator Home screen entry line. The App either the entry or answer, and press 0 or M. Lets you last viewed the App...
... Apps Use the cursor keys or press the first letter of the Apps desktop. The App icons for the App: Note: The Voyage™ 200 uses the general term variable to refer to either opens directly or displays a dialog box. If no current App variable exists, the...„ through Š). Option Current Open Description Returns the screen displayed when you open an existing file. Working with Apps The Voyage™ 200 organizes Apps by category on the calculator Home screen entry line. The App either the entry or answer, and press 0 or M. Lets you last viewed the App...
User Manual
Page 49
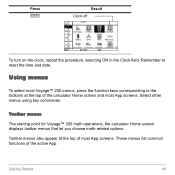
... App. These menus list common functions of most App screens. Toolbar menus also appear at the top of the calculator Home screen and most Voyage™ 200 menus, press the function keys corresponding to reset the time and date. Getting Started 49 Using menus To select ...most App screens. Toolbar menus The starting point for Voyage™ 200 math operations, the calculator Home screen displays toolbar menus that let you...
... App. These menus list common functions of most App screens. Toolbar menus also appear at the top of the calculator Home screen and most Voyage™ 200 menus, press the function keys corresponding to reset the time and date. Getting Started 49 Using menus To select ...most App screens. Toolbar menus The starting point for Voyage™ 200 math operations, the calculator Home screen displays toolbar menus that let you...
User Manual
Page 55
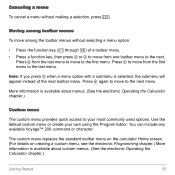
... making a selection, press N. You can include any available Voyage™ 200 command or character. Note: If you press B when a menu option with a submenu is available about menus. (See the electronic Operating the Calculator chapter.) Custom menu The custom menu provides quick access to ... last menu. Press B from one toolbar menu to the next. More information is available about custom menus. (See the electronic Operating the Calculator chapter.) Getting Started 55 Canceling a menu To cancel a menu without selecting a menu option: • Press the function key (ƒ ...
... making a selection, press N. You can include any available Voyage™ 200 command or character. Note: If you press B when a menu option with a submenu is available about menus. (See the electronic Operating the Calculator chapter.) Custom menu The custom menu provides quick access to ... last menu. Press B from one toolbar menu to the next. More information is available about custom menus. (See the electronic Operating the Calculator chapter.) Getting Started 55 Canceling a menu To cancel a menu without selecting a menu option: • Press the function key (ƒ ...

User Manual
Page 64
... the electronic Split Screens chapter.) Managing Apps and operating system (OS) versions Using the Voyage™ 200 connectivity features, you need is turned off the splitscreen mode and displays the calculator Home screen in full-screen mode. • Select Split Screen on Page 2 of ...Productivity Solutions (E&PS) Web site at: education.ti.com/latest • The CD-ROM included with your Voyage™ 200. • A compatible graphing calculator. Before downloading Apps to compatible calculators and download TI Connect software, Apps, and OS versions, see the TI E&PS Web site. • ...
... the electronic Split Screens chapter.) Managing Apps and operating system (OS) versions Using the Voyage™ 200 connectivity features, you need is turned off the splitscreen mode and displays the calculator Home screen in full-screen mode. • Select Split Screen on Page 2 of ...Productivity Solutions (E&PS) Web site at: education.ti.com/latest • The CD-ROM included with your Voyage™ 200. • A compatible graphing calculator. Before downloading Apps to compatible calculators and download TI Connect software, Apps, and OS versions, see the TI E&PS Web site. • ...

User Manual
Page 65
The ABOUT screen displays the following information about your Voyage™ 200: Ê Î Ë Í Ì Ê OS version Ë Hardware version Ì Unit ID (required to a model number. Write this information on the ABOUT screen. ... number. Finding the OS version and identification (ID) numbers If you will find this number down and keep it in a safe place in case the calculator is ever lost or stolen. Í Apps certificate revision number (Cert. Getting Started 65 Similar to provide information about your...
The ABOUT screen displays the following information about your Voyage™ 200: Ê Î Ë Í Ì Ê OS version Ë Hardware version Ì Unit ID (required to a model number. Write this information on the ABOUT screen. ... number. Finding the OS version and identification (ID) numbers If you will find this number down and keep it in a safe place in case the calculator is ever lost or stolen. Í Apps certificate revision number (Cert. Getting Started 65 Similar to provide information about your...
User Manual
Page 66
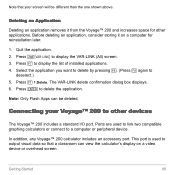
... VAR-LINK delete confirmation dialog box displays. 6. Press ¸ to display the list of installed applications. 4. In addition, any Voyage™ 200 calculator includes an accessory port. Getting Started 66 Before deleting an application, consider storing it from the Voyage™ 200 and increases space for reinstallation later. 1. Note: Only Flash Apps can view the...
... VAR-LINK delete confirmation dialog box displays. 6. Press ¸ to display the list of installed applications. 4. In addition, any Voyage™ 200 calculator includes an accessory port. Getting Started 66 Before deleting an application, consider storing it from the Voyage™ 200 and increases space for reinstallation later. 1. Note: Only Flash Apps can view the...

User Manual
Page 67
... AAA alkaline batteries and a back-up lithium battery (CR1616 or CR1620). I/O port Accessory port Voyage™ 200 ports Batteries The Voyage™ 200 use the accessory port to connect the TI ViewScreen overhead panel to your calculator to another calculator - For more information about the TI-Presenter video adapter and TI ViewScreen panel, see the...
... AAA alkaline batteries and a back-up lithium battery (CR1616 or CR1620). I/O port Accessory port Voyage™ 200 ports Batteries The Voyage™ 200 use the accessory port to connect the TI ViewScreen overhead panel to your calculator to another calculator - For more information about the TI-Presenter video adapter and TI ViewScreen panel, see the...

User Manual
Page 68
If you leave your batteries may become depleted. Getting Started 68 Please contact Texas Instruments as described in download mode for an extended time before you will then need to install new batteries before beginning an OS download. ... batteries should be installed before downloading. You can also transfer the OS to another Voyage™ 200 using an I/O unit-to replace the depleted batteries with new batteries before it is complete, you actually start the download, your calculator in Service & Support Information, if you experience a problem. You will need to ...
If you leave your batteries may become depleted. Getting Started 68 Please contact Texas Instruments as described in download mode for an extended time before you will then need to install new batteries before beginning an OS download. ... batteries should be installed before downloading. You can also transfer the OS to another Voyage™ 200 using an I/O unit-to replace the depleted batteries with new batteries before it is complete, you actually start the download, your calculator in Service & Support Information, if you experience a problem. You will need to ...
User Manual
Page 69
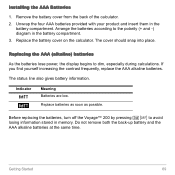
Replace the battery cover on the calculator. The status line also gives battery information. Do not remove both the back-up battery and the AAA alkaline batteries at the same time. The ... four AAA batteries provided with your product and insert them in the battery compartment. 3. Before replacing the batteries, turn off the Voyage™ 200 by pressing 2 ® to dim, especially during calculations. If you find yourself increasing the contrast frequently, replace the AAA alkaline batteries. Arrange the batteries according to the polarity (+ and...
Replace the battery cover on the calculator. The status line also gives battery information. Do not remove both the back-up battery and the AAA alkaline batteries at the same time. The ... four AAA batteries provided with your product and insert them in the battery compartment. 3. Before replacing the batteries, turn off the Voyage™ 200 by pressing 2 ® to dim, especially during calculations. If you find yourself increasing the contrast frequently, replace the AAA alkaline batteries. Arrange the batteries according to the polarity (+ and...
User Manual
Page 70
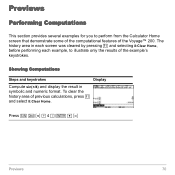
.... The history area in symbolic and numeric format. Previews Performing Computations This section provides several examples for you to illustrate only the results of previous calculations, press ƒ and select 8:Clear Home. Showing Computations Steps and keystrokes Display Compute sin(p/4) and display the result in each screen was cleared by pressing...
.... The history area in symbolic and numeric format. Previews Performing Computations This section provides several examples for you to illustrate only the results of previous calculations, press ƒ and select 8:Clear Home. Showing Computations Steps and keystrokes Display Compute sin(p/4) and display the result in each screen was cleared by pressing...
User Manual
Page 147
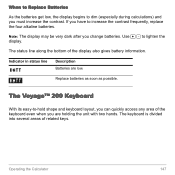
.... When to Replace Batteries As the batteries get low, the display begins to dim (especially during calculations) and you have to increase the contrast frequently, replace the four alkaline batteries. Operating the Calculator 147 The Voyage™ 200 Keyboard With its easy-to lighten the display. If you must increase the contrast. Note: The...
.... When to Replace Batteries As the batteries get low, the display begins to dim (especially during calculations) and you have to increase the contrast frequently, replace the four alkaline batteries. Operating the Calculator 147 The Voyage™ 200 Keyboard With its easy-to lighten the display. If you must increase the contrast. Note: The...

User Manual
Page 715
An I/O unit-to -unit cable I/O Port voyage 200 I/O Port voyage 200 Two Voyage™ 200 calculators linked together Connectivity 715 Either unit can transmit information between two units. Connecting before Sending or Receiving Using firm pressure, insert one end of the ... the link port of each unit. I /O port with a cable that lets you set them up from the VAR-LINK screen. Connectivity Connecting Two Units The Voyage™ 200 Graphing Calculator comes with this cable. Once connected, you can send or receive, depending on how you connect two units. use the...
An I/O unit-to -unit cable I/O Port voyage 200 I/O Port voyage 200 Two Voyage™ 200 calculators linked together Connectivity 715 Either unit can transmit information between two units. Connecting before Sending or Receiving Using firm pressure, insert one end of the ... the link port of each unit. I /O port with a cable that lets you set them up from the VAR-LINK screen. Connectivity Connecting Two Units The Voyage™ 200 Graphing Calculator comes with this cable. Once connected, you can send or receive, depending on how you connect two units. use the...


