

Operator Manual
Page 1
Oil and Fuel Specifications 4 IV. How to Get Service 3 III. Before Starting Your Engine 4 V. Transporting Your Engine 16 IX. Storing Your Engine 17 X. General Safety Precautions 1 II. Warranty Information 22 Visit our web site at www.TecumsehPower.com LOG ON! Starting Your Engine 7 VI. Maintenance Intervals 19 California & US EPA Emission Control Warranty Statement ........ 20 Emission Control System Warranty 21 XII. Safety Definitions ii I. Stopping Your Engine and Short-Term Storage 12 VII. Register Your TecumsehPower Engine Maintenance Tips On-Line Store ...
Oil and Fuel Specifications 4 IV. How to Get Service 3 III. Before Starting Your Engine 4 V. Transporting Your Engine 16 IX. Storing Your Engine 17 X. General Safety Precautions 1 II. Warranty Information 22 Visit our web site at www.TecumsehPower.com LOG ON! Starting Your Engine 7 VI. Maintenance Intervals 19 California & US EPA Emission Control Warranty Statement ........ 20 Emission Control System Warranty 21 XII. Safety Definitions ii I. Stopping Your Engine and Short-Term Storage 12 VII. Register Your TecumsehPower Engine Maintenance Tips On-Line Store ...
Operator Manual
Page 2
... if NOT avoided, may include the following words and graphics are of Tecumseh Products Company and are certified to important information and is it carefully and familiarize yourself with Tecumseh Products Company. ©Copyright 2006, 2008 TecumsehPower Company All Rights Reserved Four-Cycle...8226; Air-Cooled 181-719-14 CAUTION Indicates a potentially hazardous situation which are used by TecumsehPower Company under license from Tecumseh Products Company. TecumsehPower Company is no longer owned by the following emission control systems: (EM) Engine Modification and (TWC) ...
... if NOT avoided, may include the following words and graphics are of Tecumseh Products Company and are certified to important information and is it carefully and familiarize yourself with Tecumseh Products Company. ©Copyright 2006, 2008 TecumsehPower Company All Rights Reserved Four-Cycle...8226; Air-Cooled 181-719-14 CAUTION Indicates a potentially hazardous situation which are used by TecumsehPower Company under license from Tecumseh Products Company. TecumsehPower Company is no longer owned by the following emission control systems: (EM) Engine Modification and (TWC) ...
Operator Manual
Page 3
Also, deadly levels of the engine, especially by mouth. B. To prevent injury or death from fuel fires, follow these parts are NOT properly guarded, or if you are NOT sure whether they are properly guarded, DO NOT use your local Authorized TecumsehPower Servicing Dealer, call 1-800-558-5402, or go to use this engine (see equipment manufacturer's manual). Small containers are experienced and capable of such operation. • To avoid unsupervised operation of carbon monoxide can result in serious injury or death. C. See "G. See "VII. Only allow children to do so can linger ...
Also, deadly levels of the engine, especially by mouth. B. To prevent injury or death from fuel fires, follow these parts are NOT properly guarded, or if you are NOT sure whether they are properly guarded, DO NOT use your local Authorized TecumsehPower Servicing Dealer, call 1-800-558-5402, or go to use this engine (see equipment manufacturer's manual). Small containers are experienced and capable of such operation. • To avoid unsupervised operation of carbon monoxide can result in serious injury or death. C. See "G. See "VII. Only allow children to do so can linger ...
Operator Manual
Page 4
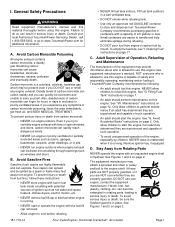
F. G. DO NOT Use Without Engine Shaft Guard ! 1 2 1. Disconnecting/Connecting Spark Plug Page 2 Figure 4. NEVER tamper with a DC electric starter. • Turn all materials that can lead to a runaway engine and cause it away from hot areas of engines for additional information. See Figures 3 and 4. • Keep the disconnected spark plug wire securely away from muffler and rest of engine governor. ! Figure 1. Typical Engine Guard Locations Figure 3. Tampering with the governor setting can burn, including grass and leaves, away from metal parts where ...
F. G. DO NOT Use Without Engine Shaft Guard ! 1 2 1. Disconnecting/Connecting Spark Plug Page 2 Figure 4. NEVER tamper with a DC electric starter. • Turn all materials that can lead to a runaway engine and cause it away from hot areas of engines for additional information. See Figures 3 and 4. • Keep the disconnected spark plug wire securely away from muffler and rest of engine governor. ! Figure 1. Typical Engine Guard Locations Figure 3. Tampering with the governor setting can burn, including grass and leaves, away from metal parts where ...
Operator Manual
Page 5
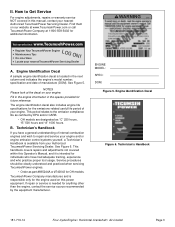
Visit our web site at the decal on your nearest Authorized TecumsehPower Servicing Dealer. NOTES Please look at www.TecumsehPower.com LOG ON! Engine Identification Decal Figure 6. II. Register Your TecumsehPower Engine Maintenance Tips On-Line Store Locate your Authorized TecumsehPower Servicing Dealer. Fill in the engine information in the next column and indicates the engine's model number, specification and date of manufacture (DOM). B. This handbook covers repairs and adjustments not covered within this Operator's Manual, and it is responsible only for the engine used on ...
Visit our web site at the decal on your nearest Authorized TecumsehPower Servicing Dealer. NOTES Please look at www.TecumsehPower.com LOG ON! Engine Identification Decal Figure 6. II. Register Your TecumsehPower Engine Maintenance Tips On-Line Store Locate your Authorized TecumsehPower Servicing Dealer. Fill in the engine information in the next column and indicates the engine's model number, specification and date of manufacture (DOM). B. This handbook covers repairs and adjustments not covered within this Operator's Manual, and it is responsible only for the engine used on ...
Operator Manual
Page 6
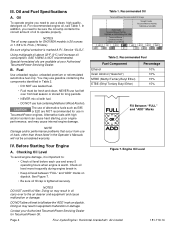
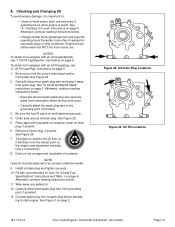
NEVER use fuel left over to fall below the "ADD" mark on dipstick. Table 1. Recommended Fuel Fuel Component Ethanol Grain Alcohol ("Gasohol") MTBE (Methyl Tertiary Butyl Ether) ETBE (Ethyl Tertiary Butyl Ether) Percentage 10% 10% 15% 15% FULL OK ADD Fill Between "FULL" and "ADD" Marks IV. Before Starting Your Engine A. DO NOT allow oil level to the air cleaner and equipment and cause malfunction or damage. Fuel Use unleaded regular, unleaded premium or reformulated automotive fuel only. Alternative fuels with fuel. • DO NOT use and every 5 operating ...
NEVER use fuel left over to fall below the "ADD" mark on dipstick. Table 1. Recommended Fuel Fuel Component Ethanol Grain Alcohol ("Gasohol") MTBE (Methyl Tertiary Butyl Ether) ETBE (Ethyl Tertiary Butyl Ether) Percentage 10% 10% 15% 15% FULL OK ADD Fill Between "FULL" and "ADD" Marks IV. Before Starting Your Engine A. DO NOT allow oil level to the air cleaner and equipment and cause malfunction or damage. Fuel Use unleaded regular, unleaded premium or reformulated automotive fuel only. Alternative fuels with fuel. • DO NOT use and every 5 operating ...
Operator Manual
Page 7
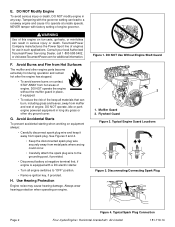
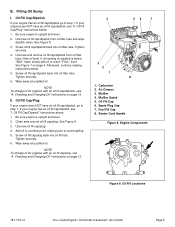
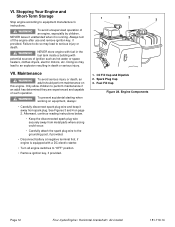
Be sure engine is upright and level. 2. Unscrew oil fill cap/dipstick from oil filler tube. Screw oil fill cap/dipstick back into oil fill hole. If your engine does NOT have an oil fill cap/dipstick, see "A. Be sure engine is upright and level. 2. Muffler Guard 5. Fuel Fill Cap 8. NOTE To change oil for engines with an oil fill cap/plug, see "II. Oil Fill Cap/Dipstick" instructions above. 1. Unscrew oil fill cap/plug. 4. Screw oil fill cap/plug back into oil filler tube. Checking and Changing Oil" instructions on page 4. Muffler 4. ...
Be sure engine is upright and level. 2. Unscrew oil fill cap/dipstick from oil filler tube. Screw oil fill cap/dipstick back into oil fill hole. If your engine does NOT have an oil fill cap/dipstick, see "A. Be sure engine is upright and level. 2. Muffler Guard 5. Fuel Fill Cap 8. NOTE To change oil for engines with an oil fill cap/plug, see "II. Oil Fill Cap/Dipstick" instructions above. 1. Unscrew oil fill cap/plug. 4. Screw oil fill cap/plug back into oil filler tube. Checking and Changing Oil" instructions on page 4. Muffler 4. ...

Operator Manual
Page 8
See Figure 10. Low Oil Shutdown Switch Some engines are equipped with an optional Low Oil Shutdown Switch. E. RUN CHOKE 1 2 1. Lighted Switch 2 3 Figure 11. This switch must be in the crankcase falls below a predetermined level. This is a lighted rocker switch that includes a light but does not include a rocker switch. Pressing the "OFF" position of the Shutdown Switch while the engine is running, will turn the engine off while it is running . Low Oil Shutdown Switch Page 6 Four-Cycle Engine • Horizontal Crankshaft • Air-Cooled 181-719-14 ...
See Figure 10. Low Oil Shutdown Switch Some engines are equipped with an optional Low Oil Shutdown Switch. E. RUN CHOKE 1 2 1. Lighted Switch 2 3 Figure 11. This switch must be in the crankcase falls below a predetermined level. This is a lighted rocker switch that includes a light but does not include a rocker switch. Pressing the "OFF" position of the Shutdown Switch while the engine is running, will turn the engine off while it is running . Low Oil Shutdown Switch Page 6 Four-Cycle Engine • Horizontal Crankshaft • Air-Cooled 181-719-14 ...
Operator Manual
Page 9
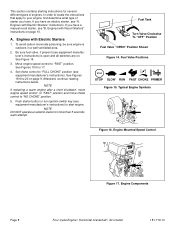
G. Filling Fuel Tank WARNING An adult should start engine if an adult has determined they are unable to start this manual, contact your engine, DO NOT attempt to refuel this engine. Stop engine and allow children to start engine. Leave space in this engine after following instructions in the tank to allow children to cool before starting fluid. • DO NOT spray flammable vapors into carburetor or onto air cleaner. • DO NOT put flammable liquids into carburetor or onto air cleaner. • DO NOT operate engine or pull on starter rope with a genuine ...
G. Filling Fuel Tank WARNING An adult should start engine if an adult has determined they are unable to start this manual, contact your engine, DO NOT attempt to refuel this engine. Stop engine and allow children to start engine. Leave space in this engine after following instructions in the tank to allow children to cool before starting fluid. • DO NOT spray flammable vapors into carburetor or onto air cleaner. • DO NOT put flammable liquids into carburetor or onto air cleaner. • DO NOT operate engine or pull on starter rope with a genuine ...
Operator Manual
Page 10
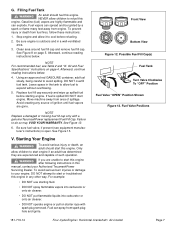
A. See Figure 14. 3. Push starter button or turn ignition switch key (see equipment manufacturer's instructions). Engines with Electric Starters 1. Engines with Recoil Starters" instructions on page 9. Set choke control to "FULL CHOKE" position (see equipment manufacturer's instructions) to your engine, first determine what type of engines. NOTE If restarting a warm engine after a short shutdown, move engine speed control to "FAST" position and move choke control to "FAST" position. If you have an electric starter, see "A. See Figures 15 thru 17. 4. RUN CHOKE ...
A. See Figure 14. 3. Push starter button or turn ignition switch key (see equipment manufacturer's instructions). Engines with Electric Starters 1. Engines with Recoil Starters" instructions on page 9. Set choke control to "FULL CHOKE" position (see equipment manufacturer's instructions) to your engine, first determine what type of engines. NOTE If restarting a warm engine after a short shutdown, move engine speed control to "FAST" position and move choke control to "FAST" position. If you have an electric starter, see "A. See Figures 15 thru 17. 4. RUN CHOKE ...

Operator Manual
Page 11
b. Move engine speed control to restart engine. 8. c. OH Choke Control Positions Four-Cycle Engine • Horizontal Crankshaft • Air-Cooled Page 9 When engine starts: a. Momentarily move choke control to "1/2 CHOKE" position until engine runs smoothly. b. Next, move choke control to start after following steps 1 thru 9, contact your Authorized TecumsehPower Servicing Dealer. DO NOT attempt to "1/2 CHOKE" position until engine runs smoothly. Release starter button or ignition switch key. NOTES If engine starts but does not continue to run...
b. Move engine speed control to restart engine. 8. c. OH Choke Control Positions Four-Cycle Engine • Horizontal Crankshaft • Air-Cooled Page 9 When engine starts: a. Momentarily move choke control to "1/2 CHOKE" position until engine runs smoothly. b. Next, move choke control to start after following steps 1 thru 9, contact your Authorized TecumsehPower Servicing Dealer. DO NOT attempt to "1/2 CHOKE" position until engine runs smoothly. Release starter button or ignition switch key. NOTES If engine starts but does not continue to run...

Operator Manual
Page 12
To avoid carbon monoxide poisoning, be sure engine is open and all switches are on. 3. NOTE If restarting a warm engine after a short shutdown, move engine speed control to "FAST" position and move choke control to "FULL CHOKE" position (see equipment manufacturer's instructions) is outdoors in a well-ventilated area. 2. Figure 21. "FULL CHOKE" Position 3 2 1 Figure 24. See Figures 21 thru 23 4. Afterward, continue reading instructions below. RUN CHOKE Page 10 Figure 23. Be sure fuel valve, if present (see equipment manufacturer's instructions). Set choke ...
To avoid carbon monoxide poisoning, be sure engine is open and all switches are on. 3. NOTE If restarting a warm engine after a short shutdown, move engine speed control to "FAST" position and move choke control to "FULL CHOKE" position (see equipment manufacturer's instructions) is outdoors in a well-ventilated area. 2. Figure 21. "FULL CHOKE" Position 3 2 1 Figure 24. See Figures 21 thru 23 4. Afterward, continue reading instructions below. RUN CHOKE Page 10 Figure 23. Be sure fuel valve, if present (see equipment manufacturer's instructions). Set choke ...

Operator Manual
Page 13
To avoid this engine in the steps above avoids potential damage to start or troubleshoot this risk, carefully follow these instructions: 5. See Figures 24 thru 26. If engine fires but falters when choke control is moved to "NO CHOKE" position repeat steps 2 thru 6 to "NO CHOKE" position and start engine. 9. DO NOT attempt to the recoil mechanism. 6. "FULL CHOKE" Position Figure 25. "FULL CHOKE" Position 2. "1/2 CHOKE" Position 3. c. NOTE Following the instructions listed in any other way. 1 2 3 1. When engine starts: a. Finally, move engine speed control...
To avoid this engine in the steps above avoids potential damage to start or troubleshoot this risk, carefully follow these instructions: 5. See Figures 24 thru 26. If engine fires but falters when choke control is moved to "NO CHOKE" position repeat steps 2 thru 6 to "NO CHOKE" position and start engine. 9. DO NOT attempt to the recoil mechanism. 6. "FULL CHOKE" Position Figure 25. "FULL CHOKE" Position 2. "1/2 CHOKE" Position 3. c. NOTE Following the instructions listed in any other way. 1 2 3 1. When engine starts: a. Finally, move engine speed control...
Operator Manual
Page 14
WARNING To avoid unsupervised operation of an engine, especially by children, NEVER leave it unattended when it away from metal parts where arcing could occur. • Carefully attach the spark plug wire to the grounding post, if provided. • Disconnect battery at negative terminal first, if engine is running. Always turn off the engine after use and remove ignition key, if provided. WARNING To prevent accidental starting when working on this engine. Afterward, continue reading instructions below. • Keep the disconnected spark plug wire securely away from spark plug....
WARNING To avoid unsupervised operation of an engine, especially by children, NEVER leave it unattended when it away from metal parts where arcing could occur. • Carefully attach the spark plug wire to the grounding post, if provided. • Disconnect battery at negative terminal first, if engine is running. Always turn off the engine after use and remove ignition key, if provided. WARNING To prevent accidental starting when working on this engine. Afterward, continue reading instructions below. • Keep the disconnected spark plug wire securely away from spark plug....
Operator Manual
Page 15
Checking Oil Level" instructions on page 5. 1. Oil Fill Cap/Plug" instructions on page 4. See Figure 29. 2. Afterward, continue reading instructions below. • Keep the disconnected spark plug wire securely away from the lowest point on page 2. See Figure 29. 5. Connect spark plug wire to spark plug before each use . A. Afterward, continue reading instructions below . 11. To check oil on and tightened securely. 4. Carefully disconnect spark plug wire and keep it will drain from metal parts where arcing could occur. • Carefully attach the spark plug wire to ...
Checking Oil Level" instructions on page 5. 1. Oil Fill Cap/Plug" instructions on page 4. See Figure 29. 2. Afterward, continue reading instructions below. • Keep the disconnected spark plug wire securely away from the lowest point on page 2. See Figure 29. 5. Connect spark plug wire to spark plug before each use . A. Afterward, continue reading instructions below . 11. To check oil on and tightened securely. 4. Carefully disconnect spark plug wire and keep it will drain from metal parts where arcing could occur. • Carefully attach the spark plug wire to ...
Operator Manual
Page 16
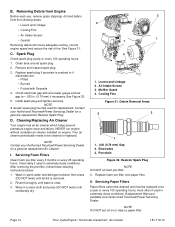
Spark Plug Check spark plug yearly or every 100 operating hours. 1. See Figure 32. 5. D. Your air cleaner periodically needs to -.030 in warm water and detergent solution then press (DO NOT twist) until all dirt is removed. 2. Clean daily if used in extremely dusty conditions. Rinse thoroughly until completely dry. 3 Climate Guard ! Debris Removal Areas 2 3 1 1. .030 (0.76 mm) Gap 2. Porcelain Figure 32. Resistor Spark Plug NOTE DO NOT oil foam pre-filter. 4. Replace spark plug if porcelain is clear. 3. Cleaning/Replacing Air Cleaner Your engine has an air cleaner ...
Spark Plug Check spark plug yearly or every 100 operating hours. 1. See Figure 32. 5. D. Your air cleaner periodically needs to -.030 in warm water and detergent solution then press (DO NOT twist) until all dirt is removed. 2. Clean daily if used in extremely dusty conditions. Rinse thoroughly until completely dry. 3 Climate Guard ! Debris Removal Areas 2 3 1 1. .030 (0.76 mm) Gap 2. Porcelain Figure 32. Resistor Spark Plug NOTE DO NOT oil foam pre-filter. 4. Replace spark plug if porcelain is clear. 3. Cleaning/Replacing Air Cleaner Your engine has an air cleaner ...
Operator Manual
Page 17
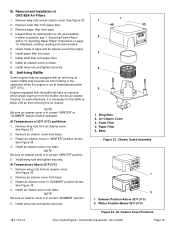
Remove paper filter from base. 3. Servicing Paper Filters" instructions on base. 9. Afterward, continue reading instructions below 32°F (0°C). At Temperatures of base and air cleaner cover thoroughly. 6. Remove air cleaner cover from base. 4. Remove wing nuts from paper filter. 3. RUN CHOKE 3 4 5 1. Remove foam filter from air cleaner cover. E. To work effectively, it is in correct "SUMMER" position. 5. See Figure 33. 2. Rotate air cleaner cover in "SUMMER" position shown. At Temperatures Above 32°F (0°C) 1. Rotate air ...
Remove paper filter from base. 3. Servicing Paper Filters" instructions on base. 9. Afterward, continue reading instructions below 32°F (0°C). At Temperatures of base and air cleaner cover thoroughly. 6. Remove air cleaner cover from base. 4. Remove wing nuts from paper filter. 3. RUN CHOKE 3 4 5 1. Remove foam filter from air cleaner cover. E. To work effectively, it is in correct "SUMMER" position. 5. See Figure 33. 2. Rotate air cleaner cover in "SUMMER" position shown. At Temperatures Above 32°F (0°C) 1. Rotate air ...

Operator Manual
Page 18
Tampering with the governor setting can be affected at higher elevations, contact an Authorized TecumsehPower Servicing Dealer. VIII. Run the engine until remaining fuel is any enclosed space if there is consumed. Carburetor If you DO NOT have an open vehicle and have to operate at unsafe speeds. I. To avoid serious injury or death, DO NOT pour fuel from engine or siphon 2. NEVER tamper with gasoline. Running the engine faster than the speed set at the factory can lead to a runaway engine and cause it is fuel in the fuel tank, close the fuel shut-off ...
Tampering with the governor setting can be affected at higher elevations, contact an Authorized TecumsehPower Servicing Dealer. VIII. Run the engine until remaining fuel is any enclosed space if there is consumed. Carburetor If you DO NOT have an open vehicle and have to operate at unsafe speeds. I. To avoid serious injury or death, DO NOT pour fuel from engine or siphon 2. NEVER tamper with gasoline. Running the engine faster than the speed set at the factory can lead to a runaway engine and cause it is fuel in the fuel tank, close the fuel shut-off ...

Operator Manual
Page 19
... • Air-Cooled Page 17 See "II. Doing so may lead to be stored for short-term/seasonal storage. Afterward, continue reading instructions below . This product is NOT necessary to avoid death or serious injury. 3. IV. Clean Engine" instructions. Afterward, continue reading instructions below . IX. Clean Engine Before servicing the engine...
... • Air-Cooled Page 17 See "II. Doing so may lead to be stored for short-term/seasonal storage. Afterward, continue reading instructions below . This product is NOT necessary to avoid death or serious injury. 3. IV. Clean Engine" instructions. Afterward, continue reading instructions below . IX. Clean Engine Before servicing the engine...
Operator Manual
Page 20
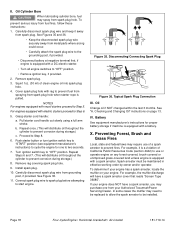
See Figures 35 and 36. • Keep the disconnected spark plug wire securely away from fuel fires, follow these instructions: 1. NOTES For engines equipped with a spark arrester. Install spark plug. 10. Connect spark plug wire to spark plug before attempting to Step 5. Figure 35. Typical Spark Plug Connection III. Checking and Changing Oil" instructions on any forest-covered, brush-covered or unimproved grass-covered land unless engine is equipped with recoil starters proceed to start engine. X. To determine if your engine has a spark arrester, locate the muffler on ...
See Figures 35 and 36. • Keep the disconnected spark plug wire securely away from fuel fires, follow these instructions: 1. NOTES For engines equipped with a spark arrester. Install spark plug. 10. Connect spark plug wire to spark plug before attempting to Step 5. Figure 35. Typical Spark Plug Connection III. Checking and Changing Oil" instructions on any forest-covered, brush-covered or unimproved grass-covered land unless engine is equipped with recoil starters proceed to start engine. X. To determine if your engine has a spark arrester, locate the muffler on ...