User's Guide
Page 2
...Overview 1 Package Contents ...1 Features ...1 Product Hardware Features 2 Application Diagram ...3 Installation Option Description 4 Wired Connection ...4 WPS Connection ...4 Wall mount installation 5 TRENDnet Cloud Service 6 Image A (connecting using WPS 6 Image B (wired connection 6 Blue Mode ...6 Green Mode...7 Red Mode ...7 Install the Camera 8 ... Network ...30 Cloud Link...31 User ...31 Date/Time ...32 Motion Detection ...32 Upload...33 Day/Night Mode (for TV-IP851WIC 35 Tools ...35 FTP Server Test...36 E-mail Test...36 Restart ...36 Factory Reset ...37 Firmware Upgrade 37 Backup...
...Overview 1 Package Contents ...1 Features ...1 Product Hardware Features 2 Application Diagram ...3 Installation Option Description 4 Wired Connection ...4 WPS Connection ...4 Wall mount installation 5 TRENDnet Cloud Service 6 Image A (connecting using WPS 6 Image B (wired connection 6 Blue Mode ...6 Green Mode...7 Red Mode ...7 Install the Camera 8 ... Network ...30 Cloud Link...31 User ...31 Date/Time ...32 Motion Detection ...32 Upload...33 Day/Night Mode (for TV-IP851WIC 35 Tools ...35 FTP Server Test...36 E-mail Test...36 Restart ...36 Factory Reset ...37 Firmware Upgrade 37 Backup...
User's Guide
Page 4
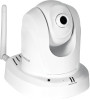
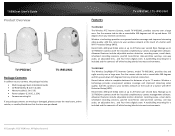
..., model TV-IP851WC, provides security over a large area. TRENDnet User's Guide Product Overview TV-IP851WC TV-IP851WIC Package Contents In addition to your wireless network at up to 20 frames per second (fps). Wireless n technology provides unsurpassed wireless coverage and improved streaming video quality. Manage up to 32 TRENDnet cameras with Wi-Fi Protected Setup (WPS). TV-IP851WIC The...
..., model TV-IP851WC, provides security over a large area. TRENDnet User's Guide Product Overview TV-IP851WC TV-IP851WIC Package Contents In addition to your wireless network at up to 20 frames per second (fps). Wireless n technology provides unsurpassed wireless coverage and improved streaming video quality. Manage up to 32 TRENDnet cameras with Wi-Fi Protected Setup (WPS). TV-IP851WIC The...
User's Guide
Page 5
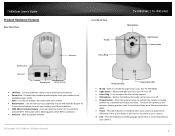
...and obscured view. The button LED is blinking green when WPS is no power to its factory defaults. • WPS (Wi-Fi Protected Setup) - All Rights Reserved. Press the privacy button to redirect the camera's viewing position to your camera. • Link - Privacy button ...to your camera. 2 To return the camera to your camera. • Reset Button - TRENDnet User's Guide Product Hardware Features Rear Panel View Front Panel View IR LED TV-IP851WC / TV-IP851WIC Microphone Light Sensor Camera Lens Antenna Focus Ring WPS button LAN port Power port Reset button...
...and obscured view. The button LED is blinking green when WPS is no power to its factory defaults. • WPS (Wi-Fi Protected Setup) - All Rights Reserved. Press the privacy button to redirect the camera's viewing position to your camera. • Link - Privacy button ...to your camera. 2 To return the camera to your camera. • Reset Button - TRENDnet User's Guide Product Hardware Features Rear Panel View Front Panel View IR LED TV-IP851WC / TV-IP851WIC Microphone Light Sensor Camera Lens Antenna Focus Ring WPS button LAN port Power port Reset button...

User's Guide
Page 11
...itself. The most important part of the setup process is TRENDnet's Terms of the device. All Rights Reserved. 8 The next step references information on -screen steps to the Main Menu. 1. If not, select the next option). TV-IP851WC / TV-IP851WIC 2. There are three options: ...a. In this case, browse to begin the installation wizard. Connect camera to your wireless network manually c. Go to your machine. Connect camera to continue. 3. TRENDnet User's Guide Install the Camera ...
...itself. The most important part of the setup process is TRENDnet's Terms of the device. All Rights Reserved. 8 The next step references information on -screen steps to the Main Menu. 1. If not, select the next option). TV-IP851WC / TV-IP851WIC 2. There are three options: ...a. In this case, browse to begin the installation wizard. Connect camera to your wireless network manually c. Go to your machine. Connect camera to continue. 3. TRENDnet User's Guide Install the Camera ...
User's Guide
Page 14
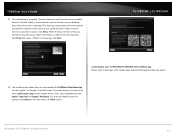
The initial setup is the Cloud Access accessibility feature. When the Cloud server isn't found . The main feature is complete. Make sure the internet connection is no warning, click Next. All Rights Reserved. 11 TV-IP851WC / TV-IP851WIC Connecting to use this feature, the user must have a...server may be busy or under maintenance. To use your TV-IP851WC/TV-IP851WIC with a Mobile App Please refer to create a shortcut on their mobile device. Click Home to the main menu, or Finish to download the TRENDnet CloudView App in either Apple™ or Google™ android...
The initial setup is the Cloud Access accessibility feature. When the Cloud server isn't found . The main feature is complete. Make sure the internet connection is no warning, click Next. All Rights Reserved. 11 TV-IP851WC / TV-IP851WIC Connecting to use this feature, the user must have a...server may be busy or under maintenance. To use your TV-IP851WC/TV-IP851WIC with a Mobile App Please refer to create a shortcut on their mobile device. Click Home to the main menu, or Finish to download the TRENDnet CloudView App in either Apple™ or Google™ android...
User's Guide
Page 17
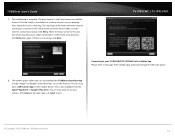
...mobile option allows the user to exit. © Copyright 2013 TRENDnet. You are now ready to use this feature, the user must have a QR Scanner App on your desktop. Make sure the internet connection is a warning. TV-IP851WC / TV-IP851WIC Connecting to create a shortcut on their mobile device. ...or icon below the icon is active, click Retry. TRENDnet User's Guide 7. Click Home to the main menu, or Finish to download the TRENDnet CloudView App in either Apple™ or Google™ android format. The initial setup is also available from the Apple™App Store or...
...mobile option allows the user to exit. © Copyright 2013 TRENDnet. You are now ready to use this feature, the user must have a QR Scanner App on your desktop. Make sure the internet connection is a warning. TV-IP851WC / TV-IP851WIC Connecting to create a shortcut on their mobile device. ...or icon below the icon is active, click Retry. TRENDnet User's Guide 7. Click Home to the main menu, or Finish to download the TRENDnet CloudView App in either Apple™ or Google™ android format. The initial setup is also available from the Apple™App Store or...
User's Guide
Page 20
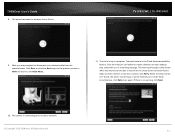
The initial setup is inactive or the cloud server cannot be busy or under maintenance... camera/router. The wizard searches for wireless Access Points. The camera is no warning, click Next. 10. TRENDnet User's Guide 8. Click the link(s) or icon below the icon is active, click Retry. Also, below to the wireless.... © Copyright 2013 TRENDnet. Under these circumstances, click Retry later again. All Rights Reserved. 17 Click Next to continue, Back to go to the previous screen or Home to return to disconnect your desktop. TV-IP851WC / TV-IP851WIC 9. Next, you are...
The initial setup is inactive or the cloud server cannot be busy or under maintenance... camera/router. The wizard searches for wireless Access Points. The camera is no warning, click Next. 10. TRENDnet User's Guide 8. Click the link(s) or icon below the icon is active, click Retry. Also, below to the wireless.... © Copyright 2013 TRENDnet. Under these circumstances, click Retry later again. All Rights Reserved. 17 Click Next to continue, Back to go to the previous screen or Home to return to disconnect your desktop. TV-IP851WC / TV-IP851WIC 9. Next, you are...
User's Guide
Page 25
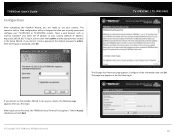
TRENDnet User's Guide Configuration After completing the AutoRun Wizard, you are ready to set up your camera, the following page appears when you first login. TV-IP851WC / TV-IP851WIC The Change Your Password page appears. Configure all the ... password, click OK. This page only appears at the first time, the TRENDnet Cloud Terms of your camera. After entering your TV-IP851WC or TV-IP851WIC camera. All Rights Reserved. 22 To log in, use the User name... Tick the Accept check box and click Next. © Copyright 2013 TRENDnet. The camera's built-in at the first time log in the...
TRENDnet User's Guide Configuration After completing the AutoRun Wizard, you are ready to set up your camera, the following page appears when you first login. TV-IP851WC / TV-IP851WIC The Change Your Password page appears. Configure all the ... password, click OK. This page only appears at the first time, the TRENDnet Cloud Terms of your camera. After entering your TV-IP851WC or TV-IP851WIC camera. All Rights Reserved. 22 To log in, use the User name... Tick the Accept check box and click Next. © Copyright 2013 TRENDnet. The camera's built-in at the first time log in the...
User's Guide
Page 41
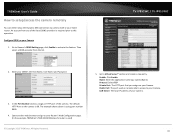
...Setting page, click Enable to Virtual Server* section and create a new entry. Enter your Router's Web Configuration page. (In the example, TRENDnet's TEW-651BR Wireless N router is required prior to this operation. Enable: Click Enable Name: Enter the application name (eg. Then select... Go to activate the feature. TRENDnet User's Guide How to setup/access the camera remotely You can either setup the Dynamic DNS connection via camera itself or your Camera 1. TV-IP851WC / TV-IP851WIC 2. Public Port: The port used ) © Copyright 2013 TRENDnet. CameraName) Protocol: Select TCP ...
...Setting page, click Enable to Virtual Server* section and create a new entry. Enter your Router's Web Configuration page. (In the example, TRENDnet's TEW-651BR Wireless N router is required prior to this operation. Enable: Click Enable Name: Enter the application name (eg. Then select... Go to activate the feature. TRENDnet User's Guide How to setup/access the camera remotely You can either setup the Dynamic DNS connection via camera itself or your Camera 1. TV-IP851WC / TV-IP851WIC 2. Public Port: The port used ) © Copyright 2013 TRENDnet. CameraName) Protocol: Select TCP ...

User's Guide
Page 42
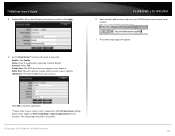
... Then click Add to add the application. * Please refer to your camera and click Apply. The setup steps should be very similar. 2. TRENDnet User's Guide TV-IP851WC / TV-IP851WIC 7. Go to Camera's DDNS Ports Number section, assign a HTTP port for this ...function. http://yourDomainName:PortNumber © Copyright 2013 TRENDnet. Some router might use Port Forwarding or Special applications for your ...
... Then click Add to add the application. * Please refer to your camera and click Apply. The setup steps should be very similar. 2. TRENDnet User's Guide TV-IP851WC / TV-IP851WIC 7. Go to Camera's DDNS Ports Number section, assign a HTTP port for this ...function. http://yourDomainName:PortNumber © Copyright 2013 TRENDnet. Some router might use Port Forwarding or Special applications for your ...
User's Guide
Page 43
...:PortNumber 7. Open another web browser and enter your Camera. Enable DDNS, fill out the following information and then click Apply. 5. TV-IP851WC / TV-IP851WIC 6. The setup steps should be very similar. © Copyright 2013 TRENDnet. Click Add to add the application. * Please refer to your router's user's manual for this function. Some router might use... Server* section and create a new entry. All Rights Reserved. 40 The camera login page will appear. Enable: Click Enable Name: Enter the application name (eg. TRENDnet User's Guide 4.
...:PortNumber 7. Open another web browser and enter your Camera. Enable DDNS, fill out the following information and then click Apply. 5. TV-IP851WC / TV-IP851WIC 6. The setup steps should be very similar. © Copyright 2013 TRENDnet. Click Add to add the application. * Please refer to your router's user's manual for this function. Some router might use... Server* section and create a new entry. All Rights Reserved. 40 The camera login page will appear. Enable: Click Enable Name: Enter the application name (eg. TRENDnet User's Guide 4.