
User's Guide
Page 3
... 14 3.3 CONFIGURING THE IP ADDRESS OF THE PC 18 CHAPTER 4 19 CONFIGURING THE CAMERA 19 4.1 USING THE WEB CONFIGURATION 19 4.2 USING SMART WIZARD 20 4.3 BASIC SETUP 23 4.4 NETWORK SETTINGS 28 4.5 PAN/TILT SETTINGS 37 4.6 SETTING UP VIDEO & AUDIO 38 4.7 EVENT SERVER CONFIGURATION 43 4.8 MOTION DETECT 47 4.9 EVENT CONFIG 48 4.10 TOOLS...
... 14 3.3 CONFIGURING THE IP ADDRESS OF THE PC 18 CHAPTER 4 19 CONFIGURING THE CAMERA 19 4.1 USING THE WEB CONFIGURATION 19 4.2 USING SMART WIZARD 20 4.3 BASIC SETUP 23 4.4 NETWORK SETTINGS 28 4.5 PAN/TILT SETTINGS 37 4.6 SETTING UP VIDEO & AUDIO 38 4.7 EVENT SERVER CONFIGURATION 43 4.8 MOTION DETECT 47 4.9 EVENT CONFIG 48 4.10 TOOLS...

User's Guide
Page 16
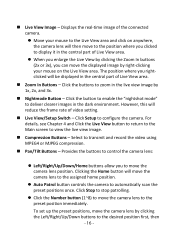
Displays the camera's location and the current date & time. After you login into the Web Configuration of the camera, the main page will appear as below: Live View/Setup Switch Zoom In Buttons Camera Information Nightmode Button Compression Buttons Pan/Tilt Buttons Live View Image Function Buttons The main page of the Web Configuration provides you with many useful information and functions, including: „ Camera Information - The information can be modified in the Web Configuration. - 15 -
Displays the camera's location and the current date & time. After you login into the Web Configuration of the camera, the main page will appear as below: Live View/Setup Switch Zoom In Buttons Camera Information Nightmode Button Compression Buttons Pan/Tilt Buttons Live View Image Function Buttons The main page of the Web Configuration provides you with many useful information and functions, including: „ Camera Information - The information can be modified in the Web Configuration. - 15 -
User's Guide
Page 17
...move the displayed image by clicking the Left/Right/Up/Down buttons to display it in the central part of video setting. „ Live View/Setup Switch - z Click the Number button (1~8) to move the camera lens position. z Move your mouse on anywhere, the camera lens will be displayed... camera. z When you enlarge the Live View by clicking the Zoom In buttons (2x or 3x), you to zoom in the dark environment. Click Setup to the preset position immediately. Click Stop to deliver clearer images in the live view image. „ Compression Buttons - „ Live View Image ...
...move the displayed image by clicking the Left/Right/Up/Down buttons to display it in the central part of video setting. „ Live View/Setup Switch - z Click the Number button (1~8) to move the camera lens position. z Move your mouse on anywhere, the camera lens will be displayed... camera. z When you enlarge the Live View by clicking the Zoom In buttons (2x or 3x), you to zoom in the dark environment. Click Setup to the preset position immediately. Click Stop to deliver clearer images in the live view image. „ Compression Buttons - „ Live View Image ...

User's Guide
Page 20
... 4 CONFIGURING THE CAMERA 4.1 Using the Web Configuration You can access and manage the camera through the configuration of Web Configuration. To configure the camera, click Setup on the main page of the camera by using the Web browser. The Web Configuration contains the settings that are required for the camera in...
... 4 CONFIGURING THE CAMERA 4.1 Using the Web Configuration You can access and manage the camera through the configuration of Web Configuration. To configure the camera, click Setup on the main page of the camera by using the Web browser. The Web Configuration contains the settings that are required for the camera in...

User's Guide
Page 24
Camera Name: Enter a descriptive name for the location used by the camera. - 23 - Location: Enter a descriptive name for the camera. - 4.3 Basic Setup The Basic menu contains three sub‐menus that provide the system settings for the camera, such as the Camera Name, Location, Date & Time, and User management. Basic >> System „ Basic -
Camera Name: Enter a descriptive name for the location used by the camera. - 23 - Location: Enter a descriptive name for the camera. - 4.3 Basic Setup The Basic menu contains three sub‐menus that provide the system settings for the camera, such as the Camera Name, Location, Date & Time, and User management. Basic >> System „ Basic -

User's Guide
Page 30
... this option to you have a PPPoE account from the ISP as starting up, it will be your Internet service provider. Therefore, when you use IP Setup to set up the email or DDNS configuration in advance. - 29 - The default setting is 192.168.10.1. When the camera starts up . Static IP...
... this option to you have a PPPoE account from the ISP as starting up, it will be your Internet service provider. Therefore, when you use IP Setup to set up the email or DDNS configuration in advance. - 29 - The default setting is 192.168.10.1. When the camera starts up . Static IP...

User's Guide
Page 36
Network >> Wireless >> WPS Setting WPS (Wi‐Fi Protected Setup) sets a new standard of the camera. „ WPS - PBC Mode (or WPS button on ...: 1. c. Click Site Survey button to select the router (or access point) you want to complete the setup. - 35 - PIN Mode 2. Click the PIN Mode option. You need to enter the PIN Code displayed on hardware design) &#...132; PROTECTED SETUP Press the Reset To Unconfigured button to start WPS function of the camera. a. WPS can be enabled by entering...
Network >> Wireless >> WPS Setting WPS (Wi‐Fi Protected Setup) sets a new standard of the camera. „ WPS - PBC Mode (or WPS button on ...: 1. c. Click Site Survey button to select the router (or access point) you want to complete the setup. - 35 - PIN Mode 2. Click the PIN Mode option. You need to enter the PIN Code displayed on hardware design) &#...132; PROTECTED SETUP Press the Reset To Unconfigured button to start WPS function of the camera. a. WPS can be enabled by entering...

User's Guide
Page 37
PBC Mode: The PBC (Push‐Button‐Configuration) mode builds the connection by : - Click the Connect button to complete the setup. „ Device Status Display the WPS configuration of the camera. You need to press the WPS button on the device. blinking 3 times when the connection ...
PBC Mode: The PBC (Push‐Button‐Configuration) mode builds the connection by : - Click the Connect button to complete the setup. „ Device Status Display the WPS configuration of the camera. You need to press the WPS button on the device. blinking 3 times when the connection ...
User's Guide
Page 60
The setup wizard will ask you must have Microsoft .NET Framework 2.0 installed in the computer. For more information of installing SecurView™ Pro. Click the SecurView Pro ...
The setup wizard will ask you must have Microsoft .NET Framework 2.0 installed in the computer. For more information of installing SecurView™ Pro. Click the SecurView Pro ...

User's Guide
Page 61
Then SecurView Pro Setup Wizard will appear. Click "Install". 4. 3. Wait until the program finish the installation. By default, the destination location is C:\Program Files\TRENDnet\SecurView Pro. - 60 -
Then SecurView Pro Setup Wizard will appear. Click "Install". 4. 3. Wait until the program finish the installation. By default, the destination location is C:\Program Files\TRENDnet\SecurView Pro. - 60 -

User's Guide
Page 65
... view current maps Camera Status: Display cameras status Playback: Playback recorded files Schedule: Display Schedule Configuration window Event Server: Setup a SMTP server Address Book: Add/Remove email address for event notification Event Trigger: Setup event trigger configuration Device Setting : Set up the camera Recording Setting: Set up the recording path Account information...
... view current maps Camera Status: Display cameras status Playback: Playback recorded files Schedule: Display Schedule Configuration window Event Server: Setup a SMTP server Address Book: Add/Remove email address for event notification Event Trigger: Setup event trigger configuration Device Setting : Set up the camera Recording Setting: Set up the recording path Account information...

User's Guide
Page 68
To change the time interval for recording, select time from the pull‐down menu. Default path is up to complete the configuration. Click the button and then select Record Setting. 2. 5.2.3 Manage the Cameras Before adding the cameras, please setup the recording setting first. „ Configure Recording Settings 1. NOTE: The system will automatically delete the oldest files (10%) when the size of recorded files is C:\, click Browse and select the desire directory then click Save to 90% of the storage space. - 67 -
To change the time interval for recording, select time from the pull‐down menu. Default path is up to complete the configuration. Click the button and then select Record Setting. 2. 5.2.3 Manage the Cameras Before adding the cameras, please setup the recording setting first. „ Configure Recording Settings 1. NOTE: The system will automatically delete the oldest files (10%) when the size of recorded files is C:\, click Browse and select the desire directory then click Save to 90% of the storage space. - 67 -

User's Guide
Page 71
To setup recording style, select Yes on the screen. These four recording types will auto detect the IP address/port number and display the stream type of the camera. The information of the recording type, configure it then click Save. It will appear. Please type in the correct user name and password, then select Preview to view live image. 6. Select one of the camera will display on Record option. 5. Continuously: Record the stream video continuously - 70 -
To setup recording style, select Yes on the screen. These four recording types will auto detect the IP address/port number and display the stream type of the camera. The information of the recording type, configure it then click Save. It will appear. Please type in the correct user name and password, then select Preview to view live image. 6. Select one of the camera will display on Record option. 5. Continuously: Record the stream video continuously - 70 -

User's Guide
Page 72
Motion: Record video by schedule. Motion detection recording required to record. If you are adding a new camera, you must save the camera information first before setup the motion detection area. - 71 - Click on New to create a new schedule and select the time to setup a motion detection area. Schedule: Records stream video by Motion Detection. Click on Save when finish. You can setup the schedule by click Add Schedule here.
Motion: Record video by schedule. Motion detection recording required to record. If you are adding a new camera, you must save the camera information first before setup the motion detection area. - 71 - Click on New to create a new schedule and select the time to setup a motion detection area. Schedule: Records stream video by Motion Detection. Click on Save when finish. You can setup the schedule by click Add Schedule here.

User's Guide
Page 73
To use motion detection record, please enable the detection areas first. Click on Motion detection area to setup Enable motion detection windows, set up the senstivity and click on Save. - 72 -
To use motion detection record, please enable the detection areas first. Click on Motion detection area to setup Enable motion detection windows, set up the senstivity and click on Save. - 72 -

User's Guide
Page 78
„ Playback the Recorded Files 1. The search result will be displayed in the Record File list. - 77 - On the Playback window, select the camera and setup the begin/end date and begin/end time, then click Search. Click the button to display the Playback window. 2.
„ Playback the Recorded Files 1. The search result will be displayed in the Record File list. - 77 - On the Playback window, select the camera and setup the begin/end date and begin/end time, then click Search. Click the button to display the Playback window. 2.

User's Guide
Page 80
It uses a background of the area (e.g. On the View Setting window, click New. - 79 - 5.2.4 eMap Setup & Camera Status „ Manage eMap Click the button and select View Setting to the geography and device scope in the SecurView Pro, which visually presents the devices in your security system. eMap refers to manage eMap. To add an eMap 1. a picture or a map) as the interface for monitoring.
It uses a background of the area (e.g. On the View Setting window, click New. - 79 - 5.2.4 eMap Setup & Camera Status „ Manage eMap Click the button and select View Setting to the geography and device scope in the SecurView Pro, which visually presents the devices in your security system. eMap refers to manage eMap. To add an eMap 1. a picture or a map) as the interface for monitoring.

User's Guide
Page 94
Go to Camera's DDNS Setting page, click Enable to access the camera behind a Router You can either setup the Dynamic DNS connection via camera itself or your home router. Enter your Camera 1. An account from the list. 2. Then select a DDNS provider from any of the listed DDNS providers is required prior to this operation. 6.1 Configure DDNS on your DDNS's the Host Name, User Name and Password. - 93 - CHAPTER 6 How to activate the feature.
Go to Camera's DDNS Setting page, click Enable to access the camera behind a Router You can either setup the Dynamic DNS connection via camera itself or your home router. Enter your Camera 1. An account from the list. 2. Then select a DDNS provider from any of the listed DDNS providers is required prior to this operation. 6.1 Configure DDNS on your DDNS's the Host Name, User Name and Password. - 93 - CHAPTER 6 How to activate the feature.

User's Guide
Page 96
LAN Server: The local IP address of your Camera. The setup steps should be very similar. - 95 - Private Port: The HTTP port that you assign on remote side to access to your Camera. Public Port: The port used on your Camera. Then click Add to add the application. * Please refer to your router's user's manual for this function. Some router might use Port Forwarding or Special applications for detail Virtual Server setting.
LAN Server: The local IP address of your Camera. The setup steps should be very similar. - 95 - Private Port: The HTTP port that you assign on remote side to access to your Camera. Public Port: The port used on your Camera. Then click Add to add the application. * Please refer to your router's user's manual for this function. Some router might use Port Forwarding or Special applications for detail Virtual Server setting.

User's Guide
Page 99
.... Enable: Click Enable Name: Enter the application name (eg. Open another web browser and enter your Camera. The camera login page will appear. - 98 - The setup steps should be very similar. 9. Click Add to add the application. * Please refer to Virtual Server* section and create a new entry. Go to your router...
.... Enable: Click Enable Name: Enter the application name (eg. Open another web browser and enter your Camera. The camera login page will appear. - 98 - The setup steps should be very similar. 9. Click Add to add the application. * Please refer to Virtual Server* section and create a new entry. Go to your router...