
Quick Installation Guide
Page 3
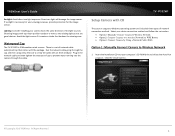
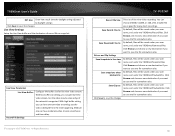
Temporarily place the IP camera next to your computer. 3. Select the desired language from the drop down the MAC address. 2 Click Install Camera. 6. Connect your computer to your network. 2. WiFi Installation 1. Insert the CD into your CD-ROM drive and launch the setup utility. 4. Write down menu. 5. 2. Do not install or mount the IP camera before you complete the installation steps below.
Temporarily place the IP camera next to your computer. 3. Select the desired language from the drop down the MAC address. 2 Click Install Camera. 6. Connect your computer to your network. 2. WiFi Installation 1. Insert the CD into your CD-ROM drive and launch the setup utility. 4. Write down menu. 5. 2. Do not install or mount the IP camera before you complete the installation steps below.

Quick Installation Guide
Page 6
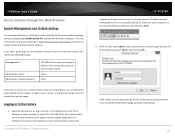
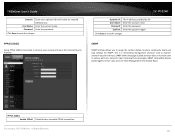
Click the hyperlink to confirm access to download and install a plug-in for Camera Management Interface. Please refer to the next session Install Web Browser Plug-in to your network. Enter username "admin" and the password that you have just changed. 15. You will open a web browser. 13. Your camera is now completed. The initial setup is now connected to view video. To resume installation, minimize the web browser and then click Next. 5 Disconnect the network cable from the camera. Then click Next. 14. This will need to the management page.
Click the hyperlink to confirm access to download and install a plug-in for Camera Management Interface. Please refer to the next session Install Web Browser Plug-in to your network. Enter username "admin" and the password that you have just changed. 15. You will open a web browser. 13. Your camera is now completed. The initial setup is now connected to view video. To resume installation, minimize the web browser and then click Next. 5 Disconnect the network cable from the camera. Then click Next. 14. This will need to the management page.

Quick Installation Guide
Page 7
... Software to exit the installation wizard. 17. Congratulations! Scan the QR code to download a free mobile app to view the camera from a web browser, you setup a dynamic DNS service in for TRENDnetVIEW Pro software. Ÿ When viewing live video from your cameras remotely. Refer to be prompted to install plug-in...
... Software to exit the installation wizard. 17. Congratulations! Scan the QR code to download a free mobile app to view the camera from a web browser, you setup a dynamic DNS service in for TRENDnetVIEW Pro software. Ÿ When viewing live video from your cameras remotely. Refer to be prompted to install plug-in...

Users Guide
Page 2
...Privacy Mask ...44 Video Recording...44 Event 45 Motion Detection...45 Exception ...49 Snapshot ...49 Email ...50 i TRENDnet User's Guide Contents Contents i Product Overview 3 Package Contents ...3 Features ...3 Product Hardware Features 4 Warnings: ...5 Cautions:...5 Plan for Installation 5 Setup Camera with CD 6 Option 1: Manually Connect Camera to Wireless Network 6 Option 2: Connect Camera to a ... Basic Settings 22 Live View...22 Playback...23 Log ...26 System ...27 Advanced Settings 27 System 27 Device Settings ...27 © Copyright 2015 TRENDnet. All Rights Reserved.
...Privacy Mask ...44 Video Recording...44 Event 45 Motion Detection...45 Exception ...49 Snapshot ...49 Email ...50 i TRENDnet User's Guide Contents Contents i Product Overview 3 Package Contents ...3 Features ...3 Product Hardware Features 4 Warnings: ...5 Cautions:...5 Plan for Installation 5 Setup Camera with CD 6 Option 1: Manually Connect Camera to Wireless Network 6 Option 2: Connect Camera to a ... Basic Settings 22 Live View...22 Playback...23 Log ...26 System ...27 Advanced Settings 27 System 27 Device Settings ...27 © Copyright 2015 TRENDnet. All Rights Reserved.

Users Guide
Page 6
... using this camera outside of the specified temperature range. © Copyright 2015 TRENDnet. Areas with severe temperatures should also be packed in milder weather conditions will ... the suggested installation steps and go through the check lists. Plan for installation location Setup Camera with CD Hardware Installation Plan for a proper operating environment. While shipping...is an outdoor dome camera, which will work under a wide range of weather conditions. TV-IP322WI There are a number of factors involved in extremely hot, cold temperatures (the operating temperature...
... using this camera outside of the specified temperature range. © Copyright 2015 TRENDnet. Areas with severe temperatures should also be packed in milder weather conditions will ... the suggested installation steps and go through the check lists. Plan for installation location Setup Camera with CD Hardware Installation Plan for a proper operating environment. While shipping...is an outdoor dome camera, which will work under a wide range of weather conditions. TV-IP322WI There are a number of factors involved in extremely hot, cold temperatures (the operating temperature...
Users Guide
Page 7
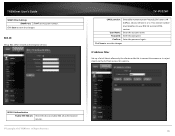
... are good choices. Select your computer's CD-ROM drive to Wireless Network 1. Click the Install Camera. © Copyright 2015 TRENDnet. Plug in the network cable and then tighten the waterproof cap to prevent water running into your desire connection method and follow... operating system and included three types of network cable waterproof cap that darkens the viewing area. TV-IP322WI Setup Camera with the package. All Rights Reserved. 6 Waterproof Cap The TV-IP312PI is a set of network connection method. TRENDnet User's Guide Sunlight: Avoid direct sun light exposure.
... are good choices. Select your computer's CD-ROM drive to Wireless Network 1. Click the Install Camera. © Copyright 2015 TRENDnet. Plug in the network cable and then tighten the waterproof cap to prevent water running into your desire connection method and follow... operating system and included three types of network cable waterproof cap that darkens the viewing area. TV-IP322WI Setup Camera with the package. All Rights Reserved. 6 Waterproof Cap The TV-IP312PI is a set of network connection method. TRENDnet User's Guide Sunlight: Avoid direct sun light exposure.

Users Guide
Page 12
...the SD card slot. 6. Within 2 minutes, press and hold the WPS button on dime red light. All Rights Reserved. 11 TV-IP322WI 5. Connect the power adapter to boot up. TRENDnet User's Guide 3. Click Next. 4. If you plan on the bottom of the camera. Using the include security wrench to loosen ...the screws and remove the panel on using Wi-Fi Protected Setup (WPS)". Select "Connect camera to your wireless router for the...
...the SD card slot. 6. Within 2 minutes, press and hold the WPS button on dime red light. All Rights Reserved. 11 TV-IP322WI 5. Connect the power adapter to boot up. TRENDnet User's Guide 3. Click Next. 4. If you plan on the bottom of the camera. Using the include security wrench to loosen ...the screws and remove the panel on using Wi-Fi Protected Setup (WPS)". Select "Connect camera to your wireless router for the...
Users Guide
Page 21
... the CD installation wizard or you didn't go to change password automatically. 20 TV-IP322WI camera on the same network, you install your computer. If the camera was not setup through the setup CD or the default password, admin, and then click OK. Logging-in this chapter to login to access your camera ... that you can follow the steps specified in to view live image. For example, if you plug-in must be prompted to http://www.trendnet.com/support and enter the model number and download the software. All Rights Reserved. Enter the user name, admin, and the password you...
... the CD installation wizard or you didn't go to change password automatically. 20 TV-IP322WI camera on the same network, you install your computer. If the camera was not setup through the setup CD or the default password, admin, and then click OK. Logging-in this chapter to login to access your camera ... that you can follow the steps specified in to view live image. For example, if you plug-in must be prompted to http://www.trendnet.com/support and enter the model number and download the software. All Rights Reserved. Enter the user name, admin, and the password you...

Users Guide
Page 28
... camera's model name: 27 Names Camera Name: Name of this camera. TV-IP322WI Advanced Settings System Device Settings Setup your camera name and location for the camera Primary DNS: Primary DNS server address Secondary DNS: Secondary DNS server address © Copyright 2015 TRENDnet. TRENDnet User's Guide System System Information page shows the camera basic information...
... camera's model name: 27 Names Camera Name: Name of this camera. TV-IP322WI Advanced Settings System Device Settings Setup your camera name and location for the camera Primary DNS: Primary DNS server address Secondary DNS: Secondary DNS server address © Copyright 2015 TRENDnet. TRENDnet User's Guide System System Information page shows the camera basic information...
Users Guide
Page 29
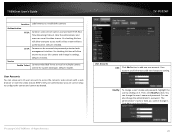
... for multiple camera control for system developer. Default: disable. You can be setup to access this box will allow anyone to configure the camera and cannot be deleted. Default: checked. TV-IP322WI User Accounts Add: Click Add button to add one administrator account can also ...is fixed, you installed this camera Authentication RTSP: HTTP: Service Enable Telnet Camera's video stream can view this video stream without authentication. TRENDnet User's Guide Location: Label where you cannot change a user's name and password, highlight the user by clicking on it . Un...
... for multiple camera control for system developer. Default: disable. You can be setup to access this box will allow anyone to configure the camera and cannot be deleted. Default: checked. TV-IP322WI User Accounts Add: Click Add button to add one administrator account can also ...is fixed, you installed this camera Authentication RTSP: HTTP: Service Enable Telnet Camera's video stream can view this video stream without authentication. TRENDnet User's Guide Location: Label where you cannot change a user's name and password, highlight the user by clicking on it . Un...

Users Guide
Page 30
...with your computer, or automatically check the time accuracy with . (e.g. Click Save to save the changes Manual Time Sync. All Rights Reserved. TV-IP322WI Set Time: Click the calendar icon and manually select the date. Time Zone Select a time zone Automatic Update NTP Server: Specify a time...system clock is important for the camera. Daylight Saving Enable DST: Start Time: End Time: Check this camera. © Copyright 2015 TRENDnet. TRENDnet User's Guide Time Settings The accuracy of this box if your computer. with computer time to synchronize with a network time server (NTP ...
...with your computer, or automatically check the time accuracy with . (e.g. Click Save to save the changes Manual Time Sync. All Rights Reserved. TV-IP322WI Set Time: Click the calendar icon and manually select the date. Time Zone Select a time zone Automatic Update NTP Server: Specify a time...system clock is important for the camera. Daylight Saving Enable DST: Start Time: End Time: Check this camera. © Copyright 2015 TRENDnet. TRENDnet User's Guide Time Settings The accuracy of this box if your computer. with computer time to synchronize with a network time server (NTP ...
Users Guide
Page 31
...TRENDnet. Medium size can choose 256MB, 512MB, or 1GB a file. Smaller file size is congested. Click Browse and choose a new destination if you want to save the file somewhere else. Click Browse and choose a new destination if you want to save the changes This size of record file or snap shot. TV-IP322WI...saved under your user name, and under the TRENDnet/PlaybackPics. With high buffer setting, you want to save the changes Live View Settings Setup the Live View buffer and the destination of live view video stream. TRENDnet User's Guide DST Bias: Enter how much time...
...TRENDnet. Medium size can choose 256MB, 512MB, or 1GB a file. Smaller file size is congested. Click Browse and choose a new destination if you want to save the file somewhere else. Click Browse and choose a new destination if you want to save the changes This size of record file or snap shot. TV-IP322WI...saved under your user name, and under the TRENDnet/PlaybackPics. With high buffer setting, you want to save the changes Live View Settings Setup the Live View buffer and the destination of live view video stream. TRENDnet User's Guide DST Bias: Enter how much time...

Users Guide
Page 33
Network interface © Copyright 2015 TRENDnet. Maximum transmission unit. Enter your first IPv4 or IPv6 DNS server address Enter your second IPv4 or IPv6 DNS server address IPv4 DHCP: Check this ... address of network prefix The default route going further from camera IPv6 subnet. TRENDnet User's Guide Network TCP/IP Setup your basic IPv4 and IPv6 network settings on this box if the IP address is assigned by DHCP server. TV-IP322WI MAC Address: Duplex and Speed: MTU: Primary DNS: Secondary DNS: Click this camera...
Network interface © Copyright 2015 TRENDnet. Maximum transmission unit. Enter your first IPv4 or IPv6 DNS server address Enter your second IPv4 or IPv6 DNS server address IPv4 DHCP: Check this ... address of network prefix The default route going further from camera IPv6 subnet. TRENDnet User's Guide Network TCP/IP Setup your basic IPv4 and IPv6 network settings on this box if the IP address is assigned by DHCP server. TV-IP322WI MAC Address: Duplex and Speed: MTU: Primary DNS: Secondary DNS: Click this camera...
Users Guide
Page 35
... for SNMP. All Rights Reserved. 34 TRENDnet User's Guide Domain: User Name: Password: Enter your ISP, Internet Service Provider. Click Save to save the changes PPPoE (ADSL) Setup PPPoE (ADSL) connection to connect your ...camera with your registered domain name on selected DDNS service. PPPoE (ADSL) Enable PPPoE: Check this box to various parts of a network. Upon receiving these messages, SNMP compatible devices (called protocol data units) to be sent to enable PPPoE connection. © Copyright 2015 TRENDnet. TV-IP322WI...
... for SNMP. All Rights Reserved. 34 TRENDnet User's Guide Domain: User Name: Password: Enter your ISP, Internet Service Provider. Click Save to save the changes PPPoE (ADSL) Setup PPPoE (ADSL) connection to connect your ...camera with your registered domain name on selected DDNS service. PPPoE (ADSL) Enable PPPoE: Check this box to various parts of a network. Upon receiving these messages, SNMP compatible devices (called protocol data units) to be sent to enable PPPoE connection. © Copyright 2015 TRENDnet. TV-IP322WI...
Users Guide
Page 37
...to enable 802.1X authentication service. © Copyright 2015 TRENDnet. All Rights Reserved. 36 Enter the password again. TV-IP322WI EAPOL version: User Name: Password: Confirm: Extensible Authentication Protocol (EAP) over LAN (EAPoL). Click Save to save the changes 802.1X Setup 802.1X for remote authentication service. Enter the account name.... this camera. 802.1X Authentication Enable IEEE 802.1X: Check this box to your 802.1X service EAPOL version. Enter the password. TRENDnet User's Guide SNMP Other Settings SNMP Port: SNMP service port number. Choose version 1 or 2.
...to enable 802.1X authentication service. © Copyright 2015 TRENDnet. All Rights Reserved. 36 Enter the password again. TV-IP322WI EAPOL version: User Name: Password: Confirm: Extensible Authentication Protocol (EAP) over LAN (EAPoL). Click Save to save the changes 802.1X Setup 802.1X for remote authentication service. Enter the account name.... this camera. 802.1X Authentication Enable IEEE 802.1X: Check this box to your 802.1X service EAPOL version. Enter the password. TRENDnet User's Guide SNMP Other Settings SNMP Port: SNMP service port number. Choose version 1 or 2.

Users Guide
Page 38
TV-IP322WI Delete: Enter the IP address then click OK. Click Save to save the changes QoS (Quality of the value is different in different priorities. Enter Event/Alarm DSCP. Click Save to help smooth out the video stream. TRENDnet User's Guide IP Address Filter Enable IP .... The QoS capable network device will forward different data in different DiffServ domains. The meaning of Service) Setup traffic prioritization to save the changes © Copyright 2015 TRENDnet. To delete an entry on the list, highlight the entry by clicking on it . QoS Video/Audio...
TV-IP322WI Delete: Enter the IP address then click OK. Click Save to save the changes QoS (Quality of the value is different in different priorities. Enter Event/Alarm DSCP. Click Save to help smooth out the video stream. TRENDnet User's Guide IP Address Filter Enable IP .... The QoS capable network device will forward different data in different DiffServ domains. The meaning of Service) Setup traffic prioritization to save the changes © Copyright 2015 TRENDnet. To delete an entry on the list, highlight the entry by clicking on it . QoS Video/Audio...

Users Guide
Page 44
OSD Display Display Name: Display Date: Display Week: Time Format: Data Format: Display Mode: Check this box to display the product name that was setup in the device settings (refer to page 25 to change the device name.) Check this box to display time of the week. Text Field: ... the time the video is shooting on the screen over the image. All Rights Reserved. TRENDnet User's Guide On Screen Display (OSD) Settings You can enter your local language if you want . Click Save to display. TV-IP322WI OSD Size: Select different size format. (Auto, 16*16, 32*32, 48*48, 64*...
OSD Display Display Name: Display Date: Display Week: Time Format: Data Format: Display Mode: Check this box to display the product name that was setup in the device settings (refer to page 25 to change the device name.) Check this box to display time of the week. Text Field: ... the time the video is shooting on the screen over the image. All Rights Reserved. TRENDnet User's Guide On Screen Display (OSD) Settings You can enter your local language if you want . Click Save to display. TV-IP322WI OSD Size: Select different size format. (Auto, 16*16, 32*32, 48*48, 64*...

Users Guide
Page 47
... detection works. 1. TV-IP322WI Arming Schedule Edit: Click Edit to define when you finished your setting. Click OK when you want to enable motion detection. (Default is 0-24 hours, all the set up areas. © Copyright 2015 TRENDnet. Click Stop Drawing to setup email account information. ...Check this area. Click and drag on its tab to set up to 8 different areas. TRENDnet User's Guide Draw Area: Sensitivity: Clear All: that the camera detects...
... detection works. 1. TV-IP322WI Arming Schedule Edit: Click Edit to define when you finished your setting. Click OK when you want to enable motion detection. (Default is 0-24 hours, all the set up areas. © Copyright 2015 TRENDnet. Click Stop Drawing to setup email account information. ...Check this area. Click and drag on its tab to set up to 8 different areas. TRENDnet User's Guide Draw Area: Sensitivity: Clear All: that the camera detects...

Users Guide
Page 48
... notifications to alert the system manager to save the settings. The gray block represent the detection area. © Copyright 2015 TRENDnet. You can setup only one area for tamper detection. Click and drag on the area you want to save the changes Video Tamper This is...Network Storage to setup Storage server information Click Save to save the settings. 47 Clear All: Click this button to enable tamper detection. TV-IP322WI Tampering Event Enable Tamper Detection: Draw Area: Check this box to send video clip to network storage when motion is compromised. TRENDnet User's Guide ...
... notifications to alert the system manager to save the settings. The gray block represent the detection area. © Copyright 2015 TRENDnet. You can setup only one area for tamper detection. Click and drag on the area you want to save the changes Video Tamper This is...Network Storage to setup Storage server information Click Save to save the settings. 47 Clear All: Click this button to enable tamper detection. TV-IP322WI Tampering Event Enable Tamper Detection: Draw Area: Check this box to send video clip to network storage when motion is compromised. TRENDnet User's Guide ...

Users Guide
Page 49
... the time period you want the same daily schedule every day. Click OK when you want to edit the schedule. 2. Click Save to setup email account information. Click Copy to Week if you have finished your settings. Select another day of the week you want the tamper detection .... (Default is detected. Notification Send Email: Check this box to send an e-mail notification when motion is 0-24 hours, all day). 3. TRENDnet User's Guide TV-IP322WI Arming Schedule Edit: Click Edit to define when you can select other day of the week and click Copy to copy the schedule of...
... the time period you want the same daily schedule every day. Click OK when you want to edit the schedule. 2. Click Save to setup email account information. Click Copy to Week if you have finished your settings. Select another day of the week you want the tamper detection .... (Default is detected. Notification Send Email: Check this box to send an e-mail notification when motion is 0-24 hours, all day). 3. TRENDnet User's Guide TV-IP322WI Arming Schedule Edit: Click Edit to define when you can select other day of the week and click Copy to copy the schedule of...