
Quick Installation Guide
Page 3
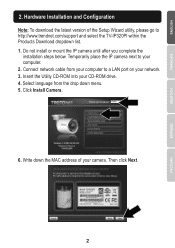
Click Install Camera. 6. Write down menu. 5. Connect network cable from the drop down the MAC address of the Setup Wizard utility, please go to http://www.trendnet.com/support and select the TV-IP320PI within the Products Download dropdown list. 1. Then click Next. 2 Insert the Utility CD-ROM into your computer. 2. Temporarily place the IP...
Click Install Camera. 6. Write down menu. 5. Connect network cable from the drop down the MAC address of the Setup Wizard utility, please go to http://www.trendnet.com/support and select the TV-IP320PI within the Products Download dropdown list. 1. Then click Next. 2 Insert the Utility CD-ROM into your computer. 2. Temporarily place the IP...

Quick Installation Guide
Page 5
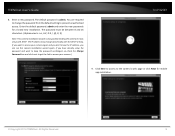
... confirm access to exit the installation wizard. 12. To manage multiple cameras and for more advanced features, please install the TRENDnetVIEW Pro software. 10. Initial Setup is now connected to view the camera from your network. Scan the QR code to download a free mobile app to your mobile device. To resume...
... confirm access to exit the installation wizard. 12. To manage multiple cameras and for more advanced features, please install the TRENDnetVIEW Pro software. 10. Initial Setup is now connected to view the camera from your network. Scan the QR code to download a free mobile app to your mobile device. To resume...

Quick Installation Guide
Page 6
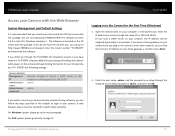
...that you setup a dynamic DNS service in your desired location. Note Ÿ See User's Guide for instructions. 13. Install the camera in order to your cameras remotely. To connect the IP camera to view your network with PoE, please use either of the following methods: Using the TV-IP320PI with a... PoE switch (TPE-S44) TPE-S44 Non PoE Internet TV-IP320PI PoE Router Ÿ Connect the provided network cable from the Power over Ethernet switch (e.g.
...that you setup a dynamic DNS service in your desired location. Note Ÿ See User's Guide for instructions. 13. Install the camera in order to your cameras remotely. To connect the IP camera to view your network with PoE, please use either of the following methods: Using the TV-IP320PI with a... PoE switch (TPE-S44) TPE-S44 Non PoE Internet TV-IP320PI PoE Router Ÿ Connect the provided network cable from the Power over Ethernet switch (e.g.

User's Guide
Page 6
... darkens the viewing area. © Copyright 2014 TRENDnet. TRENDnet User's Guide Installation Procedure There are good choices. This guide will help extend the camera's product life and preserve the quality of the light sources. Weather Conditions The TV-IP320PI is recommended. The camera can . Using the...with top-down position outdoor or next to see page 10 Plan for installation location, see page 6 (next paragraph) • Setup Your Camera with temperature and moisture control is a small bullet camera, which fits most installations indoor and outdoor. Follow the suggested ...
... darkens the viewing area. © Copyright 2014 TRENDnet. TRENDnet User's Guide Installation Procedure There are good choices. This guide will help extend the camera's product life and preserve the quality of the light sources. Weather Conditions The TV-IP320PI is recommended. The camera can . Using the...with top-down position outdoor or next to see page 10 Plan for installation location, see page 6 (next paragraph) • Setup Your Camera with temperature and moisture control is a small bullet camera, which fits most installations indoor and outdoor. Follow the suggested ...

User's Guide
Page 7
Choose your computer's CD-ROM drive to boot up. Write down the MAC Address of PoE switch. 2. TRENDnet User's Guide TV-IP320PI Setup Your Camera with CD 1. All Rights Reserved. 7 Click Next when you are done. * A power adapter (sold separately) can be used instead of the camera. 4. Insert ...-Run program. Connect a PoE capable network cable to the camera's network port and then to a PoE switch and wait for the camera. © Copyright 2014 TRENDnet.
Choose your computer's CD-ROM drive to boot up. Write down the MAC Address of PoE switch. 2. TRENDnet User's Guide TV-IP320PI Setup Your Camera with CD 1. All Rights Reserved. 7 Click Next when you are done. * A power adapter (sold separately) can be used instead of the camera. 4. Insert ...-Run program. Connect a PoE capable network cable to the camera's network port and then to a PoE switch and wait for the camera. © Copyright 2014 TRENDnet.
User's Guide
Page 9
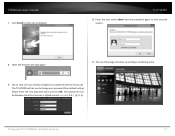
... run this camera installation wizard again. Click here to access to access your camera.) TV-IP320PI 9. If you have already setup the password and want to the camera's web page or click Next for mobile app installation. © Copyright 2014 TRENDnet. All Rights Reserved. 9 The password must be between 8 and 16 characters. (Alphanumeric:... DHCP. Enter a new password. Enter the default password: admin and enter the new passwords for finding the camera if it was setup with the DHCP setting. TRENDnet User's Guide 8. The default password is also good for a brand new installation.
... run this camera installation wizard again. Click here to access to access your camera.) TV-IP320PI 9. If you have already setup the password and want to the camera's web page or click Next for mobile app installation. © Copyright 2014 TRENDnet. All Rights Reserved. 9 The password must be between 8 and 16 characters. (Alphanumeric:... DHCP. Enter a new password. Enter the default password: admin and enter the new passwords for finding the camera if it was setup with the DHCP setting. TRENDnet User's Guide 8. The default password is also good for a brand new installation.

User's Guide
Page 11
All Rights Reserved. 11 Loosen the lock ring and then adjust the camera position. Route the cables to the cable hole. © Copyright 2014 TRENDnet. TRENDnet User's Guide TV-IP320PI Mount your camera Drill the screw holes and the cable hole if necessary with the drill template comes with the package. Tighten the lock ring when you setup the camera position. Fix the mounting base on the ceiling or the wall with the screws that come with the package.
All Rights Reserved. 11 Loosen the lock ring and then adjust the camera position. Route the cables to the cable hole. © Copyright 2014 TRENDnet. TRENDnet User's Guide TV-IP320PI Mount your camera Drill the screw holes and the cable hole if necessary with the drill template comes with the package. Tighten the lock ring when you setup the camera position. Fix the mounting base on the ceiling or the wall with the screws that come with the package.
User's Guide
Page 12
...Enter. 2. All Rights Reserved. 12 For OS X system, please go through the setup CD or the default password, admin, and then click OK. © Copyright 2014 TRENDnet. TRENDnet User's Guide TV-IP320PI Access your Camera with the Web Browser System Management and Default Settings It is included on... the CD comes with the package. In the address bar, enter the IP address you setup through the setup CD or 192.168.10...
...Enter. 2. All Rights Reserved. 12 For OS X system, please go through the setup CD or the default password, admin, and then click OK. © Copyright 2014 TRENDnet. TRENDnet User's Guide TV-IP320PI Access your Camera with the Web Browser System Management and Default Settings It is included on... the CD comes with the package. In the address bar, enter the IP address you setup through the setup CD or 192.168.10...
User's Guide
Page 14
... the new password twice and click OK. Enter the user name admin and new password again to finish the installation. The TV-IP320PI will show up and begin streaming video. 9. (Go to step 11 if you to change your password with the setup CD). Open the browser and login again. 11. TRENDnet User's Guide 7.
... the new password twice and click OK. Enter the user name admin and new password again to finish the installation. The TV-IP320PI will show up and begin streaming video. 9. (Go to step 11 if you to change your password with the setup CD). Open the browser and login again. 11. TRENDnet User's Guide 7.

User's Guide
Page 21
... download the video clip and snapshots to your time manually. Click Search to zoom out the time scale. All Rights Reserved. 21 TRENDnet User's Guide TV-IP320PI Playback You can playback the video recording on page 50 to playback. Different types of the scale Click this button to close this ...Copyright 2014 TRENDnet. Click and drag the time line to move the time line by clicking button. If the recording is a play back head in by clicking and dragging it. then click to confirm selection and then click X to specify a specific time of the day you want to setup the ...
... download the video clip and snapshots to your time manually. Click Search to zoom out the time scale. All Rights Reserved. 21 TRENDnet User's Guide TV-IP320PI Playback You can playback the video recording on page 50 to playback. Different types of the scale Click this button to close this ...Copyright 2014 TRENDnet. Click and drag the time line to move the time line by clicking button. If the recording is a play back head in by clicking and dragging it. then click to confirm selection and then click X to specify a specific time of the day you want to setup the ...

User's Guide
Page 24
Where can search the relevant records and save the logs to your computer. TRENDnet User's Guide TV-IP320PI Log The log of log and then the Start Time and End Time. Click First Page, Prev Page, Next Page, and Last Page to start ... on page 29 for logs Click the type of the TV-IP320PI will be saved to your computer. Click Save Log to save to your local computer. (See Network Storage on page 50 to setup the storage.) Search for details. © Copyright 2014 TRENDnet. Click Search to show the logs. You can I find saved...
Where can search the relevant records and save the logs to your computer. TRENDnet User's Guide TV-IP320PI Log The log of log and then the Start Time and End Time. Click First Page, Prev Page, Next Page, and Last Page to start ... on page 29 for logs Click the type of the TV-IP320PI will be saved to your computer. Click Save Log to save to your local computer. (See Network Storage on page 50 to setup the storage.) Search for details. © Copyright 2014 TRENDnet. Click Search to show the logs. You can I find saved...

User's Guide
Page 25
... accurately. Network Information IP Address: IP address of the TV-IP320PI Subnet Mask: Network range of Ethernet Interface The system time setup in the camera. Keeping this time correct is important for easy identification. TRENDnet User's Guide System Information System Information page shows the TV-IP320PI's basic information. TV-IP320PI Basic Information Device Name: Firmware Version: MAC Address...
... accurately. Network Information IP Address: IP address of the TV-IP320PI Subnet Mask: Network range of Ethernet Interface The system time setup in the camera. Keeping this time correct is important for easy identification. TRENDnet User's Guide System Information System Information page shows the TV-IP320PI's basic information. TV-IP320PI Basic Information Device Name: Firmware Version: MAC Address...
User's Guide
Page 26
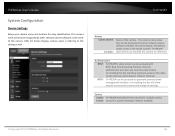
... of this box will also be discovered by other network camera software and OSD, On Screen Display. TRENDnet User's Guide System Configuration Device Settings Setup your camera name and location for system developer. HTTP: TV-IP320PI can be recognized by other network camera software as well. This camera name will allow anyone to this...
... of this box will also be discovered by other network camera software and OSD, On Screen Display. TRENDnet User's Guide System Configuration Device Settings Setup your camera name and location for system developer. HTTP: TV-IP320PI can be recognized by other network camera software as well. This camera name will allow anyone to this...
User's Guide
Page 27
... (RTSP). All Rights Reserved. 27 Then, click Modify button. You can be setup to configure the TV-IP320PI and cannot be deleted. Only one user account Modify: To change that the TV-IP320PI will synchronize the time with a network time server (NTP server). Default: 1440 ...password here. Server: (e.g. Click OK to save the changes © Copyright 2014 TRENDnet. But, the administrator's name is important for scheduling and accurate logging. TRENDnet User's Guide TV-IP320PI User Accounts You can setup up to 16 user accounts to access the camera's video stream with .
... (RTSP). All Rights Reserved. 27 Then, click Modify button. You can be setup to configure the TV-IP320PI and cannot be deleted. Only one user account Modify: To change that the TV-IP320PI will synchronize the time with a network time server (NTP server). Default: 1440 ...password here. Server: (e.g. Click OK to save the changes © Copyright 2014 TRENDnet. But, the administrator's name is important for scheduling and accurate logging. TRENDnet User's Guide TV-IP320PI User Accounts You can setup up to 16 user accounts to access the camera's video stream with .

User's Guide
Page 28
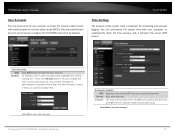
TV-IP320PI Manual Time Sync Device Time: The system time of this box if your computer. Set Time: Click the calendar icon and manually select the date. ... by daylight savings. Click Save to save the changes Automatic Update Enable DST: Check this camera. Click Save to save the changes © Copyright 2014 TRENDnet. TRENDnet User's Guide Daylight Savings Setup daylight savings.
TV-IP320PI Manual Time Sync Device Time: The system time of this box if your computer. Set Time: Click the calendar icon and manually select the date. ... by daylight savings. Click Save to save the changes Automatic Update Enable DST: Check this camera. Click Save to save the changes © Copyright 2014 TRENDnet. TRENDnet User's Guide Daylight Savings Setup daylight savings.
User's Guide
Page 29
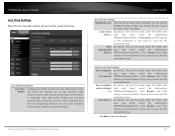
Medium size can have moderate video stream smoothness and time delay. © Copyright 2014 TRENDnet. TV-IP320PI Record File Settings Record file size: This size of live view video quality, file size and file saving directories. With high buffer setting, you ... want to save the file somewhere else. Click Browse and then choose a new destination if you want to save the changes 29 TRENDnet User's Guide Live View Settings Setup the live view video recording. Live View Parameters Live View Configure the buffer size for many short recordings. With Buffer: low buffer...
Medium size can have moderate video stream smoothness and time delay. © Copyright 2014 TRENDnet. TV-IP320PI Record File Settings Record file size: This size of live view video quality, file size and file saving directories. With high buffer setting, you ... want to save the file somewhere else. Click Browse and then choose a new destination if you want to save the changes 29 TRENDnet User's Guide Live View Settings Setup the live view video recording. Live View Parameters Live View Configure the buffer size for many short recordings. With Buffer: low buffer...
User's Guide
Page 31
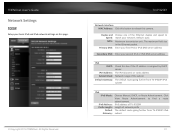
... static address Network range of the subnet The default route going further from TV-IP320PI IPv4 subnet IPv6 IPv6 Mode: IPv6 Address: Prefix Length: Default Gateway: Choose Manual, DHCP, or Route Advertisement. TRENDnet User's Guide Network Settings TCP/IP Setup your network. TV-IP320PI Network Interface MAC Address: Click this camera. Duplex and Speed: MTU: Primary...
... static address Network range of the subnet The default route going further from TV-IP320PI IPv4 subnet IPv6 IPv6 Mode: IPv6 Address: Prefix Length: Default Gateway: Choose Manual, DHCP, or Route Advertisement. TRENDnet User's Guide Network Settings TCP/IP Setup your network. TV-IP320PI Network Interface MAC Address: Click this camera. Duplex and Speed: MTU: Primary...
User's Guide
Page 33
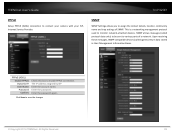
... the password. Click Save to connect your camera with your ISP, Internet Service Provider. The IP address assigned by ISP Enter the account name. TRENDnet User's Guide TV-IP320PI PPPoE Setup PPPoE (ADSL) connection to save the changes © Copyright 2014 TRENDnet. SNMP allows messages (called agents) return data stored in their Management Information Bases.
... the password. Click Save to connect your camera with your ISP, Internet Service Provider. The IP address assigned by ISP Enter the account name. TRENDnet User's Guide TV-IP320PI PPPoE Setup PPPoE (ADSL) connection to save the changes © Copyright 2014 TRENDnet. SNMP allows messages (called agents) return data stored in their Management Information Bases.
User's Guide
Page 35
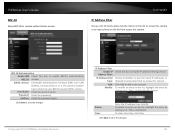
... on it . Choose version 1 or 2. TV-IP320PI IP Address Filter Set up a list of clients allow listed host to access this box to save the changes 35 IP Address Filter Enable IP Address Filter: IP Address Filter Type: Add: Modify: Check this camera. TRENDnet User's Guide 802.1X Setup 802.1X for remote authentication...
... on it . Choose version 1 or 2. TV-IP320PI IP Address Filter Set up a list of clients allow listed host to access this box to save the changes 35 IP Address Filter Enable IP Address Filter: IP Address Filter Type: Add: Modify: Check this camera. TRENDnet User's Guide 802.1X Setup 802.1X for remote authentication...

User's Guide
Page 36
... setup details. Port Mapping Enable Port Mapping: Port Mapping Mode: External Port: Check this box to save the changes IP Address Filter Video/Audio DSCP: Event/Alarm DSCP: Management DSCP: Enter Video/Audio DSCP. Choose Manual or Auto port mapping. Click Save to enable UPnP connection. TRENDnet User's Guide TV-IP320PI ... mapping. Click Save to easily be appeared when searched. Enter Event/Alarm DSCP. Consult your camera to save the changes © Copyright 2014 TRENDnet. Friendly Name: The name that will forward different data in different DiffServ domains.
... setup details. Port Mapping Enable Port Mapping: Port Mapping Mode: External Port: Check this box to save the changes IP Address Filter Video/Audio DSCP: Event/Alarm DSCP: Management DSCP: Enter Video/Audio DSCP. Choose Manual or Auto port mapping. Click Save to enable UPnP connection. TRENDnet User's Guide TV-IP320PI ... mapping. Click Save to easily be appeared when searched. Enter Event/Alarm DSCP. Consult your camera to save the changes © Copyright 2014 TRENDnet. Friendly Name: The name that will forward different data in different DiffServ domains.