Datasheet
Page 3
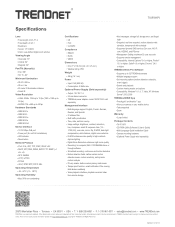
For the most recent product information please visit http://www.trendnet.com Copyright © TRENDnet.All Rights Reserved Updated: 02/12/14 TV-IP311PI Specifications Lens • Focal length: 4 mm, F1.2 • Focal depth: 20 cm + • Board lens • ...8226; Take snapshots • Zoom Warranty • 3 year limited Package Contents • TV-IP311PI • CD-ROM (Utility Software & User's Guide) • Multi-Language Quick Installation Guide • Camera mounting hardware • (Optional Power Supply sold separately Management Interface • Multi-language support: ...
For the most recent product information please visit http://www.trendnet.com Copyright © TRENDnet.All Rights Reserved Updated: 02/12/14 TV-IP311PI Specifications Lens • Focal length: 4 mm, F1.2 • Focal depth: 20 cm + • Board lens • ...8226; Take snapshots • Zoom Warranty • 3 year limited Package Contents • TV-IP311PI • CD-ROM (Utility Software & User's Guide) • Multi-Language Quick Installation Guide • Camera mounting hardware • (Optional Power Supply sold separately Management Interface • Multi-language support: ...
Quick Installation Guide
Page 2
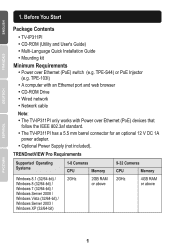
...1 TPE-S44) or PoE Injector (e.g. 1. Before You Start Package Contents • TV-IP311PI ▪ • CD-ROM (Utility and User's Guide) • Multi-Language Quick Installation Guide • Mounting kit Minimum Requirements • Power over Ethernet (PoE) devices that follow the IEEE... 802.3af standard. • The TV-IP311PI has a 5.5 mm barrel connector for an optional 12 V DC 1A power ...
...1 TPE-S44) or PoE Injector (e.g. 1. Before You Start Package Contents • TV-IP311PI ▪ • CD-ROM (Utility and User's Guide) • Multi-Language Quick Installation Guide • Mounting kit Minimum Requirements • Power over Ethernet (PoE) devices that follow the IEEE... 802.3af standard. • The TV-IP311PI has a 5.5 mm barrel connector for an optional 12 V DC 1A power ...

Quick Installation Guide
Page 3
Insert the Utility CD-ROM into your camera. Write down menu. 4. TRErlDnFT smyourianouve 11196= 5. Then click Next. Hardware Installation and Configuration 1. Do not install or mount the IP camera until after you complete the installation steps below. Select language from the drop down the MAC address of your CD-ROM drive. 3. wr camera minnnu2oi,(c().F-C 2 Temporarily place the IP camera next to your computer. 2. 2. Click Install Camera.
Insert the Utility CD-ROM into your camera. Write down menu. 4. TRErlDnFT smyourianouve 11196= 5. Then click Next. Hardware Installation and Configuration 1. Do not install or mount the IP camera until after you complete the installation steps below. Select language from the drop down the MAC address of your CD-ROM drive. 3. wr camera minnnu2oi,(c().F-C 2 Temporarily place the IP camera next to your computer. 2. 2. Click Install Camera.
Quick Installation Guide
Page 7
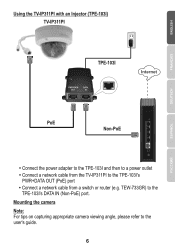
Mounting the camera Note: For tips on capturing appropriate camera viewing angle, please refer to the TPE-1031's DATA IN (Non-PoE) port. TEW-733GR) to the user's guide. 6 Using the TV-IP311PI with an Injector (TPE-1031) TV-IP311PI • TPE-1031 RIMIRTA OUT DATA MI PoE Non-PoE • Connect the power adapter to the TPE-1031 and then to a power outlet • Connect a network cable from the TV-IP311PI to the TPE-1031's PWR+DATA OUT (PoE) port • Connect a network cable from a switch or router (e.g.
Mounting the camera Note: For tips on capturing appropriate camera viewing angle, please refer to the TPE-1031's DATA IN (Non-PoE) port. TEW-733GR) to the user's guide. 6 Using the TV-IP311PI with an Injector (TPE-1031) TV-IP311PI • TPE-1031 RIMIRTA OUT DATA MI PoE Non-PoE • Connect the power adapter to the TPE-1031 and then to a power outlet • Connect a network cable from the TV-IP311PI to the TPE-1031's PWR+DATA OUT (PoE) port • Connect a network cable from a switch or router (e.g.

Quick Installation Guide
Page 8
...the camera as desired. 3. Drill holes for the provided screw anchors at each marked position on the mounting surface. Insert the provided screw anchors into the holes. 6. Align the mounting bracket with the screw anchors, and then use the provided wood screws to secure the camera to the ...camera. 7 Manually position and focus the camera as desired. 2. Secure the housing to the mounting surface. 7. CoNqWw.. 4. Make sure the drill bit matches the size of the provided screw anchors. 5. Place the provided template label on the ...
...the camera as desired. 3. Drill holes for the provided screw anchors at each marked position on the mounting surface. Insert the provided screw anchors into the holes. 6. Align the mounting bracket with the screw anchors, and then use the provided wood screws to secure the camera to the ...camera. 7 Manually position and focus the camera as desired. 2. Secure the housing to the mounting surface. 7. CoNqWw.. 4. Make sure the drill bit matches the size of the provided screw anchors. 5. Place the provided template label on the ...
User's Guide
Page 2
TV-IP311PI User's Guide Table of Service 35 UPnP 35 i All rights...34 IP Address Filter 34 QoS, Quality of Contents Product Overview 1 Features 1 Package Contents 2 Front View 3 Mounting Holes 3 Connectors 3 Installation Procedure 5 Plan for installation location 5 Viewing angle 5 Weather Conditions 5 Setup Your Camera with CD 6... Hardware Installation 9 Cabling 9 Waterproof cap 9 Mount your camera 10 Access your Camera Through the Web Browser 11 System Management and Default Settings 11 Logging-in to ...
TV-IP311PI User's Guide Table of Service 35 UPnP 35 i All rights...34 IP Address Filter 34 QoS, Quality of Contents Product Overview 1 Features 1 Package Contents 2 Front View 3 Mounting Holes 3 Connectors 3 Installation Procedure 5 Plan for installation location 5 Viewing angle 5 Weather Conditions 5 Setup Your Camera with CD 6... Hardware Installation 9 Cabling 9 Waterproof cap 9 Mount your camera 10 Access your Camera Through the Web Browser 11 System Management and Default Settings 11 Logging-in to ...

User's Guide
Page 5
...or damaged, please contact the retail store, online retailer, or reseller/distributor from which the product was purchased. 2 TV-IP311PI User's Guide IPv6 IPv6 support Advanced Playback Advanced in-camera archived video review functionality D-WDR Digital Wide Dynamic Range improves...Complimentary pro-grade software to manage up to 32 TRENDnet cameras Product Overview Package Contents TV-IP311PI package includes: • TV-IP311PI • Multi-Language Quick Installation Guide • CD-ROM ( Utility and User's Guide) • Camera mounting hardware • (Optional power supply is not ...
...or damaged, please contact the retail store, online retailer, or reseller/distributor from which the product was purchased. 2 TV-IP311PI User's Guide IPv6 IPv6 support Advanced Playback Advanced in-camera archived video review functionality D-WDR Digital Wide Dynamic Range improves...Complimentary pro-grade software to manage up to 32 TRENDnet cameras Product Overview Package Contents TV-IP311PI package includes: • TV-IP311PI • Multi-Language Quick Installation Guide • CD-ROM ( Utility and User's Guide) • Camera mounting hardware • (Optional power supply is not ...
User's Guide
Page 6
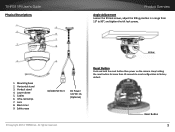
... 3 Mounting base 2. Horizontal stand 3. Keep holding the reset button for more than 10 seconds to reset configuration to 90O, and tighten the tilt lock screws. screw 1. Black Liner 9. Safety rope 10/100 PoE Port DC Power 12V DC 1A (Optional) © Copyright 2014 TRENDnet. Lower... dome 5. Reset Button Push and hold the reset button then power on the camera. TV-IP311PI User's Guide Physical Descriptions Product Overview Angle Adjustment Loosen the tilt lock screws, adjust the...
... 3 Mounting base 2. Horizontal stand 3. Keep holding the reset button for more than 10 seconds to reset configuration to 90O, and tighten the tilt lock screws. screw 1. Black Liner 9. Safety rope 10/100 PoE Port DC Power 12V DC 1A (Optional) © Copyright 2014 TRENDnet. Lower... dome 5. Reset Button Push and hold the reset button then power on the camera. TV-IP311PI User's Guide Physical Descriptions Product Overview Angle Adjustment Loosen the tilt lock screws, adjust the...

User's Guide
Page 13
TV-IP311PI User's Guide Hardware Installation Cabling It's recommended that comes with the package as well. If you already have the cable deployed, make sure the cable ... cable in the network cable and then tighten the waterproof cap to remove the lower dome. © Copyright 2014 TRENDnet. Waterproof cap The TV-IP311PI itself is suggested for power and data. Installation Mount your cable going through the cable. Loosen the screws with the torx screw driver which comes with the package. Run...
TV-IP311PI User's Guide Hardware Installation Cabling It's recommended that comes with the package as well. If you already have the cable deployed, make sure the cable ... cable in the network cable and then tighten the waterproof cap to remove the lower dome. © Copyright 2014 TRENDnet. Waterproof cap The TV-IP311PI itself is suggested for power and data. Installation Mount your cable going through the cable. Loosen the screws with the torx screw driver which comes with the package. Run...

User's Guide
Page 14
Route the cables into the wall or route through the hole. Loosen the tilt lock screws, adjust the tilting position in a range from 15O to block the water and dust. TV-IP311PI User's Guide Fix the mounting base on the ceiling or the wall with the screws that come with the package. screw © Copyright 2014 TRENDnet. This step is important to 90O, and tighten the tilt lock screws. cable Installation Fasten the lower dome back to the camera evenly and tightly. All rights reserved. 11
Route the cables into the wall or route through the hole. Loosen the tilt lock screws, adjust the tilting position in a range from 15O to block the water and dust. TV-IP311PI User's Guide Fix the mounting base on the ceiling or the wall with the screws that come with the package. screw © Copyright 2014 TRENDnet. This step is important to 90O, and tighten the tilt lock screws. cable Installation Fasten the lower dome back to the camera evenly and tightly. All rights reserved. 11