Data Sheet
Page 1
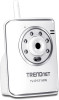
... recording, email alerts, scheduled recording sessions, MJPEG image compression, and digital zoom. SecurView Wireless N Day/Night Internet Camera TV-IP121WN(V1.0R) The SecurView Wireless N Day/Night Internet Camera (model TV-IP121WN) transmits real-time high quality video over the Internet. Manage your camera's viewing ... recording • Support up to 640 x 480 pixels resolution at up to 32 TRENDnet cameras with complimentary software **Monitoring multiple cameras may require a high performance CPU TV-IP121WN rev: 02.02.2011 Add this camera to your computer • Supports 64/128...
... recording, email alerts, scheduled recording sessions, MJPEG image compression, and digital zoom. SecurView Wireless N Day/Night Internet Camera TV-IP121WN(V1.0R) The SecurView Wireless N Day/Night Internet Camera (model TV-IP121WN) transmits real-time high quality video over the Internet. Manage your camera's viewing ... recording • Support up to 640 x 480 pixels resolution at up to 32 TRENDnet cameras with complimentary software **Monitoring multiple cameras may require a high performance CPU TV-IP121WN rev: 02.02.2011 Add this camera to your computer • Supports 64/128...
Data Sheet
Page 2
.../Night Internet Camera TV-IP121WN(V1.0R) SPECIFICATIONS Camera General Image & Video Hardware Network LED Reset Button Power Consumption Power Dimension Weight Temperature Humidity Certifications Requirement Management Interface To Run SecurView Pro SecurView Pro Network Protocols Wireless Standard Frequency Antenna Date Rate (Auto Fallback) Security Output Power Receiving Sensitivity Channels ... 1~ 30 fps • Compression: 5 levels • Recording type: continuous, schedule or motion detection with software • HTTP port: 80 (default) • 3x TV-IP121WN rev: 02.02.2011
.../Night Internet Camera TV-IP121WN(V1.0R) SPECIFICATIONS Camera General Image & Video Hardware Network LED Reset Button Power Consumption Power Dimension Weight Temperature Humidity Certifications Requirement Management Interface To Run SecurView Pro SecurView Pro Network Protocols Wireless Standard Frequency Antenna Date Rate (Auto Fallback) Security Output Power Receiving Sensitivity Channels ... 1~ 30 fps • Compression: 5 levels • Recording type: continuous, schedule or motion detection with software • HTTP port: 80 (default) • 3x TV-IP121WN rev: 02.02.2011
Data Sheet
Page 3
For the most recent product information please visit http://www.trendnet.com Copyright ©TRENDnet.All Rights Reserved. SecurView Wireless N Day/Night Internet Camera TV-IP121WN(V1.0R) SPECIFICATIONS Settings Dynamic DNS Time SMTP System log • Yes • Synchronize with NTP server or set time/date manually • SMTP mail ...
For the most recent product information please visit http://www.trendnet.com Copyright ©TRENDnet.All Rights Reserved. SecurView Wireless N Day/Night Internet Camera TV-IP121WN(V1.0R) SPECIFICATIONS Settings Dynamic DNS Time SMTP System log • Yes • Synchronize with NTP server or set time/date manually • SMTP mail ...
User's Guide
Page 2
...to Your Camera describes the features of the camera. Chapter 2 Hardware Installation helps you for purchasing the TV-IP121WN, a powerful and high-quality image SecurView Wireless Day/Night Internet Camera. You can be installed as a standalone system within your application environment easily ...you through the configuration of the camera. - 1 - NOTE The illustrations and configuration values in dark environments. Chapter 5 Using SecurView™ Pro shows you with the instructions and illustrations on your computers. You will also know the components and functions of the...
...to Your Camera describes the features of the camera. Chapter 2 Hardware Installation helps you for purchasing the TV-IP121WN, a powerful and high-quality image SecurView Wireless Day/Night Internet Camera. You can be installed as a standalone system within your application environment easily ...you through the configuration of the camera. - 1 - NOTE The illustrations and configuration values in dark environments. Chapter 5 Using SecurView™ Pro shows you with the instructions and illustrations on your computers. You will also know the components and functions of the...
User's Guide
Page 4
SECURVIEW™ PRO SOFT WARE 55 5.1 INSTALLATION 56 5.2 USING SECURVIEW™ PRO 59 CHAPTER 6 90 HOW TO ACCESS THE CAMERA BEHIND A ROUTER.......... 90 CHAPTER 7 96 APPENDIX 96 A.1 SPECIFICATION 96 A.2 GLOSSARY OF TERMS 98 LIMITED WARRANTY 107 - 3 -
SECURVIEW™ PRO SOFT WARE 55 5.1 INSTALLATION 56 5.2 USING SECURVIEW™ PRO 59 CHAPTER 6 90 HOW TO ACCESS THE CAMERA BEHIND A ROUTER.......... 90 CHAPTER 7 96 APPENDIX 96 A.1 SPECIFICATION 96 A.2 GLOSSARY OF TERMS 98 LIMITED WARRANTY 107 - 3 -
User's Guide
Page 8
... to capture crystal clear images in black & white mode using these infrared LEDs. Remote Control Supported By using a standard Web browser or the bundled SecurView™ Pro software application, the administrator can use the cameras to establish a secure wireless network by simply pressing a button. For example, babies at any time...
... to capture crystal clear images in black & white mode using these infrared LEDs. Remote Control Supported By using a standard Web browser or the bundled SecurView™ Pro software application, the administrator can use the cameras to establish a secure wireless network by simply pressing a button. For example, babies at any time...
User's Guide
Page 9
...: Intel Pentium III 800MHz or above RAM: 512MB Resolution: 800x600 or above User Interface: Microsoft® Internet Explorer 6.0 or above Accessing the Camera using SecurView Pro Platform: Microsoft® Windows® 7/Vista/XP Hardware Requirement: 1 ~ 8 cameras: Intel Core 2 Duo; 2GB RAM 9 ~ 32 cameras: Intel Core 2 Quad; 4GB RAM NOTE: It...
...: Intel Pentium III 800MHz or above RAM: 512MB Resolution: 800x600 or above User Interface: Microsoft® Internet Explorer 6.0 or above Accessing the Camera using SecurView Pro Platform: Microsoft® Windows® 7/Vista/XP Hardware Requirement: 1 ~ 8 cameras: Intel Core 2 Duo; 2GB RAM 9 ~ 32 cameras: Intel Core 2 Quad; 4GB RAM NOTE: It...
User's Guide
Page 22
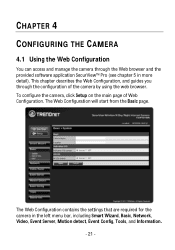
... the camera by using the web browser. This chapter describes the Web Configuration, and guides you through the Web browser and the provided software application SecurView™ Pro (see chapter 5 in the left menu bar, including Smart Wizard, Basic, Network, Video, Event Server, Motion detect, Event Config, Tools, and Information. - 21...
... the camera by using the web browser. This chapter describes the Web Configuration, and guides you through the Web browser and the provided software application SecurView™ Pro (see chapter 5 in the left menu bar, including Smart Wizard, Basic, Network, Video, Event Server, Motion detect, Event Config, Tools, and Information. - 21...

User's Guide
Page 56
... Quad; 4GB RAM * For Windows Vista users: please go to User Accounts and Family Safety > User Accounts > Turn User Account Control on using SecurView Pro, a customized software application with a user-friendly interface that allows you change some basic settings of the camera, such as schedule profiles and motion ...information of User Account Control, please go to Control Panel > User Accounts > Change User Account Control Setting to lower your computer". The SecurView Pro also supports audio or Pan/Tilt function. It also let you to access your computer to validate the setting. CHAPTER...
... Quad; 4GB RAM * For Windows Vista users: please go to User Accounts and Family Safety > User Accounts > Turn User Account Control on using SecurView Pro, a customized software application with a user-friendly interface that allows you change some basic settings of the camera, such as schedule profiles and motion ...information of User Account Control, please go to Control Panel > User Accounts > Change User Account Control Setting to lower your computer". The SecurView Pro also supports audio or Pan/Tilt function. It also let you to access your computer to validate the setting. CHAPTER...
User's Guide
Page 57
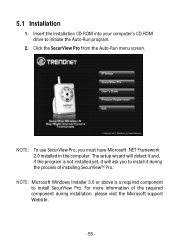
...: Microsoft Windows Installer 3.0 or above is not installed yet, it will ask you must have Microsoft .NET Framework 2.0 installed in the computer. NOTE: To use SecurView Pro, you to install it and, if the program is a required component to initiate the Auto-Run program. 2. Insert the Installation CD-ROM into your...
...: Microsoft Windows Installer 3.0 or above is not installed yet, it will ask you must have Microsoft .NET Framework 2.0 installed in the computer. NOTE: To use SecurView Pro, you to install it and, if the program is a required component to initiate the Auto-Run program. 2. Insert the Installation CD-ROM into your...
User's Guide
Page 58
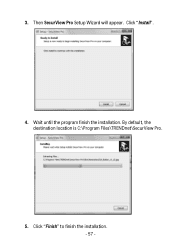
3. By default, the destination location is C:\Program Files\TRENDnet\SecurView Pro. 5. Click "Install". 4. Then SecurView Pro Setup Wizard will appear. Click "Finish" to finish the installation. - 57 - Wait until the program finish the installation.
3. By default, the destination location is C:\Program Files\TRENDnet\SecurView Pro. 5. Click "Install". 4. Then SecurView Pro Setup Wizard will appear. Click "Finish" to finish the installation. - 57 - Wait until the program finish the installation.
User's Guide
Page 59
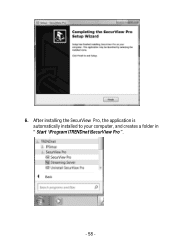
6. After installing the SecurView Pro, the application is automatically installed to your computer, and creates a folder in " Start \Program\TRENDnet\SecurView Pro ". - 58 -
6. After installing the SecurView Pro, the application is automatically installed to your computer, and creates a folder in " Start \Program\TRENDnet\SecurView Pro ". - 58 -

User's Guide
Page 60
If you wish to login. The default User name/Password is admin/admin. You can also start SecurView Pro, click Start > All Programs > TRENDnet >SecurView Pro > SecurView Pro. 5.2 Using SecurView™ Pro 5.2.1 Launch the Program To start the program by double-click the SecurView Pro icon on your desktop. On the login window, enter the User name/Password and click OK to save the login information, please select Auto Login. - 59 -
If you wish to login. The default User name/Password is admin/admin. You can also start SecurView Pro, click Start > All Programs > TRENDnet >SecurView Pro > SecurView Pro. 5.2 Using SecurView™ Pro 5.2.1 Launch the Program To start the program by double-click the SecurView Pro icon on your desktop. On the login window, enter the User name/Password and click OK to save the login information, please select Auto Login. - 59 -

User's Guide
Page 61
NOTE For best result, it cannot be displayed on . otherwise, it is higher recommended to configure resolution setting to SecurView Pro, the Main window will display as below: The Main window provides you with the information on operating the system, as well as the control panel such as the Quick Launch buttons, and so on the screen when launching the program. Live View Window displays the live video of the connected camera(s). - 60 - 5.2.2 Main Window and Features When you start and login to 1024 x 768 or higher;
NOTE For best result, it cannot be displayed on . otherwise, it is higher recommended to configure resolution setting to SecurView Pro, the Main window will display as below: The Main window provides you with the information on operating the system, as well as the control panel such as the Quick Launch buttons, and so on the screen when launching the program. Live View Window displays the live video of the connected camera(s). - 60 - 5.2.2 Main Window and Features When you start and login to 1024 x 768 or higher;
User's Guide
Page 62
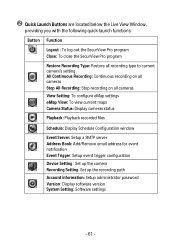
... are located below the Live View Window, providing you with the following quick-launch functions: Button Function Logout : To log out the SecurView Pro program Close: To close the SecurView Pro program Restore Recording Type: Restore all recording type to current camera's setting All Continuous Recording: Continuous recording on all cameras Stop...
... are located below the Live View Window, providing you with the following quick-launch functions: Button Function Logout : To log out the SecurView Pro program Close: To close the SecurView Pro program Restore Recording Type: Restore all recording type to current camera's setting All Continuous Recording: Continuous recording on all cameras Stop...
User's Guide
Page 77
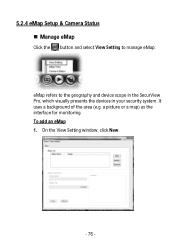
To add an eMap 1. It uses a background of the area (e.g. 5.2.4 eMap Setup & Camera Status Manage eMap Click the button and select View Setting to the geography and device scope in the SecurView Pro, which visually presents the devices in your security system. eMap refers to manage eMap. a picture or a map) as the interface for monitoring. On the View Setting window, click New. - 76 -
To add an eMap 1. It uses a background of the area (e.g. 5.2.4 eMap Setup & Camera Status Manage eMap Click the button and select View Setting to the geography and device scope in the SecurView Pro, which visually presents the devices in your security system. eMap refers to manage eMap. a picture or a map) as the interface for monitoring. On the View Setting window, click New. - 76 -

User's Guide
Page 98
Link LED (green) Audio Input Codec Built-in MIC PCM Software OS Support Windows 7/Vista/XP Browser Internet Explorer 6.0 or above Software SecurView Pro for playback/recording/ configuration features Operating Environment Temperature - Storage: -15C ~ 60C Humidity Max. 85% non-condensing EMI FCC Class B, CE Class B - 97 - Operation: 0C ~ 45C - Reset LEDs One Reset button Power LED (amber);
Link LED (green) Audio Input Codec Built-in MIC PCM Software OS Support Windows 7/Vista/XP Browser Internet Explorer 6.0 or above Software SecurView Pro for playback/recording/ configuration features Operating Environment Temperature - Storage: -15C ~ 60C Humidity Max. 85% non-condensing EMI FCC Class B, CE Class B - 97 - Operation: 0C ~ 45C - Reset LEDs One Reset button Power LED (amber);

Quick Installation Guide
Page 5
... the CD for more information. 1. Click IPSetup. 4. It is recommended that you would like to use SecurView Pro software, please install the software by clicking SecurView Pro in the Autorun window and refer to ProgramsŽ TRENDnet Ž IP Setup and click IP Setup. 3 3. Configure the IP Camera Note: 1. If you configure the...
... the CD for more information. 1. Click IPSetup. 4. It is recommended that you would like to use SecurView Pro software, please install the software by clicking SecurView Pro in the Autorun window and refer to ProgramsŽ TRENDnet Ž IP Setup and click IP Setup. 3 3. Configure the IP Camera Note: 1. If you configure the...
