
Quick Installation Guide
Page 3
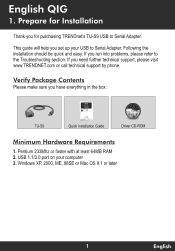
...TRENDnet's TU-S9 USB to Serial Adapter. If you for Installation Thank you run into problems, please refer to Serial Adapter. Pentium 233Mhz or faster with at least 64MB RAM 2. USB 1.1/2.0 port on your USB to the Troubleshooting section. If you have everything in the box: TU-S9 Quick Installation Guide Driver... CD-ROM Minimum Hardware Requirements 1. Windows XP, 2000, ME, 98SE or Mac OS 9.1 or later 1 English This guide will help...
...TRENDnet's TU-S9 USB to Serial Adapter. If you for Installation Thank you run into problems, please refer to Serial Adapter. Pentium 233Mhz or faster with at least 64MB RAM 2. USB 1.1/2.0 port on your USB to the Troubleshooting section. If you have everything in the box: TU-S9 Quick Installation Guide Driver... CD-ROM Minimum Hardware Requirements 1. Windows XP, 2000, ME, 98SE or Mac OS 9.1 or later 1 English This guide will help...
Quick Installation Guide
Page 7
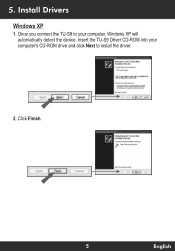
round 'New Hanlware Welcome to install the driver. Install Drivers Windows XP 1. Insert the TU-S9 Driver CD-ROM into your computer, Windows XP will automatically detect the device. fraleigels schowe ler Paw LISNoSaCown 5 English Once you connect the TU-S9 to your computers CD-ROM drive and click Next to the Found New Hardware Wizard ilasweertlhelp, pt. FounA New ...are Completing the Found New Hardware wizard The MM. 5. Click Finish. telpuerefor USEI.Septl Co* Next Cancel OL wwwwm,,, olwanwewevwsuszentaal Cick Nat.* 2.
round 'New Hanlware Welcome to install the driver. Install Drivers Windows XP 1. Insert the TU-S9 Driver CD-ROM into your computer, Windows XP will automatically detect the device. fraleigels schowe ler Paw LISNoSaCown 5 English Once you connect the TU-S9 to your computers CD-ROM drive and click Next to the Found New Hardware Wizard ilasweertlhelp, pt. FounA New ...are Completing the Found New Hardware wizard The MM. 5. Click Finish. telpuerefor USEI.Septl Co* Next Cancel OL wwwwm,,, olwanwewevwsuszentaal Cick Nat.* 2.
Quick Installation Guide
Page 8
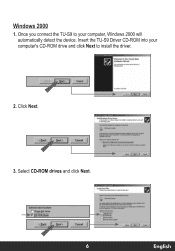
...thelebeng Memo de.. 6a. ----"^ Dennal seed beaues Deede a bake 7 Hizmawicio.... ,Deola I Nee, I Lincd I 3. Windows 2000 1. Once you connect the TU-S9 to install the driver. Select CD-ROM drives and click Next. LID,SeeeaavreSe eavise diver ame Dagen ept maim...Awe bees veek Wedom nee...m.41... °WOW efeeltelaramedivenlm.derleeteeull eenehapsee emcee I 6 En • fish Insert the TU-S9 Driver CD-ROM into your computers CD-ROM drive and click Next to your computer, Windows 2000 will automatically detect the device. Welcome to the Found New Hardware Wizard I Cancel...
...thelebeng Memo de.. 6a. ----"^ Dennal seed beaues Deede a bake 7 Hizmawicio.... ,Deola I Nee, I Lincd I 3. Windows 2000 1. Once you connect the TU-S9 to install the driver. Select CD-ROM drives and click Next. LID,SeeeaavreSe eavise diver ame Dagen ept maim...Awe bees veek Wedom nee...m.41... °WOW efeeltelaramedivenlm.derleeteeull eenehapsee emcee I 6 En • fish Insert the TU-S9 Driver CD-ROM into your computers CD-ROM drive and click Next to your computer, Windows 2000 will automatically detect the device. Welcome to the Found New Hardware Wizard I Cancel...
Quick Installation Guide
Page 9
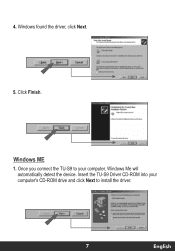
4. Windows found the driver, click Next. PM...1MM < flack rog_ivLak Cancel r Cornpie4.010FOLInfitiM HaNNIMWI3ard n,q,usp.s,,,,,„ vm \./ In to install the driver. I Windows ME 1. Bach Next > I 5. et I Cancel USB.SenalContolter 7 En • lish Once you connect the TU-S9 to your computer's CD-ROM drive and click Next to dos 6 di I Cancel 10 F7 2 dIun_sen,..3.5.1. Click Finish. Insert the TU-S9 Driver CD-ROM into your computer, Windows Me will automatically detect the device.
4. Windows found the driver, click Next. PM...1MM < flack rog_ivLak Cancel r Cornpie4.010FOLInfitiM HaNNIMWI3ard n,q,usp.s,,,,,„ vm \./ In to install the driver. I Windows ME 1. Bach Next > I 5. et I Cancel USB.SenalContolter 7 En • lish Once you connect the TU-S9 to your computer's CD-ROM drive and click Next to dos 6 di I Cancel 10 F7 2 dIun_sen,..3.5.1. Click Finish. Insert the TU-S9 Driver CD-ROM into your computer, Windows Me will automatically detect the device.
Quick Installation Guide
Page 10
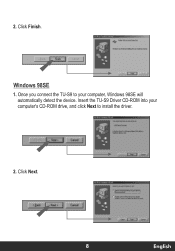
2. Click Next. do , Cancel ,flaok I - _11 co, 2. W. r LIle1_1 Cancel =12211=0: Dia wkarciseactre, he new drkts lac USIMmialConrydel Adevimm.....powant.Prn I NW> 8 En • lish Once you connect the TU-S9 to your computer's CD-ROM drive, and click Next to do you wareNnlows to install the driver. Insert the TU-S9 Driver CD-ROM into your computer, Windows 98SE will automatically detect the device. r Fl Windows 98SE 1. Click Finish. _BacI, Rolific USR.Seriel Dna Putt Widows Imfinisbedindelnplhenexhadowe device.
2. Click Next. do , Cancel ,flaok I - _11 co, 2. W. r LIle1_1 Cancel =12211=0: Dia wkarciseactre, he new drkts lac USIMmialConrydel Adevimm.....powant.Prn I NW> 8 En • lish Once you connect the TU-S9 to your computer's CD-ROM drive, and click Next to do you wareNnlows to install the driver. Insert the TU-S9 Driver CD-ROM into your computer, Windows 98SE will automatically detect the device. r Fl Windows 98SE 1. Click Finish. _BacI, Rolific USR.Seriel Dna Putt Widows Imfinisbedindelnplhenexhadowe device.
Quick Installation Guide
Page 11
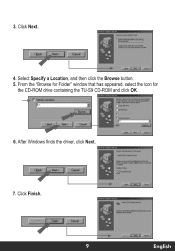
Click Finish. Ro. fc _j I Cancel I Cancel 0,OOadolealladtivershape. W.nt to tl, t < Back o Next> I 7. Click Next. ==== Wh. USPoSerie, Comm Pod location of dim \SEFIWPI. do you w. 3.
Click Finish. Ro. fc _j I Cancel I Cancel 0,OOadolealladtivershape. W.nt to tl, t < Back o Next> I 7. Click Next. ==== Wh. USPoSerie, Comm Pod location of dim \SEFIWPI. do you w. 3.
Quick Installation Guide
Page 13
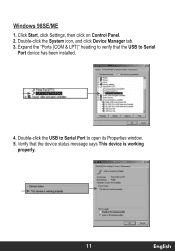
... "Ports (COM & LPT)" heading to verify that the device status message says This device is working properly. NOS, I Ream.. General Pot SeNS96 I Driver I PeNsaRee a Vee deem.tn Gpe f Va.Swanby oonnecson Modem Manoomrs En}- f Poole, Port (LPT1) it E 9S. USB ro Serial Porn (...oic 4. ProBio Hods.. Click Start, click Settings, then click on Control Panel. 2. Verify that the USB to open its Properties window. 5. Windows 98SE/ME 1. Ss_A1O. Sound, video and game contioiers M=0=MMEMMEN Boas DeviceMmager I ,14 USB M Serial Port [COMP) Device Soo Ports (COM ...
... "Ports (COM & LPT)" heading to verify that the device status message says This device is working properly. NOS, I Ream.. General Pot SeNS96 I Driver I PeNsaRee a Vee deem.tn Gpe f Va.Swanby oonnecson Modem Manoomrs En}- f Poole, Port (LPT1) it E 9S. USB ro Serial Porn (...oic 4. ProBio Hods.. Click Start, click Settings, then click on Control Panel. 2. Verify that the USB to open its Properties window. 5. Windows 98SE/ME 1. Ss_A1O. Sound, video and game contioiers M=0=MMEMMEN Boas DeviceMmager I ,14 USB M Serial Port [COMP) Device Soo Ports (COM ...

