
Quick Installation Guide
Page 5
Press the face panel button on the KVM Switch to select the second computer (Optional). 6. PC 1 5. Turn ON the first computer and wait until startup completes. 4. PC 2 (TK-209K) PC2, PC 3, PC4 (TK-409K) Your installation is now complete. 3 English Turn ON the second computer and wait until startup completes.
Press the face panel button on the KVM Switch to select the second computer (Optional). 6. PC 1 5. Turn ON the first computer and wait until startup completes. 4. PC 2 (TK-209K) PC2, PC 3, PC4 (TK-409K) Your installation is now complete. 3 English Turn ON the second computer and wait until startup completes.

Quick Installation Guide
Page 7
... with your USB port is Hot-Pluggable. Operation is properly installed on your sound card is subject to the USB port, it with FCC and CE Rules. Waste electrical and electronic products must accept any questions regarding the TK-209K/TK-409K, please contact TRENDnet's Technical Support Department. Check with household waste. As long as...
... with your USB port is Hot-Pluggable. Operation is properly installed on your sound card is subject to the USB port, it with FCC and CE Rules. Waste electrical and electronic products must accept any questions regarding the TK-209K/TK-409K, please contact TRENDnet's Technical Support Department. Check with household waste. As long as...

Quick Installation Guide
Page 9
TRENDnet SHALL NOT BE LIABLE UNDER THIS WARRANTY IF ITS TESTING AND EXAMINATION DISCLOSE THAT THE ALLEGED DEFECT IN THE PRODUCT DOES NOT EXIST OR WAS CAUSED BY CUSTOMER'S OR ANY THIRD PERSON'S MISUSE, NEGLECT, IMPROPER INSTALLATION OR TESTING, UNAUTHORIZED ATTEMPTS TO REPAIR OR MODIFY, OR...THE PURCHASE PRICE PAID, AT TRENDnet'S OPTION. Governing Law: This Limited Warranty shall be governed by the laws of the state of California. TRENDnet NEITHER ASSUMES NOR AUTHORIZES ANY OTHER PERSON TO ASSUME FOR IT ANY OTHER LIABILITY IN CONNECTION WITH THE SALE, INSTALLATION MAINTENANCE OR USE OF...
TRENDnet SHALL NOT BE LIABLE UNDER THIS WARRANTY IF ITS TESTING AND EXAMINATION DISCLOSE THAT THE ALLEGED DEFECT IN THE PRODUCT DOES NOT EXIST OR WAS CAUSED BY CUSTOMER'S OR ANY THIRD PERSON'S MISUSE, NEGLECT, IMPROPER INSTALLATION OR TESTING, UNAUTHORIZED ATTEMPTS TO REPAIR OR MODIFY, OR...THE PURCHASE PRICE PAID, AT TRENDnet'S OPTION. Governing Law: This Limited Warranty shall be governed by the laws of the state of California. TRENDnet NEITHER ASSUMES NOR AUTHORIZES ANY OTHER PERSON TO ASSUME FOR IT ANY OTHER LIABILITY IN CONNECTION WITH THE SALE, INSTALLATION MAINTENANCE OR USE OF...
User's Guide
Page 3
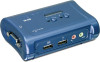
... the box and packing materials in case you have: ♦ 1 x TK-207/TK-407/TK-209/TK-409 USB KVM Switch. ♦ 1 x Utility CD-ROM ♦ Multi-Language Quick Installation Guide ♦ 2/4 Sets of USB KVM Cables ♦ 2/4 Sets of Audio Cables (for TK-209 & TK-409 models only) If any item is damaged or missing, please...
... the box and packing materials in case you have: ♦ 1 x TK-207/TK-407/TK-209/TK-409 USB KVM Switch. ♦ 1 x Utility CD-ROM ♦ Multi-Language Quick Installation Guide ♦ 2/4 Sets of USB KVM Cables ♦ 2/4 Sets of Audio Cables (for TK-209 & TK-409 models only) If any item is damaged or missing, please...

User's Guide
Page 5
Click Next >. - 5 - Click Client Switching Software from the Auto-Run menu screen. The welcome screen appears as below . Installing the KVM Client Switching Software Insert the Installation CD-ROM into your computer's CD-ROM drive to initiate the Auto-Run program, and the menu screen will appear as below . 1.
Click Next >. - 5 - Click Client Switching Software from the Auto-Run menu screen. The welcome screen appears as below . Installing the KVM Client Switching Software Insert the Installation CD-ROM into your computer's CD-ROM drive to initiate the Auto-Run program, and the menu screen will appear as below . 1.

User's Guide
Page 7
After installing the utility, the Client Switching Software is on port 4 (TK-407K & TK-409K only) - 7 - Just right click to evoke the operation menu and double-click to your window desktop. For operation details of the KVM Switcher software, ... is on port 2 : Current active PC channel is on the system tray of your computer, and creates a folder in Start\Program\USBKVM Switcher. 4. After the installation is completed, you will see a KVM Switch icon on port 3 (TK-407K & TK-409K only) : Current active PC channel is automatically...
After installing the utility, the Client Switching Software is on port 4 (TK-407K & TK-409K only) - 7 - Just right click to evoke the operation menu and double-click to your window desktop. For operation details of the KVM Switcher software, ... is on port 2 : Current active PC channel is on the system tray of your computer, and creates a folder in Start\Program\USBKVM Switcher. 4. After the installation is completed, you will see a KVM Switch icon on port 3 (TK-407K & TK-409K only) : Current active PC channel is automatically...
User's Guide
Page 8
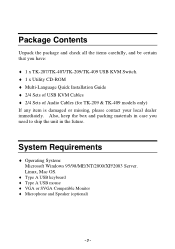
..., the KVM Switch is highly recommend that you connect the USB mouse directly to computer first before using the Windows 98(SE) and has not installed a USB mouse yet, it connects to switch between PCs. 5. Connects each KVM PC port to your USB interface does not work, please check the USB...
..., the KVM Switch is highly recommend that you connect the USB mouse directly to computer first before using the Windows 98(SE) and has not installed a USB mouse yet, it connects to switch between PCs. 5. Connects each KVM PC port to your USB interface does not work, please check the USB...

User's Guide
Page 10
... the face-panel button to switch. Universal Hotkey sequence = ScrLk + ScrLk * For other operating systems on the system tray of your Windows desktop after its installation. • All the hotkeys are only functional after your KVM to switch to an empty port, just press the face-panel button to switch. Otherwise...
... the face-panel button to switch. Universal Hotkey sequence = ScrLk + ScrLk * For other operating systems on the system tray of your Windows desktop after its installation. • All the hotkeys are only functional after your KVM to switch to an empty port, just press the face-panel button to switch. Otherwise...