Data Sheet
Page 1
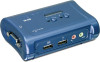
... Quality, up to share your monitor, keyboard and mouse but you can also share microphone and speakers. 2-Port USB KVM Switch Kit with Audio TK-209K The 2-Port USB Audio KVM Switch lets you control multimedia PCs with 1 set of speakers. With it's Hot-Plug, Auto-Scan and Hot-Key operating... features, the TK-209K is the perfect choice for PCs monitoring • Hot-Key, push button and Windows-based client switching software •...
... Quality, up to share your monitor, keyboard and mouse but you can also share microphone and speakers. 2-Port USB KVM Switch Kit with Audio TK-209K The 2-Port USB Audio KVM Switch lets you control multimedia PCs with 1 set of speakers. With it's Hot-Plug, Auto-Scan and Hot-Key operating... features, the TK-209K is the perfect choice for PCs monitoring • Hot-Key, push button and Windows-based client switching software •...

Data Sheet
Page 2
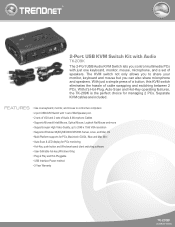
... USB Audio KVM Switch (TK-209K) PACKAGE CONTENTS • TK-209K • Multi-Language User's Guide • Utility CD-ROM • 2 sets of USB KVM Cables • 2 sets of their respective holders. For the most recent product information please visit http://www.trendnet.com. Copyright © TRENDnet. 2-Port USB KVM Switch Kit with Audio TK-209K SPECIFICATIONS Hardware Management USB Interface KVM Cable Cable...
... USB Audio KVM Switch (TK-209K) PACKAGE CONTENTS • TK-209K • Multi-Language User's Guide • Utility CD-ROM • 2 sets of USB KVM Cables • 2 sets of their respective holders. For the most recent product information please visit http://www.trendnet.com. Copyright © TRENDnet. 2-Port USB KVM Switch Kit with Audio TK-209K SPECIFICATIONS Hardware Management USB Interface KVM Cable Cable...
Quick Installation Guide
Page 3
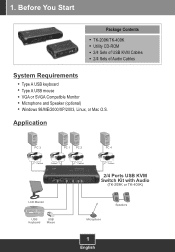
Application PC 3 PC 1 PC 2 Cables Cables Cables PC 4 Cables 2/4 Ports USB KVM Switch Kit with Audio (TK-209K or TK-409K) LCD Monitor USB Keyboard USB Mouse Microphone Speakers 1 English Before You Start Package Contents TK-209K/TK-409K Utility CD-ROM 2/4 Sets of USB KVM Cables 2/4 Sets of Audio Cables System Requirements Type A USB keyboard Type A USB mouse VGA or SVGA Compatible Monitor Microphone and Speaker (optional) Windows 98/ME/2000/XP/2003, Linux, or Mac O.S. 1.
Application PC 3 PC 1 PC 2 Cables Cables Cables PC 4 Cables 2/4 Ports USB KVM Switch Kit with Audio (TK-209K or TK-409K) LCD Monitor USB Keyboard USB Mouse Microphone Speakers 1 English Before You Start Package Contents TK-209K/TK-409K Utility CD-ROM 2/4 Sets of USB KVM Cables 2/4 Sets of Audio Cables System Requirements Type A USB keyboard Type A USB mouse VGA or SVGA Compatible Monitor Microphone and Speaker (optional) Windows 98/ME/2000/XP/2003, Linux, or Mac O.S. 1.

Quick Installation Guide
Page 4
How to your PC to Connect 1. Use the provided KVM and audio cables to connect your KVM switch. 2 English Connect the shared keyboard, monitor, mouse, microphone (optional) and speaker (optional) into to the KVM Switch's console . 3. Turn off both computers and their peripherals, and disconnect all power cords. 2. 2.
How to your PC to Connect 1. Use the provided KVM and audio cables to connect your KVM switch. 2 English Connect the shared keyboard, monitor, mouse, microphone (optional) and speaker (optional) into to the KVM Switch's console . 3. Turn off both computers and their peripherals, and disconnect all power cords. 2. 2.

Quick Installation Guide
Page 5
4. PC 2 (TK-209K) PC2, PC 3, PC4 (TK-409K) Your installation is now complete. 3 English Turn ON the second computer and wait until startup completes. Press the face panel button on the KVM Switch to select the second computer (Optional). 6. PC 1 5. Turn ON the first computer and wait until startup completes.
4. PC 2 (TK-209K) PC2, PC 3, PC4 (TK-409K) Your installation is now complete. 3 English Turn ON the second computer and wait until startup completes. Press the face panel button on the KVM Switch to select the second computer (Optional). 6. PC 1 5. Turn ON the first computer and wait until startup completes.
Quick Installation Guide
Page 6
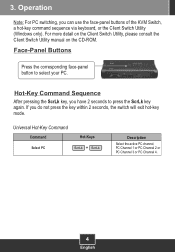
... exit hot-key mode. For more detail on the Client Switch Utility, please consult the Client Switch Utility manual on the CD-ROM. Universal Hot-Key Command Command Hot-Keys Select PC ScrLk + ScrLk Description Select the active PC channel, PC Channel 1 ... Sequence After pressing the ScrLk key, you have 2 seconds to select your PC. If you can use the face-panel buttons of the KVM Switch, a hot-key command sequence via keyboard, or the Client Switch Utility (Windows only). Face-Panel Buttons Press the corresponding face-panel button to press the ScrLk key again.
... exit hot-key mode. For more detail on the Client Switch Utility, please consult the Client Switch Utility manual on the CD-ROM. Universal Hot-Key Command Command Hot-Keys Select PC ScrLk + ScrLk Description Select the active PC channel, PC Channel 1 ... Sequence After pressing the ScrLk key, you have 2 seconds to select your PC. If you can use the face-panel buttons of the KVM Switch, a hot-key command sequence via keyboard, or the Client Switch Utility (Windows only). Face-Panel Buttons Press the corresponding face-panel button to press the ScrLk key again.

Quick Installation Guide
Page 7
...the TK-209K/TK-409K, please contact TRENDnet's Technical Support Department. Second, make sure your USB port is the power supply? Third, make sure your sound card is functional, please reboot your computers, and try to the correct jack on your computers. A5: Yes, the KVM switch ... operation. Operation is Hot-Pluggable. SUCH MODIFICATIONS COULD VOID THE USER'S AUTHORITY TO OPERATE THE EQUIPMENT. 5 As long as your KVM switch is running Windows 98SE, you Local Authority or Retailer for download and installation instructions: http://support.microsoft.com/kb/q240075. Third, if...
...the TK-209K/TK-409K, please contact TRENDnet's Technical Support Department. Second, make sure your USB port is the power supply? Third, make sure your sound card is functional, please reboot your computers, and try to the correct jack on your computers. A5: Yes, the KVM switch ... operation. Operation is Hot-Pluggable. SUCH MODIFICATIONS COULD VOID THE USER'S AUTHORITY TO OPERATE THE EQUIPMENT. 5 As long as your KVM switch is running Windows 98SE, you Local Authority or Retailer for download and installation instructions: http://support.microsoft.com/kb/q240075. Third, if...

User's Guide
Page 2
..., monitor, mouse, and a set of USB KVM and/or Audio cables, no additional equipment required. The USB console port provides support for home and business environment. - 2 - Users can switch between PCs using hot-key, push button, or... provided Windows-based software application for flexible management. Popular hardware platforms such as PC, Linux and Macs are supported. ABOUT THIS GUIDE The 2/4 Port USB KVM Switch or 2/4 Port USB KVM Swith with Audio lets you manage 2/4 computers with 2/4 sets of speakers and microphone (TK-209 & TK...
..., monitor, mouse, and a set of USB KVM and/or Audio cables, no additional equipment required. The USB console port provides support for home and business environment. - 2 - Users can switch between PCs using hot-key, push button, or... provided Windows-based software application for flexible management. Popular hardware platforms such as PC, Linux and Macs are supported. ABOUT THIS GUIDE The 2/4 Port USB KVM Switch or 2/4 Port USB KVM Swith with Audio lets you manage 2/4 computers with 2/4 sets of speakers and microphone (TK-209 & TK...
User's Guide
Page 3
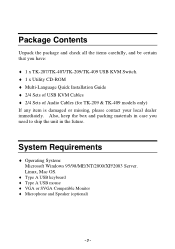
... you need to ship the unit in case you have: ♦ 1 x TK-207/TK-407/TK-209/TK-409 USB KVM Switch. ♦ 1 x Utility CD-ROM ♦ Multi-Language Quick Installation Guide ♦ 2/4 Sets of USB KVM Cables ♦ 2/4 Sets of Audio Cables (for TK-209 & TK-409 models only) If any item is damaged or missing, please contact...
... you need to ship the unit in case you have: ♦ 1 x TK-207/TK-407/TK-209/TK-409 USB KVM Switch. ♦ 1 x Utility CD-ROM ♦ Multi-Language Quick Installation Guide ♦ 2/4 Sets of USB KVM Cables ♦ 2/4 Sets of Audio Cables (for TK-209 & TK-409 models only) If any item is damaged or missing, please contact...

User's Guide
Page 4
... ♦ Hot-Plug pluggable. General Features ♦ Management 2/4 Computers ♦ 2/4 ports USB KVM Switch with 1 set of Microphone/Speaker port. (Audio ports for TK-209 & TK-409 models only) ♦ 2/4 sets of USB KVM Cables ♦ 2/4 sets of Audio & Microphone Cables (for TK-209 & TK-409 models only) ♦ Supports Microsoft IntelliMouse, Optical Mouse, Logitech Net Mouse...
... ♦ Hot-Plug pluggable. General Features ♦ Management 2/4 Computers ♦ 2/4 ports USB KVM Switch with 1 set of Microphone/Speaker port. (Audio ports for TK-209 & TK-409 models only) ♦ 2/4 sets of USB KVM Cables ♦ 2/4 sets of Audio & Microphone Cables (for TK-209 & TK-409 models only) ♦ Supports Microsoft IntelliMouse, Optical Mouse, Logitech Net Mouse...

User's Guide
Page 5
Installing the KVM Client Switching Software Insert the Installation CD-ROM into your computer's CD-ROM drive to initiate the Auto-Run program, and the menu screen will appear as below . 1. Click Next >. - 5 - Click Client Switching Software from the Auto-Run menu screen. The welcome screen appears as below .
Installing the KVM Client Switching Software Insert the Installation CD-ROM into your computer's CD-ROM drive to initiate the Auto-Run program, and the menu screen will appear as below . 1. Click Next >. - 5 - Click Client Switching Software from the Auto-Run menu screen. The welcome screen appears as below .

User's Guide
Page 7
... computer, and creates a folder in Start\Program\USBKVM Switcher. 4. After the installation is automatically installed to your window desktop. After installing the utility, the Client Switching Software is completed, you will see a KVM Switch icon on port 4 (TK-407K & TK-409K only) - 7 - 3. For operation details of the KVM Switcher software, please refer to evoke configuration box.
... computer, and creates a folder in Start\Program\USBKVM Switcher. 4. After the installation is automatically installed to your window desktop. After installing the utility, the Client Switching Software is completed, you will see a KVM Switch icon on port 4 (TK-407K & TK-409K only) - 7 - 3. For operation details of the KVM Switcher software, please refer to evoke configuration box.
User's Guide
Page 8
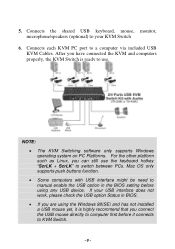
... be need to manual enable the USB option in BIOS. • If you connect the USB mouse directly to KVM Switch. - 8 - 5. Connects each KVM PC port to switch between PCs. If your KVM Switch 6. Connects the shared USB keyboard, mouse, monitor, microphone/speakers (optional) to your USB interface does not work,... Status in the BIOS setting before it connects to computer first before using any USB device. After you have connected the KVM and computers properly, the KVM Switch is highly recommend that you are using the Windows 98(SE) and has not installed a USB mouse yet, it is...
... be need to manual enable the USB option in BIOS. • If you connect the USB mouse directly to KVM Switch. - 8 - 5. Connects each KVM PC port to switch between PCs. If your KVM Switch 6. Connects the shared USB keyboard, mouse, monitor, microphone/speakers (optional) to your USB interface does not work,... Status in the BIOS setting before it connects to computer first before using any USB device. After you have connected the KVM and computers properly, the KVM Switch is highly recommend that you are using the Windows 98(SE) and has not installed a USB mouse yet, it is...
User's Guide
Page 9
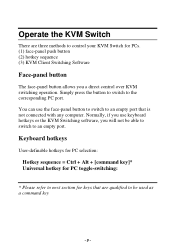
... press the button to switch to control your KVM Switch for keys that is not connected with any computer. Operate the KVM Switch There are qualified to an empty port. Normally, if you use the face-panel button to switch to an empty port that...switching: * Please refer to next section for PCs. (1) face-panel push button (2) hotkey sequence (3) KVM Client Switching Software Face-panel button The face-panel button allows you will not be able to switch to be used as a command key - 9 - You can use keyboard hotkeys or the KVM Switching software, you a direct control over KVM switching...
... press the button to switch to control your KVM Switch for keys that is not connected with any computer. Operate the KVM Switch There are qualified to an empty port. Normally, if you use the face-panel button to switch to an empty port that...switching: * Please refer to next section for PCs. (1) face-panel push button (2) hotkey sequence (3) KVM Client Switching Software Face-panel button The face-panel button allows you will not be able to switch to be used as a command key - 9 - You can use keyboard hotkeys or the KVM Switching software, you a direct control over KVM switching...

User's Guide
Page 10
... BIOS/preboot stage, press the face-panel button to switch. If you can perform next switching again. To force your PCs are booting into the OS. The KVM Switch icon could be found on PC such as described in any computer. KVM Switching Software (only for Mac. However, you can still ..., ScrLk + ScrLk and the userdefinable hotkey, Ctrl + Alt + [command key] WILL NOT allow you to switch to an empty port that is not available for Windows platform) In addition to PC switching, the KVM Switching Software also allows you more advanced functions such as Linux, you can press button to...
... BIOS/preboot stage, press the face-panel button to switch. If you can perform next switching again. To force your PCs are booting into the OS. The KVM Switch icon could be found on PC such as described in any computer. KVM Switching Software (only for Mac. However, you can still ..., ScrLk + ScrLk and the userdefinable hotkey, Ctrl + Alt + [command key] WILL NOT allow you to switch to an empty port that is not available for Windows platform) In addition to PC switching, the KVM Switching Software also allows you more advanced functions such as Linux, you can press button to...
User's Guide
Page 11
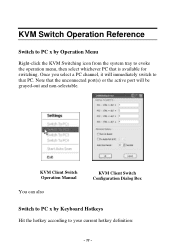
KVM Switch Operation Reference Switch to PC x by Keyboard Hotkeys Hit the hotkey according to your current hotkey definition: - 11 - Once you select a PC channel, it will be grayed-out and non-selectable. Note that PC. KVM Client Switch Operation Manual You can also KVM Client Switch Configuration Dialog Box Switch to PC x by Operation Menu Right-click the KVM Switching icon from the system tray to that the unconnected port(s) or the active port will immediately switch to evoke the operation menu, then select whichever PC that is available for switching.
KVM Switch Operation Reference Switch to PC x by Keyboard Hotkeys Hit the hotkey according to your current hotkey definition: - 11 - Once you select a PC channel, it will be grayed-out and non-selectable. Note that PC. KVM Client Switch Operation Manual You can also KVM Client Switch Configuration Dialog Box Switch to PC x by Operation Menu Right-click the KVM Switching icon from the system tray to that the unconnected port(s) or the active port will immediately switch to evoke the operation menu, then select whichever PC that is available for switching.
User's Guide
Page 12
Stop Auto-scan (While auto-scanning) Right-click the KVM Switch icon to evoke the operation menu, then select Stop Auto-Scan...typing it in the editable field. You can specify the hotkey for PC 1/2/3/4. Start Auto-scan Right-click the KVM Switch icon to evoke the operation menu, then select Start Auto-Scan to de-activate autoscanning. Or you like by ...typing an A (not case-sensitive) in . KVM Switcher configuration Right-click the KVM Switcher icon and select Settings or double-click the icon to be used a hotkey command key. Hotkey...
Stop Auto-scan (While auto-scanning) Right-click the KVM Switch icon to evoke the operation menu, then select Stop Auto-Scan...typing it in the editable field. You can specify the hotkey for PC 1/2/3/4. Start Auto-scan Right-click the KVM Switch icon to evoke the operation menu, then select Start Auto-Scan to de-activate autoscanning. Or you like by ...typing an A (not case-sensitive) in . KVM Switcher configuration Right-click the KVM Switcher icon and select Settings or double-click the icon to be used a hotkey command key. Hotkey...
User's Guide
Page 13
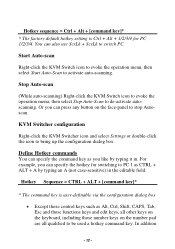
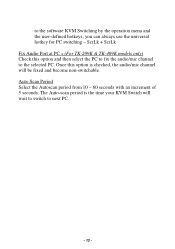
Auto Scan Period Select the Autoscan period from 10 ~ 60 seconds with an increment of 5 seconds. The Auto-scan period is checked, the audio/mic channel will wait to switch to next PC. - 13 - to the selected PC. ScrLk + ScrLk Fix Audio Port at PC x (For TK-209K & TK-409K models only) Check this option is the time your KVM Switch will be fixed and become non-switchable. Once this option and then select the PC to fix the audio/mic channel to the software KVM Switching by the operation menu and the user-defined hotkeys, you can always use the universal hotkey for PC switching -
Auto Scan Period Select the Autoscan period from 10 ~ 60 seconds with an increment of 5 seconds. The Auto-scan period is checked, the audio/mic channel will wait to switch to next PC. - 13 - to the selected PC. ScrLk + ScrLk Fix Audio Port at PC x (For TK-209K & TK-409K models only) Check this option is the time your KVM Switch will be fixed and become non-switchable. Once this option and then select the PC to fix the audio/mic channel to the software KVM Switching by the operation menu and the user-defined hotkeys, you can always use the universal hotkey for PC switching -


