User Guide
Page 6
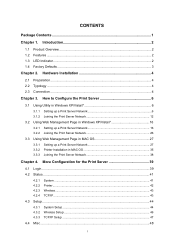
... 35 Joining the Print Server Network 38 Chapter 4. Hardware Installation 4 2.1 Preparation...4 2.2 Typology...4 2.3 Connection ...4 Chapter 3. More Configuration for the Print Server 39 4.1 Login...39 4.2 Status ...41 4.2.1 4.2.2 4.2.3 4.2.4 System ...41 Printer...42 Wireless...43 TCP/IP...43 4.3 Setup ...44 4.3.1 4.3.2 4.3.3 System Setup ...44 Wireless Setup ...46 TCP/IP Setup ...47 4.4 Misc ...48 I Introduction 2 1.1 Product Overview ...2 1.2 Features ...2 1.3 LED Indicator...2 1.4 Factory Defaults ...3 Chapter 2.
... 35 Joining the Print Server Network 38 Chapter 4. Hardware Installation 4 2.1 Preparation...4 2.2 Typology...4 2.3 Connection ...4 Chapter 3. More Configuration for the Print Server 39 4.1 Login...39 4.2 Status ...41 4.2.1 4.2.2 4.2.3 4.2.4 System ...41 Printer...42 Wireless...43 TCP/IP...43 4.3 Setup ...44 4.3.1 4.3.2 4.3.3 System Setup ...44 Wireless Setup ...46 TCP/IP Setup ...47 4.4 Misc ...48 I Introduction 2 1.1 Product Overview ...2 1.2 Features ...2 1.3 LED Indicator...2 1.4 Factory Defaults ...3 Chapter 2.
User Guide
Page 10
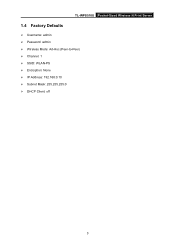
TL-WPS510U Pocket-Sized Wireless N Print Server 1.4 Factory Defaults ¾ Username: admin ¾ Password: admin ¾ Wireless Mode: Ad-Hoc (Peer-to-Peer) ¾ Channel: 1 ¾ SSID: WLAN-PS ¾ Encryption: None ¾ IP Address: 192.168.0.10 ¾ Subnet Mask: 255.255.255.0 ¾ DHCP Client: off 3
TL-WPS510U Pocket-Sized Wireless N Print Server 1.4 Factory Defaults ¾ Username: admin ¾ Password: admin ¾ Wireless Mode: Ad-Hoc (Peer-to-Peer) ¾ Channel: 1 ¾ SSID: WLAN-PS ¾ Encryption: None ¾ IP Address: 192.168.0.10 ¾ Subnet Mask: 255.255.255.0 ¾ DHCP Client: off 3
User Guide
Page 25
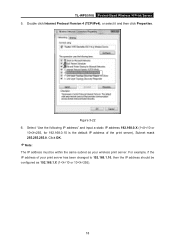
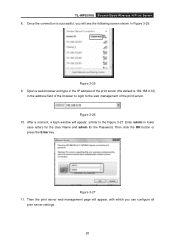
Select "Use the following IP address" and input a static IP address 192.168.0.X (1 TL-WPS510U Pocket-Sized Wireless N Print Server 5. Double click Internet Protocol Version 4 (TCP/IPv4), or select it and then click Properties. Figure 3-22 6.
Select "Use the following IP address" and input a static IP address 192.168.0.X (1 TL-WPS510U Pocket-Sized Wireless N Print Server 5. Double click Internet Protocol Version 4 (TCP/IPv4), or select it and then click Properties. Figure 3-22 6.
User Guide
Page 27
...web-browser and type in the IP address of the print server (the default is successful, you will appear, with which you can configure all print server settings. 20 Once the connection is 192.168.0.10) in the address field of the print server. Then the print server web management page will see the...shown in lower case letters for the User Name and admin for the Password. Figure 3-25 9. Enter admin in Figure 3-25. TL-WPS510U Pocket-Sized Wireless N Print Server 8. After a moment, a login window will appear, similar to the web management of the browser to login to the Figure 3-...
...web-browser and type in the IP address of the print server (the default is successful, you will appear, with which you can configure all print server settings. 20 Once the connection is 192.168.0.10) in the address field of the print server. Then the print server web management page will see the...shown in lower case letters for the User Name and admin for the Password. Figure 3-25 9. Enter admin in Figure 3-25. TL-WPS510U Pocket-Sized Wireless N Print Server 8. After a moment, a login window will appear, similar to the web management of the browser to login to the Figure 3-...
User Guide
Page 28
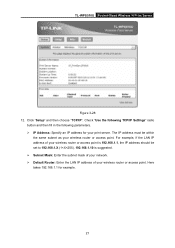
For example, if the LAN IP address of your wireless router or access point is 192.168.1.1, the IP address should be within the same subnet as your print server. TL-WPS510U Pocket-Sized Wireless N Print Server Figure 3-28 12. Check "Use the following TCP/IP Settings" radio button and then fill in the following parameters. ¾ IP Address: Specify an IP address for your wireless router or access point. The IP address must be set to 192.168.1.X (1 Click "Setup" and then choose "TCP/IP".
For example, if the LAN IP address of your wireless router or access point is 192.168.1.1, the IP address should be within the same subnet as your print server. TL-WPS510U Pocket-Sized Wireless N Print Server Figure 3-28 12. Check "Use the following TCP/IP Settings" radio button and then fill in the following parameters. ¾ IP Address: Specify an IP address for your wireless router or access point. The IP address must be set to 192.168.1.X (1 Click "Setup" and then choose "TCP/IP".
User Guide
Page 30
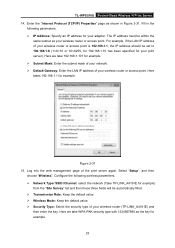
TL-WPS510U Pocket-Sized Wireless N Print Server 14. For example, if the LAN IP address of your wireless router or access point is 192.168.1.1, the IP address should be within the same subnet as shown in the following parameters. ¾ IP Address: Specify an IP address for your wireless router or access point. The IP address must be set to 192.168.1.X (1 Fill in Figure 3-31. Enter the "Internet Protocol (TCP/IP) Properties" page as your adapter.
TL-WPS510U Pocket-Sized Wireless N Print Server 14. For example, if the LAN IP address of your wireless router or access point is 192.168.1.1, the IP address should be within the same subnet as shown in the following parameters. ¾ IP Address: Specify an IP address for your wireless router or access point. The IP address must be set to 192.168.1.X (1 Fill in Figure 3-31. Enter the "Internet Protocol (TCP/IP) Properties" page as your adapter.
User Guide
Page 37
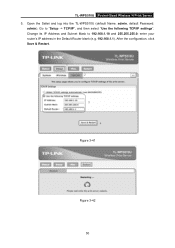
enter your router's IP address in the Default Router blank (e.g. 192.168.1.1). Go to 192.168.1.10 and 255.255.255.0; TL-WPS510U Pocket-Sized Wireless N Print Server 5. After the configuration, click Save & Restart. 1 2 3 4 Figure 3-41 Figure 3-42 30 Change its IP Address and Subnet Mask to "Setup -> TCP/IP", and then select "Use the following TCP/IP settings". Open the Safari and log into the TL-WPS510U (default Name: admin, default Password: admin).
enter your router's IP address in the Default Router blank (e.g. 192.168.1.1). Go to 192.168.1.10 and 255.255.255.0; TL-WPS510U Pocket-Sized Wireless N Print Server 5. After the configuration, click Save & Restart. 1 2 3 4 Figure 3-41 Figure 3-42 30 Change its IP Address and Subnet Mask to "Setup -> TCP/IP", and then select "Use the following TCP/IP settings". Open the Safari and log into the TL-WPS510U (default Name: admin, default Password: admin).
User Guide
Page 38
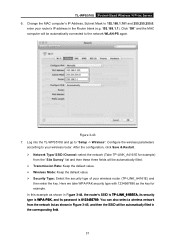
...the configuration, click Save & Restart. ¾ Network Type/ SSID /Channel: select the network (Take TP-LINK_A4161E for example. enter your wireless router. Log into the TL-WPS510U and go to 192.168.1.101 and 255.255.255.0; Click "OK" and the MAC computer will ...default value. ¾ Security Type: Select the security type of your wireless router (TP-LINK_A4161E) and then enter the key. Change the MAC computer's IP Address, Subnet Mask to "Setup -> Wireless". Configure the wireless parameters according to the network WLAN-PS again. TL-WPS510U Pocket-Sized Wireless N Print Server...
...the configuration, click Save & Restart. ¾ Network Type/ SSID /Channel: select the network (Take TP-LINK_A4161E for example. enter your wireless router. Log into the TL-WPS510U and go to 192.168.1.101 and 255.255.255.0; Click "OK" and the MAC computer will ...default value. ¾ Security Type: Select the security type of your wireless router (TP-LINK_A4161E) and then enter the key. Change the MAC computer's IP Address, Subnet Mask to "Setup -> Wireless". Configure the wireless parameters according to the network WLAN-PS again. TL-WPS510U Pocket-Sized Wireless N Print Server...
User Guide
Page 46
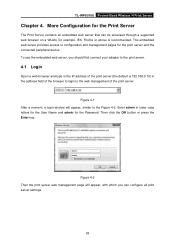
... your adapter to the web management of the print server (the default is recommended. The embedded web server provides access to the Figure 4-2. Figure 4-2 Then the print server web management page will appear, similar to configuration and management pages for the print server and the connected peripheral device. TL-WPS510U Pocket-Sized Wireless N Print Server Chapter 4. Then click the OK button or...
... your adapter to the web management of the print server (the default is recommended. The embedded web server provides access to the Figure 4-2. Figure 4-2 Then the print server web management page will appear, similar to configuration and management pages for the print server and the connected peripheral device. TL-WPS510U Pocket-Sized Wireless N Print Server Chapter 4. Then click the OK button or...
User Guide
Page 51
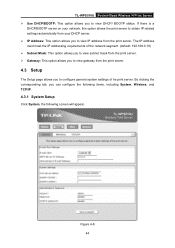
...settings of the network segment. (default: 192.168.0.10) ¾ Subnet Mask: This option allows you to view subnet mask from the print server. ¾ Gateway: This option allows you to view gateway from the print server. 4.3 Setup The Setup page allows...IP address must meet the IP addressing requirements of he print server. If there is a DHCP/BOOTP server on your network, this option allows the print server to obtain IP-related settings automatically from your DHCP server. ¾ IP Address: This option allows you to view DHCP/ BOOTP status. TL-WPS510U Pocket-Sized Wireless N Print Server...
...settings of the network segment. (default: 192.168.0.10) ¾ Subnet Mask: This option allows you to view subnet mask from the print server. ¾ Gateway: This option allows you to view gateway from the print server. 4.3 Setup The Setup page allows...IP address must meet the IP addressing requirements of he print server. If there is a DHCP/BOOTP server on your network, this option allows the print server to obtain IP-related settings automatically from your DHCP server. ¾ IP Address: This option allows you to view DHCP/ BOOTP status. TL-WPS510U Pocket-Sized Wireless N Print Server...

User Guide
Page 52
To correct the print server's device name. ¾ Password: This option allows you to input device name of the print server. Factory default is admin. (default user name is admin, it's not available to change password of the print server. TL-WPS510U Pocket-Sized Wireless N Print Server ¾ E-mail Alert: This option allows you to receive alert of the device. ¾ SMTP Server IP Address: Enter the IP Address of the SMTP Server. ¾ Administrator E-mail Address: Enter the e-mail address used to receive alert. ¾ Print Server Name: This option allows you to change ) 45
To correct the print server's device name. ¾ Password: This option allows you to input device name of the print server. Factory default is admin. (default user name is admin, it's not available to change password of the print server. TL-WPS510U Pocket-Sized Wireless N Print Server ¾ E-mail Alert: This option allows you to receive alert of the device. ¾ SMTP Server IP Address: Enter the IP Address of the SMTP Server. ¾ Administrator E-mail Address: Enter the e-mail address used to receive alert. ¾ Print Server Name: This option allows you to change ) 45
User Guide
Page 54
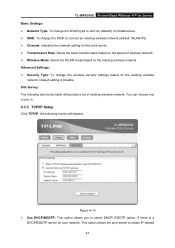
... your network. Figure 4-10 ¾ Use DHCP/BOOTP: This option allows you to obtain IP-related 47 If there is Disable. TL-WPS510U Pocket-Sized Wireless N Print Server Basic Settings: ¾ Network Type: To change the WLAN type to Ad-Hoc (default) or Infrastructure. ¾ SSID: To change the SSID to connect an existing wireless network...
... your network. Figure 4-10 ¾ Use DHCP/BOOTP: This option allows you to obtain IP-related 47 If there is Disable. TL-WPS510U Pocket-Sized Wireless N Print Server Basic Settings: ¾ Network Type: To change the WLAN type to Ad-Hoc (default) or Infrastructure. ¾ SSID: To change the SSID to connect an existing wireless network...
User Guide
Page 55
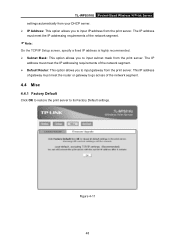
... gateway from the print server. TL-WPS510U Pocket-Sized Wireless N Print Server settings automatically from your DHCP server. ¾ IP Address: This option allows you to input IP address from the print server. The IP address must meet the IP addressing requirements of the network segment. 4.4 Misc 4.4.1 Factory Default Click OK to restore the print server to input subnet mask from the print server. This IP address of gateway...
... gateway from the print server. TL-WPS510U Pocket-Sized Wireless N Print Server settings automatically from your DHCP server. ¾ IP Address: This option allows you to input IP address from the print server. The IP address must meet the IP addressing requirements of the network segment. 4.4 Misc 4.4.1 Factory Default Click OK to restore the print server to input subnet mask from the print server. This IP address of gateway...


