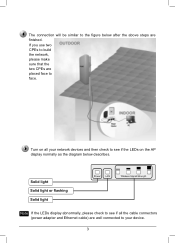
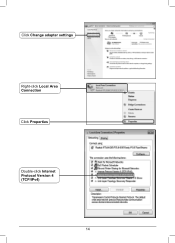
TP Link TL WA5210G Adapter

View Results Below
Free TP-Link TL-WA5210G manuals!
Problems with TP-Link TL-WA5210G?
Ask a Question
Free TP-Link TL-WA5210G manuals!
Problems with TP-Link TL-WA5210G?
Ask a Question
Related Manual Pages

Similar Questions

Tp-link Usb Adapter T9uh Versions
Hello, could you tell me the difference between V1 and V2 versions of this TP-Link T9UH USB Wi-Fi ad...
Hello, could you tell me the difference between V1 and V2 versions of this TP-Link T9UH USB Wi-Fi ad...
(Posted by gamers123 3 years ago)
Wireless Adapter Problem. From Curtis
i purchase a wireless n usb adapter. tl-WN821N. I can not get it work. it is saying acquiring networ...
i purchase a wireless n usb adapter. tl-WN821N. I can not get it work. it is saying acquiring networ...
(Posted by Anonymous-38854 12 years ago)

How To Use Tp Link Adapter To My Laptop Connect In Broadban 100mbps
how to use TP link adapter to my laptop connect in broadban 100mbps
how to use TP link adapter to my laptop connect in broadban 100mbps
(Posted by loisaflores08 13 years ago)