
TL-WA5210G V1 QIG 7106503701
Page 5
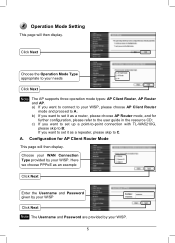
...provided by your WISP, please choose AP Client Route2r mode and proceed to AǗ b) If you want to set up a point-to-point connection with TL-WA5210G, please skip to C. If you want to set it as a router, please choose AP Router mode, and for AP Client Router Mode This page will then display... Type provided by your needs Click Next Note The AP supports three operation mode types: AP Client Router, AP Router and AP. Operation Mode Setting This page will then display. Click Next Choose the Operation Mode Type appropriate to the user guide in the resource CD;
...provided by your WISP, please choose AP Client Route2r mode and proceed to AǗ b) If you want to set up a point-to-point connection with TL-WA5210G, please skip to C. If you want to set it as a router, please choose AP Router mode, and for AP Client Router Mode This page will then display... Type provided by your needs Click Next Note The AP supports three operation mode types: AP Client Router, AP Router and AP. Operation Mode Setting This page will then display. Click Next Choose the Operation Mode Type appropriate to the user guide in the resource CD;
TL-WA5210G V1 QIG 7106503701
Page 6
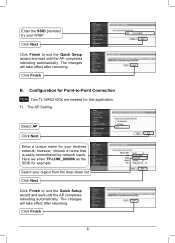
The changes will take effect after rebooting. Here we enter TP-LINK_900008 as the SSID for your wireless network; however, choose a name that is easily remembered by your region from the drop-down list Click Next ... rebooting automatically. The changes will take effect after rebooting. Click Finish 6 Click Finish B. Configuration for Point-to-Point Connection Note Two TL-WA5210Gs are needed for this application. 1) The AP Setting Select AP Click Next Enter a unique name for example Select your WISP Click Next Click Finish to exit the Quick Setup wizard...
The changes will take effect after rebooting. Here we enter TP-LINK_900008 as the SSID for your wireless network; however, choose a name that is easily remembered by your region from the drop-down list Click Next ... rebooting automatically. The changes will take effect after rebooting. Click Finish 6 Click Finish B. Configuration for Point-to-Point Connection Note Two TL-WA5210Gs are needed for this application. 1) The AP Setting Select AP Click Next Enter a unique name for example Select your WISP Click Next Click Finish to exit the Quick Setup wizard...
TL-WA5210G V1 QIG 7106503701
Page 7
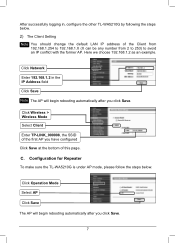
... Network Enter 192.168.1.2 in , configure the other TL-WA5210G by following the steps below . Click Operation Mode Select AP Click Save The AP will begin rebooting automatically after you click Save. 7 Click Wireless > Wireless Mode Select Client Enter TP-LINK_900008, the SSID of the first AP you have ... field Click Save Note The AP will begin rebooting automatically after you click Save. C. Configuration for Repeater To make sure the TL-WA5210G is under AP mode, please follow the steps below . 2) The Client Setting Note You should change the default LAN IP address of this page.
... Network Enter 192.168.1.2 in , configure the other TL-WA5210G by following the steps below . Click Operation Mode Select AP Click Save The AP will begin rebooting automatically after you click Save. 7 Click Wireless > Wireless Mode Select Client Enter TP-LINK_900008, the SSID of the first AP you have ... field Click Save Note The AP will begin rebooting automatically after you click Save. C. Configuration for Repeater To make sure the TL-WA5210G is under AP mode, please follow the steps below . 2) The Client Setting Note You should change the default LAN IP address of this page.
TL-WA5210G V1 QIG 7106503701
Page 10
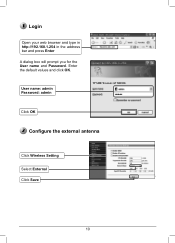
User name: admin Password: admin Click OK Configure the external antenna Click Wireless Setting Select External Click Save ' 10 Login Open your web browser and type in http://192.168.1.254 in the address bar and press Enter A dialog box will prompt you for the User name and Password. Enter the default values and click OK.
User name: admin Password: admin Click OK Configure the external antenna Click Wireless Setting Select External Click Save ' 10 Login Open your web browser and type in http://192.168.1.254 in the address bar and press Enter A dialog box will prompt you for the User name and Password. Enter the default values and click OK.
TL-WA5210G V1 QIG 7106503701
Page 11
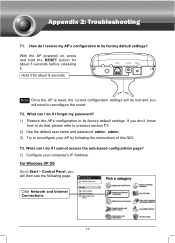
... configuration to Start > Control Panel, you will then see the following the instructions of this QIG. For Windows XP OS Go to its factory default settings? With the AP powered on, press and hold the RESET button for about 8 seconds before releasing it for about 8 seconds Note Once the AP ...is reset, the current configuration settings will be lost and you will need to reconfigure your computer's IP Address. How do that, please refer to previous section T1; 2) Use the ...
... configuration to Start > Control Panel, you will then see the following the instructions of this QIG. For Windows XP OS Go to its factory default settings? With the AP powered on, press and hold the RESET button for about 8 seconds before releasing it for about 8 seconds Note Once the AP ...is reset, the current configuration settings will be lost and you will need to reconfigure your computer's IP Address. How do that, please refer to previous section T1; 2) Use the ...
TL-WA5210G V1 QIG 7106503701
Page 13
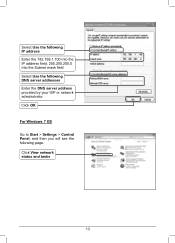
Select Use the following IP address Enter the 192.168.1.100 into the IP address field, 255.255.255.0 into the Subnet mask field Select Use the following DNS server addresses Enter the DNS server address provided by your ISP or network administrator Click OK For Windows 7 OS Go to Start > Settings > Control Panel, and then you will see the following page. Click View network status and tasks 13
Select Use the following IP address Enter the 192.168.1.100 into the IP address field, 255.255.255.0 into the Subnet mask field Select Use the following DNS server addresses Enter the DNS server address provided by your ISP or network administrator Click OK For Windows 7 OS Go to Start > Settings > Control Panel, and then you will see the following page. Click View network status and tasks 13
TL-WA5210G V1 QIG 7106503701
Page 14
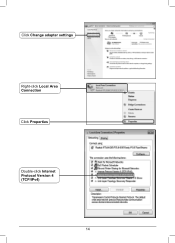
Click Change adapter settings Right-click Local Area Connection Click Properties Double-click Internet Protocol Version 4 (TCP/IPv4) 14
Click Change adapter settings Right-click Local Area Connection Click Properties Double-click Internet Protocol Version 4 (TCP/IPv4) 14


