
User Guide
Page 3
... must not be required to 10 Military Radiolocation use limited to take adequate measures. This device and its antenna must be installed to only Mobile Configurations.
... must not be required to 10 Military Radiolocation use limited to take adequate measures. This device and its antenna must be installed to only Mobile Configurations.
User Guide
Page 5
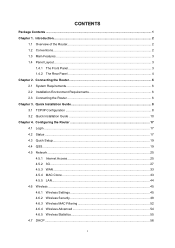
Configuring the Router 17 4.1 Login ...17 4.2 Status ...17 4.3 Quick Setup...19 4.4 QSS...19 4.5 Network ...25 4.5.1 Internet Access 25 4.5.2 3G...27...45 4.6.1 Wireless Settings 45 4.6.2 Wireless Security 48 4.6.3 Wireless MAC Filtering 52 4.6.4 Wireless Advanced 54 4.6.5 Wireless Statistics 55 4.7 DHCP ...56 I Quick Installation Guide 8 3.1 TCP/IP Configuration 8 3.2 Quick Installation Guide 10 Chapter 4. Connecting the Router 6 2.1 System Requirements 6 2.2 Installation Environment Requirements 6 2.3 Connecting the Router 6 Chapter 3. Introduction...2 1.1 Overview of the ...
Configuring the Router 17 4.1 Login ...17 4.2 Status ...17 4.3 Quick Setup...19 4.4 QSS...19 4.5 Network ...25 4.5.1 Internet Access 25 4.5.2 3G...27...45 4.6.1 Wireless Settings 45 4.6.2 Wireless Security 48 4.6.3 Wireless MAC Filtering 52 4.6.4 Wireless Advanced 54 4.6.5 Wireless Statistics 55 4.7 DHCP ...56 I Quick Installation Guide 8 3.1 TCP/IP Configuration 8 3.2 Quick Installation Guide 10 Chapter 4. Connecting the Router 6 2.1 System Requirements 6 2.2 Installation Environment Requirements 6 2.3 Connecting the Router 6 Chapter 3. Introduction...2 1.1 Overview of the ...
User Guide
Page 7
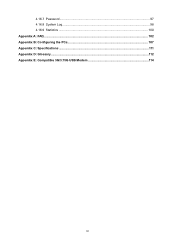
4.16.7 Password...97 4.16.8 System Log...98 4.16.9 Statistics ...100 Appendix A: FAQ ...102 Appendix B: Configuring the PCs 107 Appendix C: Specifications ...111 Appendix D: Glossary...112 Appendix E: Compatible 3G/3.75G USB Modem 114 III
4.16.7 Password...97 4.16.8 System Log...98 4.16.9 Statistics ...100 Appendix A: FAQ ...102 Appendix B: Configuring the PCs 107 Appendix C: Specifications ...111 Appendix D: Glossary...112 Appendix E: Compatible 3G/3.75G USB Modem 114 III
User Guide
Page 15
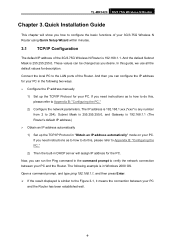
.... If you need instructions as you how to Appendix B: "Configuring the PC." 2) Then the built-in Windows 2000 OS. Now, you can run the Ping command in "Obtain an IP address automatically" mode on your PC. TL-MR3420 3G/3.75G Wireless N Router Chapter 3. And the default Subnet ...Mask is similar to verify the network connection between your PC and the Router. Quick Installation Guide This chapter will assign IP address for the PC. And then you can configure the IP address ...
.... If you need instructions as you how to Appendix B: "Configuring the PC." 2) Then the built-in Windows 2000 OS. Now, you can run the Ping command in "Obtain an IP address automatically" mode on your PC. TL-MR3420 3G/3.75G Wireless N Router Chapter 3. And the default Subnet ...Mask is similar to verify the network connection between your PC and the Router. Quick Installation Guide This chapter will assign IP address for the PC. And then you can configure the IP address ...
User Guide
Page 17
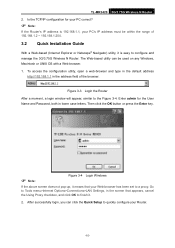
TL-MR3420 3G/3.75G Wireless N Router 2. The Web-based utility can click the Quick Setup to a proxy. ...appear, similar to finish it is 192.168.1.1, your PC correct? ) Note: If the Router's IP address is easy to configure and manage the 3G/3.75G Wireless N Router. Enter admin for your PC's IP address must be used on any Windows, Macintosh... or UNIX OS with a Web browser. 1. To access the configuration utility, open a web-browser and type in the default address http://192.168.1.1 in the address field of 192.168.1.2 ~ 192...
TL-MR3420 3G/3.75G Wireless N Router 2. The Web-based utility can click the Quick Setup to a proxy. ...appear, similar to finish it is 192.168.1.1, your PC correct? ) Note: If the Router's IP address is easy to configure and manage the 3G/3.75G Wireless N Router. Enter admin for your PC's IP address must be used on any Windows, Macintosh... or UNIX OS with a Web browser. 1. To access the configuration utility, open a web-browser and type in the default address http://192.168.1.1 in the address field of 192.168.1.2 ~ 192...
User Guide
Page 18
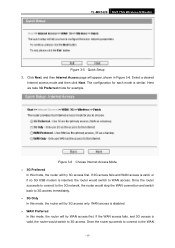
... access mode and then click Next. Figure 3-6 Choose Internet Access Mode ¾ 3G Preferred In this mode, the router will try 3G access first. The configuration for example. TL-MR3420 3G/3.75G Wireless N Router Figure 3-5 Quick Setup 3.
... access mode and then click Next. Figure 3-6 Choose Internet Access Mode ¾ 3G Preferred In this mode, the router will try 3G access first. The configuration for example. TL-MR3420 3G/3.75G Wireless N Router Figure 3-5 Quick Setup 3.
User Guide
Page 19
... ISP, check the box before detection. Make sure the cable is checked. ¾ Username & Password - After finishing the configuration on this mode, the router will automatically detect the connection type your ISP. TL-MR3420 3G/3.75G Wireless N Router network, the router would stop the 3G connection and switch back to WAN access immediately...
... ISP, check the box before detection. Make sure the cable is checked. ¾ Username & Password - After finishing the configuration on this mode, the router will automatically detect the connection type your ISP. TL-MR3420 3G/3.75G Wireless N Router network, the router would stop the 3G connection and switch back to WAN access immediately...

User Guide
Page 20
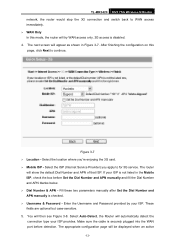
... Name and Password provided by the Router. Figure 3-9 Quick Setup - TL-MR3420 3G/3.75G Wireless N Router Internet service is PPPoE, the next screen will appear as shown in Figure 3-9. These fields are case sensitive. Then you have difficulty with the wireless configuration. ¾ If the connection type detected is Dynamic IP, the next...
... Name and Password provided by the Router. Figure 3-9 Quick Setup - TL-MR3420 3G/3.75G Wireless N Router Internet service is PPPoE, the next screen will appear as shown in Figure 3-9. These fields are case sensitive. Then you have difficulty with the wireless configuration. ¾ If the connection type detected is Dynamic IP, the next...

User Guide
Page 22
... stations will see the Finish page. PSK Password - You can adjust the channel width for your clients automatically. ¾ Max Tx Rate - TL-MR3420 3G/3.75G Wireless N Router indicates the last unique six numbers of any letters A to Z, the length should be able to connect the Router without... all related wireless security settings. You will not change the wireless channel unless you choose one of those specified in this option, wireless security configuration will then see the Finish page as test. ¾ Region - If you chose this field. It may be a good idea to write...
... stations will see the Finish page. PSK Password - You can adjust the channel width for your clients automatically. ¾ Max Tx Rate - TL-MR3420 3G/3.75G Wireless N Router indicates the last unique six numbers of any letters A to Z, the length should be able to connect the Router without... all related wireless security settings. You will not change the wireless channel unless you choose one of those specified in this option, wireless security configuration will then see the Finish page as test. ¾ Region - If you chose this field. It may be a good idea to write...
User Guide
Page 23
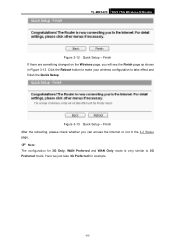
Figure 3-13 Quick Setup - Finish After the rebooting, please check whether you will see the Finish page as shown in the 4.2 Status page. ) Note: The configuration for example. -16- Finish If there are something changed on the Wireless page, you can access the Internet or not in Figure 3-13. Click the Reboot button to make your wireless configuration to 3G Preferred mode. TL-MR3420 3G/3.75G Wireless N Router Figure 3-12 Quick Setup - Here we just take 3G Preferred for 3G Only, WAN Preferred and WAN Only mode is very similar to take effect and finish the Quick Setup.
Figure 3-13 Quick Setup - Finish After the rebooting, please check whether you will see the Finish page as shown in the 4.2 Status page. ) Note: The configuration for example. -16- Finish If there are something changed on the Wireless page, you can access the Internet or not in Figure 3-13. Click the Reboot button to make your wireless configuration to 3G Preferred mode. TL-MR3420 3G/3.75G Wireless N Router Figure 3-12 Quick Setup - Here we just take 3G Preferred for 3G Only, WAN Preferred and WAN Only mode is very similar to take effect and finish the Quick Setup.

User Guide
Page 24
TL-MR3420 3G/3.75G Wireless N Router Chapter 4. All information is read-only. -17- Configuring the Router This chapter will show each Web page's key function are the corresponding explanations and instructions. The detailed explanations for each Web page's key functions and the configuration way. 4.1 Login After your successful login, you will see the fifteen main menus on the left of the Web-based utility. On the right, there are listed below. 4.2 Status The Status page provides the current status information about the Router.
TL-MR3420 3G/3.75G Wireless N Router Chapter 4. All information is read-only. -17- Configuring the Router This chapter will show each Web page's key function are the corresponding explanations and instructions. The detailed explanations for each Web page's key functions and the configuration way. 4.1 Login After your successful login, you will see the fifteen main menus on the left of the Web-based utility. On the right, there are listed below. 4.2 Status The Status page provides the current status information about the Router.
User Guide
Page 26
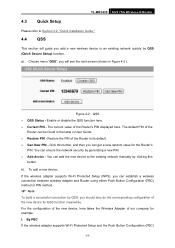
...add a new device: If the wireless adapter supports Wi-Fi Protected Setup (WPS), you can be found in Figure 4-2 ). For the configuration of the new device, here takes the Wireless Adapter of the Router can get a new random value for example. You can establish a ...between wireless adapter and Router using either Push Button Configuration (PBC) method or PIN method. ) Note: To build a successful connection by clicking this button, and then you can ensure the network security by QSS (Quick Secure Setup) function. TL-MR3420 3G/3.75G Wireless N Router 4.3 Quick Setup Please...
...add a new device: If the wireless adapter supports Wi-Fi Protected Setup (WPS), you can be found in Figure 4-2 ). For the configuration of the new device, here takes the Wireless Adapter of the Router can get a new random value for example. You can establish a ...between wireless adapter and Router using either Push Button Configuration (PBC) method or PIN method. ) Note: To build a successful connection by clicking this button, and then you can ensure the network security by QSS (Quick Secure Setup) function. TL-MR3420 3G/3.75G Wireless N Router 4.3 Quick Setup Please...

User Guide
Page 27
... 1: Press the QSS button on my access point in the configuration utility of the adapter directly for a while until the next screen appears. Step 2: For the configuration of the wireless adapter, please choose Push the button on the front panel of the Router. TL-MR3420 3G/3.75G Wireless N Router method, you can add it...
... 1: Press the QSS button on my access point in the configuration utility of the adapter directly for a while until the next screen appears. Step 2: For the configuration of the wireless adapter, please choose Push the button on the front panel of the Router. TL-MR3420 3G/3.75G Wireless N Router method, you can add it...
User Guide
Page 28
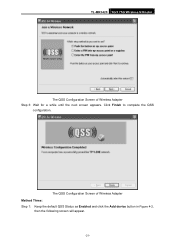
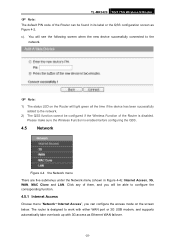
The QSS Configuration Screen of Wireless Adapter Step 3: Wait for a while until the next screen appears. TL-MR3420 3G/3.75G Wireless N Router The QSS Configuration Screen of Wireless Adapter Method Three: Step 1: Keep the default QSS Status as Enabled and click the Add device button in Figure 4-2, then the following screen will appear. -21- Click Finish to complete the QSS configuration.
The QSS Configuration Screen of Wireless Adapter Step 3: Wait for a while until the next screen appears. TL-MR3420 3G/3.75G Wireless N Router The QSS Configuration Screen of Wireless Adapter Method Three: Step 1: Keep the default QSS Status as Enabled and click the Add device button in Figure 4-2, then the following screen will appear. -21- Click Finish to complete the QSS configuration.
User Guide
Page 29
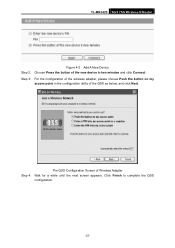
TL-MR3420 3G/3.75G Wireless N Router Figure 4-3 Add A New Device Step 2: Choose Press the button of the QSS as below, and click Next. Step 3: For the configuration of the wireless adapter, please choose Push the button on my access point in the configuration utility of the new device in two minutes and click Connect. Step 4: The QSS Configuration Screen of Wireless Adapter Wait for a while until the next screen appears. Click Finish to complete the QSS configuration. -22-
TL-MR3420 3G/3.75G Wireless N Router Figure 4-3 Add A New Device Step 2: Choose Press the button of the QSS as below, and click Next. Step 3: For the configuration of the wireless adapter, please choose Push the button on my access point in the configuration utility of the new device in two minutes and click Connect. Step 4: The QSS Configuration Screen of Wireless Adapter Wait for a while until the next screen appears. Click Finish to complete the QSS configuration. -22-
User Guide
Page 30
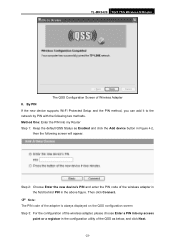
... 4-2, then the following two methods. Then click Connect. ) Note: The PIN code of the adapter is always displayed on the QSS configuration screen Step 3: For the configuration of the wireless adapter, please choose Enter a PIN into my Router Step 1: Keep the default QSS Status as Enabled and click the... Add device button in the configuration utility of the QSS as below, and click Next. -23- Step 2: Choose Enter the new device's PIN and enter the PIN code of Wireless Adapter II. TL-MR3420 3G/3.75G Wireless N Router The QSS Configuration Screen of the wireless adapter in the ...
... 4-2, then the following two methods. Then click Connect. ) Note: The PIN code of the adapter is always displayed on the QSS configuration screen Step 3: For the configuration of the wireless adapter, please choose Enter a PIN into my Router Step 1: Keep the default QSS Status as Enabled and click the... Add device button in the configuration utility of the QSS as below, and click Next. -23- Step 2: Choose Enter the new device's PIN and enter the PIN code of Wireless Adapter II. TL-MR3420 3G/3.75G Wireless N Router The QSS Configuration Screen of the wireless adapter in the ...

User Guide
Page 31
...please choose Enter a PIN from my Router Step 1: Get the Current PIN code of the Router in the configuration utility of the QSS as the above figure shown. TL-MR3420 3G/3.75G Wireless N Router The QSS Configuration Screen of Wireless Adapter ) Note: In this example, the default PIN code of this Router for example... my access point in Figure 4-2 (each Router has its unique PIN code. Here takes the PIN code 12345670 of Wireless Adapter -24- The QSS Configuration Screen of this adapter is 16952898 as below, and enter the PIN code of the Router into the field behind Access Point PIN.
...please choose Enter a PIN from my Router Step 1: Get the Current PIN code of the Router in the configuration utility of the QSS as the above figure shown. TL-MR3420 3G/3.75G Wireless N Router The QSS Configuration Screen of Wireless Adapter ) Note: In this example, the default PIN code of this Router for example... my access point in Figure 4-2 (each Router has its unique PIN code. Here takes the PIN code 12345670 of Wireless Adapter -24- The QSS Configuration Screen of this adapter is 16952898 as below, and enter the PIN code of the Router into the field behind Access Point PIN.
User Guide
Page 32
... Click any of them, and you will be able to configure the corresponding function. 4.5.1 Internet Access Choose menu "Network→Internet Access", you can be configured if the Wireless Function of the Router can configure the access mode on the Router will see the following screen...c). Please make sure the Wireless Function is enabled before configuring the QSS. 4.5 Network Figure 4-4 the Network menu There are five submenus under the Network menu (shown in its label or the QSS configuration screen as Ethernet WAN failover. -25- TL-MR3420 3G/3.75G Wireless N Router ) Note: The default ...
... Click any of them, and you will be able to configure the corresponding function. 4.5.1 Internet Access Choose menu "Network→Internet Access", you can be configured if the Wireless Function of the Router can configure the access mode on the Router will see the following screen...c). Please make sure the Wireless Function is enabled before configuring the QSS. 4.5 Network Figure 4-4 the Network menu There are five submenus under the Network menu (shown in its label or the QSS configuration screen as Ethernet WAN failover. -25- TL-MR3420 3G/3.75G Wireless N Router ) Note: The default ...
User Guide
Page 34
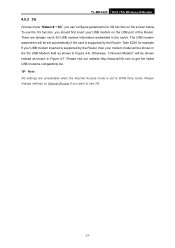
... the router. Please visit our website http://www.tp-link.com to get the latest USB modems compatibility list. ) Note: 3G settings are already much 3G USB modem information embedded in Figure 4-7. TL-MR3420 3G/3.75G Wireless N Router 4.5.2 3G Choose menu "Network→3G", you can configure parameters for example. Please change settings on the...
... the router. Please visit our website http://www.tp-link.com to get the latest USB modems compatibility list. ) Note: 3G settings are already much 3G USB modem information embedded in Figure 4-7. TL-MR3420 3G/3.75G Wireless N Router 4.5.2 3G Choose menu "Network→3G", you can configure parameters for example. Please change settings on the...

User Guide
Page 38
You can configure the Router to activate Connect on Demand - Otherwise, enter the number of minutes you want to have the Internet connecting last unless a new link requested. ) Note: Sometimes the connection cannot be able to re-establish your connection automatically as soon as... option, click the radio button. Otherwise, enter the number in minutes that you specify a time to make it connect or disconnect manually. TL-MR3420 3G/3.75G Wireless N Router Figure 4-9 ¾ Connect on Demand, click the radio button. Connect automatically after a specified period of inactivity ...
You can configure the Router to activate Connect on Demand - Otherwise, enter the number of minutes you want to have the Internet connecting last unless a new link requested. ) Note: Sometimes the connection cannot be able to re-establish your connection automatically as soon as... option, click the radio button. Otherwise, enter the number in minutes that you specify a time to make it connect or disconnect manually. TL-MR3420 3G/3.75G Wireless N Router Figure 4-9 ¾ Connect on Demand, click the radio button. Connect automatically after a specified period of inactivity ...


