RE300US V1 User Guide
Page 2
... 3: Via the WPS Button 12 Chapter 3. How to Manage the Extender 23 4. 3. 2.Remove TP-Link ID(s) from OneMesh Network 18 3. 3. 1.Method 1: Via the TP-Link Tether App 18 3. 3. 2.Method 2: Via a Web Browser 18 Chapter 4. Remove Extender from Managing the Extender 23 4. 4. Manage the User TP-Link IDs 22 4. 3. 1.Add TP-Link ID to Set Up a OneMesh Network 16 3. 2. 1.Method 1: Via the...
... 3: Via the WPS Button 12 Chapter 3. How to Manage the Extender 23 4. 3. 2.Remove TP-Link ID(s) from OneMesh Network 18 3. 3. 1.Method 1: Via the TP-Link Tether App 18 3. 3. 2.Method 2: Via a Web Browser 18 Chapter 4. Remove Extender from Managing the Extender 23 4. 4. Manage the User TP-Link IDs 22 4. 3. 1.Add TP-Link ID to Set Up a OneMesh Network 16 3. 2. 1.Method 1: Via the...
RE300US V1 User Guide
Page 3
Set System Time 34 6. 2. Backup and Restore Configuration Settings 37 6. 6. Upgrade the Firmware 36 6. 5. 5. 6. Manage Your Extender 33 6. 1. Check System Log 39 FAQ 40 Set High Speed Mode 32 Chapter 6. Change Login Password 38 6. 7. Control LEDs 34 6. 3. Set Power Schedule 35 6. 4.
Set System Time 34 6. 2. Backup and Restore Configuration Settings 37 6. 6. Upgrade the Firmware 36 6. 5. 5. 6. Manage Your Extender 33 6. 1. Check System Log 39 FAQ 40 Set High Speed Mode 32 Chapter 6. Change Login Password 38 6. 7. Control LEDs 34 6. 3. Set Power Schedule 35 6. 4.
RE300US V1 User Guide
Page 4
... conditions, including local interference, volume and density of the extender. Actual wireless data throughput and wireless coverage are available from IEEE Standard 802.11 specifications. Our Technical Support contact information can click to redirect to discuss our products at https://www.tp-link.com. You can be emphasized and texts on the web...
... conditions, including local interference, volume and density of the extender. Actual wireless data throughput and wireless coverage are available from IEEE Standard 802.11 specifications. Our Technical Support contact information can click to redirect to discuss our products at https://www.tp-link.com. You can be emphasized and texts on the web...

RE300US V1 User Guide
Page 5
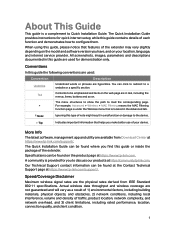
It contains the following sections: • Product Overview • Appearance Chapter 1 Get to Know About Your Extender This chapter introduces what the extender can do and its appearance.
It contains the following sections: • Product Overview • Appearance Chapter 1 Get to Know About Your Extender This chapter introduces what the extender can do and its appearance.

RE300US V1 User Guide
Page 6
...dead zones"? Easy Installation & Quick Position The extender works with no further configuration required. The intelligent signal light can check the extender's working status by the extender's WPS button. Easy Management with the TP-Link Tether App Tether provides a simple, intuitive ...otherwise be reached. Product Overview Bring Dead Zones Back to Know About Your Extender 1. 1. Alternatively, follow the Quick Setup instructions on the extender's web management page. Appearance 1. 2. 1. The TP-Link extender is connected to a router, you can relocate it to your smart devices....
...dead zones"? Easy Installation & Quick Position The extender works with no further configuration required. The intelligent signal light can check the extender's working status by the extender's WPS button. Easy Management with the TP-Link Tether App Tether provides a simple, intuitive ...otherwise be reached. Product Overview Bring Dead Zones Back to Know About Your Extender 1. 1. Alternatively, follow the Quick Setup instructions on the extender's web management page. Appearance 1. 2. 1. The TP-Link extender is connected to a router, you can relocate it to your smart devices....

RE300US V1 User Guide
Page 7
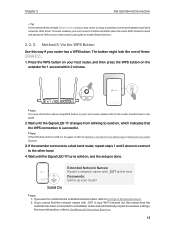
... it closer to your host router. Use a pin to press the button for 1 second. The extender is connected or not connected to the 5GHz wireless network of the extender should change from blinking to solid on, indicating successful WPS connection. Button Description Button (WPS) Reset ...) 2.4G 5G Status On/Off Blinking Solid white Solid red Blinking Off On/Off On/Off Indication The extender is on the extender for 1 second to reset the extender. 4 The extender is connected to the 2.4GHz wireless network of your host router. The LED of your router's wireless network...
... it closer to your host router. Use a pin to press the button for 1 second. The extender is connected or not connected to the 5GHz wireless network of the extender should change from blinking to solid on, indicating successful WPS connection. Button Description Button (WPS) Reset ...) 2.4G 5G Status On/Off Blinking Solid white Solid red Blinking Off On/Off On/Off Indication The extender is on the extender for 1 second to reset the extender. 4 The extender is connected to the 2.4GHz wireless network of your host router. The LED of your router's wireless network...

RE300US V1 User Guide
Page 8
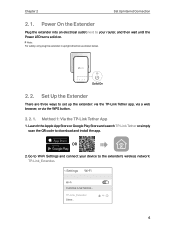
Please follow the step-by-step instructions to boost your host wireless coverage. It contains the following sections: • Power On the Extender • Set Up the Extender Chapter 2 Set Up Internet Connection This chapter introduces how to set up the internet connection.
Please follow the step-by-step instructions to boost your host wireless coverage. It contains the following sections: • Power On the Extender • Set Up the Extender Chapter 2 Set Up Internet Connection This chapter introduces how to set up the internet connection.
RE300US V1 User Guide
Page 9
... until the Power LED turns solid on. Method 1: Via the TP-Link Tether App 1. TP-Link_Extender Other... 6 Launch the Apple App Store or Google Play Store and search TP-Link Tether or simply scan the QR code to set up the extender: via the TP-Link Tether app, via a web browser, or via the WPS button.... 2. 2. 1. Chapter 2 Set Up Internet Connection 2. 1. Solid On 2. 2. Set Up the Extender There are three ways to ...
... until the Power LED turns solid on. Method 1: Via the TP-Link Tether App 1. TP-Link_Extender Other... 6 Launch the Apple App Store or Google Play Store and search TP-Link Tether or simply scan the QR code to set up the extender: via the TP-Link Tether app, via a web browser, or via the WPS button.... 2. 2. 1. Chapter 2 Set Up Internet Connection 2. 1. Solid On 2. 2. Set Up the Extender There are three ways to ...
RE300US V1 User Guide
Page 10
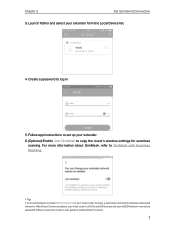
...is recommended to enjoy a seamless connection between dual-band networks. Launch Tether and select your host router to enable Smart Connect on your extender from the Local Device list. 4. Follow app instructions to set up your host router's user guide to copy the router's wireless ...settings for seamless roaming. Refer to your extender. 6. (Optional) Enable Join OneMesh to enable Smart Connect. 7 Create a password to OneMesh with Seamless Roaming. With Smart Connect enabled, your ...
...is recommended to enjoy a seamless connection between dual-band networks. Launch Tether and select your host router to enable Smart Connect on your extender from the Local Device list. 4. Follow app instructions to set up your host router's user guide to copy the router's wireless ...settings for seamless roaming. Refer to your extender. 6. (Optional) Enable Join OneMesh to enable Smart Connect. 7 Create a password to OneMesh with Seamless Roaming. With Smart Connect enabled, your ...
RE300US V1 User Guide
Page 11
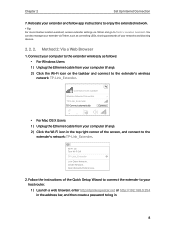
... cable from your networks and blocking devices. 2. 2. 2. Wi-Fi: On Turn Wi-Fi O TP-Link_Extender Join Other Network... Follow the instructions of the Quick Setup Wizard to connect the extender to your computer (if any ). 2 ) Click the Wi-Fi icon on the taskbar and connect... to the extender's wireless network: TP-Link_Extender. Tip: For more intuitive location assistant, access extender settings via Tether, such as follows: • For Windows Users 1 ) Unplug the Ethernet cable from your host router....
... cable from your networks and blocking devices. 2. 2. 2. Wi-Fi: On Turn Wi-Fi O TP-Link_Extender Join Other Network... Follow the instructions of the Quick Setup Wizard to connect the extender to your computer (if any ). 2 ) Click the Wi-Fi icon on the taskbar and connect... to the extender's wireless network: TP-Link_Extender. Tip: For more intuitive location assistant, access extender settings via Tether, such as follows: • For Windows Users 1 ) Unplug the Ethernet cable from your host router....

RE300US V1 User Guide
Page 13
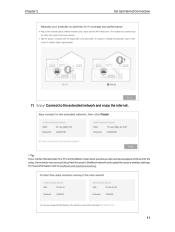
For more information, refer to OneMesh with Seamless Roaming. 6 ) Follow web instructions to a TP-Link OneMesh router, the extender will automatically join the router's OneMesh network and copy the router's wireless settings. Chapter 2 Set Up Internet Connection 5 ) Either keep the default SSIDs (network names) or customize them for optimal Wi-Fi coverage and performance, and then click Done. 10 Tip: If you connect the extender to relocate your extender for the extended networks, and then click Next.
For more information, refer to OneMesh with Seamless Roaming. 6 ) Follow web instructions to a TP-Link OneMesh router, the extender will automatically join the router's OneMesh network and copy the router's wireless settings. Chapter 2 Set Up Internet Connection 5 ) Either keep the default SSIDs (network names) or customize them for optimal Wi-Fi coverage and performance, and then click Done. 10 Tip: If you connect the extender to relocate your extender for the extended networks, and then click Next.
RE300US V1 User Guide
Page 14
For more information, refer to a TP-Link OneMesh router and a success screen as below appears at the end of the setup, the extender has successfully joined the router's OneMesh network and copied the router's wireless settings. Tip: If you connect the extender to OneMesh with Seamless Roaming. 11 Chapter 2 Set Up Internet Connection 7 ) Enjoy! Connect to the extended network and enjoy the internet.
For more information, refer to a TP-Link OneMesh router and a success screen as below appears at the end of the setup, the extender has successfully joined the router's OneMesh network and copied the router's wireless settings. Tip: If you connect the extender to OneMesh with Seamless Roaming. 11 Chapter 2 Set Up Internet Connection 7 ) Enjoy! Connect to the extended network and enjoy the internet.
RE300US V1 User Guide
Page 15
... information, refer to OneMesh with _EXT at the end Passwords: Same as your host router, please refer to Method 1: Via the TP-Link Tether App or Method 2: Via a Web Browser. 3. If the extender connects to a dual band router, repeat steps 1 and 2 above to connect to your host router's 2.4GHz and 5GHz share the...
... information, refer to OneMesh with _EXT at the end Passwords: Same as your host router, please refer to Method 1: Via the TP-Link Tether App or Method 2: Via a Web Browser. 3. If the extender connects to a dual band router, repeat steps 1 and 2 above to connect to your host router's 2.4GHz and 5GHz share the...

RE300US V1 User Guide
Page 16
...Router Halfway Devices Tip: To minimize signal interference, please choose a location which is recommended to enable Smart Connect. 5. Relocate your extender for about halfway between dual-band networks. Connect to achieve better signal quality. Chapter 2 Set Up Internet Connection 3. The location you... guide to enable Smart Connect on your router. 2 ) Wait for optimal Wi-Fi coverage and performance. 1 ) Plug in the extender about 2 minutes until the Signal LED turns solid white. Enjoy! It is far away from Bluetooth devices and other household electronic devices,...
...Router Halfway Devices Tip: To minimize signal interference, please choose a location which is recommended to enable Smart Connect. 5. Relocate your extender for about halfway between dual-band networks. Connect to achieve better signal quality. Chapter 2 Set Up Internet Connection 3. The location you... guide to enable Smart Connect on your router. 2 ) Wait for optimal Wi-Fi coverage and performance. 1 ) Plug in the extender about 2 minutes until the Signal LED turns solid white. Enjoy! It is far away from Bluetooth devices and other household electronic devices,...

RE300US V1 User Guide
Page 17
It contains the following sections: • What's a OneMesh Network • How to Set Up a OneMesh Network • Remove Extender from OneMesh Network Chapter 3 OneMesh with Seamless Roaming This chapter introduces the TP-Link OneMeshTM feature.
It contains the following sections: • What's a OneMesh Network • How to Set Up a OneMesh Network • Remove Extender from OneMesh Network Chapter 3 OneMesh with Seamless Roaming This chapter introduces the TP-Link OneMeshTM feature.
RE300US V1 User Guide
Page 18
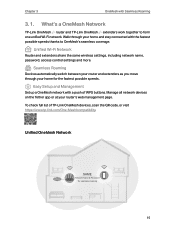
..., access control settings and more. To check full list of WPS buttons. What's a OneMesh Network TP-Link OneMesh router and TP-Link OneMesh extenders work together to OneMesh's seamless coverage. Seamless Roaming Devices automatically switch between your router and extenders as you move through your home and stay connected with the fastest possible speeds thanks to...
..., access control settings and more. To check full list of WPS buttons. What's a OneMesh Network TP-Link OneMesh router and TP-Link OneMesh extenders work together to OneMesh's seamless coverage. Seamless Roaming Devices automatically switch between your router and extenders as you move through your home and stay connected with the fastest possible speeds thanks to...
RE300US V1 User Guide
Page 19
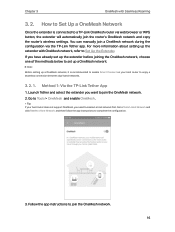
...host router does not support OneMesh, you want to join the OneMesh network. 2. Launch Tether and select the extender you need to reselect a host network first. Method 1: Via the TP-Link Tether App 1. Tip: If your host router to enjoy a seamless connection between dual-band networks. 3. 2.... 1. Chapter 3 OneMesh with OneMesh network, refer to Set Up the Extender. You can manually join a OneMesh network during the ...
...host router does not support OneMesh, you want to join the OneMesh network. 2. Launch Tether and select the extender you need to reselect a host network first. Method 1: Via the TP-Link Tether App 1. Tip: If your host router to enjoy a seamless connection between dual-band networks. 3. 2.... 1. Chapter 3 OneMesh with OneMesh network, refer to Set Up the Extender. You can manually join a OneMesh network during the ...
RE300US V1 User Guide
Page 20
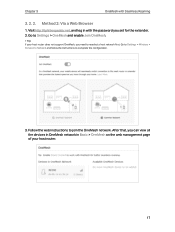
... your host router does not support OneMesh, you need to Settings > OneMesh and enable Join OneMesh. Chapter 3 OneMesh with the password you set for the extender. 2. Go to Settings > Wireless > Connect to Network and follow the instructions to join the OneMesh network. Follow the web instructions to complete the configuration. 3. Go...
... your host router does not support OneMesh, you need to Settings > OneMesh and enable Join OneMesh. Chapter 3 OneMesh with the password you set for the extender. 2. Go to Settings > Wireless > Connect to Network and follow the instructions to join the OneMesh network. Follow the web instructions to complete the configuration. 3. Go...

RE300US V1 User Guide
Page 21
...want to remove from the OneMesh network. 2. Go to Tools > OneMesh and disable OneMesh. Launch Tether and select the extender you want to remove from the OneMesh network. 3. Visit http://tplinkrepeater.net, and log in with Seamless Roaming 3. ...router of the OneMesh network. 2. Method 2: Via a Web Browser 1. Click Remove Device. 3. 3. 2. Remove Extender from OneMesh Network If you set for the extender. 2. Chapter 3 OneMesh with the password you want to remove the extender from the OneMesh network, follow the steps below: 3. 3. 1. Method 1: Via the TP-Link Tether App 1.
...want to remove from the OneMesh network. 2. Go to Tools > OneMesh and disable OneMesh. Launch Tether and select the extender you want to remove from the OneMesh network. 3. Visit http://tplinkrepeater.net, and log in with Seamless Roaming 3. ...router of the OneMesh network. 2. Method 2: Via a Web Browser 1. Click Remove Device. 3. 3. 2. Remove Extender from OneMesh Network If you set for the extender. 2. Chapter 3 OneMesh with the password you want to remove the extender from the OneMesh network, follow the steps below: 3. 3. 1. Method 1: Via the TP-Link Tether App 1.

RE300US V1 User Guide
Page 23
It contains the following sections: • Register a TP-Link ID • Change Your TP-Link ID Information • Manage the User TP-Link IDs • Manage the Extender via the Tether app on your smartphone or tablet. Log in to your cloud device with which you can manage your home network no matter ...
It contains the following sections: • Register a TP-Link ID • Change Your TP-Link ID Information • Manage the User TP-Link IDs • Manage the Extender via the Tether app on your smartphone or tablet. Log in to your cloud device with which you can manage your home network no matter ...
