
Owners Manual
Page 17
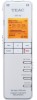
Press this key during playback or when paused during playback to return to the MIC/EXT. On the FILE/FOLDER screen, press to the previous recording. When a separate microphone or other external device is disabled. 2 Display This ... the built-in stereo microphone is connected to the beginning of parts 1 Built-in stereo microphone This is open to return to search backward. Press when a menu screen is a stereo electret condenser microphone. TEAC VR-10 17 Press and hold to the previous screen. Top panel 2 - Names and functions of the recording.
Press this key during playback or when paused during playback to return to the MIC/EXT. On the FILE/FOLDER screen, press to the previous recording. When a separate microphone or other external device is disabled. 2 Display This ... the built-in stereo microphone is connected to the beginning of parts 1 Built-in stereo microphone This is open to return to search backward. Press when a menu screen is a stereo electret condenser microphone. TEAC VR-10 17 Press and hold to the previous screen. Top panel 2 - Names and functions of the recording.
Owners Manual
Page 18
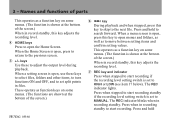
.... 7 REC key and indicator Press when stopped to start recording if the recording level setting switch is shown at the bottom of the screen.) 18 TEAC VR-10 6 ¯ key During playback and when stopped, press this key to open , press to return to HIGH or LOW (see item 17 below).
.... 7 REC key and indicator Press when stopped to start recording if the recording level setting switch is shown at the bottom of the screen.) 18 TEAC VR-10 6 ¯ key During playback and when stopped, press this key to open , press to return to HIGH or LOW (see item 17 below).
Owners Manual
Page 28
... the Home Screen. Turn the built-in speaker ON/OFF. When the SETUP menu is open , press to return to the Home Screen. Depending on the screen, this key has the following settings. • DATE/TIME • AUTO POWER OFF • BACKLIGHT • BATTERY ... enhancement) • JUMP BACK (jump back time) Make settings related to the next digit. • On the repeat screen, sets the repeat end point. 28 TEAC VR-10
... the Home Screen. Turn the built-in speaker ON/OFF. When the SETUP menu is open , press to return to the Home Screen. Depending on the screen, this key has the following settings. • DATE/TIME • AUTO POWER OFF • BACKLIGHT • BATTERY ... enhancement) • JUMP BACK (jump back time) Make settings related to the next digit. • On the repeat screen, sets the repeat end point. 28 TEAC VR-10
Owners Manual
Page 29
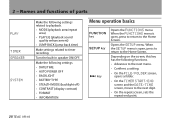
...+/- Yes: Respond "Yes" to the previous screen. Names and functions of the screen. When, the Home Screen is open, press to return to a confirmation message. keys HOME key Depending on and off. The assignments of the Â, ¯, + and - keys. Exec.: ...ON/OFF: Turn the selected function on the screen, this key has the following functions. • Returns to the previous screen. • On the repeat screen, sets the repeat start point. The functions... message. : Change the value by using the +/- Opens the Home Screen. No: Respond "No" to B point. TEAC VR-10 29
...+/- Yes: Respond "Yes" to the previous screen. Names and functions of the screen. When, the Home Screen is open, press to return to a confirmation message. keys HOME key Depending on and off. The assignments of the Â, ¯, + and - keys. Exec.: ...ON/OFF: Turn the selected function on the screen, this key has the following functions. • Returns to the previous screen. • On the repeat screen, sets the repeat start point. The functions... message. : Change the value by using the +/- Opens the Home Screen. No: Respond "No" to B point. TEAC VR-10 29
Owners Manual
Page 36
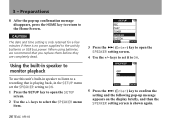
... SPEAKER setting to ON. 1 Press the SETUP key to confirm the setting and the following pop-up confirmation message disappears, press the HOME key to return to open the SETUP screen. 2 Use the +/- Using the built-in speaker to monitor playback To use this unit's built-in the SETUP menu set... unit by batteries or USB bus power. CAUTION The date and time setting is only retained for a few minutes if there is shown again. 36 TEAC VR-10 3 -
... SPEAKER setting to ON. 1 Press the SETUP key to confirm the setting and the following pop-up confirmation message disappears, press the HOME key to return to open the SETUP screen. 2 Use the +/- Using the built-in speaker to monitor playback To use this unit's built-in the SETUP menu set... unit by batteries or USB bus power. CAUTION The date and time setting is only retained for a few minutes if there is shown again. 36 TEAC VR-10 3 -

Owners Manual
Page 37
NOTE Even if the SPEAKER setting is ON, no sound is output from the speaker when recording or in recording standby, or when headphones or a monitoring system is connected. 3 - Headphones TEAC VR-10 37 To monitor with headphones, connect them to the /LINE OUT jack. 6 When you have finished making the setting, press the HOME key to return to the /LINE OUT jack. Preparations Connecting monitoring equipment To monitor with an external monitoring system (powered monitor speakers or an amplifier and speakers), connect it to the Home Screen.
NOTE Even if the SPEAKER setting is ON, no sound is output from the speaker when recording or in recording standby, or when headphones or a monitoring system is connected. 3 - Headphones TEAC VR-10 37 To monitor with headphones, connect them to the /LINE OUT jack. 6 When you have finished making the setting, press the HOME key to return to the /LINE OUT jack. Preparations Connecting monitoring equipment To monitor with an external monitoring system (powered monitor speakers or an amplifier and speakers), connect it to the Home Screen.

Owners Manual
Page 40
keys to set the recording quality (encoding format) to one of the following. (The default value is PCM16/44/ST.) 40 TEAC VR-10 Display Format (bit rate), sampling frequency, number of channels PCM24/48/ST PCM, 24-bit, 48 kHz, stereo PCM16/48/ST PCM, 16-.../32/MO MP3, 32 kbps, monaural 7 Press the ¯ (Enter) key to confirm the setting and show a pop-up with the setting briefly, and then return to open the ENCODING setting screen. 6 Use the +/- Recording 5 Press the ¯ (Enter) key to the ENCODING menu screen. 4 -
keys to set the recording quality (encoding format) to one of the following. (The default value is PCM16/44/ST.) 40 TEAC VR-10 Display Format (bit rate), sampling frequency, number of channels PCM24/48/ST PCM, 24-bit, 48 kHz, stereo PCM16/48/ST PCM, 16-.../32/MO MP3, 32 kbps, monaural 7 Press the ¯ (Enter) key to confirm the setting and show a pop-up with the setting briefly, and then return to open the ENCODING setting screen. 6 Use the +/- Recording 5 Press the ¯ (Enter) key to the ENCODING menu screen. 4 -

Owners Manual
Page 41
... player or another external audio device is set as the input source. When nothing is set to the Home Screen. keys to the MIC/EXT. TEAC VR-10 41 4 - Setting the built-in stereo microphone, external microphone input or external device input. IN jack, the external input is connected to select... the EXT.INPUT item. Recording 8 When you have finished making the setting, press the HOME key to return to the built-in stereo microphone for input The input source for this unit can be set as the input. keys to select the REC...
... player or another external audio device is set as the input source. When nothing is set to the Home Screen. keys to the MIC/EXT. TEAC VR-10 41 4 - Setting the built-in stereo microphone, external microphone input or external device input. IN jack, the external input is connected to select... the EXT.INPUT item. Recording 8 When you have finished making the setting, press the HOME key to return to the built-in stereo microphone for input The input source for this unit can be set as the input. keys to select the REC...

Owners Manual
Page 42
Display LINE EXT. Recording 5 Press the ¯ (Enter) key to the EXT.INPUT screen. 6 Use the +/- 4 - MIC Input source External audio device (the headphone jack of the following. (The default value is LINE.) 8 When you have finished making the setting, press the HOME key to return to the Home Screen. 42 TEAC VR-10 INPUT setting screen. keys to select one of a portable CD player, etc.) External microphone 7 Press the ¯ (Enter) key to confirm the setting and show a pop-up with the setting briefly and then return to open the EXT.
Display LINE EXT. Recording 5 Press the ¯ (Enter) key to the EXT.INPUT screen. 6 Use the +/- 4 - MIC Input source External audio device (the headphone jack of the following. (The default value is LINE.) 8 When you have finished making the setting, press the HOME key to return to the Home Screen. 42 TEAC VR-10 INPUT setting screen. keys to select one of a portable CD player, etc.) External microphone 7 Press the ¯ (Enter) key to confirm the setting and show a pop-up with the setting briefly and then return to open the EXT.

Owners Manual
Page 44
... Low-cut filter below 120 Hz 7 Press the ¯ (Enter) key to confirm the setting and show a pop-up with the setting briefly, and then return to the LOW CUT menu screen. 8 When you have finished making the setting, press the HOME key to...
... Low-cut filter below 120 Hz 7 Press the ¯ (Enter) key to confirm the setting and show a pop-up with the setting briefly, and then return to the LOW CUT menu screen. 8 When you have finished making the setting, press the HOME key to...

Owners Manual
Page 45
... Middle frequency enhancement Emphasizes low frequencies 7 Press the ¯ (Enter) key to confirm the setting and show a pop-up with the setting briefly, and then return to open the REC menu screen. 4 Use the +/- Recording 3 Press the ¯ (Enter) key to open the REC EQ setting screen. 6 Use the...
... Middle frequency enhancement Emphasizes low frequencies 7 Press the ¯ (Enter) key to confirm the setting and show a pop-up with the setting briefly, and then return to open the REC menu screen. 4 Use the +/- Recording 3 Press the ¯ (Enter) key to open the REC EQ setting screen. 6 Use the...

Owners Manual
Page 46
... screen. 2 Use the +/- keys to the Home Screen. Recording 8 When you have finished making the setting, press the HOME key to return to select the ON/OFF item. 46 TEAC VR-10 4 - Automatically starting and pausing recording This unit can be set to automatically start and pause recording according to input sound...
... screen. 2 Use the +/- keys to the Home Screen. Recording 8 When you have finished making the setting, press the HOME key to return to select the ON/OFF item. 46 TEAC VR-10 4 - Automatically starting and pausing recording This unit can be set to automatically start and pause recording according to input sound...
Owners Manual
Page 47
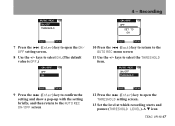
keys to select ON. (The default value is OFF.) 10 Press the  (Back) key to return to open the THRESHOLD setting screen. 13 Set the level at which recording starts and pauses (THRESHOLD LEVEL). keys to select the THRESHOLD item. 9 Press the ¯ (Enter) key to confirm the setting and show a pop-up with the setting briefly, and then return to the AUTO REC ON/OFF screen 12 Press the ¯ (Enter) key to open the ON/ OFF setting screen. 8 Use the +/- Recording 7 Press the ¯ (Enter) key to the AUTO REC menu screen 11 Use the +/- A ¶ icon TEAC VR-10 47 4 -
keys to select ON. (The default value is OFF.) 10 Press the  (Back) key to return to open the THRESHOLD setting screen. 13 Set the level at which recording starts and pauses (THRESHOLD LEVEL). keys to select the THRESHOLD item. 9 Press the ¯ (Enter) key to confirm the setting and show a pop-up with the setting briefly, and then return to the AUTO REC ON/OFF screen 12 Press the ¯ (Enter) key to open the ON/ OFF setting screen. 8 Use the +/- Recording 7 Press the ¯ (Enter) key to the AUTO REC menu screen 11 Use the +/- A ¶ icon TEAC VR-10 47 4 -

Owners Manual
Page 48
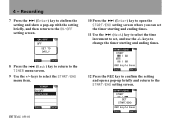
... the +/- keys to set the value to -6dB, -12dB, -24dB or -36dB. 15 When you have finished making the settings, press the HOME key to return to the Home Screen. 14 Press the ¯ (Enter) key to confirm the setting and show a pop-up with the setting briefly, and then... return to select the FILE/FOLDER menu item. 48 TEAC VR-10 Set the folder where recorded files are saved Set the folder where the file being recorded is made, the...
... the +/- keys to set the value to -6dB, -12dB, -24dB or -36dB. 15 When you have finished making the settings, press the HOME key to return to the Home Screen. 14 Press the ¯ (Enter) key to confirm the setting and show a pop-up with the setting briefly, and then... return to select the FILE/FOLDER menu item. 48 TEAC VR-10 Set the folder where recorded files are saved Set the folder where the file being recorded is made, the...

Owners Manual
Page 49
Creating new folders Folders can be created to the Home Screen. TIONS menu screen. 2 Use the +/- Press the HOME key to return to a maximum of two levels inside the SOUND folder, which is the root folder used by this unit. NOTE If you want to save recorded ... ¯ (Enter) key to open the FUNC- Use folders to organize recording sessions and categorize music tracks, for saving new recorded files, they are saved. TEAC VR-10 49 keys to open the FILE/FOLDER screen. 4 Use the +/- Recording 6 This sets the folder where recorded files are saved in the folder...
Creating new folders Folders can be created to the Home Screen. TIONS menu screen. 2 Use the +/- Press the HOME key to return to a maximum of two levels inside the SOUND folder, which is the root folder used by this unit. NOTE If you want to save recorded ... ¯ (Enter) key to open the FUNC- Use folders to organize recording sessions and categorize music tracks, for saving new recorded files, they are saved. TEAC VR-10 49 keys to open the FILE/FOLDER screen. 4 Use the +/- Recording 6 This sets the folder where recorded files are saved in the folder...

Owners Manual
Page 50
... place where vibration is set as the folder where recorded files are saved. 7 When you are finished creating new folders, press the HOME key to return to open the following pop-up message. Recording 3 Press the ¯ (Enter) key to the Home Screen. The newly created folder is minimal. 50...
... place where vibration is set as the folder where recorded files are saved. 7 When you are finished creating new folders, press the HOME key to return to open the following pop-up message. Recording 3 Press the ¯ (Enter) key to the Home Screen. The newly created folder is minimal. 50...

Owners Manual
Page 53
... Use the following procedures after selecting the input, adjusting the level and returning to LOW or HIGH, pressing the REC key once starts recording immediately without putting the unit into recording standby. TIP In addition to using the +/- REC indicator TEAC VR-10 53 You can be adjusted using the Â/¯...
... Use the following procedures after selecting the input, adjusting the level and returning to LOW or HIGH, pressing the REC key once starts recording immediately without putting the unit into recording standby. TIP In addition to using the +/- REC indicator TEAC VR-10 53 You can be adjusted using the Â/¯...
Owners Manual
Page 56
... select the START/END menu item. 12 Press the REC key to confirm the setting and open a pop-up with the setting briefly, and then return to the ON/OFF setting screen. 10 Press the ¯ (Enter) key to open the START/END setting screen where you can set , and use... the +/- Recording 7 Press the ¯ (Enter) key to cinfirm the setting and show a pop-up briefly and return to set the timer starting and ending times. 8 Press the  (Back) key to return to the TIMER menu screen. 9 Use the +/- keys to change the timer starting and ending times. 11 Use...
... select the START/END menu item. 12 Press the REC key to confirm the setting and open a pop-up with the setting briefly, and then return to the ON/OFF setting screen. 10 Press the ¯ (Enter) key to open the START/END setting screen where you can set , and use... the +/- Recording 7 Press the ¯ (Enter) key to cinfirm the setting and show a pop-up briefly and return to set the timer starting and ending times. 8 Press the  (Back) key to return to the TIMER menu screen. 9 Use the +/- keys to change the timer starting and ending times. 11 Use...

Owners Manual
Page 57
..., you can record up message appears if you want to the Home Screen. Be sure to use the keys on the DATE/TIME item setting. TEAC VR-10 57 ing, slide the /HOLD switch toward the HOLD position momentarily to disable the hold the REC button when stopped to set this...
..., you can record up message appears if you want to the Home Screen. Be sure to use the keys on the DATE/TIME item setting. TEAC VR-10 57 ing, slide the /HOLD switch toward the HOLD position momentarily to disable the hold the REC button when stopped to set this...

Owners Manual
Page 62
... screen) Folder operations You can confirm whether you want to create a new folder. 62 TEAC VR-10 Press the ¯ (Yes) key to open a pop-up message where ...a folder for recording and playing files and create new folders. After finishing the creation of a new folder and return to open the selected folder and show a list of folders can be created. • If you are saved .... Press the  (No) key to cancel creation of a new folder, press the HOME key to return to the Home Screen. When you select PLAYLIST as the destination for recording and playback. When a new folder...
... screen) Folder operations You can confirm whether you want to create a new folder. 62 TEAC VR-10 Press the ¯ (Yes) key to open a pop-up message where ...a folder for recording and playing files and create new folders. After finishing the creation of a new folder and return to open the selected folder and show a list of folders can be created. • If you are saved .... Press the  (No) key to cancel creation of a new folder, press the HOME key to return to the Home Screen. When you select PLAYLIST as the destination for recording and playback. When a new folder...