Owners Manual
Page 6
... Recording Screen 26 Menu structure 27 FUNCTION menu 27 SETUP menu 27 Menu operation basics 28 3 - Names and functions of Contents Quick Start Guide 9 1 - Introduction 11 Features 11 Product components 12 Conventions used in this manual 13 Intellectual property rights 13 About microSD cards 15 Precautions for use 34 Setting the date and time 34 Using the built-in stereo microphone for input.. 41 Setting external input 41 Reducing low-frequency noise when recording... 43 6 TEAC VR-10 Recording 39 Making recording settings...
... Recording Screen 26 Menu structure 27 FUNCTION menu 27 SETUP menu 27 Menu operation basics 28 3 - Names and functions of Contents Quick Start Guide 9 1 - Introduction 11 Features 11 Product components 12 Conventions used in this manual 13 Intellectual property rights 13 About microSD cards 15 Precautions for use 34 Setting the date and time 34 Using the built-in stereo microphone for input.. 41 Setting external input 41 Reducing low-frequency noise when recording... 43 6 TEAC VR-10 Recording 39 Making recording settings...
Owners Manual
Page 7
... 81 TEAC VR-10 7 IN).51 Adjusting the input level 51 Using the auto gain control function 51 Setting the recording level manually 52 Recording 53 Starting a new file while continuing to the Playlist 71 Editing the Playlist 72 Selecting a file for recording and playback...... 62 Creating a new folder 62 Splitting files 63 Erasing files 64 6 - Connecting with an external device (MIC/EXT. File and folder operations (FILE/FOLDER screen 59 Navigating the FILE/FOLDER screen 59 Icons shown on the FILE/FOLDER screen 60 File operations 60 Folder operations 62 Selecting a folder for...
... 81 TEAC VR-10 7 IN).51 Adjusting the input level 51 Using the auto gain control function 51 Setting the recording level manually 52 Recording 53 Starting a new file while continuing to the Playlist 71 Editing the Playlist 72 Selecting a file for recording and playback...... 62 Creating a new folder 62 Splitting files 63 Erasing files 64 6 - Connecting with an external device (MIC/EXT. File and folder operations (FILE/FOLDER screen 59 Navigating the FILE/FOLDER screen 59 Icons shown on the FILE/FOLDER screen 60 File operations 60 Folder operations 62 Selecting a folder for...

Owners Manual
Page 8
... 8 TEAC VR-10 Requirements for connected computers 103 Other specifications 104 Dimensional drawings 105 Messages 96 10 - Troubleshooting 100 11 - Table of Contents Connecting to a computer by USB 81 Copying files to a computer 82 Copying files from a computer 83 Ending the connection with a computer 83 8 - Various Settings and Information Display 84 Other settings 84 Using the auto power off function 84 Setting the backlight 85 Setting the battery type 86 Using the stealth mode 88 Setting...
... 8 TEAC VR-10 Requirements for connected computers 103 Other specifications 104 Dimensional drawings 105 Messages 96 10 - Troubleshooting 100 11 - Table of Contents Connecting to a computer by USB 81 Copying files to a computer 82 Copying files from a computer 83 Ending the connection with a computer 83 8 - Various Settings and Information Display 84 Other settings 84 Using the auto power off function 84 Setting the backlight 85 Setting the battery type 86 Using the stealth mode 88 Setting...
Owners Manual
Page 9
... the recording. You can change the recording format to increase the quality of the sound source is shipped from the factory, a microSD card has already been installed and the recording format has been set to LOW. 2 Turn the power ON. Moreover, when recording music, setting the recording level manually could improve the recording quality even TEAC VR-10 9 Quick Start Guide In this guide, we will show you how to record and playback using this switch to make longer recording possible...
... the recording. You can change the recording format to increase the quality of the sound source is shipped from the factory, a microSD card has already been installed and the recording format has been set to LOW. 2 Turn the power ON. Moreover, when recording music, setting the recording level manually could improve the recording quality even TEAC VR-10 9 Quick Start Guide In this guide, we will show you how to record and playback using this switch to make longer recording possible...

Owners Manual
Page 10
... playback. For details, see "Using the built-in speaker, turn the speaker ON. To listen using the unit's built-in speaker to monitor playback" on page 51. 4 Press the REC key to stop recording. keys to adjust the playback volume. 8 Press the STOP key to start recording. To listen using headphones or an amplification system with speakers, connect the equipment to stop playback. Quick Start Guide more. REC indicator 5 Press the STOP...
... playback. For details, see "Using the built-in speaker, turn the speaker ON. To listen using the unit's built-in speaker to monitor playback" on page 51. 4 Press the REC key to stop recording. keys to adjust the playback volume. 8 Press the STOP key to start recording. To listen using headphones or an amplification system with speakers, connect the equipment to stop playback. Quick Start Guide more. REC indicator 5 Press the STOP...
Owners Manual
Page 11
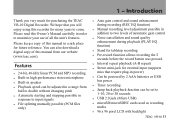
... a copy of this manual from half to double without changing pitch •• Automatic starting and stopping possible in response to input signals •• File splitting manually possible (PCM files only) •• Auto gain control and sound enhancement during recording (REC EQ function) •• Manual recording level adjustment possible in addition to 1-10, 20 or 30 seconds •• USB 2.0 jack (Micro USB) •• microSD/microSDHC cards used as recording media...
... a copy of this manual from half to double without changing pitch •• Automatic starting and stopping possible in response to input signals •• File splitting manually possible (PCM files only) •• Auto gain control and sound enhancement during recording (REC EQ function) •• Manual recording level adjustment possible in addition to 1-10, 20 or 30 seconds •• USB 2.0 jack (Micro USB) •• microSD/microSDHC cards used as recording media...

Owners Manual
Page 17
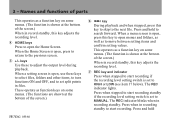
... a level. When a separate microphone or other external device is disabled. 2 Display This shows various types of information. 3 Â key Press this key when stopped at the beginning of parts 1 Built-in stereo microphone is connected to the previous recording. Press this key during playback or when paused during playback to return to the previous screen. TEAC VR-10 17 Press when a menu screen is a stereo electret condenser microphone. Names and functions of a recording...
... a level. When a separate microphone or other external device is disabled. 2 Display This shows various types of information. 3 Â key Press this key when stopped at the beginning of parts 1 Built-in stereo microphone is connected to the previous recording. Press this key during playback or when paused during playback to return to the previous screen. TEAC VR-10 17 Press when a menu screen is a stereo electret condenser microphone. Names and functions of a recording...
Owners Manual
Page 18
... Use these keys to select files, folders and other items, to turn functions ON and OFF, and to the previous screen. 5 +/- Press and hold Press when stopped to start recording standby if the recording level setting switch is set to search forward. Press and hold to MANUAL. Names and functions of parts This operates as function keys on some menus. (The function is open the Home Screen. Press when in record standby, this key adjusts the recording level. 7 REC key...
... Use these keys to select files, folders and other items, to turn functions ON and OFF, and to the previous screen. 5 +/- Press and hold Press when stopped to start recording standby if the recording level setting switch is set to search forward. Press and hold to MANUAL. Names and functions of parts This operates as function keys on some menus. (The function is open the Home Screen. Press when in record standby, this key adjusts the recording level. 7 REC key...
Owners Manual
Page 21
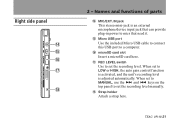
.... t Micro USB port Use the included Micro USB cable to connect this USB port to mics that can provide plug-in power to a computer. TEAC VR-10 21 Right side panel 2 - When set to MANUAL, use the ¯ and  keys on the top panel to set to set the recording level. Names and functions of parts r MIC/EXT. u REC LEVEL switch Use to LOW or HIGH, the auto gain control function is activated, and the unit's recording level is an external microphone/device input jack that need...
.... t Micro USB port Use the included Micro USB cable to connect this USB port to mics that can provide plug-in power to a computer. TEAC VR-10 21 Right side panel 2 - When set to MANUAL, use the ¯ and  keys on the top panel to set to set the recording level. Names and functions of parts r MIC/EXT. u REC LEVEL switch Use to LOW or HIGH, the auto gain control function is activated, and the unit's recording level is an external microphone/device input jack that need...

Owners Manual
Page 24
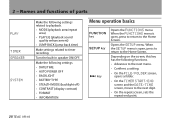
... depending on whether the playback speed function is shown. 0 Playback speed status One of the currently selected file is shown. 5 File mode display This shows the recording file format. Icon Meaning Stopped Paused Playing back Searching forward Searching backward Skipping to the start of the next file Skipping to the start of the current or previous file 24 TEAC VR-10 7 Playback file format This shows the format of parts When using USB bus power, is shown after the...
... depending on whether the playback speed function is shown. 0 Playback speed status One of the currently selected file is shown. 5 File mode display This shows the recording file format. Icon Meaning Stopped Paused Playing back Searching forward Searching backward Skipping to the start of the next file Skipping to the start of the current or previous file 24 TEAC VR-10 7 Playback file format This shows the format of parts When using USB bus power, is shown after the...

Owners Manual
Page 27
...A-B repeat playback. SPLIT FILE Divide files. DELETE FILE Delete files. Their menu items are as follows. REC Make the following settings related to open the SETUP menu. Names and functions of parts Menu structure Press the FUNCTION key to open the FUNCTIONS menu, and press the SETUP key to recording. • ENCODING (recording quality) • EXT. FILE/FOLDER Work with files and folders on the card. 2 - PLAY SPEED Set the playback speed. INPUT (switch to external input) • LOW CUT (low-cut filter) • REC EQ (recording quality adjustment settings) • AUTO REC...
...A-B repeat playback. SPLIT FILE Divide files. DELETE FILE Delete files. Their menu items are as follows. REC Make the following settings related to open the SETUP menu. Names and functions of parts Menu structure Press the FUNCTION key to open the FUNCTIONS menu, and press the SETUP key to recording. • ENCODING (recording quality) • EXT. FILE/FOLDER Work with files and folders on the card. 2 - PLAY SPEED Set the playback speed. INPUT (switch to external input) • LOW CUT (low-cut filter) • REC EQ (recording quality adjustment settings) • AUTO REC...
Owners Manual
Page 28
... playback. • MODE (playback area/repeat area) • PLAY EQ (playback sound quality enhancement) • JUMP BACK (jump back time) Make settings related to the next digit. • On the repeat screen, sets the repeat end point. 28 TEAC VR-10 Turn the built-in speaker ON/OFF. Make the following functions. • Advances to the next menu. • Confirms a setting. • On the FILE/FOLDER screen, opens a folder. • On the TIMER START/END screen and the DATE/TIME screen...
... playback. • MODE (playback area/repeat area) • PLAY EQ (playback sound quality enhancement) • JUMP BACK (jump back time) Make settings related to the next digit. • On the repeat screen, sets the repeat end point. 28 TEAC VR-10 Turn the built-in speaker ON/OFF. Make the following functions. • Advances to the next menu. • Confirms a setting. • On the FILE/FOLDER screen, opens a folder. • On the TIMER START/END screen and the DATE/TIME screen...

Owners Manual
Page 34
... that the microSD card is sufficient or use USB bus power. CAUTION When formatting, confirm that the remaining battery charge is inserted and turn the power ON. 2 If a new card or a card that has been formatted by this unit has been inserted, the following pop-up message appears. 3 Press the ¯ (Exec.) key to start formatting the card. keys to open the SETUP menu screen. 2 Use the +/- 3 - Timer recording also uses the internal clock...
... that the microSD card is sufficient or use USB bus power. CAUTION When formatting, confirm that the remaining battery charge is inserted and turn the power ON. 2 If a new card or a card that has been formatted by this unit has been inserted, the following pop-up message appears. 3 Press the ¯ (Exec.) key to start formatting the card. keys to open the SETUP menu screen. 2 Use the +/- 3 - Timer recording also uses the internal clock...
Owners Manual
Page 36
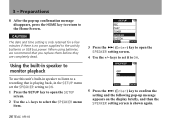
... the unit by batteries or USB bus power. Using the built-in speaker to monitor playback To use this unit's built-in the SETUP menu set the SPEAKER setting to ON. 1 Press the SETUP key to a recording that you replace them before they are completely dead. CAUTION The date and time setting is only retained for a few minutes if there is no power supplied to the Home Screen. 3 -
... the unit by batteries or USB bus power. Using the built-in speaker to monitor playback To use this unit's built-in the SETUP menu set the SPEAKER setting to ON. 1 Press the SETUP key to a recording that you replace them before they are completely dead. CAUTION The date and time setting is only retained for a few minutes if there is no power supplied to the Home Screen. 3 -

Owners Manual
Page 39
... want to prioritize sound quality or recording time. keys to select the REC menu item. Making recording settings 4 - Recording • With MP3 formats, higher bit-rates allow recording for a longer time than PCM formats. 3 Press the ¯ (Enter) key to choosing stereo or monaural, set the audio file format. TEAC VR-10 39 In addition to open the SETUP menu screen. 2 Use the +/- In addition to open the REC menu screen. 4 Use the +/- NOTE • PCM formats allow recording at higher quality...
... want to prioritize sound quality or recording time. keys to select the REC menu item. Making recording settings 4 - Recording • With MP3 formats, higher bit-rates allow recording for a longer time than PCM formats. 3 Press the ¯ (Enter) key to choosing stereo or monaural, set the audio file format. TEAC VR-10 39 In addition to open the SETUP menu screen. 2 Use the +/- In addition to open the REC menu screen. 4 Use the +/- NOTE • PCM formats allow recording at higher quality...

Owners Manual
Page 41
... set to open the SETUP menu screen. 2 Use the +/- Make the following setting according to the type of connected device. 1 Press the SETUP key to the Home Screen. IN jack, the external input is connected to the MIC/EXT. Recording 8 When you have finished making the setting, press the HOME key to return to open the REC menu screen. 4 Use the +/- keys to select the REC menu item. 3 Press the ¯ (Enter) key to the built-in stereo microphone...
... set to open the SETUP menu screen. 2 Use the +/- Make the following setting according to the type of connected device. 1 Press the SETUP key to the Home Screen. IN jack, the external input is connected to the MIC/EXT. Recording 8 When you have finished making the setting, press the HOME key to return to open the REC menu screen. 4 Use the +/- keys to select the REC menu item. 3 Press the ¯ (Enter) key to the built-in stereo microphone...

Owners Manual
Page 57
... AUTO REC function, you can record events without losing the beginnings of sounds. Be sure to use the keys on the DATE/TIME item setting. If you try to disable the hold the REC button when stopped to start recording for timer recording are disabled to start recording. Press and hold function. Press REC button again to staty pre-recording standby. ing, slide the /HOLD switch toward the HOLD position momentarily to use the DATE/TIME setting screen to set this in recording...
... AUTO REC function, you can record events without losing the beginnings of sounds. Be sure to use the keys on the DATE/TIME item setting. If you try to disable the hold the REC button when stopped to start recording for timer recording are disabled to start recording. Press and hold function. Press REC button again to staty pre-recording standby. ing, slide the /HOLD switch toward the HOLD position momentarily to use the DATE/TIME setting screen to set this in recording...

Owners Manual
Page 61
... one of the following operations. TEAC VR-10 61 File and folder operations (FILE/FOLDER screen) 1 After selecting a file on page 70.) DELETE Opens a pop-up message. 2 Use the +/- Press the  (No) key to erase the selected file. keys to select the desired item, and press the ¯ (Exec.) key to delete the selected file. NOTE You cannot erase write-protected files and files that this unit does not recognize.
... one of the following operations. TEAC VR-10 61 File and folder operations (FILE/FOLDER screen) 1 After selecting a file on page 70.) DELETE Opens a pop-up message. 2 Use the +/- Press the  (No) key to erase the selected file. keys to select the desired item, and press the ¯ (Exec.) key to delete the selected file. NOTE You cannot erase write-protected files and files that this unit does not recognize.

Owners Manual
Page 62
... Home Screen. NOTE • A maximum of two sub-levels of a new folder and return to open it is automatically set as the destination for recording and playback Select the desired folder on the FILE/FOLDER screen, and press the ¯ (Next) key to open a pop-up message where you can select the folder for recording and playback. File and folder operations (FILE/FOLDER screen) Folder operations You can confirm whether you select PLAYLIST as the recording/playback folder.
... Home Screen. NOTE • A maximum of two sub-levels of a new folder and return to open it is automatically set as the destination for recording and playback Select the desired folder on the FILE/FOLDER screen, and press the ¯ (Next) key to open a pop-up message where you can select the folder for recording and playback. File and folder operations (FILE/FOLDER screen) Folder operations You can confirm whether you select PLAYLIST as the recording/playback folder.

Owners Manual
Page 90
... batteries run out of power during this operation, the formatting might not be completed correctly. ªªQuick formatting Use this procedure to format the microSD card quickly. 1 Press the SETUP key to select the SYSTEM menu item. 90 TEAC VR-10 CAUTION • If you have finished making the setting, press the HOME key to return to the Home Screen. keys to open the SETUP menu screen. 2 Use the +/- Various Settings...
... batteries run out of power during this operation, the formatting might not be completed correctly. ªªQuick formatting Use this procedure to format the microSD card quickly. 1 Press the SETUP key to select the SYSTEM menu item. 90 TEAC VR-10 CAUTION • If you have finished making the setting, press the HOME key to return to the Home Screen. keys to open the SETUP menu screen. 2 Use the +/- Various Settings...