Instruction Manual
Page 1
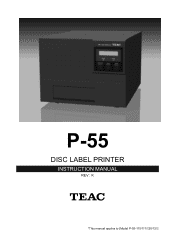
P-55 DISC LABEL PRINTER INSTRUCTION MANUAL REV : K *This manual applies to [Model P-55-110/111/120/121]
P-55 DISC LABEL PRINTER INSTRUCTION MANUAL REV : K *This manual applies to [Model P-55-110/111/120/121]
Instruction Manual
Page 2
...PC 12 SECTION 7 : Installing the Label Editor 13 SECTION 8 : Connections...15 SECTION 9 : Control Panel Features...17 SECTION 10 : Installing the Printer Driver 20 SECTION 11 : Error Messages Explained 22 SECTION 12 : Loading Ribbons...26 SECTION 13 : Loading Print Media...33 SECTION 14 : Getting ...Label Print Job Started 34 SECTION 15 : Removing Disc Label Editor and Printer Driver 46 SECTION 16 : Maintenance ...52 SECTION 17 : Shipping...54 SECTION 18 : Specifications...55 SECTION 19 : Options ...57 SECTION 20 : Contact Information ...58 2
...PC 12 SECTION 7 : Installing the Label Editor 13 SECTION 8 : Connections...15 SECTION 9 : Control Panel Features...17 SECTION 10 : Installing the Printer Driver 20 SECTION 11 : Error Messages Explained 22 SECTION 12 : Loading Ribbons...26 SECTION 13 : Loading Print Media...33 SECTION 14 : Getting ...Label Print Job Started 34 SECTION 15 : Removing Disc Label Editor and Printer Driver 46 SECTION 16 : Maintenance ...52 SECTION 17 : Shipping...54 SECTION 18 : Specifications...55 SECTION 19 : Options ...57 SECTION 20 : Contact Information ...58 2

Instruction Manual
Page 4
If you cannot remove the ribbon cartridges from the printer. IMPORTANT SAFETY INSTRUCTIONS CAUTION [Shut-off Timing After Printing] If you turn off the printer within 10 seconds after print operation is completed, the thermal head may be moved back in place, you try too hard to turn off the printer more than 10 seconds after print operation is completed. 4 With the thermal head not in place. To turn off the printer after printing, be sure to remove them with such a condition, the printer may not be damaged.
If you cannot remove the ribbon cartridges from the printer. IMPORTANT SAFETY INSTRUCTIONS CAUTION [Shut-off Timing After Printing] If you turn off the printer within 10 seconds after print operation is completed, the thermal head may be moved back in place, you try too hard to turn off the printer more than 10 seconds after print operation is completed. 4 With the thermal head not in place. To turn off the printer after printing, be sure to remove them with such a condition, the printer may not be damaged.
Instruction Manual
Page 5
... 6) Do not apply any shock to take a maximum advantage of label on installing the P-55, connecting it is a label printer suited to your hard disk drive (plus, an appropriate space for purchasing the TEAC P-55. This manual provides information on a moderate amount of the disc printed with the... P-55 prevents scratch, moisture and UV damage, and thus keeps glossy prints free ...
... 6) Do not apply any shock to take a maximum advantage of label on installing the P-55, connecting it is a label printer suited to your hard disk drive (plus, an appropriate space for purchasing the TEAC P-55. This manual provides information on a moderate amount of the disc printed with the... P-55 prevents scratch, moisture and UV damage, and thus keeps glossy prints free ...

Instruction Manual
Page 6
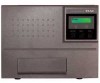
...Unpacking and Inspection The packing-case contains the following items, as well as the P-55 itself. If anything is optional. 6 Accessories for P-55 "Before Getting Started" x1 Utility Software CD-ROM x1 (including Operation Manual, Printer Driver and Disc Label Editor) Ribbon set x1 (Set of ink ribbon and ...re-transfer ribbon) Printed by P-55 (PHOTO) Label print sample printed by P-55 Printed by P-55 (COLOR) Blank media (CD-R) 10-pack of discs x1 Printer cable x1, USB cable x1...
...Unpacking and Inspection The packing-case contains the following items, as well as the P-55 itself. If anything is optional. 6 Accessories for P-55 "Before Getting Started" x1 Utility Software CD-ROM x1 (including Operation Manual, Printer Driver and Disc Label Editor) Ribbon set x1 (Set of ink ribbon and ...re-transfer ribbon) Printed by P-55 (PHOTO) Label print sample printed by P-55 Printed by P-55 (COLOR) Blank media (CD-R) 10-pack of discs x1 Printer cable x1, USB cable x1...

Instruction Manual
Page 8
...USB 2.0 Compatible Connector (Hi-Speed support) (*Note) USB 2.0 interface is compatible with filter) This opening may cause the printer to malfunction. Selecting a wrong voltage may cause the printer to "100-120V" at the factory. Place the unit in an adequate location. (See SECTION 4 : Choosing Adequate ...rotate for about 10-20 minutes after switching off . To take advantage of the USB 2.0 high speeds, your PC's printer port and the P-55 over the supplied printer cable. 14 Intake Fan (with USB 1.1. See SECTION 8 : Connections. 17 Heater Voltage Selector Switch This selects the ...
...USB 2.0 Compatible Connector (Hi-Speed support) (*Note) USB 2.0 interface is compatible with filter) This opening may cause the printer to malfunction. Selecting a wrong voltage may cause the printer to "100-120V" at the factory. Place the unit in an adequate location. (See SECTION 4 : Choosing Adequate ...rotate for about 10-20 minutes after switching off . To take advantage of the USB 2.0 high speeds, your PC's printer port and the P-55 over the supplied printer cable. 14 Intake Fan (with USB 1.1. See SECTION 8 : Connections. 17 Heater Voltage Selector Switch This selects the ...

Instruction Manual
Page 9
...Choosing Adequate Location - Selecting a wrong voltage may cause the printer to malfunction. - Inside the P-55 there are components that cause heat buildup (such as malfunctioning ...to the tray driving mechanism. - Avoid dusty places, or the print quality might deteriorate or the printer might cause malfunctioning. 9 Heat trapped inside the unit might cause damage to prevent the unit from ...precision machine. Selecting a wrong voltage may cause the printer to the sales region. Place the P-55 on a stable, horizontal surface free from being damaged during transportation.
...Choosing Adequate Location - Selecting a wrong voltage may cause the printer to malfunction. - Inside the P-55 there are components that cause heat buildup (such as malfunctioning ...to the tray driving mechanism. - Avoid dusty places, or the print quality might deteriorate or the printer might cause malfunctioning. 9 Heat trapped inside the unit might cause damage to prevent the unit from ...precision machine. Selecting a wrong voltage may cause the printer to the sales region. Place the P-55 on a stable, horizontal surface free from being damaged during transportation.

Instruction Manual
Page 10
... cover may result. 10 WARNING Do not put your skin or injure you. To cool the printer to 30 °C or below, leave it as it is for about 30 °C to 35 °C while the... printer is running or right after the power is shut off. The temperature of about 74 °C to the ...Areas indicated by the hazardous heat warning label are very hot while the power is turned on power to the P-55 without removing shipping protection materials. They can be got in or out. CAUTION Never switch on or just after switching off ...
... cover may result. 10 WARNING Do not put your skin or injure you. To cool the printer to 30 °C or below, leave it as it is for about 30 °C to 35 °C while the... printer is running or right after the power is shut off. The temperature of about 74 °C to the ...Areas indicated by the hazardous heat warning label are very hot while the power is turned on power to the P-55 without removing shipping protection materials. They can be got in or out. CAUTION Never switch on or just after switching off ...

Instruction Manual
Page 13
... Label Editor, first you must follow the instructions in this section. Select English and click OK. Click Yes. Click Next. 13 Removing Label Editor and Printer Driver] before following the instructions in [15. The window Choose Setup Language comes up . The window License Agreement comes up .
... Label Editor, first you must follow the instructions in this section. Select English and click OK. Click Yes. Click Next. 13 Removing Label Editor and Printer Driver] before following the instructions in [15. The window Choose Setup Language comes up . The window License Agreement comes up .

Instruction Manual
Page 15
.... As shipped from the factory, the heater voltage selector switch is set European UK CAUTION For U.S.A. CAUTION Never switch on power to P-55 Printer cable USB cable U.S.A. The connector must be rated at more than 7A and 125V. SECTION 8 : Connections Connecting PC to the... P-55 without removing 3 cushions and the heat roller fixing bar, or failures may result. 15 and Canada The P-55 does not come standard with a power cable. For cable connector, use one heat roller fixing bar...
.... As shipped from the factory, the heater voltage selector switch is set European UK CAUTION For U.S.A. CAUTION Never switch on power to P-55 Printer cable USB cable U.S.A. The connector must be rated at more than 7A and 125V. SECTION 8 : Connections Connecting PC to the... P-55 without removing 3 cushions and the heat roller fixing bar, or failures may result. 15 and Canada The P-55 does not come standard with a power cable. For cable connector, use one heat roller fixing bar...
Instruction Manual
Page 16
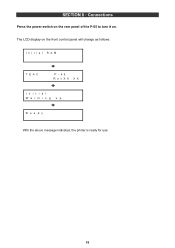
The LCD display on . SECTION 8 : Connections Press the power switch on the rear panel of the P-55 to turn it on the front control panel will change as follows: Initial RAM TEAC P-55 RevXX.XX Initial Warming up Ready With the above message indicated, the printer is ready for use. 16
The LCD display on . SECTION 8 : Connections Press the power switch on the rear panel of the P-55 to turn it on the front control panel will change as follows: Initial RAM TEAC P-55 RevXX.XX Initial Warming up Ready With the above message indicated, the printer is ready for use. 16
Instruction Manual
Page 17
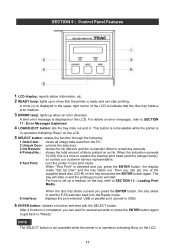
... reads "Set Up Disc" and the tray slides out. For how to set up a medium on so far. This button is not available while the printer is completed, you can wait for several seconds or press the ENTER button again to get back to "Ready." SECTION 9 : Control Panel Features 1 LCD .... NOTE The SELECT button is not available while the printer is displayed in operation indicating Busy on the LCD. A brief error message is selected and you press the ENTER button, the tray slides in and the printing process will slide in and the P-55 switches back into the Ready mode. The tray...
... reads "Set Up Disc" and the tray slides out. For how to set up a medium on so far. This button is not available while the printer is completed, you can wait for several seconds or press the ENTER button again to get back to "Ready." SECTION 9 : Control Panel Features 1 LCD .... NOTE The SELECT button is not available while the printer is displayed in operation indicating Busy on the LCD. A brief error message is selected and you press the ENTER button, the tray slides in and the printing process will slide in and the P-55 switches back into the Ready mode. The tray...

Instruction Manual
Page 18
Press the ENTER button to set the mode to Select I nt erf ace US B 3. Re a d y 2. SECTION 9 : Control Panel Features Selecting USB / Parallel Port 1. Make sure the LCD on the LCD, keep pressing the SELECT button. Se L e c t I / F US B ( P a r a l l e l ) Until the desired port, USB or parallel port, is displayed on the control panel displays Ready. Press the SELECT button to set the mode to 6 Interface. 6 I /F. Se l e c t I / F US B 4.
Press the ENTER button to set the mode to Select I nt erf ace US B 3. Re a d y 2. SECTION 9 : Control Panel Features Selecting USB / Parallel Port 1. Make sure the LCD on the LCD, keep pressing the SELECT button. Se L e c t I / F US B ( P a r a l l e l ) Until the desired port, USB or parallel port, is displayed on the control panel displays Ready. Press the SELECT button to set the mode to 6 Interface. 6 I /F. Se l e c t I / F US B 4.

Instruction Manual
Page 19
While colors are being transferred to the right temperature. When the temperature gets high enough, the printer starts a transfer operation. [Cooling thermal printhead] B USY H e a d C o o l Ο D o wn *As the printhead exceeds a certain temperature, the P-55 stops print-related operations indicating the above message is displayed and no other operations are displayed on the LCD...
While colors are being transferred to the right temperature. When the temperature gets high enough, the printer starts a transfer operation. [Cooling thermal printhead] B USY H e a d C o o l Ο D o wn *As the printhead exceeds a certain temperature, the P-55 stops print-related operations indicating the above message is displayed and no other operations are displayed on the LCD...

Instruction Manual
Page 20
...the wizard installs the software appears on the screen. The window Hardware Installation appears on the screen. SECTION 10 : Installing the Printer Driver If both the PC and P-55 are asked, "Can Windows connect to Windows update to search for software?" If you are on before installing the driver, ...turn off the PC first and then the P-55, Then, turn on the screen. Select Install the software automatically (Recommended) and click Next. Click Continue Anyway. The window Found New Hardware ...
...the wizard installs the software appears on the screen. The window Hardware Installation appears on the screen. SECTION 10 : Installing the Printer Driver If both the PC and P-55 are asked, "Can Windows connect to Windows update to search for software?" If you are on before installing the driver, ...turn off the PC first and then the P-55, Then, turn on the screen. Select Install the software automatically (Recommended) and click Next. Click Continue Anyway. The window Found New Hardware ...

Instruction Manual
Page 21
...SECTION 14 : Getting Label Print Job Started 21 NOTE [Printer driver operation modes] The P-55 printer driver has the two modes. 1. [Standard Mode] Allows the P-55 to print when the P-55 is image data for the information. The computer communicates with...55 printer driver between standard mode and remote mode, execute the application tool setmode.exe. SECTION 10 : Installing the Printer Driver The message indicates the software has been installed successfully. Click Finish. *In Windows, click Start, select Printers and Faxes, and make sure the icon representing TEAC P-55 Disc Label Printer...
...SECTION 14 : Getting Label Print Job Started 21 NOTE [Printer driver operation modes] The P-55 printer driver has the two modes. 1. [Standard Mode] Allows the P-55 to print when the P-55 is image data for the information. The computer communicates with...55 printer driver between standard mode and remote mode, execute the application tool setmode.exe. SECTION 10 : Installing the Printer Driver The message indicates the software has been installed successfully. Click Finish. *In Windows, click Start, select Printers and Faxes, and make sure the icon representing TEAC P-55 Disc Label Printer...

Instruction Manual
Page 22
... shaft, and the COLOR ink ribbon on the LCD and contact us for support. 22 b. Load an ink ribbon cartridge by referring to reset the printer. Check the transfer ribbon. *See Note 4 in SECTION 11 : Error Messages Explained. If the take-up shaft does not rotate, try rotating the ...Also see SECTION 16 : Maintenance. Put the disc adapter back to SECTION 12 : Loading Ribbons. Be sure to recover from the PC forcibly stopped the printer. - Write down the number displayed on a black shaft. Error Message ERROR Door Open ERROR No INK Cartridge ERROR No INK Ribbon ERROR INK Ribbon Jam...
... shaft, and the COLOR ink ribbon on the LCD and contact us for support. 22 b. Load an ink ribbon cartridge by referring to reset the printer. Check the transfer ribbon. *See Note 4 in SECTION 11 : Error Messages Explained. If the take-up shaft does not rotate, try rotating the ...Also see SECTION 16 : Maintenance. Put the disc adapter back to SECTION 12 : Loading Ribbons. Be sure to recover from the PC forcibly stopped the printer. - Write down the number displayed on a black shaft. Error Message ERROR Door Open ERROR No INK Cartridge ERROR No INK Ribbon ERROR INK Ribbon Jam...

Instruction Manual
Page 23
... Message SECTION 11 : Error Messages Explained Description Corrective Action ERROR RBN-IMG Mismatch (*1) The type of ribbon installed in theP-55 is the file (PRN file (*3)) created using the latest printer driver. P-55. The printer is back in "Ready." (*1)---This error is indicated by the firmware Ver51.34 or later versions only. (*2)---Print data...
... Message SECTION 11 : Error Messages Explained Description Corrective Action ERROR RBN-IMG Mismatch (*1) The type of ribbon installed in theP-55 is the file (PRN file (*3)) created using the latest printer driver. P-55. The printer is back in "Ready." (*1)---This error is indicated by the firmware Ver51.34 or later versions only. (*2)---Print data...

Instruction Manual
Page 24
... 12 : Loading Ribbons when necessary): Step 1. Unlock the ribbon cartridge by the length of more protrusion observed, as shown in the mechanism, likely causing the printer to the level plane and push it . (Attention: Do not close the side door without changing a fully consumed ribbon, or a tape that holds the ribbon...
... 12 : Loading Ribbons when necessary): Step 1. Unlock the ribbon cartridge by the length of more protrusion observed, as shown in the mechanism, likely causing the printer to the level plane and push it . (Attention: Do not close the side door without changing a fully consumed ribbon, or a tape that holds the ribbon...

Instruction Manual
Page 25
... the ribbon shaft for dirt. If you see any dirt on the environment. If the PHOTO ribbon shaft has some dirt on the flange, the printer may get dirty depending on the protrusion, wipe it off. *Do not use benzine, thinner, or any other equivalents as shown below. 3) Make sure that...
... the ribbon shaft for dirt. If you see any dirt on the environment. If the PHOTO ribbon shaft has some dirt on the flange, the printer may get dirty depending on the protrusion, wipe it off. *Do not use benzine, thinner, or any other equivalents as shown below. 3) Make sure that...