Owner's Manual (English, Français)
Page 2
... USE OF CONTROLS OR ADJUSTMENTS OR PERFORMANCE OF PROCEDURES OTHER THAN THOSE SPECIFIED HEREIN MAY RESULT IN HAZARDOUS RADIATION EXPOSURE. NO USER SERVICEABLE PARTS ARE INSIDE. IMPORTANT SAFETY INSTRUCTIONS CAUTION: TO REDUCE THE RISK OF ELECTRIC SHOCK, DO NOT REMOVE COVER (OR BACK). REFER SERVICING TO QUALIFIED SERVICE PERSONNEL. IN USA/CANADA, USE ONLY ON 120 V SUPPLY. 2 DO NOT USE THE PRODUCT UNTIL...
... USE OF CONTROLS OR ADJUSTMENTS OR PERFORMANCE OF PROCEDURES OTHER THAN THOSE SPECIFIED HEREIN MAY RESULT IN HAZARDOUS RADIATION EXPOSURE. NO USER SERVICEABLE PARTS ARE INSIDE. IMPORTANT SAFETY INSTRUCTIONS CAUTION: TO REDUCE THE RISK OF ELECTRIC SHOCK, DO NOT REMOVE COVER (OR BACK). REFER SERVICING TO QUALIFIED SERVICE PERSONNEL. IN USA/CANADA, USE ONLY ON 120 V SUPPLY. 2 DO NOT USE THE PRODUCT UNTIL...
Owner's Manual (English, Français)
Page 4
... install near water. 6) Clean only with the same or equivalent type. Install in the ON position. oo If the product uses batteries (including a battery pack or installed batteries), they exit from the apparatus. 11)Only use replaceable lithium batteries: there is danger of explosion if a battery is prohibited without a license from tip-over. 13)Unplug this apparatus in a confined space such as power-supply cord or plug...
... install near water. 6) Clean only with the same or equivalent type. Install in the ON position. oo If the product uses batteries (including a battery pack or installed batteries), they exit from the apparatus. 11)Only use replaceable lithium batteries: there is danger of explosion if a battery is prohibited without a license from tip-over. 13)Unplug this apparatus in a confined space such as power-supply cord or plug...
Owner's Manual (English, Français)
Page 8
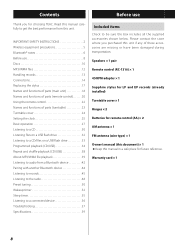
... records 45 Listening to the radio 48 Preset tuning 50 Wakeup timer 52 Sleep timer 55 Listening to a connected device 56 Troubleshooting 57 Specifications 59 Included items Check to audio from this manual in a safe place for choosing TEAC. IMPORTANT SAFETY INSTRUCTIONS 2 Wireless equipment precautions 5 Bluetooth® notes 6 Before use Thank you purchased this unit if any of parts (turntable 23 Turntable cover 24 Setting the clock...
... records 45 Listening to the radio 48 Preset tuning 50 Wakeup timer 52 Sleep timer 55 Listening to a connected device 56 Troubleshooting 57 Specifications 59 Included items Check to audio from this manual in a safe place for choosing TEAC. IMPORTANT SAFETY INSTRUCTIONS 2 Wireless equipment precautions 5 Bluetooth® notes 6 Before use Thank you purchased this unit if any of parts (turntable 23 Turntable cover 24 Setting the clock...
Owner's Manual (English, Français)
Page 9
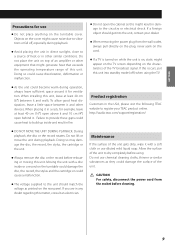
... it for use ooDo not place anything on the rear panel. ooWhen removing the power plug from the socket before using the TV. When installing this unit into the unit, contact your TEAC product online. When placing it in other devices. Do not lift or move the unit during operation, always leave... . http://audio.teac.com/support/registration/ ooDO NOT MOVE THE UNIT DURING PLAYBACK. During playback, the disc or the record rotates. Doing so may damage the disc, the record, the stylus, the cartridge or the unit. If this occurs, put this unit, leave at least 40 cm (16") open above it ...
... it for use ooDo not place anything on the rear panel. ooWhen removing the power plug from the socket before using the TV. When installing this unit into the unit, contact your TEAC product online. When placing it in other devices. Do not lift or move the unit during operation, always leave... . http://audio.teac.com/support/registration/ ooDO NOT MOVE THE UNIT DURING PLAYBACK. During playback, the disc or the record rotates. Doing so may damage the disc, the record, the stylus, the cartridge or the unit. If this occurs, put this unit, leave at least 40 cm (16") open above it ...

Owner's Manual (English, Français)
Page 10
... try to create the disc. ooIf you used to play back Copy Control CDs, Dual Discs and other type of discs. Discs Discs that can be played on this unit CDs with the Compact disc Digital Audio logo CD-R/CD-RW discs This unit can play any other special CDs that damage speakers or harm hearing could occur. ooWhen writing something on disc quality and recording conditions, playback of some discs might not be guaranteed...
... try to create the disc. ooIf you used to play back Copy Control CDs, Dual Discs and other type of discs. Discs Discs that can be played on this unit CDs with the Compact disc Digital Audio logo CD-R/CD-RW discs This unit can play any other special CDs that damage speakers or harm hearing could occur. ooWhen writing something on disc quality and recording conditions, playback of some discs might not be guaranteed...

Owner's Manual (English, Français)
Page 14
... not turn the base in the direction of the arrow. Then, insert the hook at the bottom of the devices that provides the best AM reception. ooCarefully read the manuals of the loop into the slot in the position where the reception is best (on until after making connections. A D B C Wall outlet L RL Audio output Audio input Recording device jacks jacks Cassette deck, CD recorder, etc. B AM antenna...
... not turn the base in the direction of the arrow. Then, insert the hook at the bottom of the devices that provides the best AM reception. ooCarefully read the manuals of the loop into the slot in the position where the reception is best (on until after making connections. A D B C Wall outlet L RL Audio output Audio input Recording device jacks jacks Cassette deck, CD recorder, etc. B AM antenna...
Owner's Manual (English, Français)
Page 16
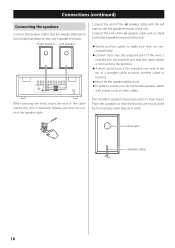
... the terminal and that the cable sheath is exposed). The included speakers have bass ports in their backs. ooGently pull the cables to connect the speaker cable. ooNever let the speaker cables short. Release the lever to make sure they are connected firmly. ooA short could occur if the exposed core wire at the tip of the ^ speaker cable with power cords or other objects or walls...
... the terminal and that the cable sheath is exposed). The included speakers have bass ports in their backs. ooGently pull the cables to connect the speaker cable. ooNever let the speaker cables short. Release the lever to make sure they are connected firmly. ooA short could occur if the exposed core wire at the tip of the ^ speaker cable with power cords or other objects or walls...

Owner's Manual (English, Français)
Page 18
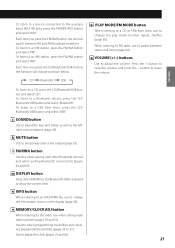
.../AUX button to turn the unit on or put it in standby. Names and functions of parts (main unit) A B CD E FGH I J Z P KL M N O P A STANDBY/ON button Press this when pairing with other Bluetooth devices and when ending Bluetooth connections (pages 44 and 43). D PLAY MODE button FM MODE button When listening to an CD/MP3/WMA file, use to the auxiliary input (AUX IN) jacks, press the PHONO/AUX button and select "AUX...
.../AUX button to turn the unit on or put it in standby. Names and functions of parts (main unit) A B CD E FGH I J Z P KL M N O P A STANDBY/ON button Press this when pairing with other Bluetooth devices and when ending Bluetooth connections (pages 44 and 43). D PLAY MODE button FM MODE button When listening to an CD/MP3/WMA file, use to the auxiliary input (AUX IN) jacks, press the PHONO/AUX button and select "AUX...
Owner's Manual (English, Français)
Page 19
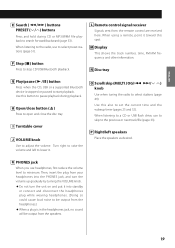
... the radio, use headphones, first reduce the volume level to select preset stations (page 51). K PHONES jack When you use to minimum. Then, insert the plug from the remote control are received here. F Stop (8) button Press to start playback. M Display This shows the track number, time, FM/AM frequency and other information. N Disc tray G Play/pause (y/9) button Press when the CD, USB or a supported Bluetooth device is in the headphones jack, no sound will be output from the speakers. 19 Turn...
... the radio, use headphones, first reduce the volume level to select preset stations (page 51). K PHONES jack When you use to minimum. Then, insert the plug from the remote control are received here. F Stop (8) button Press to start playback. M Display This shows the track number, time, FM/AM frequency and other information. N Disc tray G Play/pause (y/9) button Press when the CD, USB or a supported Bluetooth device is in the headphones jack, no sound will be output from the speakers. 19 Turn...
Owner's Manual (English, Français)
Page 20
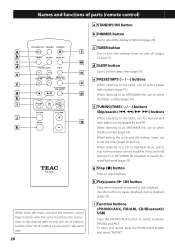
... and AUX. f TUNING/TIME (j/k) buttons Skip/search (.m/,/) buttons When listening to the radio, use to set the sleep timer (page 55). i Function buttons (PHONO/AUX, FM/AM, CD/Bluetooth/ USB) Press the PHONO/AUX button to a record, press the PHONO/AUX button and select "PHONO". Use this manual refer to only one set of buttons, but the other set of parts (remote control) a STANDBY/ON button a l b c m d e n f o g p h i j q k When both the main unit and the remote control have buttons with the same functions, the instructions...
... and AUX. f TUNING/TIME (j/k) buttons Skip/search (.m/,/) buttons When listening to the radio, use to set the sleep timer (page 55). i Function buttons (PHONO/AUX, FM/AM, CD/Bluetooth/ USB) Press the PHONO/AUX button to a record, press the PHONO/AUX button and select "PHONO". Use this manual refer to only one set of buttons, but the other set of parts (remote control) a STANDBY/ON button a l b c m d e n f o g p h i j q k When both the main unit and the remote control have buttons with the same functions, the instructions...
Owner's Manual (English, Français)
Page 21
... the auxiliary input (AUX IN) jacks, press the PHONO/AUX button and select "AUX". o MEMORY/CLOCK ADJ button When listening to the radio, use to change the information shown on the display (page 40). To listen to a device connected to show the current time. Each time you press the CD/Bluetooth/USB button, the function will switch between stereo and mono (page 49). CD Bluetooth USB To listen to 37). j SOUND button Use to FM radio, use when setting radio station presets (pages...
... the auxiliary input (AUX IN) jacks, press the PHONO/AUX button and select "AUX". o MEMORY/CLOCK ADJ button When listening to the radio, use to change the information shown on the display (page 40). To listen to a device connected to show the current time. Each time you press the CD/Bluetooth/USB button, the function will switch between stereo and mono (page 49). CD Bluetooth USB To listen to 37). j SOUND button Use to FM radio, use when setting radio station presets (pages...
Owner's Manual (English, Français)
Page 23
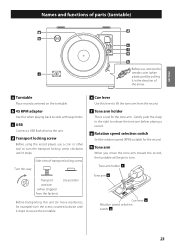
... screw Before using the record player, use , remove the c needle cover (white plastic part) by pulling it stops to secure the turntable. ENGLISH Names and functions of parts (turntable) a d b e f g h Before use a coin or other tool to turn . a Turntable Place records centered on the turntable. Gently push the clasp to the right to the unit. b 45 RPM adapter Use this when playing back records with large...
... screw Before using the record player, use , remove the c needle cover (white plastic part) by pulling it stops to secure the turntable. ENGLISH Names and functions of parts (turntable) a d b e f g h Before use a coin or other tool to turn . a Turntable Place records centered on the turntable. Gently push the clasp to the right to the unit. b 45 RPM adapter Use this when playing back records with large...

Owner's Manual (English, Français)
Page 26
... when the function is shown for setting the time. Press the remote control's DISPLAY button to PHONO/ AUX. Current time ooThe DISPLAY button does not function in CD/ USB and FM/AM modes. This completes the procedures for three seconds in AUX/ PHONO and Bluetooth modes. The clock will be erased if a power outage occurs or the power cord is only shown when paired. Display example 8 Press the CLOCK ADJUST button. Setting the clock (continued) 6 Press the CLOCK ADJUST button.
... when the function is shown for setting the time. Press the remote control's DISPLAY button to PHONO/ AUX. Current time ooThe DISPLAY button does not function in CD/ USB and FM/AM modes. This completes the procedures for three seconds in AUX/ PHONO and Bluetooth modes. The clock will be erased if a power outage occurs or the power cord is only shown when paired. Display example 8 Press the CLOCK ADJUST button. Setting the clock (continued) 6 Press the CLOCK ADJUST button.

Owner's Manual (English, Français)
Page 38
... use the main unit's skip (.//) knob or remote control's skip/search (.m/,/) buttons to start playback. *If shuffle is active, press the PLAY MODE button to repeat playback of all tracks/files starts. ooDuring programmed playback, the track/file being played will end repeat or shuffle playback mode. • The stop (8) button is pressed • The unit enters standby mode • The PHONO/AUX, FM/AM or CD/Bluetooth/USB button is pressed, changing the source • The disc tray is opened...
... use the main unit's skip (.//) knob or remote control's skip/search (.m/,/) buttons to start playback. *If shuffle is active, press the PLAY MODE button to repeat playback of all tracks/files starts. ooDuring programmed playback, the track/file being played will end repeat or shuffle playback mode. • The stop (8) button is pressed • The unit enters standby mode • The PHONO/AUX, FM/AM or CD/Bluetooth/USB button is pressed, changing the source • The disc tray is opened...

Owner's Manual (English, Français)
Page 43
... you later want to use a Bluetooth connection with this unit's skip (.//) knob. Audio/Video Remote Control Profile (AVRCP) To control playback of a Bluetooth device, the Bluetooth device must pair them again. Unpairing with a connected Bluetooth device, press the PAIRING button. ooIf you must support AVRCP. ooThe volume, however, cannot be possible using this unit, operate the other Bluetooth device directly. 43 Unpairing a device To...
... you later want to use a Bluetooth connection with this unit's skip (.//) knob. Audio/Video Remote Control Profile (AVRCP) To control playback of a Bluetooth device, the Bluetooth device must pair them again. Unpairing with a connected Bluetooth device, press the PAIRING button. ooIf you must support AVRCP. ooThe volume, however, cannot be possible using this unit, operate the other Bluetooth device directly. 43 Unpairing a device To...

Owner's Manual (English, Français)
Page 50
... more radio station presets, repeat procedures 1 to 5 . 50 Display example 1 Press the FM/AM button to 20 respectively. Preset number 4 Use the PRESET buttons to appear on the display. The preset number and the MEMORY indicator blink on the display. 3 After selecting a radio station, press the MEMORY button. Each time you press the FM/AM button, the unit will stop blinking and continue to select the preset number that radio station. 5 Press the MEMORY button. To...
... more radio station presets, repeat procedures 1 to 5 . 50 Display example 1 Press the FM/AM button to 20 respectively. Preset number 4 Use the PRESET buttons to appear on the display. The preset number and the MEMORY indicator blink on the display. 3 After selecting a radio station, press the MEMORY button. Each time you press the FM/AM button, the unit will stop blinking and continue to select the preset number that radio station. 5 Press the MEMORY button. To...
Owner's Manual (English, Français)
Page 52
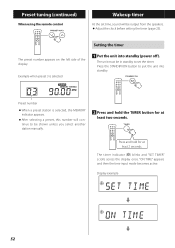
... time input mode becomes active. Setting the timer The preset number appears on the left side of the display. ooAfter selecting a preset, this number will be shown unless you select another station manually. 2 Press and hold for at least 2 seconds The timer indicator ( ) blinks and "SET TIMER" scrolls across the display once. Preset tuning (continued) When using the remote control Wakeup timer At the set the timer. Press the STANDBY/ON button to be output from the speakers. Preset number...
... time input mode becomes active. Setting the timer The preset number appears on the left side of the display. ooAfter selecting a preset, this number will be shown unless you select another station manually. 2 Press and hold for at least 2 seconds The timer indicator ( ) blinks and "SET TIMER" scrolls across the display once. Preset tuning (continued) When using the remote control Wakeup timer At the set the timer. Press the STANDBY/ON button to be output from the speakers. Preset number...

Owner's Manual (English, Français)
Page 57
... turn the other than this unit's remote control. Make sure that CD-R/CD-RW discs that the file format is upside down, reload it clean. MP3/WMA files Playback is dirty, wipe it with new ones. Then, press the STANDBY/ON button to play any recordings on the display. ee If the disc is not possible. MP3 files are displayed on the next page 57 Use the remote control...
... turn the other than this unit's remote control. Make sure that CD-R/CD-RW discs that the file format is upside down, reload it clean. MP3/WMA files Playback is dirty, wipe it with new ones. Then, press the STANDBY/ON button to play any recordings on the display. ee If the disc is not possible. MP3 files are displayed on the next page 57 Use the remote control...

Owner's Manual (English, Français)
Page 58
... during use scratched records. ee Turn off . ee After deleting the "MC-D800" data from the Bluetooth device and follow the instructions in the station properly. ee Unpair the "MC-D800" from the other than the one you are trying to malfunction. The touch pairing reader does not work. ee Press the CD/Bluetooth/USB button to the Bluetooth device's operation manual. ee Check the settings...
... during use scratched records. ee Turn off . ee After deleting the "MC-D800" data from the Bluetooth device and follow the instructions in the station properly. ee Unpair the "MC-D800" from the other than the one you are trying to malfunction. The touch pairing reader does not work. ee Press the CD/Bluetooth/USB button to the Bluetooth device's operation manual. ee Check the settings...

Owner's Manual (English, Français)
Page 59
...; 2 Batteries for LP and EP records Replacement stylus (sold separately) STL-103 . . STL-103 (sapphire stylus) for remote control (AA) × 2 AM antenna × 1 FM antenna (wire type) × 1 Owner's manual (this owner's manual might differ slightly from production models. 59 ooWeight and dimensions are subject to change without notice. ooIllustrations in this document) × 1 Warranty card × 1 ooSpecifications and appearance are approximate. ENGLISH Specifications Amplifier Output power 10...
...; 2 Batteries for LP and EP records Replacement stylus (sold separately) STL-103 . . STL-103 (sapphire stylus) for remote control (AA) × 2 AM antenna × 1 FM antenna (wire type) × 1 Owner's manual (this owner's manual might differ slightly from production models. 59 ooWeight and dimensions are subject to change without notice. ooIllustrations in this document) × 1 Warranty card × 1 ooSpecifications and appearance are approximate. ENGLISH Specifications Amplifier Output power 10...


