Owners Manual
Page 2
... been damaged in any ventilation openings. Servicing is intended to alert the user to the presence of important operating and maintenance (servicing) instructions in accordance with dry cloth. 7) Do not block any way, such as radiators, heat registers, stoves, or other . Install ...in the literature accompanying the appliance. 2) Keep these instructions. The lightning flash with one wider than the other apparatus (including amplifiers) that may be of sufficient magnitude to constitute a risk of electric...
... been damaged in any ventilation openings. Servicing is intended to alert the user to the presence of important operating and maintenance (servicing) instructions in accordance with dry cloth. 7) Do not block any way, such as radiators, heat registers, stoves, or other . Install ...in the literature accompanying the appliance. 2) Keep these instructions. The lightning flash with one wider than the other apparatus (including amplifiers) that may be of sufficient magnitude to constitute a risk of electric...
Owners Manual
Page 4
... panel. Avoid placing it is more sensitive to extremes of the TV broadcast. Doing so may become warm during playback. If you for instructions. 4 Do NOT lift or move the unit during operation, always leave sufficient space around the unit for ventilation. < The voltage supplied ...on the plug, never yank on an amplifier/receiver. < Do not open the cabinet as this might damage the finish. See Page 12 for choosing TEAC. Contents Before using the unit 4 Handling Records 5 How to Replace the Stylus 5 Discs 6 Turntable Cover 7 Handling Cassette Tape 8 Connection 9 Unit...
... panel. Avoid placing it is more sensitive to extremes of the TV broadcast. Doing so may become warm during playback. If you for instructions. 4 Do NOT lift or move the unit during operation, always leave sufficient space around the unit for ventilation. < The voltage supplied ...on the plug, never yank on an amplifier/receiver. < Do not open the cabinet as this might damage the finish. See Page 12 for choosing TEAC. Contents Before using the unit 4 Handling Records 5 How to Replace the Stylus 5 Discs 6 Turntable Cover 7 Handling Cassette Tape 8 Connection 9 Unit...
Owners Manual
Page 8
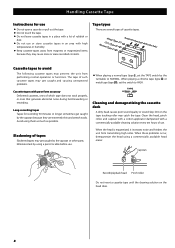
... available head eraser. Slackening of which tape does not track properly, or ones that generate abnormal noise during fast-forwarding or rewinding. Handling Cassette Tape Instructions for recording 90 minutes or longer sometimes get caught by using a pencil or alike before use. Clean the head, pinch roller, and capstan with a cotton...
... available head eraser. Slackening of which tape does not track properly, or ones that generate abnormal noise during fast-forwarding or rewinding. Handling Cassette Tape Instructions for recording 90 minutes or longer sometimes get caught by using a pencil or alike before use. Clean the head, pinch roller, and capstan with a cotton...

Owners Manual
Page 9
... a new location. C AUX IN/OUT jacks Analog 2-channel audio signal is input or output from the antenna. Keep all equipment before making connections. < Read the instructions of each plug securely. Connection ENGLISH A B White Red White C D White Red White LR RL LINE OUT LINE IN Cassette Tape Deck, etc. Connect these jacks...
... a new location. C AUX IN/OUT jacks Analog 2-channel audio signal is input or output from the antenna. Keep all equipment before making connections. < Read the instructions of each plug securely. Connection ENGLISH A B White Red White C D White Red White LR RL LINE OUT LINE IN Cassette Tape Deck, etc. Connect these jacks...
Owners Manual
Page 11
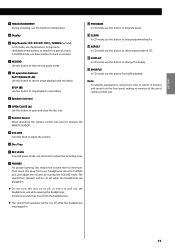
... button to select repeat mode of CD. T REPEAT In CD mode, use this button to start or pause playback and recording. Note: To simplify explanations, instructions refer to names of buttons and controls on or off, or insert or pull out the headphones jack while wearing the headphones. (Excessive sounds may...
... button to select repeat mode of CD. T REPEAT In CD mode, use this button to start or pause playback and recording. Note: To simplify explanations, instructions refer to names of buttons and controls on or off, or insert or pull out the headphones jack while wearing the headphones. (Excessive sounds may...
Owners Manual
Page 31
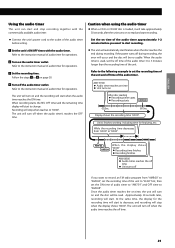
... on time < Unit turns on The unit will turn on and the disc will take approximately 30 seconds after the unit turns on to the instruction manual of audio timer for operations. 3 Set the recording time. While the recording time decreases from "AM8:00" to "AM9:00", set ...finishes working: Including time for operations. < The unit will turn off when the audio timer reaches the off time of the audio timer 3 to the instruction manual of the audio timer approximately 1-2 minutes before setting. Refer to "00:00". Follow the steps 1 to "AM9:08". Display shows the recording time...
... on time < Unit turns on The unit will turn on and the disc will take approximately 30 seconds after the unit turns on to the instruction manual of audio timer for operations. 3 Set the recording time. While the recording time decreases from "AM8:00" to "AM9:00", set ...finishes working: Including time for operations. < The unit will turn off when the audio timer reaches the off time of the audio timer 3 to the instruction manual of the audio timer approximately 1-2 minutes before setting. Refer to "00:00". Follow the steps 1 to "AM9:08". Display shows the recording time...