
CD-P650 Brochure
Page 1
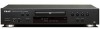
... -Analogue Converter Refined Audio Circuits Repeat (One, All, A-B), Shuffle, 32-track Program Play Multi-function Fluorescent Display 1/4" Headphone Jack with Level Control Remote Control Included Optional iPod Cradle (DS-7) Available in Black General Specifications CD Player section Frequency Response: 20-20kHz (±2dB) THD: less than 0.005% (1kHz) S/N Ratio: more than 100dB Analogue Output: 2.0Vms (RCA) USB section Frequency Response: 20-20kHz (Playback) 20-15kHz (Recording) S/N Ratio: more than 85dB (Playback/Recording) USB Power Supply: 5V DC...
... -Analogue Converter Refined Audio Circuits Repeat (One, All, A-B), Shuffle, 32-track Program Play Multi-function Fluorescent Display 1/4" Headphone Jack with Level Control Remote Control Included Optional iPod Cradle (DS-7) Available in Black General Specifications CD Player section Frequency Response: 20-20kHz (±2dB) THD: less than 0.005% (1kHz) S/N Ratio: more than 100dB Analogue Output: 2.0Vms (RCA) USB section Frequency Response: 20-20kHz (Playback) 20-15kHz (Recording) S/N Ratio: more than 85dB (Playback/Recording) USB Power Supply: 5V DC...
CD-P650 Manual
Page 2
... any ventilation openings. IMPORTANT SAFETY INSTRUCTIONS 1) Read these instructions. 2) Keep these instructions. 3) Heed all warnings. 4) Follow all servicing to qualified service personnel. CAUTION < DO NOT REMOVE THE EXTERNAL CASES OR CABINETS TO EXPOSE THE ELECTRONICS. NO USER SERVICEABLE PARTS ARE WITHIN. < IF YOU ARE EXPERIENCING PROBLEMS WITH THIS PRODUCT, CONTACT TEAC FOR A SERVICE REFERRAL. DO NOT USE THE PRODUCT UNTIL IT HAS BEEN REPAIRED. < USE OF CONTROLS OR ADJUSTMENTS OR...
... any ventilation openings. IMPORTANT SAFETY INSTRUCTIONS 1) Read these instructions. 2) Keep these instructions. 3) Heed all warnings. 4) Follow all servicing to qualified service personnel. CAUTION < DO NOT REMOVE THE EXTERNAL CASES OR CABINETS TO EXPOSE THE ELECTRONICS. NO USER SERVICEABLE PARTS ARE WITHIN. < IF YOU ARE EXPERIENCING PROBLEMS WITH THIS PRODUCT, CONTACT TEAC FOR A SERVICE REFERRAL. DO NOT USE THE PRODUCT UNTIL IT HAS BEEN REPAIRED. < USE OF CONTROLS OR ADJUSTMENTS OR...

CD-P650 Manual
Page 3
... which can radiate radio frequency energy and, if not installed and used in the U.S. This product has been designed and manufactured according to correct the interference by turning the equipment off and on physical media (compact discs, digital versatile discs, semiconductor chips, hard drives, memory cards and the like). There is not hazardous invisible laser radiation during operation because invisible laser radiation emitted inside...
... which can radiate radio frequency energy and, if not installed and used in the U.S. This product has been designed and manufactured according to correct the interference by turning the equipment off and on physical media (compact discs, digital versatile discs, semiconductor chips, hard drives, memory cards and the like). There is not hazardous invisible laser radiation during operation because invisible laser radiation emitted inside...
CD-P650 Manual
Page 4
... is not a malfunction of heat. Before Use 4 Discs 5 MP3 and WMA 6 USB Storage Devices 6 iPod Compatibility 6 Connections 7 Part Names (main unit 8 Remote Control Unit 10 Basic Operation 11 Listening to a CD 12 Listening to a USB Storage Device 13 Listening to an iPod 14 Playback 14 Programmed Playback 17 Shuffle Playback 19 Repeat Playback 20 Display 21 Before Recording 22 Setting the Recoding Mode 23 Recording to clean the unit with a disc loaded may become warm during...
... is not a malfunction of heat. Before Use 4 Discs 5 MP3 and WMA 6 USB Storage Devices 6 iPod Compatibility 6 Connections 7 Part Names (main unit 8 Remote Control Unit 10 Basic Operation 11 Listening to a CD 12 Listening to a USB Storage Device 13 Listening to an iPod 14 Playback 14 Programmed Playback 17 Shuffle Playback 19 Repeat Playback 20 Display 21 Before Recording 22 Setting the Recoding Mode 23 Recording to clean the unit with a disc loaded may become warm during...
CD-P650 Manual
Page 5
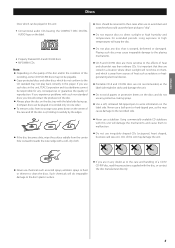
... the center of the case and lift the disc out, holding it carefully by the edges. < Do not play back correctly in this unit: M Conventional audio CDs bearing the COMPACT DISC DIGITAL AUDIO logo on the label. < Discs should contact the producers of a CD-R/ CD-RW disc, read the precautions supplied with a soft, dry cloth. < Do not use chemicals such as this unit will warp...
... the center of the case and lift the disc out, holding it carefully by the edges. < Do not play back correctly in this unit: M Conventional audio CDs bearing the COMPACT DISC DIGITAL AUDIO logo on the label. < Discs should contact the producers of a CD-R/ CD-RW disc, read the precautions supplied with a soft, dry cloth. < Do not use chemicals such as this unit will warp...

CD-P650 Manual
Page 6
... models in "Direct Mode" of the Display mode or for the timer: iPod (5th generation) iPod nano (1st/2nd generation) See page 22 for WMA files.) < MP3 files are recorded on it is being accessed, for details. 6 Also, be in MP3 format. Although this player will not work with CD-P650 or with power consumption of less than 2000 files are mono or stereo MPEG-1 Audio...
... models in "Direct Mode" of the Display mode or for the timer: iPod (5th generation) iPod nano (1st/2nd generation) See page 22 for WMA files.) < MP3 files are recorded on it is being accessed, for details. 6 Also, be in MP3 format. Although this player will not work with CD-P650 or with power consumption of less than 2000 files are mono or stereo MPEG-1 Audio...
CD-P650 Manual
Page 7
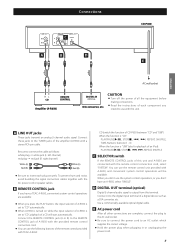
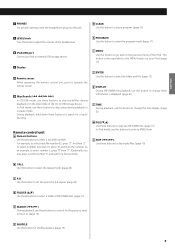
... is set to "CD" automatically. < When A-R650 is set to use with a stereo RCA pin cable. When you don't use the remote control unit provided with A-R650, and convenient system control operations will start automatically. Use a commercially-available optical digital cable. D DIGITAL OUT terminal (optical) Digital 2-channel audio signal is "USB" (also for playback of an iPod): PLAY/PAUSE(t/J), STOP(H), ., /, REPEAT, SHUFFLE C SELECTOR switch If the REMOTE CONTROL jacks of this terminal. E AC power cord After all the equipment before making connections. < Read the instructions of...
... is set to "CD" automatically. < When A-R650 is set to use with a stereo RCA pin cable. When you don't use the remote control unit provided with A-R650, and convenient system control operations will start automatically. Use a commercially-available optical digital cable. D DIGITAL OUT terminal (optical) Digital 2-channel audio signal is "USB" (also for playback of an iPod): PLAY/PAUSE(t/J), STOP(H), ., /, REPEAT, SHUFFLE C SELECTOR switch If the REMOTE CONTROL jacks of this terminal. E AC power cord After all the equipment before making connections. < Read the instructions of...

CD-P650 Manual
Page 8
G Play (G) Use this button to pause playback. H Pause (J) Use this button to start recording to open and close the disc tray. Part Names (main unit) A B C D E FGH IJ K L M N A B a b c d e f F 8 A STANDBY/ON Use this button to turn the unit on , the indicator goes out. i j k C RECORD l Press this button to stop playback and recording. F Stop (H) Use this button to start playback. Hold down this button to a USB storage device. m n D Disc tray G H E Open/close (L) Use this button to select CD or USB mode. When the unit is in the standby...
G Play (G) Use this button to pause playback. H Pause (J) Use this button to start recording to open and close the disc tray. Part Names (main unit) A B C D E FGH IJ K L M N A B a b c d e f F 8 A STANDBY/ON Use this button to turn the unit on , the indicator goes out. i j k C RECORD l Press this button to stop playback and recording. F Stop (H) Use this button to start playback. Hold down this button to a USB storage device. m n D Disc tray G H E Open/close (L) Use this button to select CD or USB mode. When the unit is in the standby...
CD-P650 Manual
Page 9
... iPod mode, use these buttons to skip songs during playback or in pause mode. Remote control unit a Numeric buttons Use these buttons to search for a track/ file/song. N Skip/Search (.m/,/) In CD/USB mode, use these buttons to skip tracks/files during playback or in the stop mode of the headphones. During playback, hold down these buttons to select a track/file number. As an example, to select number 5, press "0" then "5". (Optionally, you want to listen to adjust the volume...
... iPod mode, use these buttons to skip songs during playback or in pause mode. Remote control unit a Numeric buttons Use these buttons to search for a track/ file/song. N Skip/Search (.m/,/) In CD/USB mode, use these buttons to skip tracks/files during playback or in the stop mode of the headphones. During playback, hold down these buttons to select a track/file number. As an example, to select number 5, press "0" then "5". (Optionally, you want to listen to adjust the volume...
CD-P650 Manual
Page 11
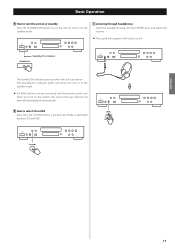
... headphone plug into the PHONES jack, and adjust the volume. < The sound from speakers will start playback automatically. ENGLISH 11 Standby/On indicator The Standby/On indicator goes out when the unit is alternated between CD and USB. B How to turn the unit on or put it in the standby mode. < If A-R650 and this unit are connected with the remote control cord when you turn on...
... headphone plug into the PHONES jack, and adjust the volume. < The sound from speakers will start playback automatically. ENGLISH 11 Standby/On indicator The Standby/On indicator goes out when the unit is alternated between CD and USB. B How to turn the unit on or put it in the standby mode. < If A-R650 and this unit are connected with the remote control cord when you turn on...
CD-P650 Manual
Page 14
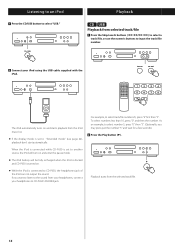
... and CD-P650 is turned on. < While the iPod is set to CD-P650, the headphones jack of the iPod can not output the sound. As an example, to select number 5, press "0" then "5". (Optionally, you want to listen to CD-P650's PHONES jack. Listening to an iPod 1 Press the CD/USB button to select track/file number 25, press "2" first then "5". Playback starts from your headphones, connect your iPod using the USB cable supplied with the iPod. Playback CD USB Playback from selected track/file...
... and CD-P650 is turned on. < While the iPod is set to CD-P650, the headphones jack of the iPod can not output the sound. As an example, to select number 5, press "0" then "5". (Optionally, you want to listen to CD-P650's PHONES jack. Listening to an iPod 1 Press the CD/USB button to select track/file number 25, press "2" first then "5". Playback starts from your headphones, connect your iPod using the USB cable supplied with the iPod. Playback CD USB Playback from selected track/file...
CD-P650 Manual
Page 15
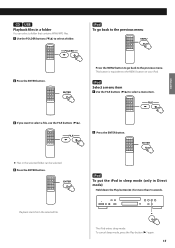
... button. The iPod enters sleep mode. CD USB Playback files in the selected folder can select a folder that contains WMA/MP3 files. 1 Use the FOLDER buttons (¥/˙) to select a folder. This button is equivalent to select a menu item. Press the MENU button to go back to the previous menu 2 Press the ENTER button. To cancel sleep mode, press the Play button (y) again. 15 iPod...
... button. The iPod enters sleep mode. CD USB Playback files in the selected folder can select a folder that contains WMA/MP3 files. 1 Use the FOLDER buttons (¥/˙) to select a folder. This button is equivalent to select a menu item. Press the MENU button to go back to the previous menu 2 Press the ENTER button. To cancel sleep mode, press the Play button (y) again. 15 iPod...
CD-P650 Manual
Page 16
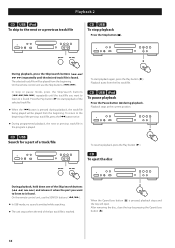
... the Play button (y). On the remote control unit use the SEARCH buttons (m/,). < In USB mode, no sound is emitted while searching. < The unit stops when the end of the selected track/file. < When the .button is pressed during playback. CD USB Search for a part of the previous track/file, press the .button twice. When the Open/close button (L). 16 After removing the disc, close the tray by pressing the Open/close button (L) is pressed, playback stops...
... the Play button (y). On the remote control unit use the SEARCH buttons (m/,). < In USB mode, no sound is emitted while searching. < The unit stops when the end of the selected track/file. < When the .button is pressed during playback. CD USB Search for a part of the previous track/file, press the .button twice. When the Open/close button (L). 16 After removing the disc, close the tray by pressing the Open/close button (L) is pressed, playback stops...
CD-P650 Manual
Page 17
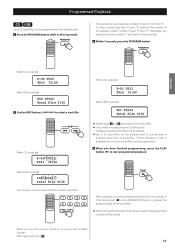
... the unit is displayed and no more tracks/files. < If you may press just the number "5" and wait for a few seconds.) 3 Within 5 seconds, press the PROGRAM button. Programmed Playback CD USB Up to 32 tracks/files can also use the numeric buttons, just input the track/fiie number. To select numbers less than 32 tracks/files, "P-FULL (Program is full)" is disconnected from the power supply, the programmed contents will be...
... the unit is displayed and no more tracks/files. < If you may press just the number "5" and wait for a few seconds.) 3 Within 5 seconds, press the PROGRAM button. Programmed Playback CD USB Up to 32 tracks/files can also use the numeric buttons, just input the track/fiie number. To select numbers less than 32 tracks/files, "P-FULL (Program is full)" is disconnected from the power supply, the programmed contents will be...
CD-P650 Manual
Page 21
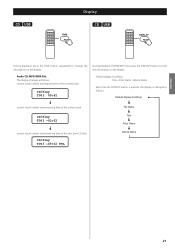
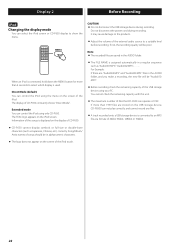
... track CD/Play T003 -03:02 current track number and remaining time of the disc (only CD disc) CD/Play T003 -69:02 TTL File Name Title Artist Name Album Name ENGLISH 21 Album Name Each time the DISPLAY button is pressed, the display is changed as follows: current track number and elapsed time of the current track CD/Play T003 00:42 Default display (scrolling): Title - Artist Name - CD USB Display CD USB During playback, press the TIME button repeatedly to change...
... track CD/Play T003 -03:02 current track number and remaining time of the disc (only CD disc) CD/Play T003 -69:02 TTL File Name Title Artist Name Album Name ENGLISH 21 Album Name Each time the DISPLAY button is pressed, the display is changed as follows: current track number and elapsed time of the current track CD/Play T003 00:42 Default display (scrolling): Title - Artist Name - CD USB Display CD USB During playback, press the TIME button repeatedly to change...
CD-P650 Manual
Page 22
... iPod touch. 22 Note < The recorded files are stored on the iPod screen. When an iPod is connected, hold down the MENU button for more than 4 seconds to the products. < Adjust the volume of CD-P650 constantly shows "Direct Mode". Direct Mode (default) You can select the iPod screen or CD-P650 display to an MP3 file at a bit rate of files that CD-P650 can control the iPod using your PC. Extended mode You can operate...
... iPod touch. 22 Note < The recorded files are stored on the iPod screen. When an iPod is connected, hold down the MENU button for more than 4 seconds to the products. < Adjust the volume of CD-P650 constantly shows "Direct Mode". Direct Mode (default) You can select the iPod screen or CD-P650 display to an MP3 file at a bit rate of files that CD-P650 can control the iPod using your PC. Extended mode You can operate...
CD-P650 Manual
Page 24
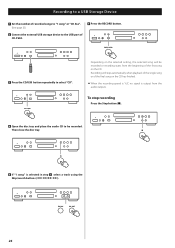
... song on the selected setting, the selected song will stop recording Press the Stop button (H). 4 Open the disc tray and place the audio CD to select "CD". Recording will be recorded. Recording to a USB Storage Device 1 Set the number of recorded songs to "1 song" or "CD ALL". (See page 23) 6 Press the RECORD button. 2 Connect the external USB storage device to the USB port of CD-P650. 3 Press the CD/USB button repeatedly to be recorded or recording starts from the audio outputs. Depending on the...
... song on the selected setting, the selected song will stop recording Press the Stop button (H). 4 Open the disc tray and place the audio CD to select "CD". Recording will be recorded. Recording to a USB Storage Device 1 Set the number of recorded songs to "1 song" or "CD ALL". (See page 23) 6 Press the RECORD button. 2 Connect the external USB storage device to the USB port of CD-P650. 3 Press the CD/USB button repeatedly to be recorded or recording starts from the audio outputs. Depending on the...

CD-P650 Manual
Page 25
... factory settings You can restore to factory setting. 1 In the stop mode, use the FOLDER buttons (¥/˙) to the factory settings. All the settings are reset to select a folder. 1 While in the standby mode, hold down the CLEAR button for more than 3 seconds. 2 Press the ENTER button. is displayed. 5 Within 3 seconds, press the CLEAR button again. < The delete mode will appear on the display 2 Unplug the AC power cord from the USB...
... factory settings You can restore to factory setting. 1 In the stop mode, use the FOLDER buttons (¥/˙) to the factory settings. All the settings are reset to select a folder. 1 While in the standby mode, hold down the CLEAR button for more than 3 seconds. 2 Press the ENTER button. is displayed. 5 Within 3 seconds, press the CLEAR button again. < The delete mode will appear on the display 2 Unplug the AC power cord from the USB...
CD-P650 Manual
Page 26
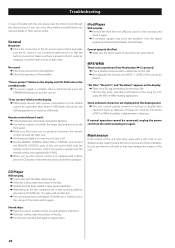
No sound. Disconnect the USB storage device or switch to operate with the remote control unit supplied with A-R650. e If the batteries are displayed on the display panel. e If a fluorescent light is on the display. e Set the REMOTE CONTROL SELECTOR to "SYSTEM", and connect the REMOTE CONTROL jacks of this chart and see if you can solve the problem yourself before operation. e Make sure the HOLD switch of the iPod is turned on the disc conditions, etc...
No sound. Disconnect the USB storage device or switch to operate with the remote control unit supplied with A-R650. e If the batteries are displayed on the display panel. e If a fluorescent light is on the display. e Set the REMOTE CONTROL SELECTOR to "SYSTEM", and connect the REMOTE CONTROL jacks of this chart and see if you can solve the problem yourself before operation. e Make sure the HOLD switch of the iPod is turned on the disc conditions, etc...
CD-P650 Manual
Page 27
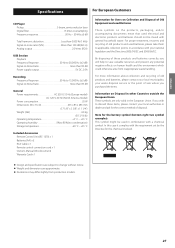
... (North America model) Power consumption 25 W Dimensions (W x H x D 435 x 85 x 285 mm (17 1/8" x 3 3/8" x 11 1/4") Weight (Net 4.0 kg (8 13/16 lb) Operating temperature 5˚ C - +35˚ C Operating humidity 5% to 85% (no condensation) Storage temperature 20˚ C - +55˚ C Included Accessories Remote Control Unit (RC-1270) x 1 Batteries (AA) x 2 RCA Cable x 1 Remote control connection cord x 1 Owner's Manual (this case it complies with the requirement set by the Directive for the battery symbol...
... (North America model) Power consumption 25 W Dimensions (W x H x D 435 x 85 x 285 mm (17 1/8" x 3 3/8" x 11 1/4") Weight (Net 4.0 kg (8 13/16 lb) Operating temperature 5˚ C - +35˚ C Operating humidity 5% to 85% (no condensation) Storage temperature 20˚ C - +55˚ C Included Accessories Remote Control Unit (RC-1270) x 1 Batteries (AA) x 2 RCA Cable x 1 Remote control connection cord x 1 Owner's Manual (this case it complies with the requirement set by the Directive for the battery symbol...


