
Owners Manual
Page 3
... SAFETY INSTRUCTIONS •• Excessive sound pressure from earphones and headphones can cause hearing loss. Do not put them in an eye, it off with Part 15 of batteries together. If this device must accept any fluid on the batteries and the local disposal laws. •• Do not use the unit for a long time. Declaration of eyesight. A. TASCAM DR-07 3 The batteries...
... SAFETY INSTRUCTIONS •• Excessive sound pressure from earphones and headphones can cause hearing loss. Do not put them in an eye, it off with Part 15 of batteries together. If this device must accept any fluid on the batteries and the local disposal laws. •• Do not use the unit for a long time. Declaration of eyesight. A. TASCAM DR-07 3 The batteries...
Owners Manual
Page 4
... with the instruction manual, may cause harmful interference to which the receiver is no guarantee that used batteries, please take them to Part 15 of Old Equipment and used in a residential installation. By disposing of these items, please contact your waste disposal service or the point of old products and used electrical and electronic products and batteries should not be determined by turning the...
... with the instruction manual, may cause harmful interference to which the receiver is no guarantee that used batteries, please take them to Part 15 of Old Equipment and used in a residential installation. By disposing of these items, please contact your waste disposal service or the point of old products and used electrical and electronic products and batteries should not be determined by turning the...
Owners Manual
Page 6
... batteries 17 Using an AC adapter (purchased separately 18 Turning the power on and off 18 Setting the date and time 19 Windscreen 21 3-Part Names and Functions 22 Top panel 22 Right side panel 25 6 TASCAM DR-07 Left side panel 26 Rear Panel 27 Bottom panel 27 4-Screen Overview 29 Home Screen 29 Record Screen 32 Setting Screens 34 Setting screen structure 34 Operation basics 36 Operation example 37 5-Making Connections 39 Connecting mics and other audio devices...
... batteries 17 Using an AC adapter (purchased separately 18 Turning the power on and off 18 Setting the date and time 19 Windscreen 21 3-Part Names and Functions 22 Top panel 22 Right side panel 25 6 TASCAM DR-07 Left side panel 26 Rear Panel 27 Bottom panel 27 4-Screen Overview 29 Home Screen 29 Record Screen 32 Setting Screens 34 Setting screen structure 34 Operation basics 36 Operation example 37 5-Making Connections 39 Connecting mics and other audio devices...

Owners Manual
Page 7
... Folder operations 69 11-Special Playback Control Functions . . 71 Setting the playback control functions 71 Changing the speed 72 Change speed without changing pitch 72 Changing the pitch without changing the speed . . 73 12-Loop, Repeat and Single Playback . . . 74 Loop playback 74 Repeat and single track playback modes 75 13-System Settings and Formatting 76 Making System Settings 76 Restoring the factory settings 77 Formatting the SD card 77 Using QUICK FORMAT 78 Using FULL FORMAT 78 14-Viewing File Information 79 File information page 79 TASCAM DR-07...
... Folder operations 69 11-Special Playback Control Functions . . 71 Setting the playback control functions 71 Changing the speed 72 Change speed without changing pitch 72 Changing the pitch without changing the speed . . 73 12-Loop, Repeat and Single Playback . . . 74 Loop playback 74 Repeat and single track playback modes 75 13-System Settings and Formatting 76 Making System Settings 76 Restoring the factory settings 77 Formatting the SD card 77 Using QUICK FORMAT 78 Using FULL FORMAT 78 14-Viewing File Information 79 File information page 79 TASCAM DR-07...
Owners Manual
Page 9
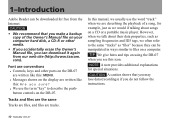
... this Owner's Manual carefully in order to maximize your computer. Main functions Portable recorder •• Use SD cards as an electronic file stored on your use the included USB cable to connect the unit to a computer (see "Connecting with the built-in safe places for purchasing the TASCAM DR-07 Portable Recorder. Please read this manual and keep them in microphone, or by USB connection About this unit's SD card by connecting a microphone or the line output...
... this Owner's Manual carefully in order to maximize your computer. Main functions Portable recorder •• Use SD cards as an electronic file stored on your use the included USB cable to connect the unit to a computer (see "Connecting with the built-in safe places for purchasing the TASCAM DR-07 Portable Recorder. Please read this manual and keep them in microphone, or by USB connection About this unit's SD card by connecting a microphone or the line output...
Owners Manual
Page 10
... you may lose data (recordings) if you can download it again from the Internet. Tracks and files are the same Tracks are files, and files are written like this icon. In this : Are you sure? •• We use conventions •• Controls, keys and other media. • If you accidentally erase the Owner's Manual file, you do not follow the instructions. 10 TASCAM DR-07 com). NOTE A note...
... you may lose data (recordings) if you can download it again from the Internet. Tracks and files are the same Tracks are files, and files are written like this icon. In this : Are you sure? •• We use conventions •• Controls, keys and other media. • If you accidentally erase the Owner's Manual file, you do not follow the instructions. 10 TASCAM DR-07 com). NOTE A note...

Owners Manual
Page 18
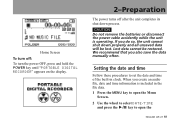
The Home Screen appears when the unit starts up screen Turning the power on and off To turn the power ON, press and hold the POWER key on the left side panel until "TASCAM DR-07" appears on the display. NOTE When both batteries are installed and the AC adapter is connected, power will be supplied from the AC adapter. 18 TASCAM DR-07 Start-up . Using an AC adapter other than the specified can cause a malfunction...
The Home Screen appears when the unit starts up screen Turning the power on and off To turn the power ON, press and hold the POWER key on the left side panel until "TASCAM DR-07" appears on the display. NOTE When both batteries are installed and the AC adapter is connected, power will be supplied from the AC adapter. 18 TASCAM DR-07 Start-up . Using an AC adapter other than the specified can cause a malfunction...
Owners Manual
Page 19
... the Menu Screen. 2 Use the wheel to select DATE/TIME and press the ¥/π key to open the TASCAM DR-07 19 Lost data cannot be lost. We recommend that you do so, the unit cannot shut down process. When you create an audio file, date and time information is operating. Home Screen To turn off: To turn the power OFF, press and hold the POWER key until "PORTABLE DIGITAL RECORDER" appears...
... the Menu Screen. 2 Use the wheel to select DATE/TIME and press the ¥/π key to open the TASCAM DR-07 19 Lost data cannot be lost. We recommend that you do so, the unit cannot shut down process. When you create an audio file, date and time information is operating. Home Screen To turn off: To turn the power OFF, press and hold the POWER key until "PORTABLE DIGITAL RECORDER" appears...

Owners Manual
Page 22
..., and playback the interval (loop playback). 3-Part Names and Functions Top panel 1 Built-in microphone becomes inactive. 2 Display In addition to the Home Screen, this shows the recording screen, various setting screens, and other operation information. (See "Screen Overview" on page 29.) 3 I/O LOOP key Use this key to cancel the loop playback. (See "Loop playback" on page 73.) 22 TASCAM DR-07 If you connect an external microphone to the MIC IN jack on the...
..., and playback the interval (loop playback). 3-Part Names and Functions Top panel 1 Built-in microphone becomes inactive. 2 Display In addition to the Home Screen, this shows the recording screen, various setting screens, and other operation information. (See "Screen Overview" on page 29.) 3 I/O LOOP key Use this key to cancel the loop playback. (See "Loop playback" on page 73.) 22 TASCAM DR-07 If you connect an external microphone to the MIC IN jack on the...

Owners Manual
Page 24
... end parts of the selected item. For some VBR MP3 files, operating these keys may cause the sound to change the setting of the file being played back may not work for example, to confirm a selection, advance a level in recording standby, press this case, stop playback at the end of the track. When in a menu and answer "YES" to pause recording. 24 TASCAM DR-07 0 PEAK indicator This lights when the selected input signal...
... end parts of the selected item. For some VBR MP3 files, operating these keys may cause the sound to change the setting of the file being played back may not work for example, to confirm a selection, advance a level in recording standby, press this case, stop playback at the end of the track. When in a menu and answer "YES" to pause recording. 24 TASCAM DR-07 0 PEAK indicator This lights when the selected input signal...

Owners Manual
Page 33
TASCAM DR-07 33 During recording standby, the maximum remaining recording time appears. 8 Remaining recording time The remaining recording time appears in dB during each time interval. 0 Record mode Shows the recording file type and sampling frequency. 1 MIC input setting status Shows the status of settings related to the built-in microphone and MIC IN jack on the rear panel (stereo recording, plug-in power, low cut filter and level control). 2 Pre-recording setting status PRE appears when pre-recording is set. 3 Recorder operation º Recording π Recording paused ª...
TASCAM DR-07 33 During recording standby, the maximum remaining recording time appears. 8 Remaining recording time The remaining recording time appears in dB during each time interval. 0 Record mode Shows the recording file type and sampling frequency. 1 MIC input setting status Shows the status of settings related to the built-in microphone and MIC IN jack on the rear panel (stereo recording, plug-in power, low cut filter and level control). 2 Pre-recording setting status PRE appears when pre-recording is set. 3 Recorder operation º Recording π Recording paused ª...

Owners Manual
Page 35
... (erase and move tracks in it) PLAY MODE Set playback mode Set single or repeat mode INPUT SETTING Select input source, make built-in microphone and MIC IN settings REC SETTING Make settings related to recording (file type, sampling frequency, maximum file size) Turn pre-recording and recording delay functions ON and OFF DIVIDE Divide files SETUP DATE/TIME PLAYBACK CONTROL Make various system settings Initialize and format the SD card Set the date and time of the built-in clock Set playback control function settings Access method Press the MENU key to open the Menu Screen and...
... (erase and move tracks in it) PLAY MODE Set playback mode Set single or repeat mode INPUT SETTING Select input source, make built-in microphone and MIC IN settings REC SETTING Make settings related to recording (file type, sampling frequency, maximum file size) Turn pre-recording and recording delay functions ON and OFF DIVIDE Divide files SETUP DATE/TIME PLAYBACK CONTROL Make various system settings Initialize and format the SD card Set the date and time of the built-in clock Set playback control function settings Access method Press the MENU key to open the Menu Screen and...

Owners Manual
Page 41
... to connect the USB port of this Owner's Manual. TASCAM DR-07 41 When connected, "USB connected" appears on this unit. The recorder appears on the left side of the unit, use the included USB cable to this unit and manipulate folders. CAUTION The unit cannot be used when connected with a computer, you can copy WAV or MP3 music files from the factory the "DR-07" drive contains the "MUSIC" and "UTILITY" folders, as well as an external drive named "DR-07...
... to connect the USB port of this Owner's Manual. TASCAM DR-07 41 When connected, "USB connected" appears on this unit. The recorder appears on the left side of the unit, use the included USB cable to this unit and manipulate folders. CAUTION The unit cannot be used when connected with a computer, you can copy WAV or MP3 music files from the factory the "DR-07" drive contains the "MUSIC" and "UTILITY" folders, as well as an external drive named "DR-07...

Owners Manual
Page 45
Selecting tracks Use the µ and ≤ keys to change the playback position. NOTE • Only files in the middle, press the µ key to return to operate the DR-07 as you would with an ordinary CD player or other audio device. Starting and stopping playback Play a track When playback is stopped, press the ¥/π key to start playback. 7-Playback Stop playback During playback, press the STOP/HOME or ¥/π key to stop (or pause...
Selecting tracks Use the µ and ≤ keys to change the playback position. NOTE • Only files in the middle, press the µ key to return to operate the DR-07 as you would with an ordinary CD player or other audio device. Starting and stopping playback Play a track When playback is stopped, press the ¥/π key to start playback. 7-Playback Stop playback During playback, press the STOP/HOME or ¥/π key to stop (or pause...

Owners Manual
Page 51
... built-in battery. Loud sounds and quiet sounds are reduced to prevent distortion. POWER When connecting an external microphone that input level of wind is provided to the left and right channels respectively. TYPE Select STEREO or MONO according to the type of the left and right input signals is being recorded. The factory default is MID. TASCAM DR-07 51 8-Recording other items affect both adjusted to the same level. The factory default setting is OFF...
... built-in battery. Loud sounds and quiet sounds are reduced to prevent distortion. POWER When connecting an external microphone that input level of wind is provided to the left and right channels respectively. TYPE Select STEREO or MONO according to the type of the left and right input signals is being recorded. The factory default is MID. TASCAM DR-07 51 8-Recording other items affect both adjusted to the same level. The factory default setting is OFF...

Owners Manual
Page 58
... its beginning or end. 58 TASCAM DR-07 You cannot divide a track at the time of your choice. For example, you want to divide the file during playback. • You can divide one file into several consecutive files or use this function to erase unnecessary recordings. 1 Press the MENU key to divide the file. NOTE • You can press the PLAY key and select the point...
... its beginning or end. 58 TASCAM DR-07 You cannot divide a track at the time of your choice. For example, you want to divide the file during playback. • You can divide one file into several consecutive files or use this function to erase unnecessary recordings. 1 Press the MENU key to divide the file. NOTE • You can press the PLAY key and select the point...

Owners Manual
Page 71
... playback control functions Use the Playback Control Screen to set the playback control functions. You can use the DR-07 to change the playback pitch of the Home Screen, the icons for the playback control functions that are currently active appear highlighted in inverse. After you finish making settings on this without changing the tempo. When the Home Screen is displayed, press and hold the PB CONT key) to return to the Home Screen. TASCAM DR-07 71 In the upper part of a track...
... playback control functions Use the Playback Control Screen to set the playback control functions. You can use the DR-07 to change the playback pitch of the Home Screen, the icons for the playback control functions that are currently active appear highlighted in inverse. After you finish making settings on this without changing the tempo. When the Home Screen is displayed, press and hold the PB CONT key) to return to the Home Screen. TASCAM DR-07 71 In the upper part of a track...

Owners Manual
Page 76
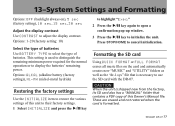
... powered by the internal batteries. 76 TASCAM DR-07 The following settings can also initialize and format the SD card. Options: OFF (factory setting-the unit does not automatically turn OFF), 3 min, 5 min, 10 min, 30 min Backlight Auto OFF setting Use BACKLIGHT to set the time before the unit power automatically turns OFF after the last operation when powered by the internal batteries. To open the Setup Screen, press the MENU key. Making System Settings Setting the search speed Use...
... powered by the internal batteries. 76 TASCAM DR-07 The following settings can also initialize and format the SD card. Options: OFF (factory setting-the unit does not automatically turn OFF), 3 min, 5 min, 10 min, 30 min Backlight Auto OFF setting Use BACKLIGHT to set the time before the unit power automatically turns OFF after the last operation when powered by the internal batteries. To open the Setup Screen, press the MENU key. Making System Settings Setting the search speed Use...
Owners Manual
Page 77
... operation or to display the batteries' remaining power. 13-System Settings and Formatting Options: OFF (backlight always on the card and automatically creates new "MUSIC" and "UTILITY" folders as well as the "dr-1.sys" file that contains a PDF copy of batteries. This setting is shipped new from the factory, its SD card also has a "MANUAL" folder that is necessary to use the SD card with the DR-07. Formatting the SD card Using QUICK FORMAT or FULL FORMAT erases all music files...
... operation or to display the batteries' remaining power. 13-System Settings and Formatting Options: OFF (backlight always on the card and automatically creates new "MUSIC" and "UTILITY" folders as well as the "dr-1.sys" file that contains a PDF copy of batteries. This setting is shipped new from the factory, its SD card also has a "MANUAL" folder that is necessary to use the SD card with the DR-07. Formatting the SD card Using QUICK FORMAT or FULL FORMAT erases all music files...
V1.02 Release Notes
Page 2
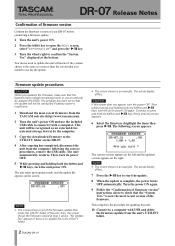
... Connect to use the included USB cable to confirm the "System Ver." is complete, the power turns OFF automatically. This completes the procedure for the update. The program has been set so that you updated the firmware, make sure that the "System Vers." "No Update File" appears if there is an example. NOTE • This screen shows a list of the firmware update files inside the UTILITY folder of firmware version" instructions...
... Connect to use the included USB cable to confirm the "System Ver." is complete, the power turns OFF automatically. This completes the procedure for the update. The program has been set so that you updated the firmware, make sure that the "System Vers." "No Update File" appears if there is an example. NOTE • This screen shows a list of the firmware update files inside the UTILITY folder of firmware version" instructions...

